Claim your free 3‑month license for intellij idea ultimate
Содержание:
- Системные требования
- Create HTTP request files
- Version control
- Системы контроля версий
- Главные изменения
- Silent installation on Windows
- Other
- Deep code insight
- Developer ergonomics
- Первая программа в IntelliJ IDEA
- Как пользоваться
- 7 Python Plugins для IntelliJ IDEA
- Profiler
- Frameworks and technologies
- Kotlin
- Collaborative development
- Хочу! Что нужно делать?
Системные требования
Требования к оборудованию:
- RAM от 2 ГБ, рекомендуется 4 ГБ оперативной памяти
- 1,5 ГБ свободного места на жестком диске + не менее 1 ГБ для кэшей
- Минимальное разрешение экрана 1024×768
Требования к ПО:
JRE 1.8 и JDK для Java. JRE 1.8 поставляется с дистрибутивом IntelliJ IDEA, но также их можно скачать отдельно на официальном сайте Oracle.
Windows — 32-разрядные или 64-разрядные версии Microsoft Windows 10, 8, 7 или Vista
Macos — macOS 10.8.3 или новее (поддерживаются только 64-разрядные системы) Linux (ubuntu) — OS Linux (обратите внимание, что 32-разрядный JDK не поставляется в комплекте, поэтому рекомендуется использовать 64-разрядную систему). Рекомендуется использовать среду рабочего стола KDE, Gnome или Unity
Create HTTP request files
You can work with HTTP requests either from scratch files or from physical files of the HTTP Request type. Each file can contain multiple requests, and you can create as many files as needed.
Scratch files can be used to test HTTP requests during development. Scratch files are not stored inside a project, so IntelliJ IDEA can modify them and add additional information about the request. When an HTTP request is executed from a scratch file, the link to the response output file is added below the request and at the top of the file.
Physical files can be used for documenting, testing, and validating HTTP requests. Physical files are stored inside your project, and IntelliJ IDEA will not modify them. When an HTTP request is executed from a physical file, this file is not modified. Information about the executed request with the link to the response output file is added to the top of the file.
Version control
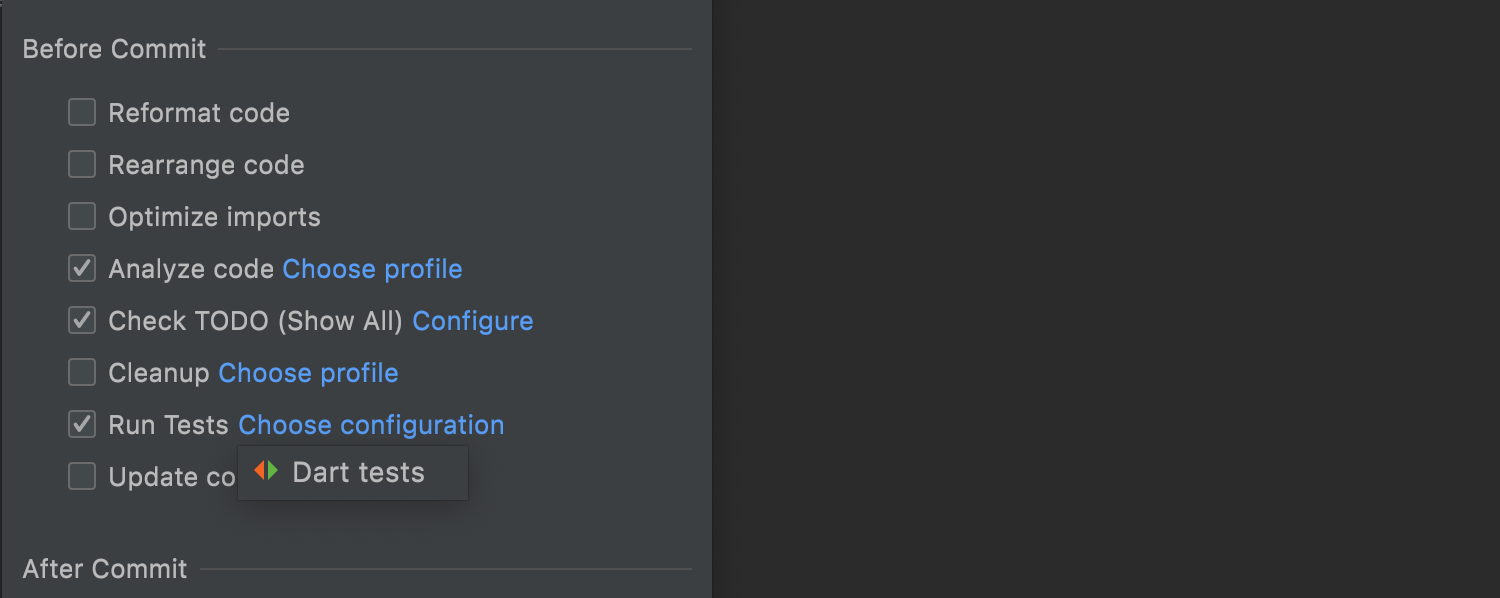
Changes to pre-commit checks
In v2021.2, we’ve expanded the list of possible pre-commit actions with the ability
to execute tests. When you tick the Run Tests checkbox in the Before Commit
section, your IDE will test the applied changes and notify you if anything goes wrong.
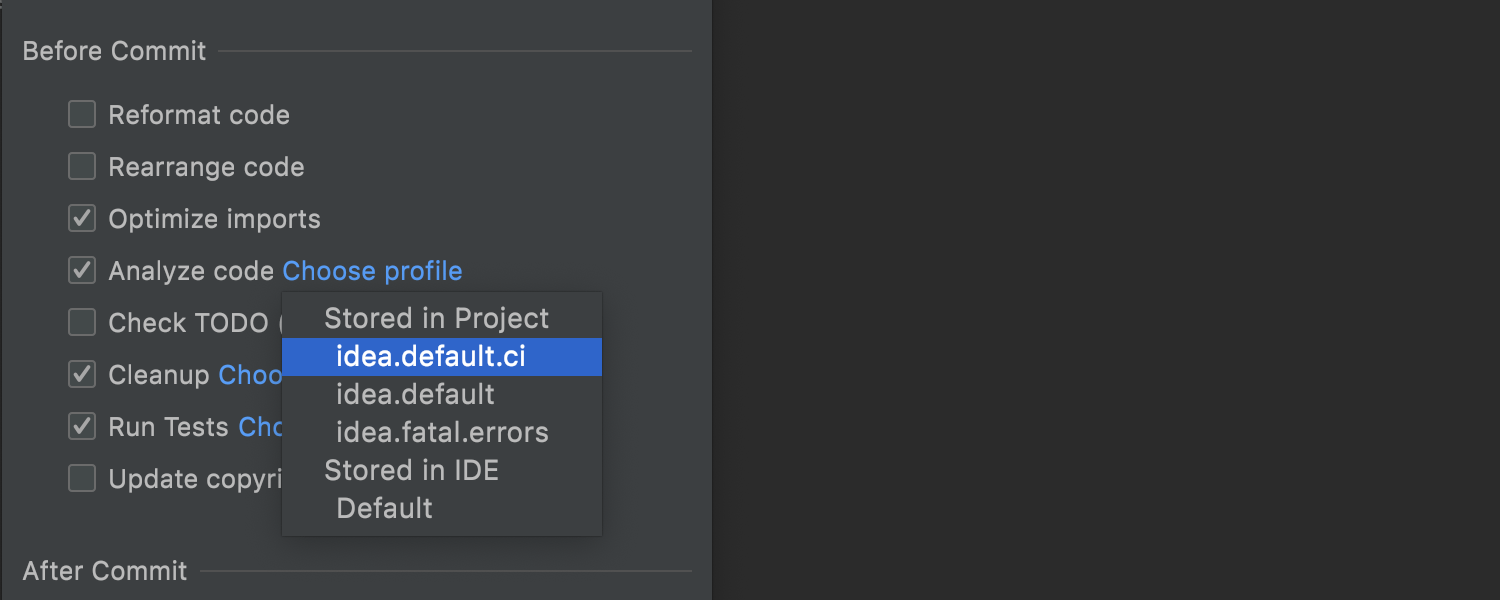
We’ve also added the ability to customize the Analyze code and Cleanup
options by clicking Choose profile next to them.
The progress and results of all the pre-commit checks appear in the Commit area,
without disturbing you with additional modal windows.
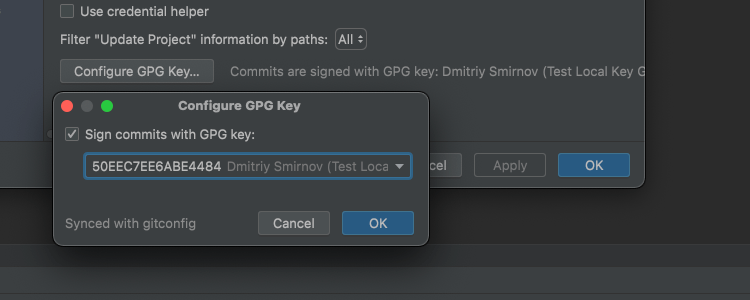
GPG signature
IntelliJ IDEA 2021.2 offers a way to secure your commits by enabling Git commit signing
with GPG. To do this, go to Preferences/Settings | Version Control | Git, click
Configure GPG Key, and then select it from the drop-down list. If you’re using a GPG key
for the first time, you’ll need to configure it.
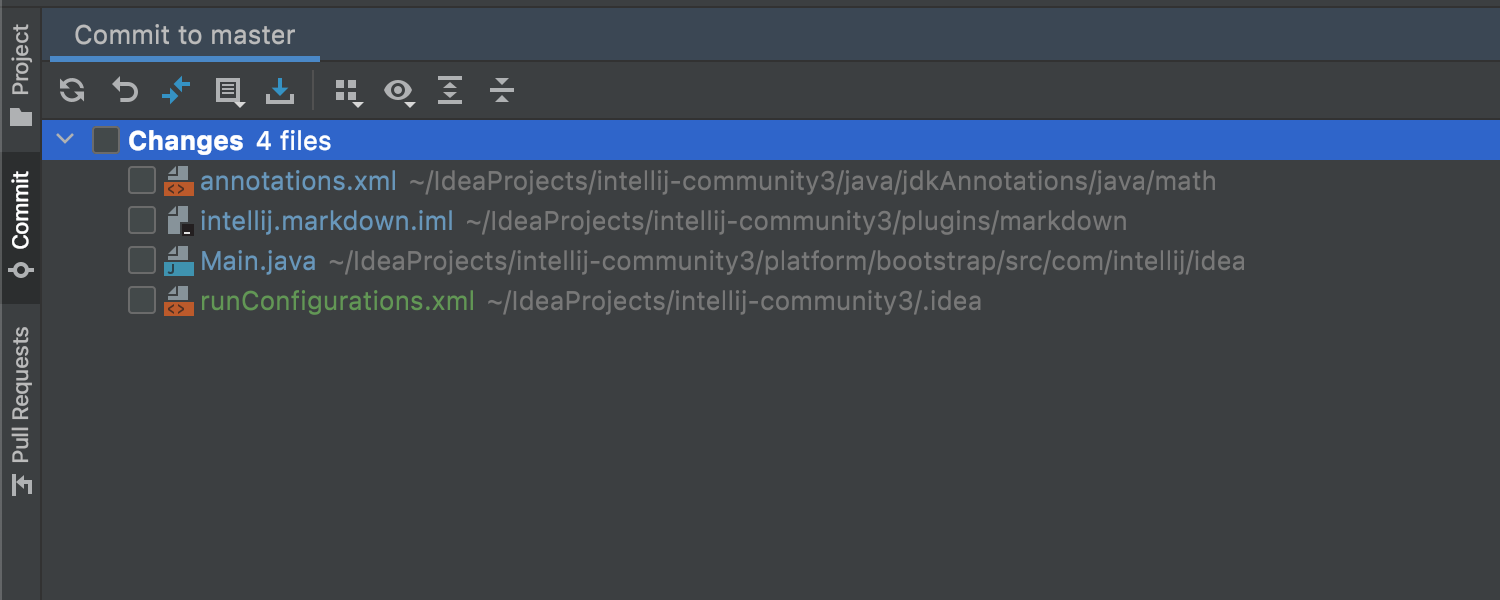
Changes instead of Default Changelists in new projects
We will no longer use Default changelists as the name for the node that stores
uncommitted changes in new projects. Starting from version 2021.2, it is called
Changes. Additionally, Git operations will no longer trigger automatic creation
of changelists.
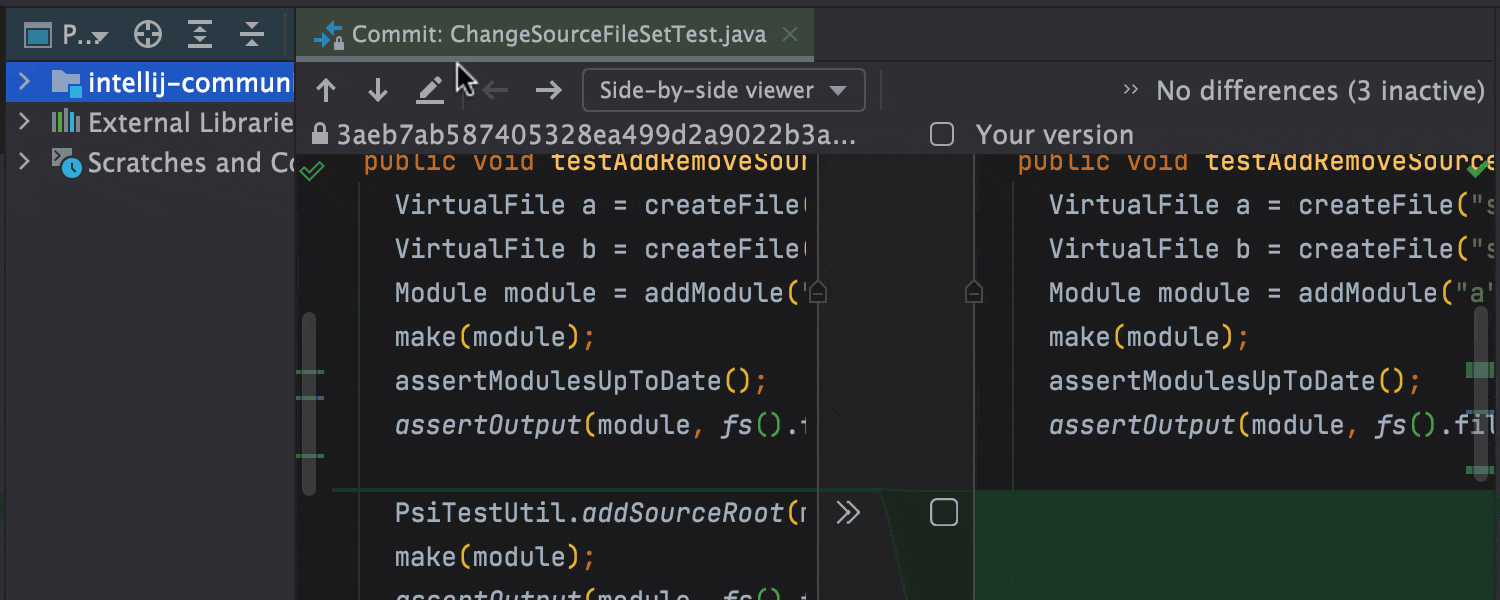
Unified Show Diff
IntelliJ IDEA displays the difference between the initial and changed files in the
editor by default, no matter where you’ve invoked the Show Diff action. If
tracking changes in a separate window is more convenient to you, just drag the desired
file from the editor.
Системы контроля версий
-
В этом релизе представлены обновления для работы с пул-реквестами: ускорился процесс их создания, появилась возможность быстро открывать diff в редакторе и добавилась поддержка шаблонов пул-реквестов.
-
Появилась поддержка шаблонов Git-коммитов, и в них можно вносить любую информацию, которая должна быть в сообщении коммита.
-
Теперь можно просто выбрать профиль инспекций кода перед коммитом. Нажмите на значок шестеренки, чтобы открыть параметры коммита, отметьте галочкой Analyze code, кликните Choose profile и выберите нужный профиль.
-
С помощью нового действия рядом с Show diff в можно получить файл из другой ветки.
-
Новое действие Save to Shelf позволяет скопировать изменения на вкладку Shelf, сохранив их при этом в локальной истории.
-
Perforce-плагин теперь полностью совместим с IntelliJ IDEA Community Edition и поставляется вместе с IDE.
Главные изменения
-
Наша новая платформа для разработки и командного взаимодействия Space теперь интегрирована с IntelliJ IDEA. После того как вы вошли в свою организацию в JetBrains Space, вы сможете просматривать и клонировать репозитории проектов, ревьюить код своих коллег и писать скрипты автоматизации Space.
-
Появилась поддержка WSL 2 для Java-проектов.
-
Сервис для совместной разработки и парного программирования Code With Me теперь доступен из коробки, а кроме того, в нем появилась поддержка видео- и аудиозвонков.
-
Новая функция Run Targets позволяет запускать, тестировать, профилировать и отлаживать приложения в Docker-контейнерах и на удаленных компьютерах.
Silent installation on Windows
Silent installation is performed without any user interface. It can be used by network administrators to install IntelliJ IDEA on a number of machines and avoid interrupting other users.
To perform silent install, run the installer with the following switches:
-
: Enable silent install
-
: Specify the path to the
-
: Specify the path to the installation directory
This parameter must be the last in the command line and it should not contain any quotes even if the path contains blank spaces.
For example:
ideaIU.exe /S /CONFIG=d:\temp\silent.config /D=d:\IDE\IntelliJ IDEA Ultimate
To check for issues during the installation process, add the switch with the log file path and name between the and parameters. The installer will generate the specified log file. For example:
ideaIU.exe /S /CONFIG=d:\temp\silent.config /LOG=d:\JetBrains\IDEA\install.log /D=d:\IDE\IntelliJ IDEA Ultimate
Other
Localized UI in Chinese, Japanese, and Korean
Starting with this version, you can enjoy the fully localized IntelliJ IDEA UI in
Chinese,
Korean, and
Japanese.
Localization is available as a non-bundled language pack plugin, which can be
easily installed in your IDE.
More than 1.5 million users have started using the partially localized EAP version of our
language packs. Now you can enjoy the full localization experience!
Unbundled plugins
After analyzing how often you use several plugins, we decided to unbundle some of them,
including Resource Bundle Editor, Drools, JSP Debugger Support,
CoffeeScript, Spring Web Flow, Spring OSGI, Arquillian,
AspectJ, Guice, Helidon, Emma, and EJB. If you still
need any of these plugins, please install them manually from JetBrains Marketplace.
Deep code insight
Though designed primarily for Java development, IntelliJ IDEA understands many
other programming languages, including Groovy, Kotlin, Scala, JavaScript, TypeScript, and SQL,
and it provides smart coding assistance for each of them. Initial indexing of source code allows
the IDE to create a virtual map of your project. Using the information from the virtual map, it
can detect errors on the fly, suggest code completion variants with precise context-awareness,
perform refactoring, and more.

Inspections and context actions
IntelliJ IDEA is very good at checking over the quality and validity of your code with
on-the-fly inspections. These inspections help you code faster, comply with the highest
quality standards, and stay confident through the whole development process. We provide
a host of standard inspections, as well as dozens of framework-specific ones covering a
wide range of problems, such as Spring bean class autowiring errors, etc.
If IntelliJ IDEA finds any issues, it offers to help solve them via context actions, which
include quick-fixes for highlighted errors and intention actions for changing your code if
the issues are minor. To invoke a context action, click the light bulb icon
(or press Alt+Enter).

Intelligent code completion
IntelliJ IDEA provides context-sensitive code completion, offering you suggestions that are
only valid for the current caret position. You don’t need to use any shortcuts or configure
additional settings; code completion will start as soon as you begin typing your code in the
editor.
IntelliJ IDEA uses machine learning to ensure the most relevant suggestion is at the top of
the list.
To learn more about code completion, check out this
blog post.

Language injections
IntelliJ IDEA lets you work with elements of code in other languages embedded in your code.
You won’t notice a difference between your experience working with the core Java code and
your experience with the code that you’ve injected. We provide code highlighting, completion,
error detection, and other coding assistance features for embedded code fragments. To add a
snippet of alternative code into Java, just press Alt+Enter, select Inject
language or reference, and select the desired language from the list.

Diagrams
IntelliJ IDEA has lots of useful diagrams that can help you visualize and analyze your code
and navigate through it. Depending on their types, these diagrams can reflect the structure
of classes and methods in your application, of the database objects, of entity beans defined
in your module, and so on. You can call a list of available diagrams via
Diagrams / Show Diagram from the context menu.

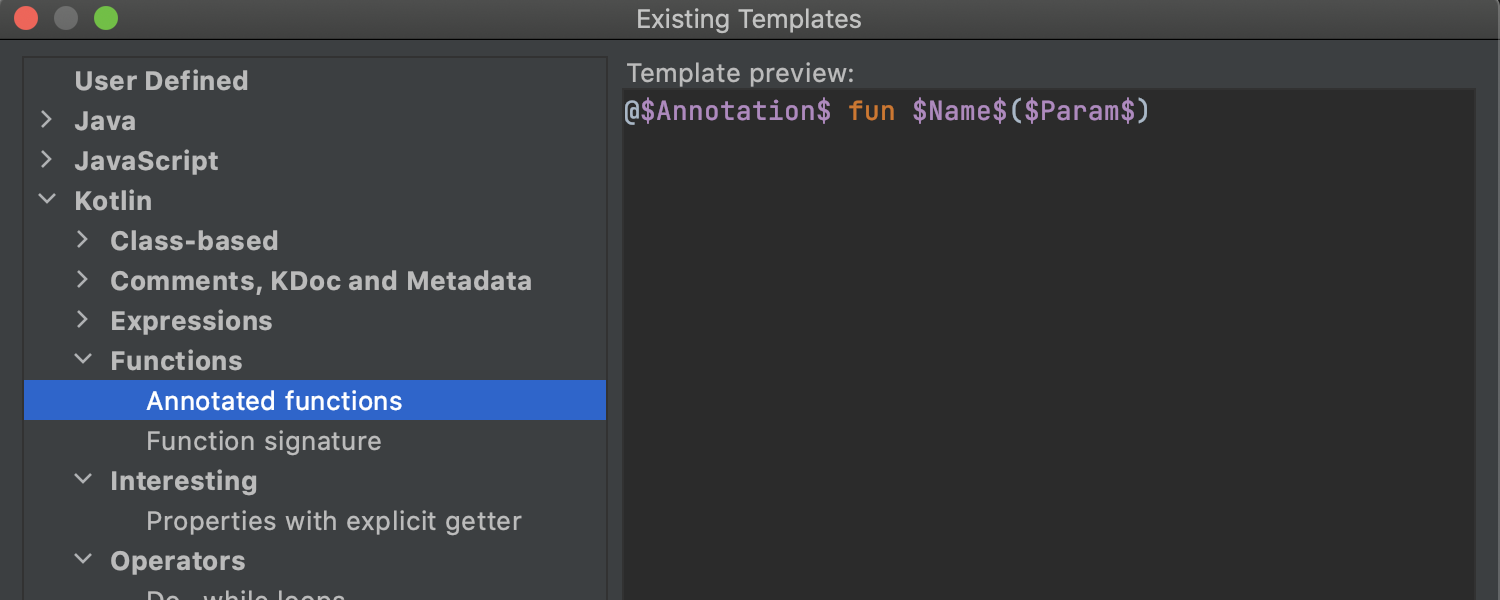
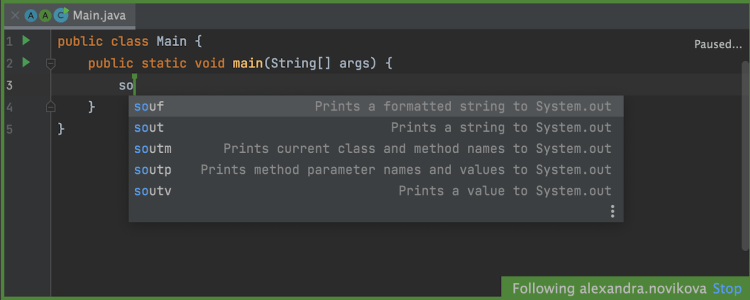
Live templates
Live templates
is a powerful feature that helps speed up your coding. Just type in an abbreviation
predefined in the template to insert standard code constructs into your work quickly.
You can also create your own custom templates, which you can use to insert snippets of
code that you use repeatedly.
Developer ergonomics
Every aspect of IntelliJ IDEA is built to provide you with a seamless
out-of-the-box experience. It provides quick access to all the features and integrated tools
that are important to your work, as well as a wide range of customization options. You can
fine-tune everything to support your workflow: set shortcuts, install plugins, customize the
interface to your liking, and more.

Easy start up
Even if this is your first time using an IDE, it shouldn’t take you long to get up and
running with your first project. In the New Project wizard, you can set the project type,
Java version, and supported build tools (like Maven and Gradle); IntelliJ IDEA will
configure all the remaining settings for you. This means you’ll be able to start working
just moments after launching IntelliJ IDEA. You can also open projects, import existing
Maven or Gradle projects, and pull projects from Version Control Systems.

Keyboard shortcuts for everything
IntelliJ IDEA has keyboard shortcuts for pretty much everything, from viewing recent files
to running and debugging your project. One universally applicable shortcut is double
Shift (Search Everywhere). It allows you to find just about any item inside or
outside of the project. The range of your search can vary from files, actions, classes,
and symbols to settings, UI elements, and even Git history.
Check out this
video
for other shortcuts that are useful in just about any situation.

Standard and custom themes
You can spend long days coding in front of a screen as a developer, so making the UI easy
on your eyes is important. We have several options available that allow you to create a
comfortable environment to work in. You can use one of the standard color themes, like
IntelliJ Light or Darcula, or configure IntelliJ IDEA to synchronize its theme with your
OS preferences.
Alternatively, you can give your IDE a completely new look, with over 100 interface
custom themes
to choose from. So whether you are in the mood for Solarized’s Californian sun
vibe or feeling a little purple with Dark Purple Theme, IntelliJ IDEA has a
theme for you.

Accessibility
JetBrains is committed to making our products accessible to everyone. IntelliJ
IDEA lets you enable various accessibility features that will accommodate your needs. Screen
readers are compatible with IntelliJ IDEA, for example. You can also configure the colors for
different UI elements, add a contrast color for scrollbars, resize tool windows and the size of
the text in the editor, and more.
Первая программа в IntelliJ IDEA
Последнее обновление: 28.09.2020
В прошлой теме мы рассмотрели, как создавать первую программу с последующим ее запуском в командной строке. Однако в реальности,
как правило, крупные программы разрабатываются не при помощи простого текстового редактора, а с использованием таких средств как IDE или интегрированные среды
разработки, которые упрощают и ускоряют написание кода и создание приложений. На данный момент самой популярной средой разработки для Java является
IntelliJ IDEA от компании JetBrains (по ряду опросов на момент середины 2018 ею пользовалось до 60% разработчиков на Java).
Рассмотрим, как использовать данную среду.
Конечно, Community-версия не имеет ряда многих возможностей, которые доступны в Ultimate-версии (в частности, в Community недоступны опции для
веб-приложений на Java). Но Community-версия тоже довольно функциональна и тоже позволяет делать довольно много, в том числе приложения на JavaFX и Android.
После установки запустим IntelliJ IDEA и создадим первый проект. Для этого на стартовом экране выберем New Project:
Далее откроется окно создания проекта. В левой части в качестве типа проекта выберем Java.
Кроме того, в поле Project SDK можно указать путь к Java SDK, который будет использоваться
в проекте. Как правило, это поле по умолчанию уже содержит путь к SDK, который установлен на локальном компьютере. Если это поле пусто, то его надо установить.
После этого нажмем на кнопку Next. Далее будет предложено отметить шаблон проекта. По умолчанию тут один шаблон проекта — Command Line App, который предполагает запуск приложения как
консольного.
И в конце откроется окно, где надо будет ввести название проекта и пакета, а также указать его расположение на жестком диске. Здесь можно ввести
любые данные. Ну в данном случае проект будет называться HelloApp, а базовый пакет «com.metanit».
И после этого для создания проекта нажмем на кнопку Finish. После этого среда создаст и откроет проект.
В левой части мы можем увидеть структуру проекта. Все файлы с исходным кодом помещаются в папку src.
По умолчанию она содержит каталог, который называется по имени пакета и который имеет один файл Main.java.
В центральной части программы открыт исходный код программы в виде класса Main. Изменим его следующим образом:
package com.metanit;

public class Main {

    public static void main(String[] args) {

        System.out.println("Hello Java!");
    }
}
С помощью зеленой стрелки на панели инструментов или через меню Run -> Run запустим проект.
И внизу IntelliJ IDEA отобразится окно вывода, где мы можем увидеть результат работы нашей программы.
НазадВперед
Как пользоваться
Первоначальная настройка при первом запуске
При первом запускаете или после того, как было сделано обновление программы, откроется диалоговое окно полной установки, в котором вы можете выбрать импортирование параметров IDE.

Если это был первая установка, то выбирается параметр «Не импортировать параметры» так как их неоткуда импортировать. Далее можно выбрать тему среды.
После выбора темы, можно выбрать выключить или включить нужные плагины, загрузить и установить их из репозитория плагинов IntelliJ IDEA.
После завершения первоначальной настройки, отобразится экран приветствия. Он позволяет:
- создать новый проект
- или проверить существующий проект из системы управления версиями
- открыть существующий
- импортировать новый проект (среда разработки позволяет перетащить существующий каталог проекта или отдельный файл на экран приветствия и открыть его в IntelliJ IDEA)
После запуска, среда разработки открывает справку Trip of Day.
Как создать проект java
- В меню приветствия выбираем пункт Create New Project (или если какой то проект уже открыт нажимаем File -> New Project … )
- В окне New Project выбираем папку Java. В поле Project SDK выбираем папку на компьютере где лежит ранее скаченный SDK для java. (Обычно эти библиотеки для работы с java устанавливаются в папку C/Programs File (или Programs File(x68) в зависимости от той версии которую вы используете)/java/). Далее нажимаем Next. – расположение библиотек jdk и jre для рабы с java.
- На Create project from template ставим галку и выбираем Command Line App. Нажимаем Next.
- В поле Project name пишем название создаваемого проекта латинскими буквами без пробелов. Нажимаем Finish. Название проекта и выбор его местоположения. В итоге генерируется класс Main который является точкой входа для созданного приложения (программы). Он создается пустым и ничего не делает, но при этом его можно запустить на выполнение.
package com.company; public class Main { public static void main(String[] args) { // write your code here } }
По завершению выполнения компилятор выдает нам следующее:
Process finished with exit code 0
Запустить проект
Что бы запустить проект в IntelliJ IDEA можно воспользоваться знаком старта на верхней панели быстрого доступа:

Также программу можно запустить через вкладку Run -> Run Main или сочетанием клавиш Shift+F10.
Как создать jar файл?
Для создания jar файла необходимо открыть окно Project Structure (значок в верхнем меню быстрого доступа рядом с лупой). Так же это окно можно найти и открыть через поиск (лупа на панели быстрого доступа) или сочетание клавиш Ctrl+Alt+Shift+S.
В открывшемся окне выбираем вкладку Atrifacts -> + -> JAR –> From modules with dependencies…
В открывшемся окне в поле Main Class выбираем главный класс проекта и нажимаем OK.
В следующем окне ничего не делаем, просто нажимаем ОК.
Теперь, чтобы добавить jar файл проекта в сам проект нажимаем Build (верхняя панель меню) -> Build Artifacts… -> название проекта.jar -> Edit …
В открывшемся окне выбираем созданный jar файл и нажимаем OK.
Теперь в панели где отображается структура проекта появляется папка out в которой можно найти созданный jar файл
Все тоже самое только на видео:
Увеличение шрифта
Чтобы увеличить шрифт заходим в File -> Settings -> Editor -> Font. В данном окне в поле size можно указать желаемый шрифт.

Смена темы
Чтобы сменить тему заходим в File -> Settings -> Editor -> Color Scheme -> Color Scheme Font. Здесь в поле Scheme можно выбрать желаемую тему:
- Default (по умолчанию, фон редактора будет белым)
- Darcula (фон редактора темный)
Помимо этого, через знак колеса (настройки) можно импортировать желаемую тему или цвет фона.
Создание библиотеки
Jar файл является библиотекой для языка java (пакетом, в котором собраны классы). Как создается Jar файл было описано в четвертом пункте.
Полезное видео по настройке и запуску
Загрузка, установка и настройка. Первая программа на Java — Hello java!
7 Python Plugins для IntelliJ IDEA
Базовый плагин даёт возможность интеллектуального редактирования скриптов Python, эффективно расширяя функциональность IntelliJ IDEA и в целом соответствует функциональности PyCharm при решении проблем и достижения целей, связанных с кодированием на Python. Однако у профессионалов программного обеспечения, таких как вы, в рукаве должно быть несколько дополнительных плагинов, которые сделают вашу разработку на Python в IntelliJ IDEA еще более эффективной и продуктивной.
1.
 Python linter
Как следует из названия, плагин является . Он обеспечивает сканирование файлов Python в реальном времени и/или по требованию внутри IntelliJ IDEA. Pylint — проект с открытым исходным кодом и поэтому может быть полностью настроен для вас. Кроме того, у Pylint есть .
2.
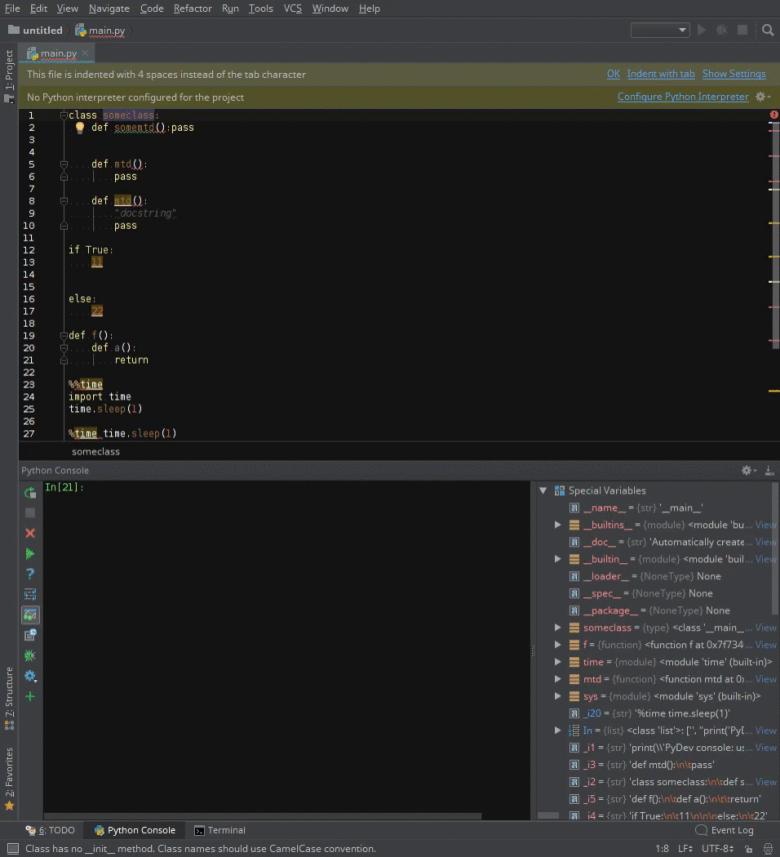 Python Smart Execute
Этот удобный маленький плагин является разумной альтернативой команде «Execute Line in Console» (Выполнить строку в консоли). Он автоматически определяет количество строк, отправляемых на консоль Python, и к нему легко получить доступ с помощью сочетания клавиш: alt + shift + A.
Надо сразу предупредить, что в следующих версиях IntelliJ IDEA и PyCharm этот плагин может устареть, так как .
3.
В строгом смысле, это не плагин Python. Tabnine — инструмент для повышения производительности программирования, который помогает быстрее писать лучший код. Tabnine использует GPT-2 для обеспечения высокоточных предсказаний кода в Python и других языках. Tabnine теперь является частью семьи Codota, но, честно говоря, мне всегда нравилась его удивительная точность.
4.
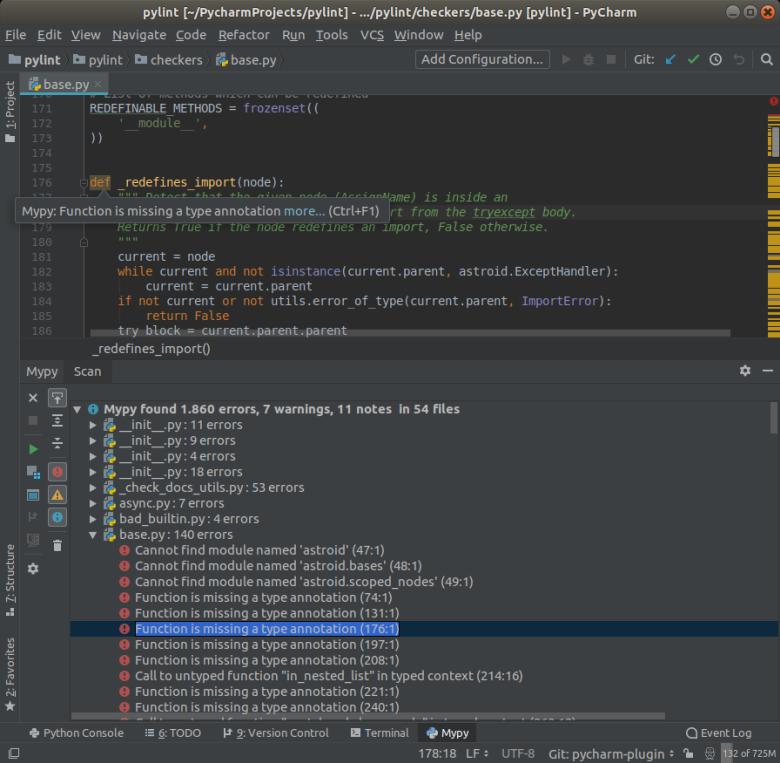 MyPyMypy — дополнительный анализатор для статической проверки исходного кода Python
Mypy — дополнительный анализатор для стаческой проверки исходного кода Python, который стремится объединить прелести динамического (или ”duck») и обычного ввода. Среди прочего, он ищет ошибки программирования, помогает применять стандарты кодирования и принюхивается к некоторым запахам кода.
5.
 DeepBugs может обнаруживать ошибки
Этот плагин, разработанный исследовательским отделом JetBrains, обещает выявлять потенциальные ошибки и проблемы качеством вашего кода Python с помощью моделей глубокого машинного обучения. DeepBugs может обнаруживать ошибки, такие как неверные аргументы функций, некорректное сравнение и другие, на основе семантики анализируемого кода.
7.
Этот последний в нашем списке плагин представляет собой удобный набор из трех проверок. Его можно запустить в своем коде Python и он будет искать потенциально неиспользуемые классы, функции (включая методы) и имена (глобальные и на уровне классов) в вашем коде.
Основа:
Profiler
Focus on method calls
Now when you analyze your application’s performance with the CPU profiler, you can use a number of additional options to focus more specifically on a chosen method call and filter out the unnecessary ones:
- Focus on Subtree shows the selected method call and all the following calls in the subtree. When this is selected, the parent time-sample counter displays the overall time spent in the selected subtree.
- Focus on Call shows the selected method and the methods that call it. When this is selected, every time frame shows only the time spent in the selected method.
- Exclude Subtree ignores the selected method call and all the following calls in the subtree.
- Exclude Call excludes the selected method and all calls to it.

Visit the Profiling tools section to learn how to install and use this feature to analyze applications in IntelliJ IDEA Ultimate.
Collapse recursive calls
IntelliJ IDEA now detects recursive calls when the same method is called higher up in the stack. The IDE now encourages you to take these calls out of the subtree, allowing you to bypass recursion and focus on the methods that consume most of the resources and on the calls that they make.
Recursive calls are indicated with this new special icon in the Call Tree tab:

Analyze HProf memory snapshots
IntelliJ IDEA 2020.1 enables you to open `.hprof` memory dump files without taking up too much of your RAM.
To open the .hprof file, go to Help | Find action and type “hprof” to find the Open Hprof Snapshot action:

Once you have chosen the .hprof file, the IDE will open it in the Profiler tool window:

A number of tabs appear in the picture above. Here’s what they do:
- Summary shows common information like the total size, number of instances and stack traces of the file.
- GC Roots shows all the root objects grouped by classes.
- Classes lists all classes sorted by their numbers of instances or size.
- Object view (double-click on an object) lists all the class instances with the field value viewer.
Note that in v2020.1 we are working on the very first version of this new feature. More sophisticated analysis should become available in the next major versions. As usual, we’re excited to see your feedback and suggestions in the comments.
Frameworks and technologies
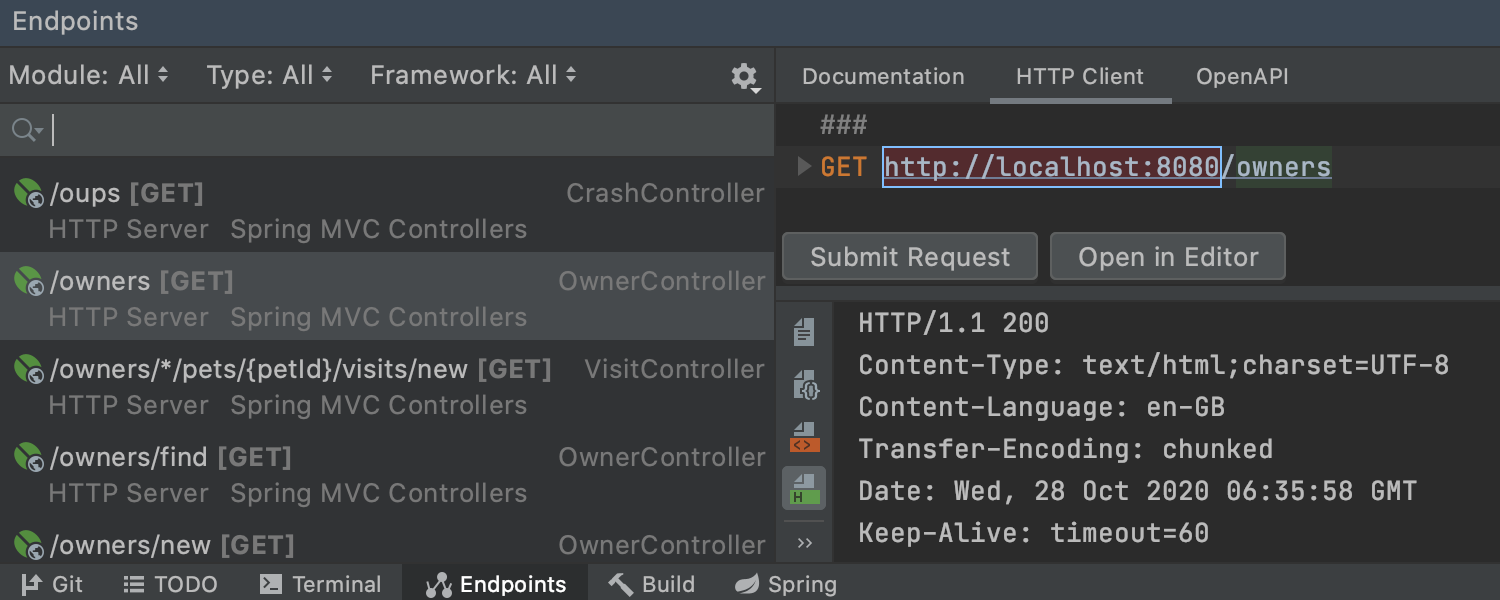
Reworked Endpoints tool window Ultimate
In this release, we’ve significantly improved the Endpoints
tool
window which shows both client and server APIs for HTTP and WebSocket protocols.
It features a more
convenient display of endpoints grouped by module with an option to make the list more
compact. You can use comprehensive search with filters, multiple search parameters, and
completion. You can read documentation for each endpoint in a new tab. If endpoints have
associated URLs, you can see an Open API representation of them and access an ad hoc HTTP
client.
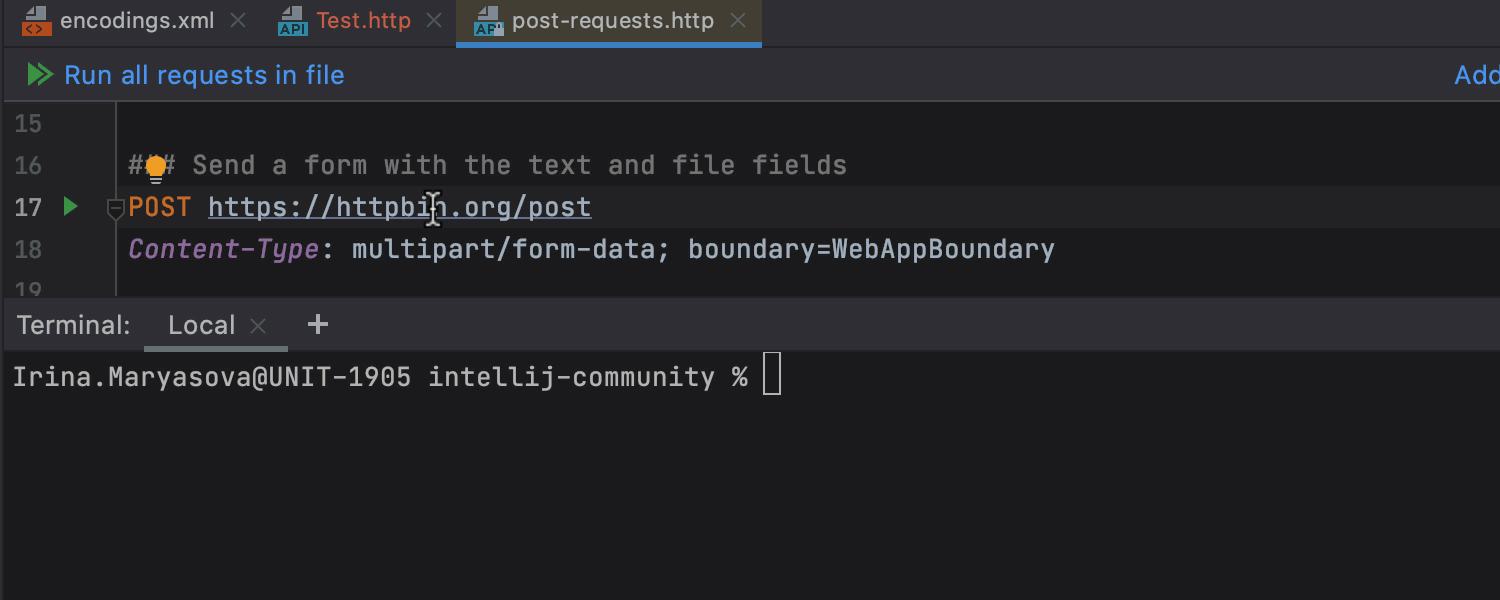
cURL conversion Ultimate
You can now export an HTTP request to cURL by pressing Alt+Enter in the HTTP request
editor
and selecting the Convert to cURL and copy to clipboard option.
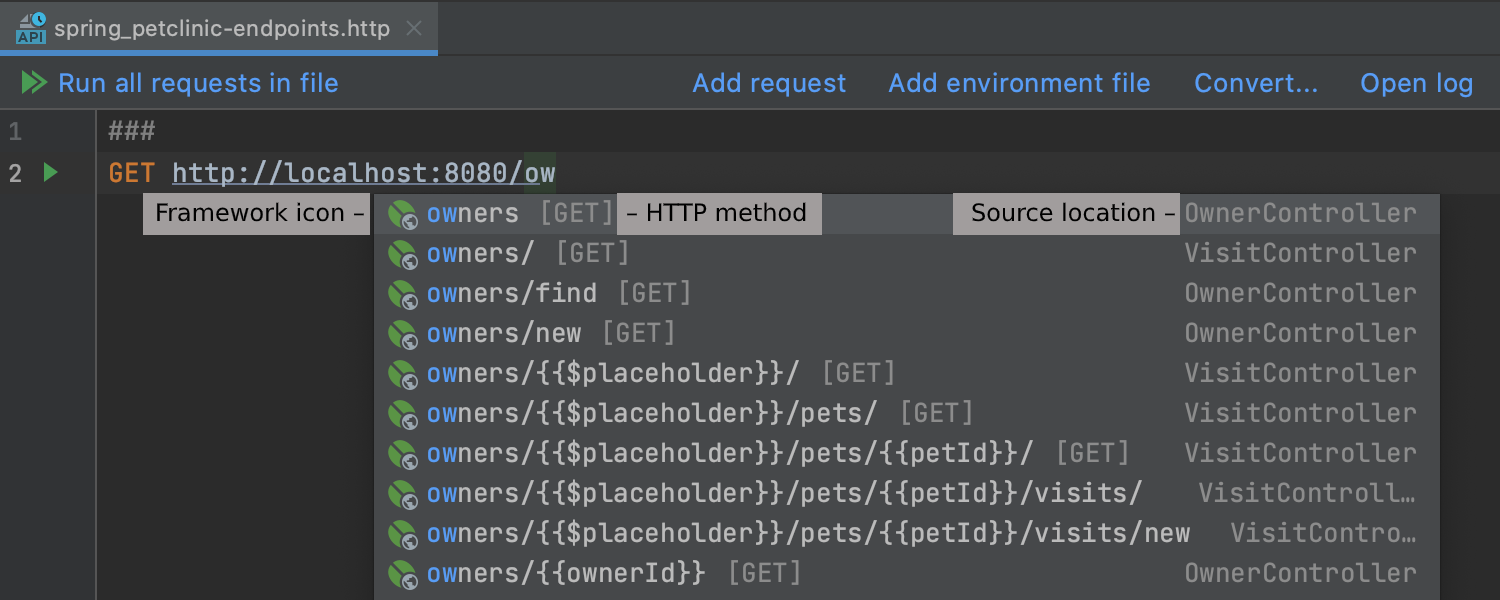
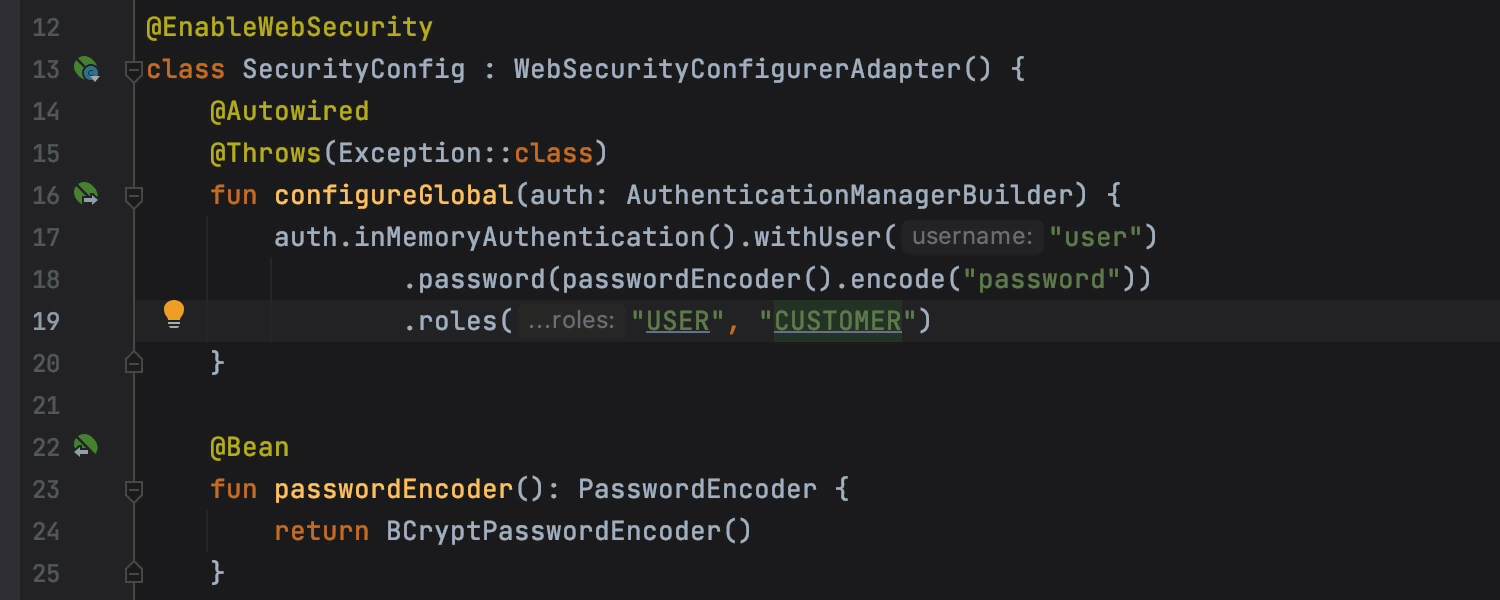
Better URL completion Ultimate
URL completion is now more informative, with framework icons, HTTP methods, and source
locations
of the classes or files in which you declared the endpoint. Deprecated URLs are displayed
with strikethrough formatting.
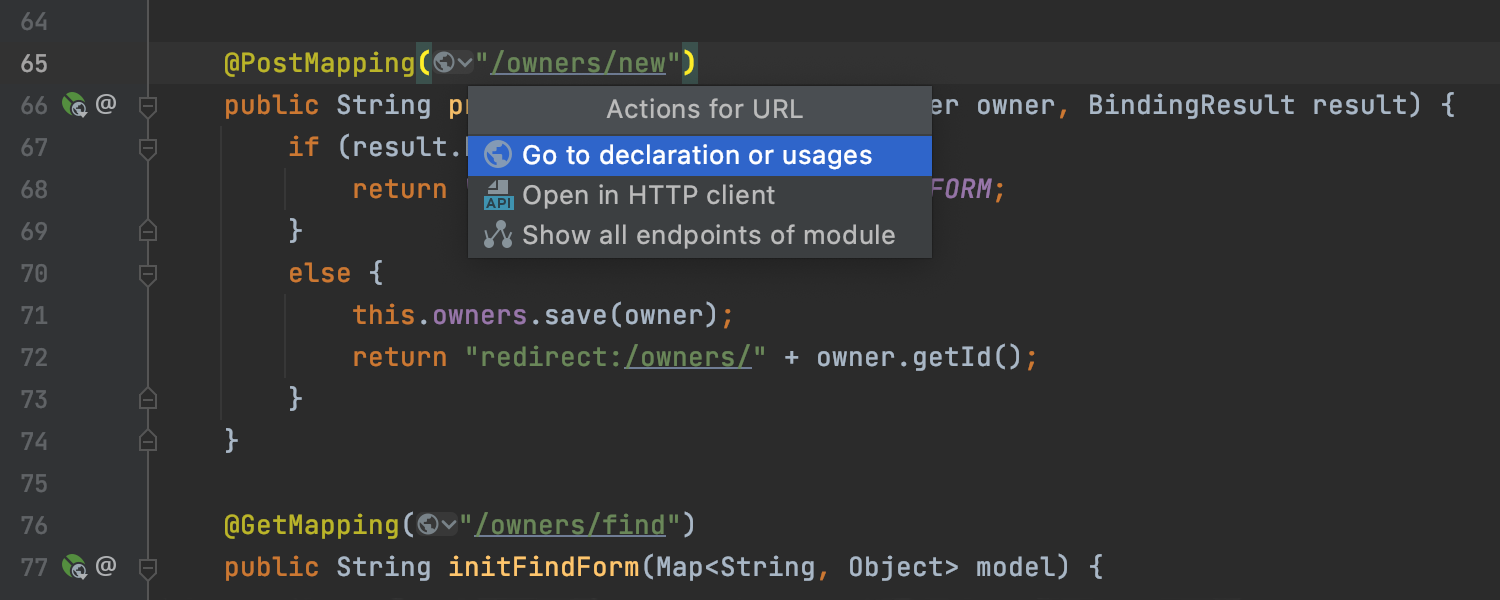
URL Inlay Hints Ultimate
We’ve added fast access to some key actions for URLs. Click the globe icon next to the URL to
access them. These actions are currently available for the Spring MVC, WebFlux, Feign
Client, JAX-RS, Micronaut, and Retrofit frameworks.
Spring updates Ultimate
We now support code insight for Spring MVC Functional Routing, RestOperations, Spring
WebTestClient, and Spring Reactive WebClient. We also display endpoints declared with them.
We’ve added code completion and navigation for Kotlin Spring Security projects.
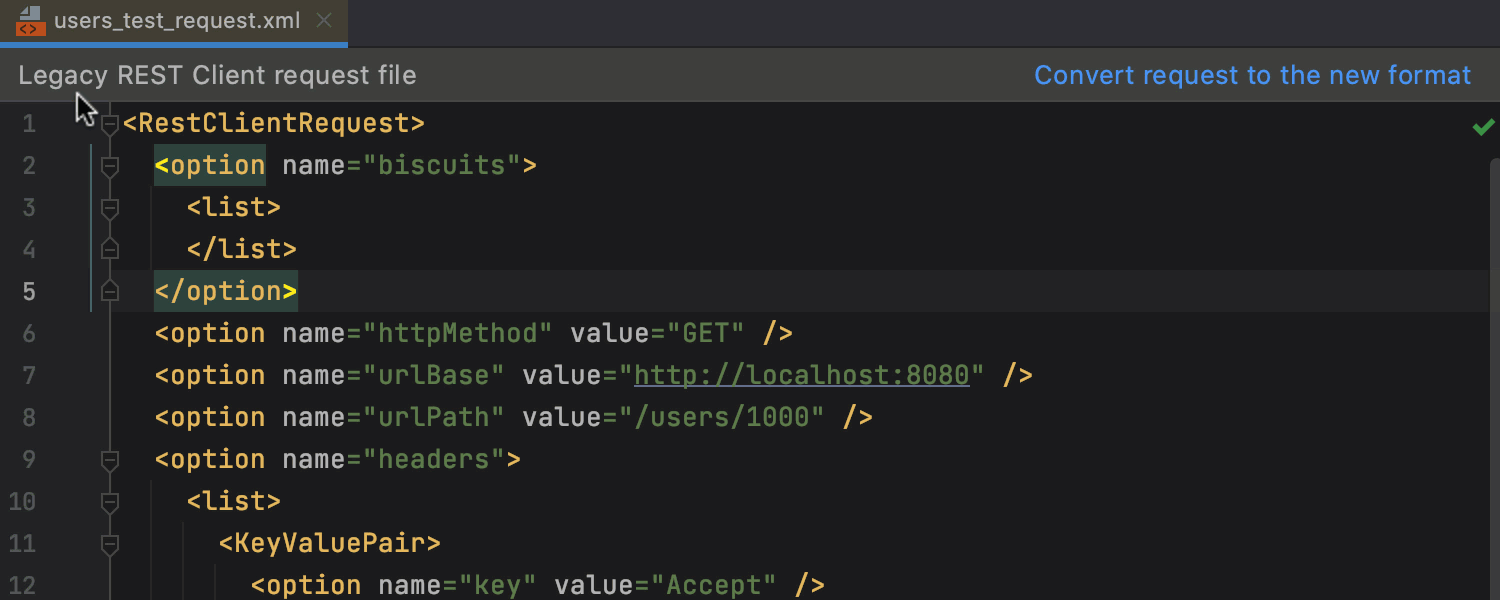
HTTP request conversion Ultimate
If you still use HTTP requests in the old HTTP client format, you can easily convert them by
clicking Convert request to the new format at the top of an open request. Other
ways to do
it are via the context menu in the Project view or from the HTTP request editor.
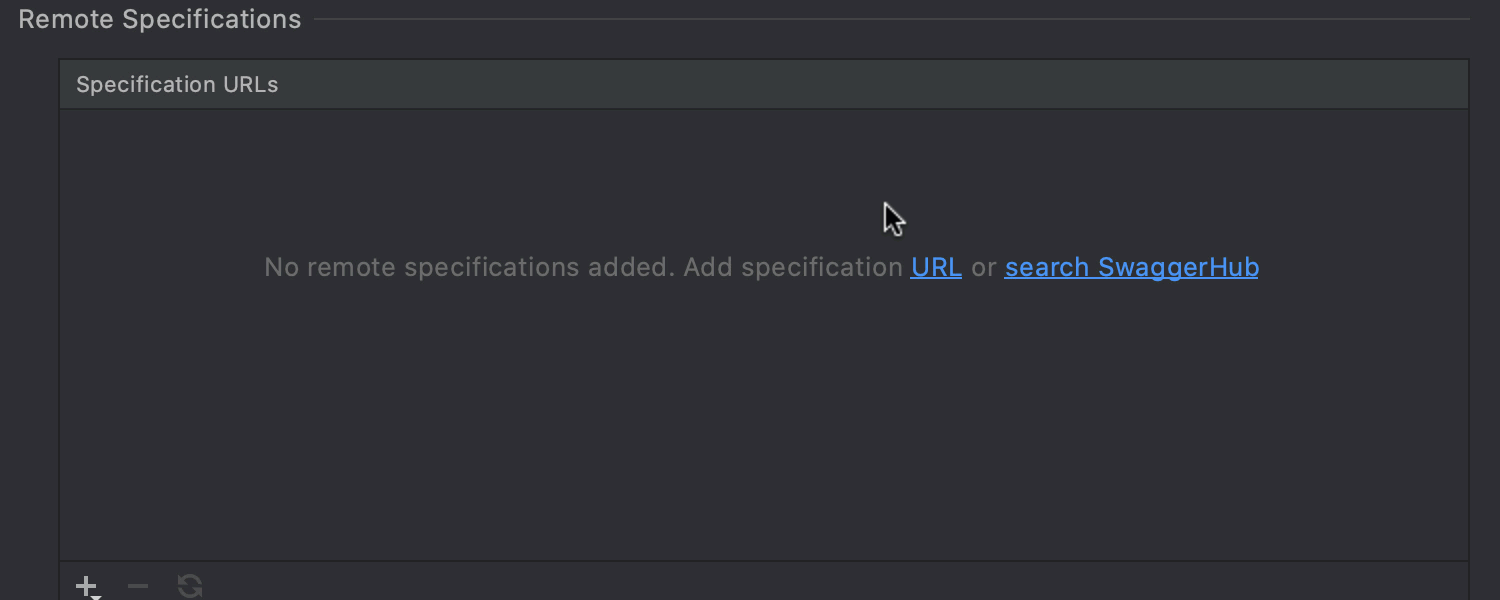
Swagger updates Ultimate
We’ve significantly improved code insight in various cases, including when you want to
reference external definitions with the keyword. As another important
update, we’ve
added Swagger Hub support for you to get both public and private specifications from Swagger
Hub and open them in the Endpoints tool window. Another nice feature is that the Swagger UI
now syncs with the Darcula theme.
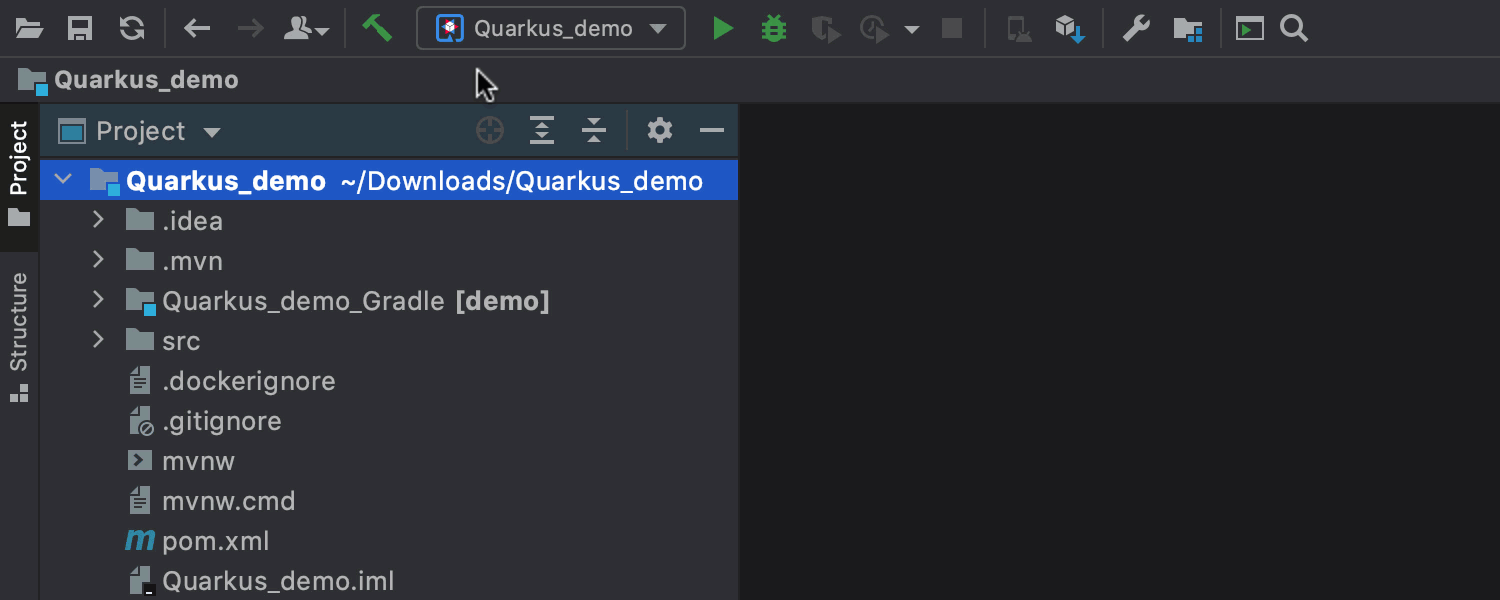
Quarkus and Micronaut run configurations Ultimate
Your new Quarkus and Micronaut projects have automatically created run configurations, which
means that you
can run and debug your application right away. If you decide to change the Quarkus settings
in Edit
Configurations, the Environment section will feature only the settings
applicable to Gradle
or Maven, depending on which of these you are using to build your project.
Kotlin
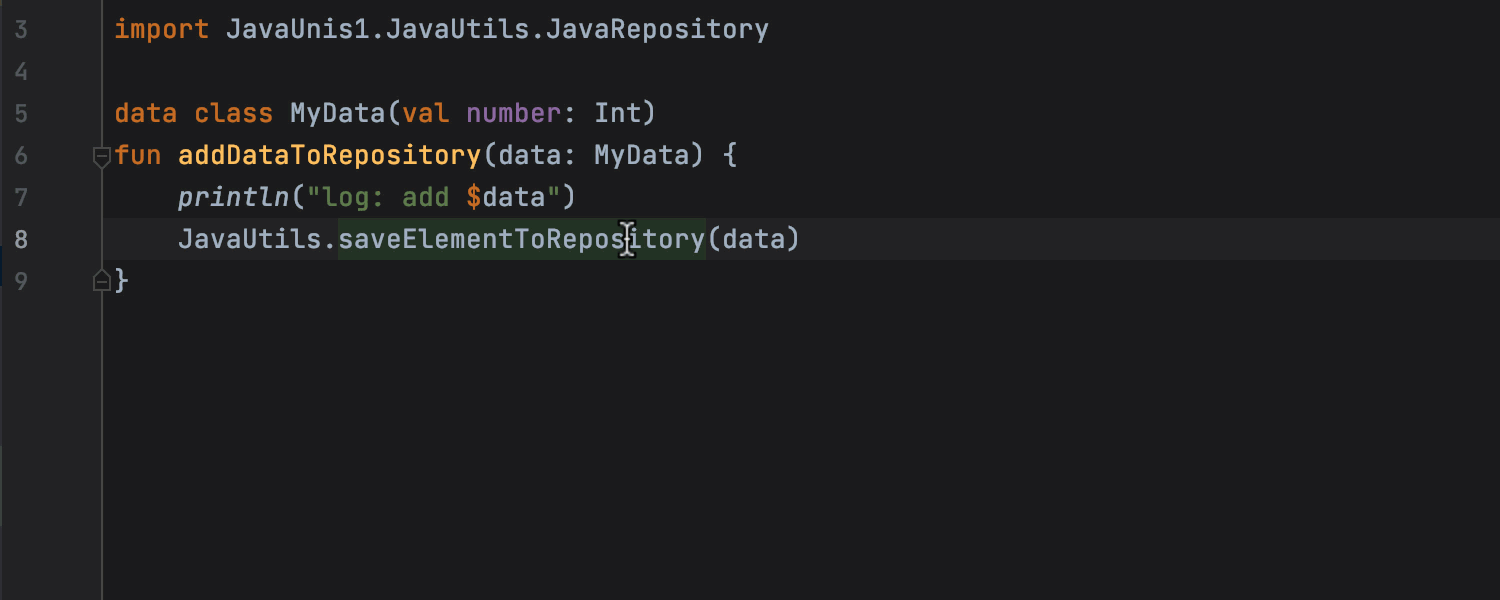
New types of inline refactorings
Cross-language conversion is now possible, meaning you can inline Kotlin elements
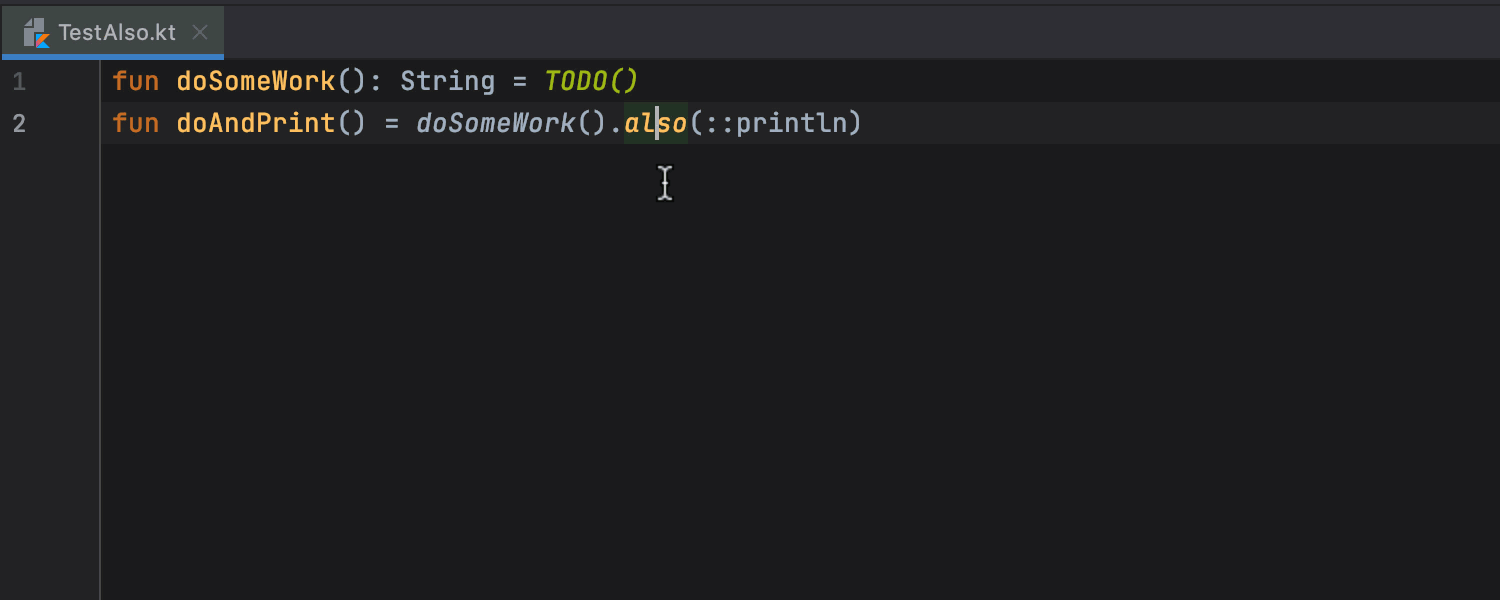
from Java. You can also inline-refactor the also, let, run, apply, and with
scope functions.
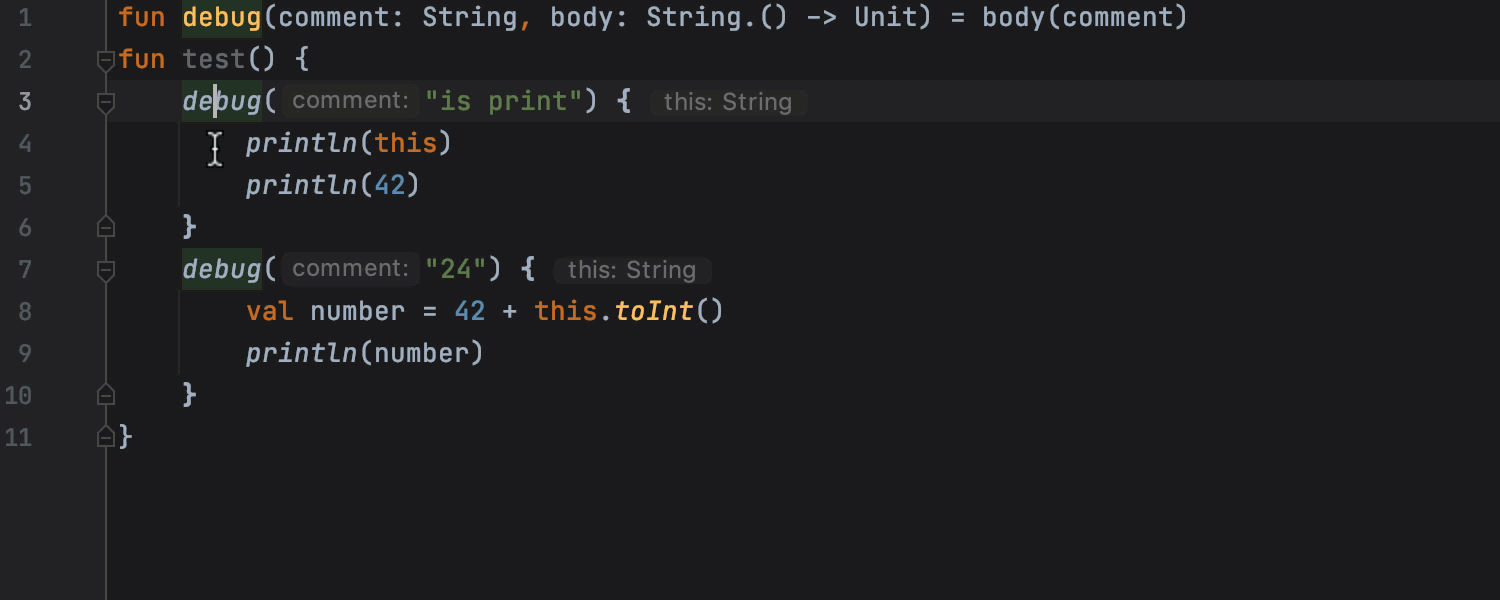
We’ve improved the inlining of lambda expressions for the IDE to analyze their syntax more
thoroughly and format them correctly.
Structural search and replace
We’ve introduced support for structural
search
and replace (SSR) actions for
Kotlin. You can find and replace code patterns, taking the syntax and semantics of the source
code into account. Filters for variables allow you to narrow down your search.
Collaborative development
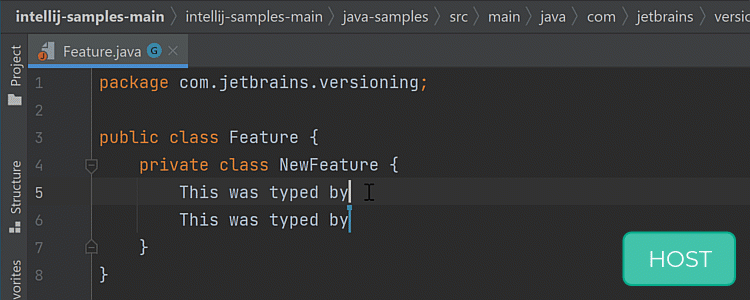
Synchronized code completion
You can now understand the logic behind your teammate’s actions even more precisely,
as you’ll see what code completion suggestions the person you are following uses. This
feature works when you are in Following mode during your Code With Me session.
Undo your actions
IntelliJ IDEA 2021.2 features a re-worked undo functionality that significantly
improves the collaborative programming experience. The revamped undo logic enables
both guests and the host to reverse their individual changes in the code. This means
that upgrading to the 2021.2 version will allow you to avoid unpleasant situations
where one developer accidentally deletes changes made by their peers. This improvement
is particularly useful in pair and mob programming scenarios.
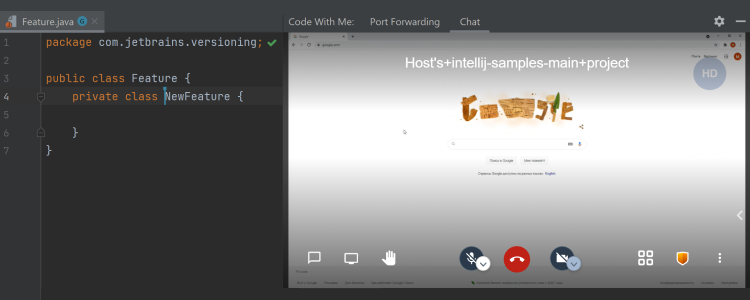
One of the most eagerly-awaited features, screen sharing, is finally here. In v2021.2,
participants can share an application window from their computer screen, not just your
JetBrains IDE, to help participants collaborate better.
Хочу! Что нужно делать?
Сразу видно, что проект очень экспериментальный. Эта штука для тех, кто очень любит всё новое и хочет попробовать использовать в повседневной жизни. Но ставить на эту штуку свою жизнь я бы не стал.
Расскажу о том, как всё это запустить и начать разбираться. Дальше вы уже сами.
Алгоритм действий:
- Подготовить сервер (только для использования в облаке)
- Сбилдить и запустить докерные образы
- Открыть IDEA в браузере
- PROFIT
Подготовка сервера
Вам понадобится компьютер с Docker.
Завести всё это можно и без Docker, но конкретно эта статья подразумевает его наличие, ибо без Docker всё становится куда сложнее.
«Сервер» может быть как машиной в облаке, так и вашим обычным компьютером — неважно. Я всё тестировал в двух конфигурациях: Linux на десктопе и Linux на удалённой виртуалке с четырьмя ядрами и 4 гигабайтами оперативной памяти
Для других операционных систем могут потребоваться корректировки
Я всё тестировал в двух конфигурациях: Linux на десктопе и Linux на удалённой виртуалке с четырьмя ядрами и 4 гигабайтами оперативной памяти. Для других операционных систем могут потребоваться корректировки.
Краткое содержание установки Docker на Ubuntu 16.04:
Дальше нужно немного поднастроить саму операционку. Если вы используете Linux-десктоп как рабочую машину в графическом режиме, то ничего делать не нужно.
Если же вы хотите развернуть что-нибудь вроде тестового сервера в облаке (благо сейчас это делается двумя щелчками мыши в Amazon и других облачных сервисах), нужно будет поставить пару пакетов.
Суть в том, чтобы у вас в командной строке появились xvfb (виртуальный фреймбуфер) и dbus-launch. Зачем нужен фреймбуфер я сказать затрудняюсь, но без этого не работают скрипты сборки. Вероятно, тяжелое наследие AWT.
Вот что нужно установить для Ubuntu 16.04:
Устанавливать gnome-keyring приходится по внутренним убунтовым причинам. Иначе окажется, что у вас проблемы с секретами для десктопа. Если у вас не Ubuntu, то скорей всего, это не нужно.
Дальше нужно создать фреймбуфер:
Скрипт этот стоит засунуть куда-нибудь в автозагрузку. Например, в юнит systemd. Ну или просто руками каждый раз набирать заново.
Тут критик воскликнет — ага, фреймбуфер, рендерите джипеги на сервере! Нет, он нужен только чтобы запустить скрипт сборки имиджа. В рендеринге он не участвует. Это просто артефакты легаси-кода, торчащего из джавы 1998-ого года производства. Думаю, в ближайшем времени разработчики выпилят необходимость использовать фреймбуфер на этапе сборки.
Скачиваем репозиторий со сборочными скриптами:
Собираем и запускаем образ:
Заходим в IntelliJ IDEA из браузера
Вместо нужно ввести IP-адрес вашего сервера или доменное имя
Обратите внимание, что hostname в URL встречается два раза. Без этого не заработает
Проблемы:
- Если вы используете прокси (именно прокси, а не VPN), временно отключите. Проблемы с пробросом вебсокетов через прокси всё ещё существуют в 21 веке.
Как работать в Android
Одновременно и то и другое использовать не имеет смысла, т.к. FUlly Kiosk Browser уже умеет отключать органы управления Android-оболочки и делает это по-умолчанию.
Как работать в iOS
Понятия не имею! Из всех эппловских девайсов у меня есть только служебный макбук и личный айфон. На айфоне проверять всё это бессмысленно (экран слишком маленький), а на макбуке никаких проблем не существует.
Как запаролить соединение?
Идём в файлы проекта, которые мы скачали ранее, открываем файл и ищем строчку:
И добавляем туда ещё один параметр с негуманоидным именем, значение которого — ваш пароль:
Теперь контейнер можно запускать!
Теперь можно пойти в браузер и подключиться по новому URL. Новый отличается от старого наличием параметра token с вашим паролем.
