Незаменимая для программистов
Содержание:
- Frameworks & Technologies
- Microservices diagram Ultimate
- Automatic migration from Java EE to Jakarta EE Ultimate
- Automatic download of shared indexes for new Spring Boot projects Ultimate
- Support for JPA Entity Graph Ultimate
- Support for cache annotations in Micronaut and Quarkus Ultimate
- Better microservice navigation support in JavaScript and TypeScript Ultimate
- gRPC endpoints displayed in the Endpoints tool window Ultimate
- Ktor integration Ultimate
- Docker
- Database tools
- Kotlin
- Автоматическая сборка проектов на Gradle
- Space integration
- Profiler
- Install as a snap package on Linux
- Version control
- Пример программы на Kotlin!
- Создание простого проекта на Kotlin
- Инструменты для работы с базами данных
- Kubernetes
- Предварительная настройка
- Установка и настройка IntelliJ IDEA
- Системы контроля версий
- Instant navigation and search
- Системные требования
- Version control
- System requirements
Frameworks & Technologies
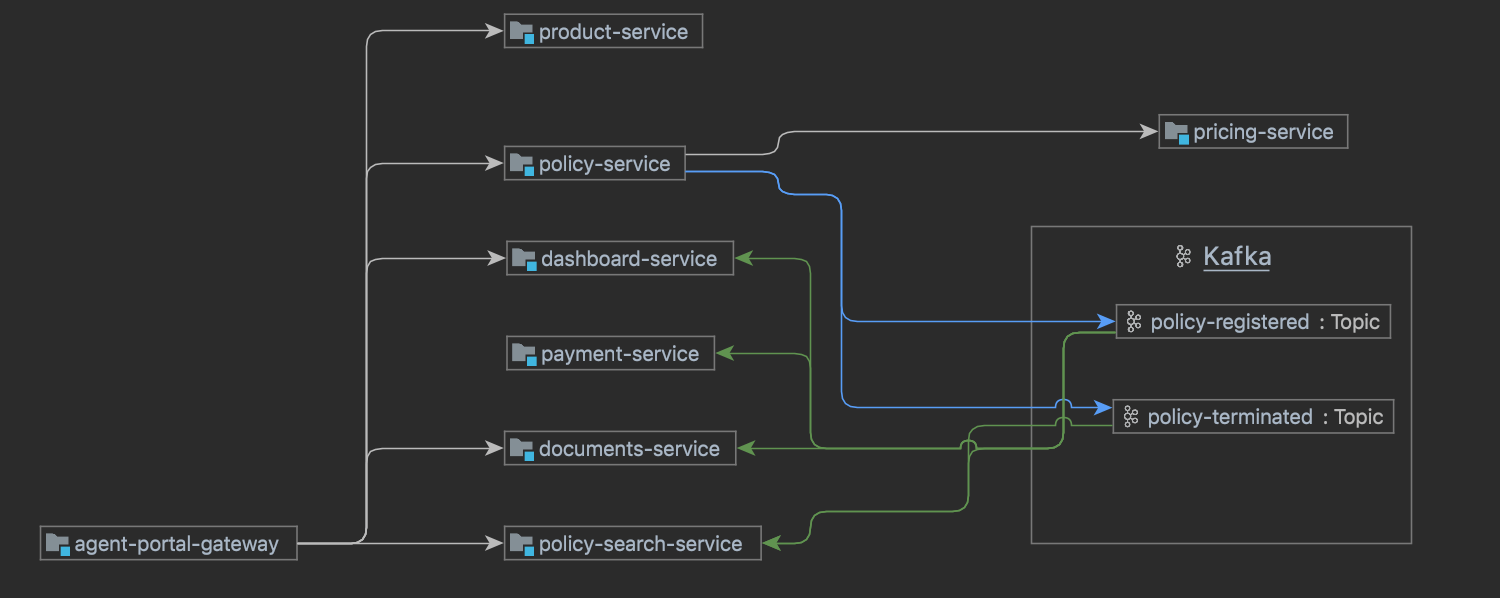
Microservices diagram
Ultimate
IntelliJ IDEA lets you display microservice interactions in a diagram, which you can
build by clicking the respective icon in the Endpoints tools window. This new diagram
offers the option to track which client calls a particular service and navigate to this
call in your code. To do so, just click on an arrow that connects the blocks in the diagram.
The diagram is available in Java and Kotlin projects if you use Spring, Micronaut,
Quarkus, or Helidon.
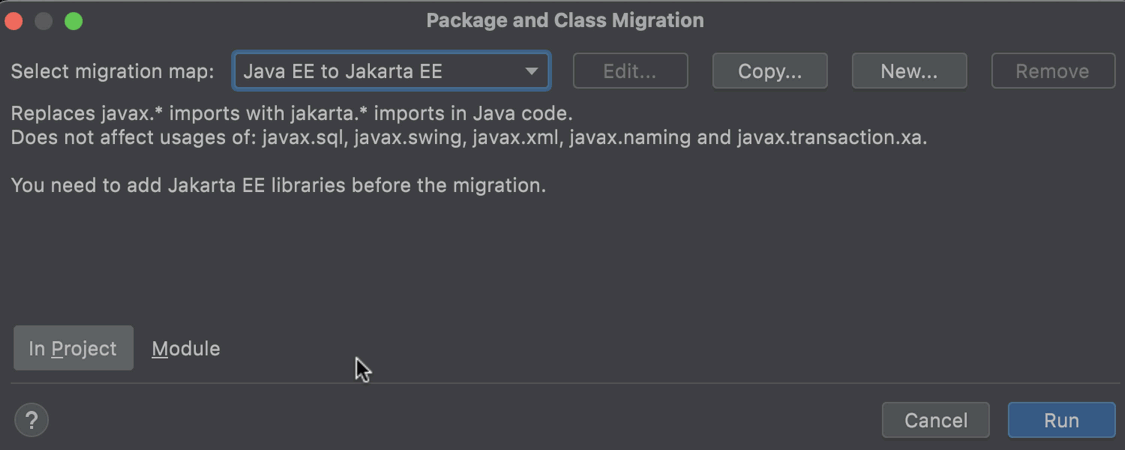
Automatic migration from Java EE to Jakarta EE
Ultimate
The new Migrate… refactoring helps quickly and painlessly migrate a project
or module from Java EE to Jakarta EE. After you initiate it, the Refactoring Preview
shows all the found usages of Java EE imports. You can then check through and finalize
the process.
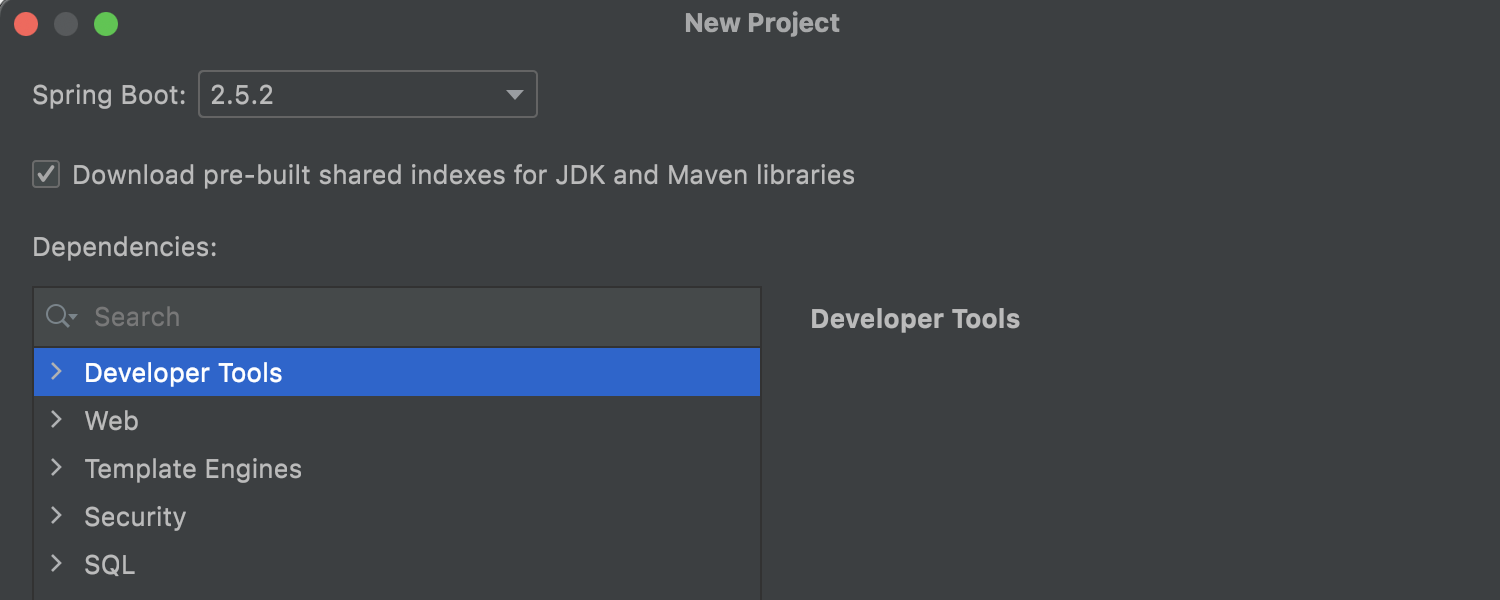
When you create a new Spring Initializer project, the IDE will download shared
indexes automatically, reducing indexing time and speeding up IDE startup. The checkbox
that turns this feature on is located on the second screen of the New Project wizard.
Please note it won’t work if you have disabled Shared Indexes in
Settings/Preferences | Shared Indexes.
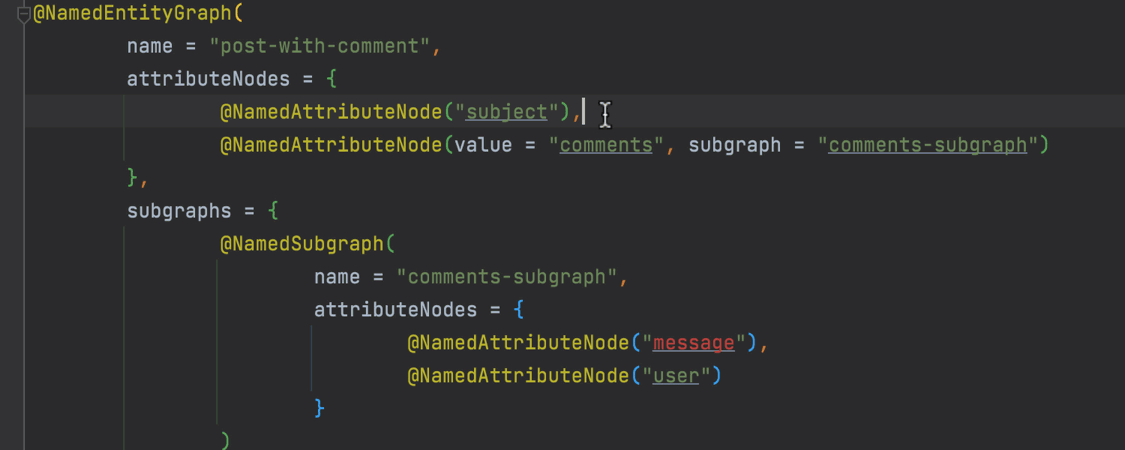
Support for JPA Entity Graph
Ultimate
In this version, we’ve introduced support for an
Entity Graph
which you can define with the annotation. Your IDE allows
you to specify a unique name and the attributes () for
this annotation using code completion, error detection, and navigation to the related
entity by clicking on an attribute.
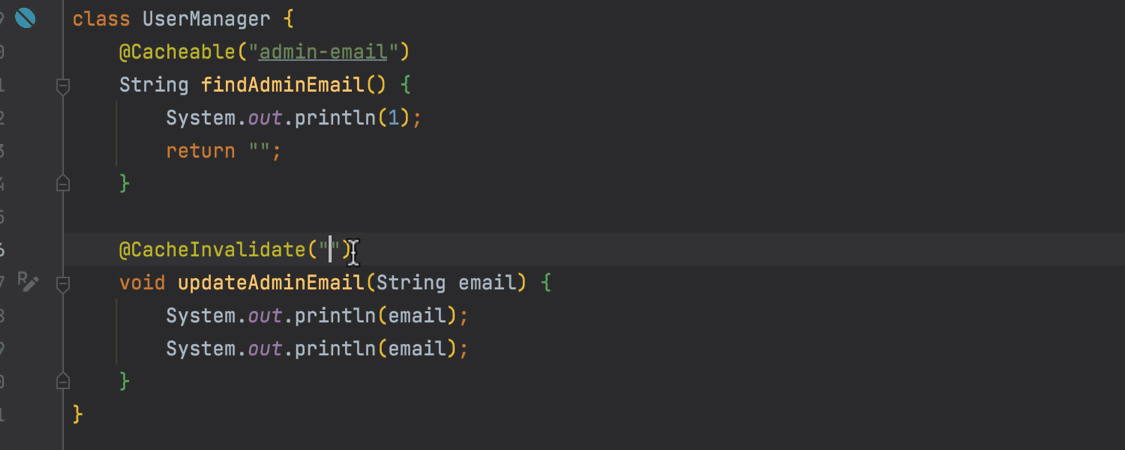
Support for cache annotations in Micronaut and Quarkus
Ultimate
Cache annotations for
Micronaut
and
Quarkus
are now supported in the IDE. We’ve added gutter navigation between cache name usages,
as well as the ability to use Find usages and the Rename refactoring for
cache identifiers.
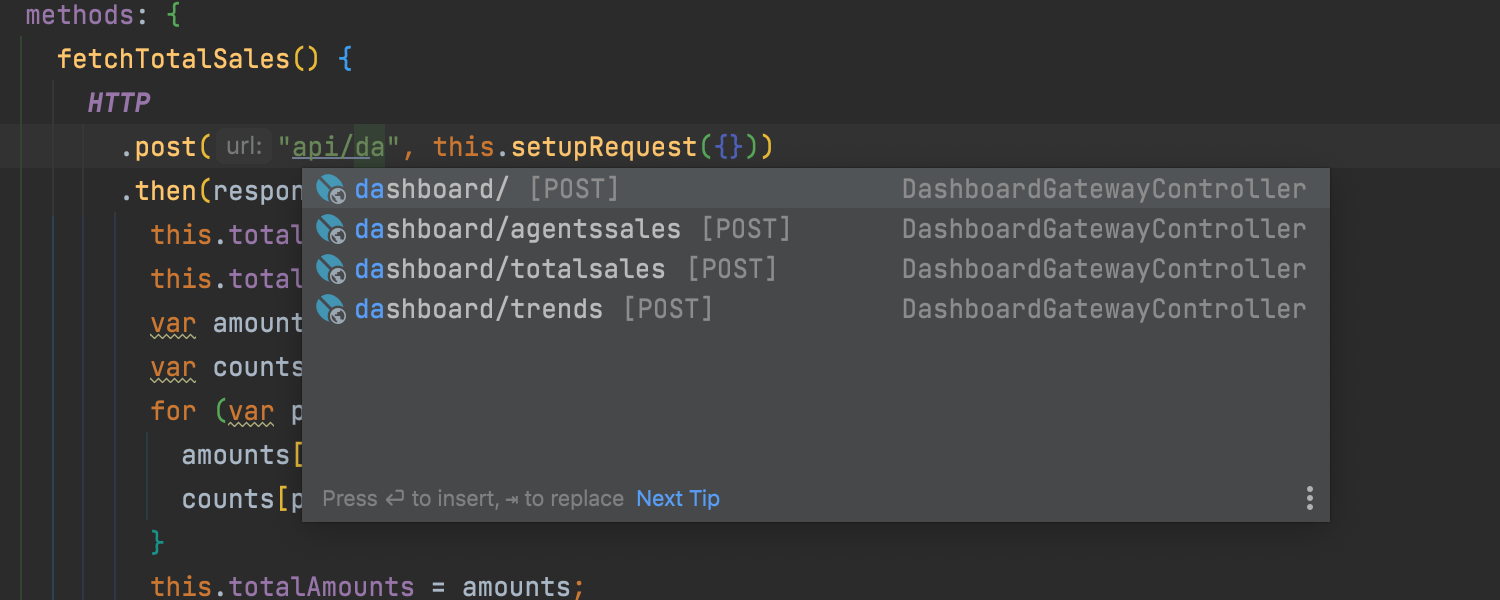
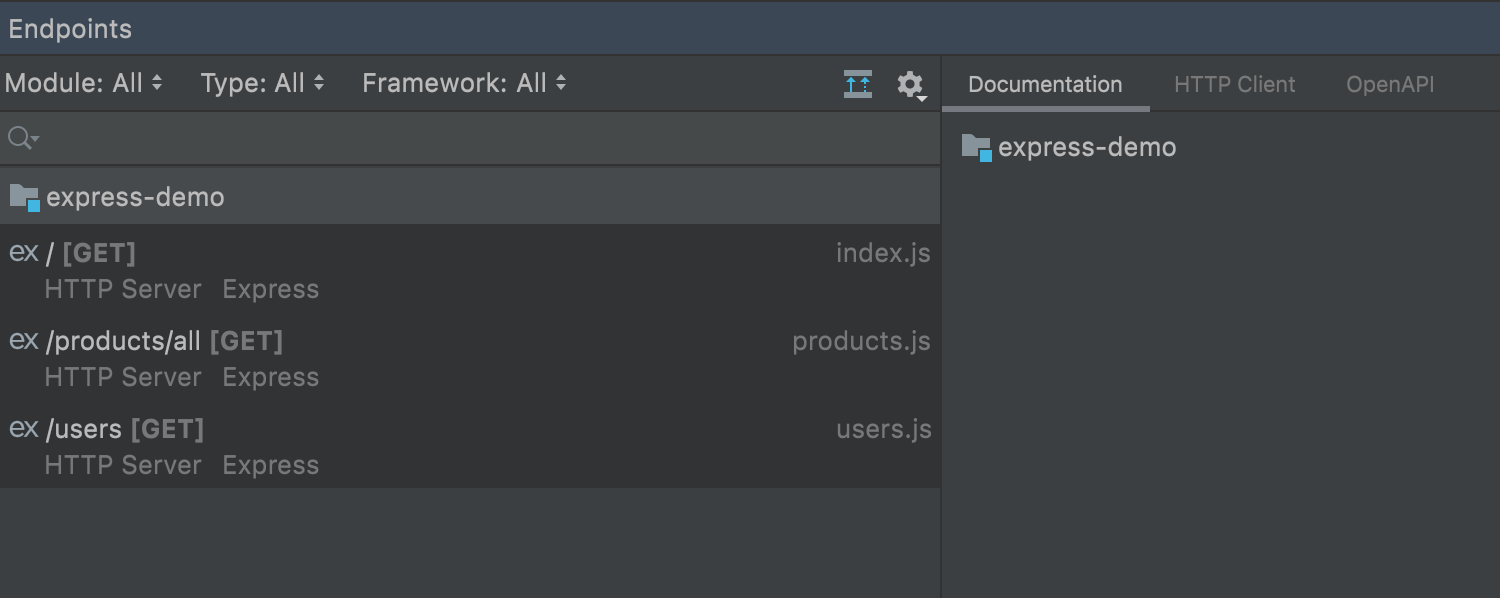
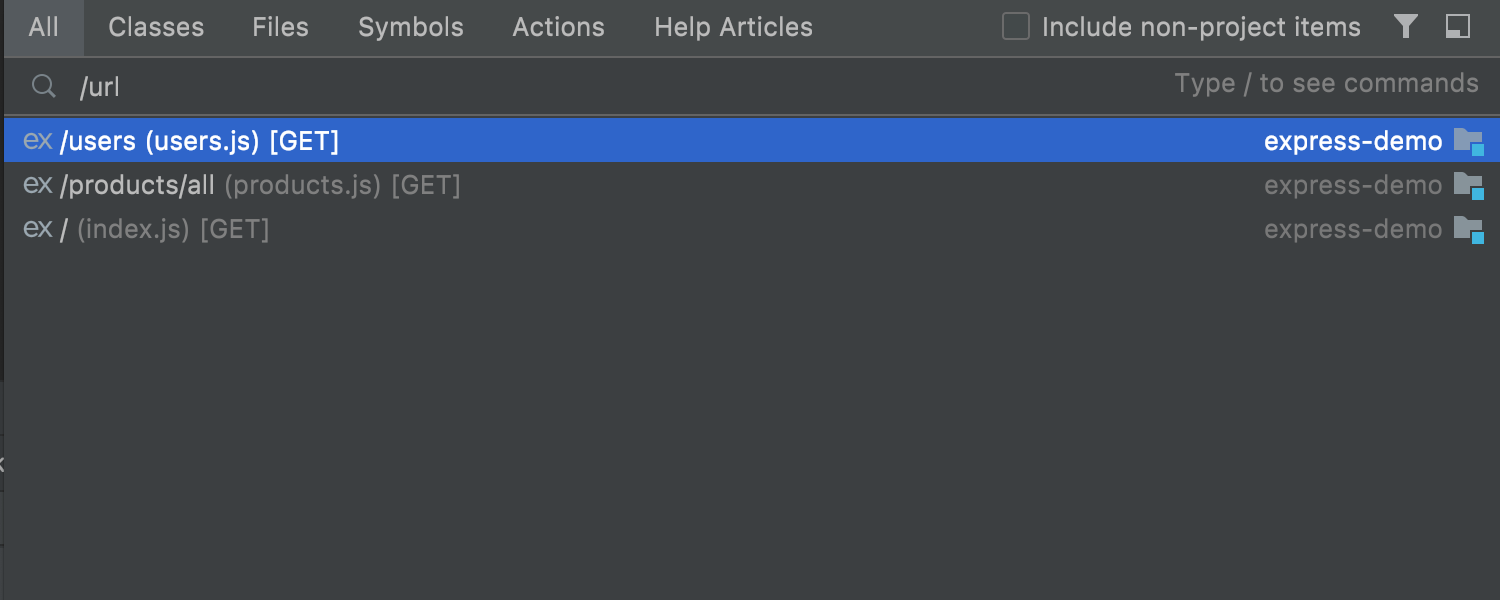
URL navigation in JavaScript and TypeScript has been significantly improved. For
client-side code (for Angular or Axios), URL references have been added for the
$http
service and
HttpClient
request method calls, and URL completion works based on available server-side frameworks
and OpenAPI specifications. For server-side, Express users can see Route handlers in the
Endpoints tool window and search for Express route declarations via
Navigate | URL Mapping.
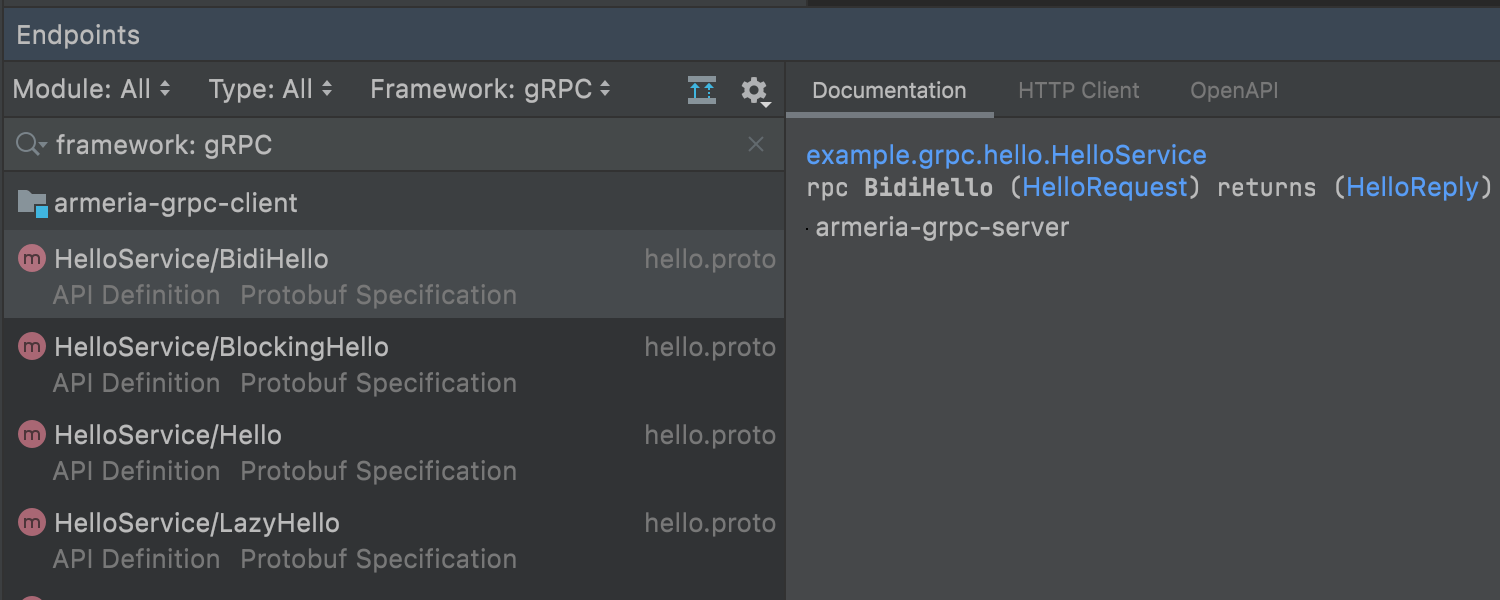
gRPC endpoints displayed in the Endpoints tool window
Ultimate
In this version, we’ve added support for yet another framework – gRPC. We are planning
to introduce more features for working with it. For now, it is possible to see the gRPC
endpoints in the Endpoints tool window. Stay tuned for more updates!
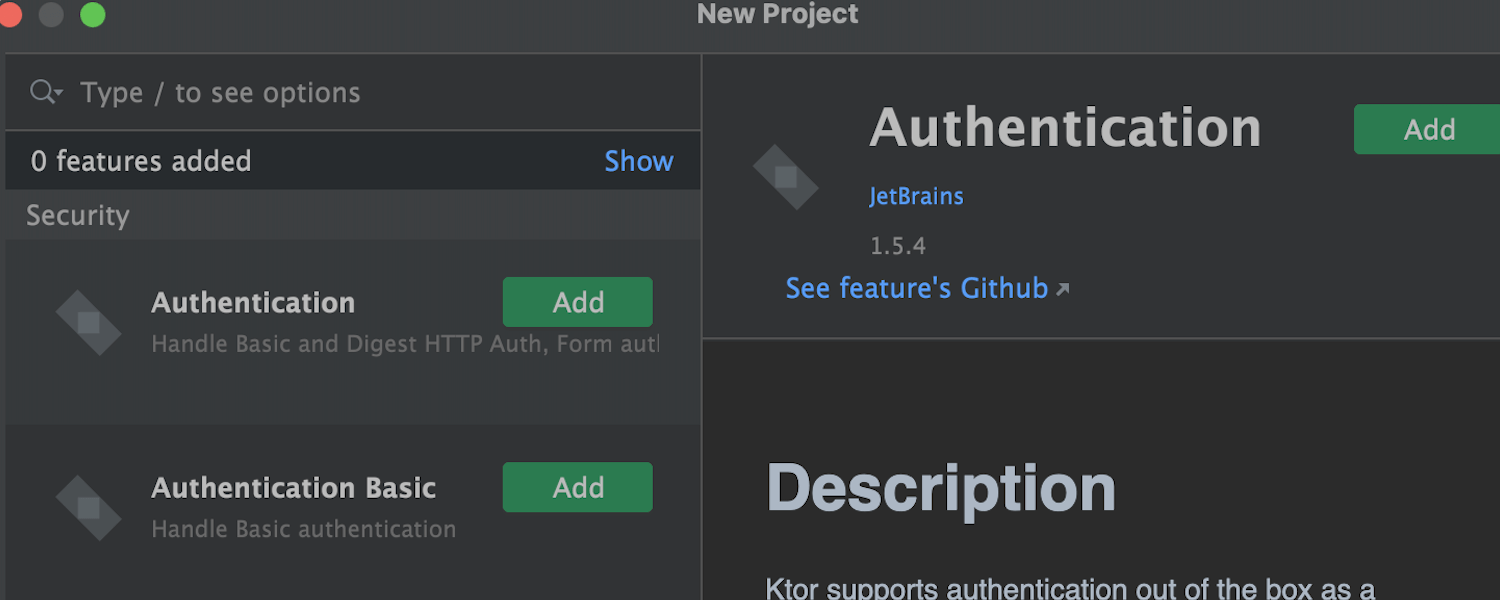
Ktor integration
Ultimate
Ktor,
a web application framework for creating connected systems, is bundled with IntelliJ
IDEA Ultimate. Right from the welcome screen, you can create a new Ktor project for
developing server-side or client-side applications and configure the basic project
settings and various features supported by Ktor.
Docker
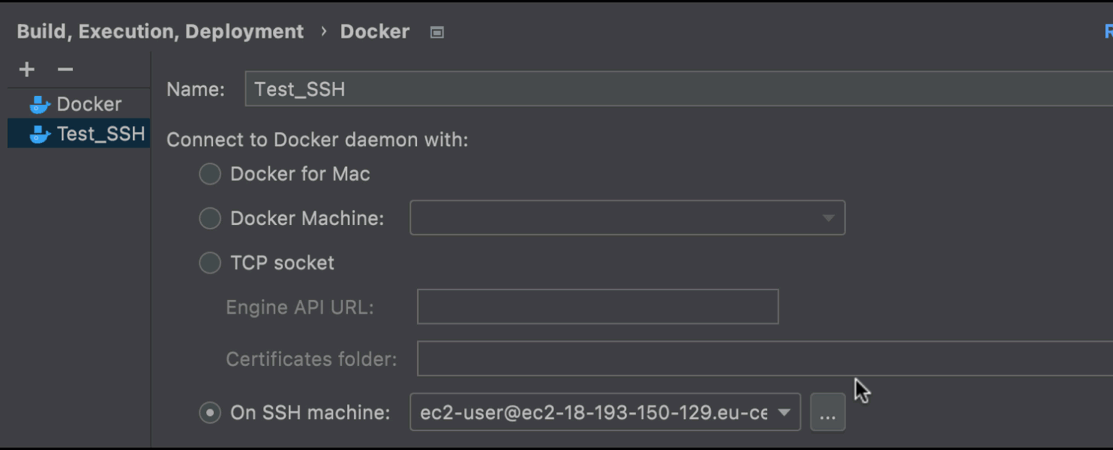
Work with Docker via SSH
It is possible to connect to Docker via SSH. To configure an SSH connection, go to
Preferences / Settings | Build, Execution, Deployment | Docker, click the
On SSH machine radio button, click …, and then enter the SSH connection
parameters in the window that appears.
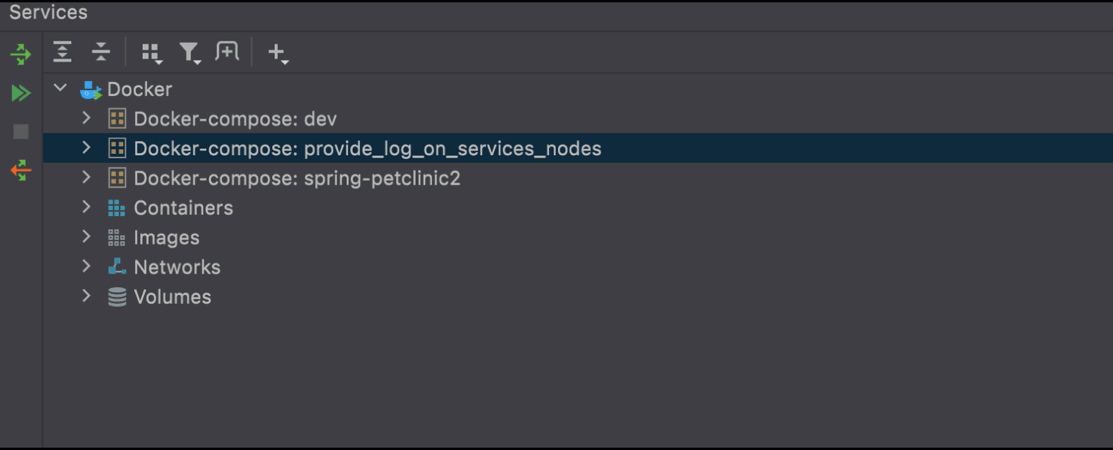
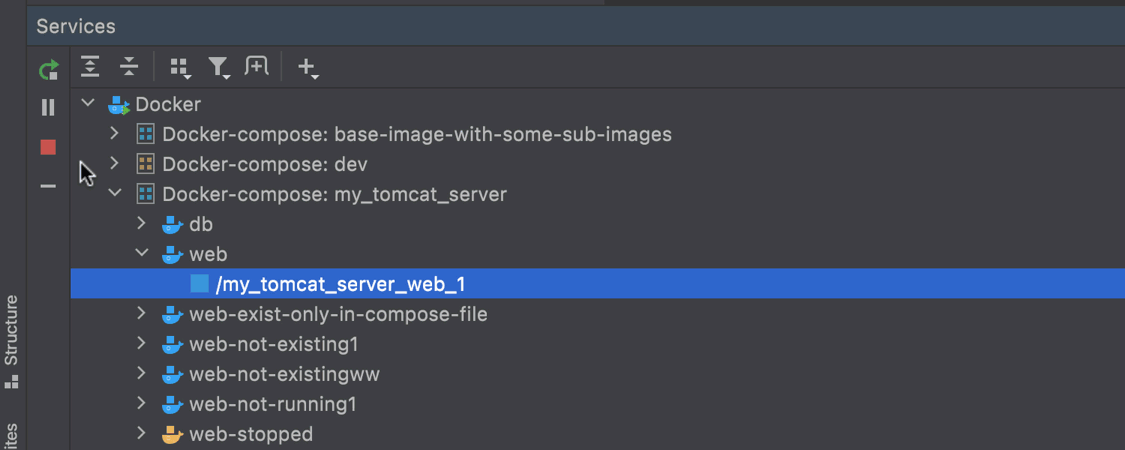
Services synchronization
It is possible to display Docker Compose applications in the Services tool window even
if they are not running. To do this, just click the cycle arrows icon in the editor window.
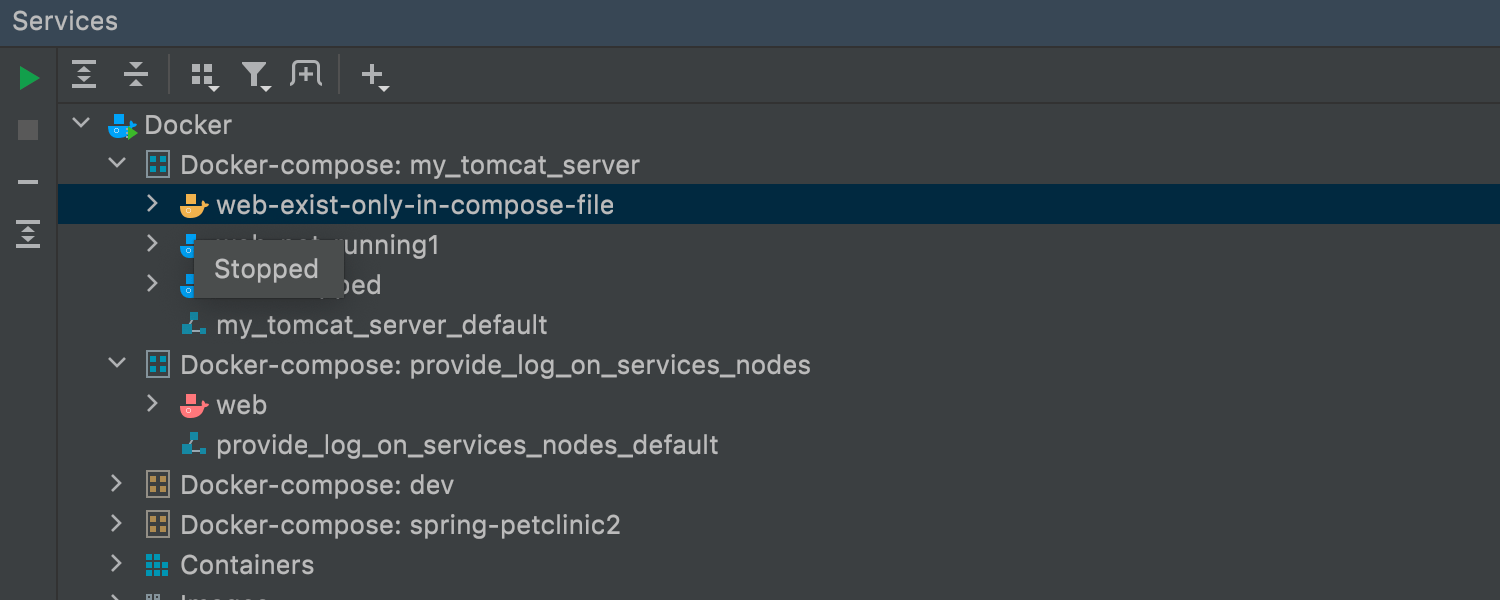
New icons for service states
We’ve implemented new icons for the different states of your Docker Compose services.
To get accustomed to them, you can read the tooltips that appear when you hover over
each icon.
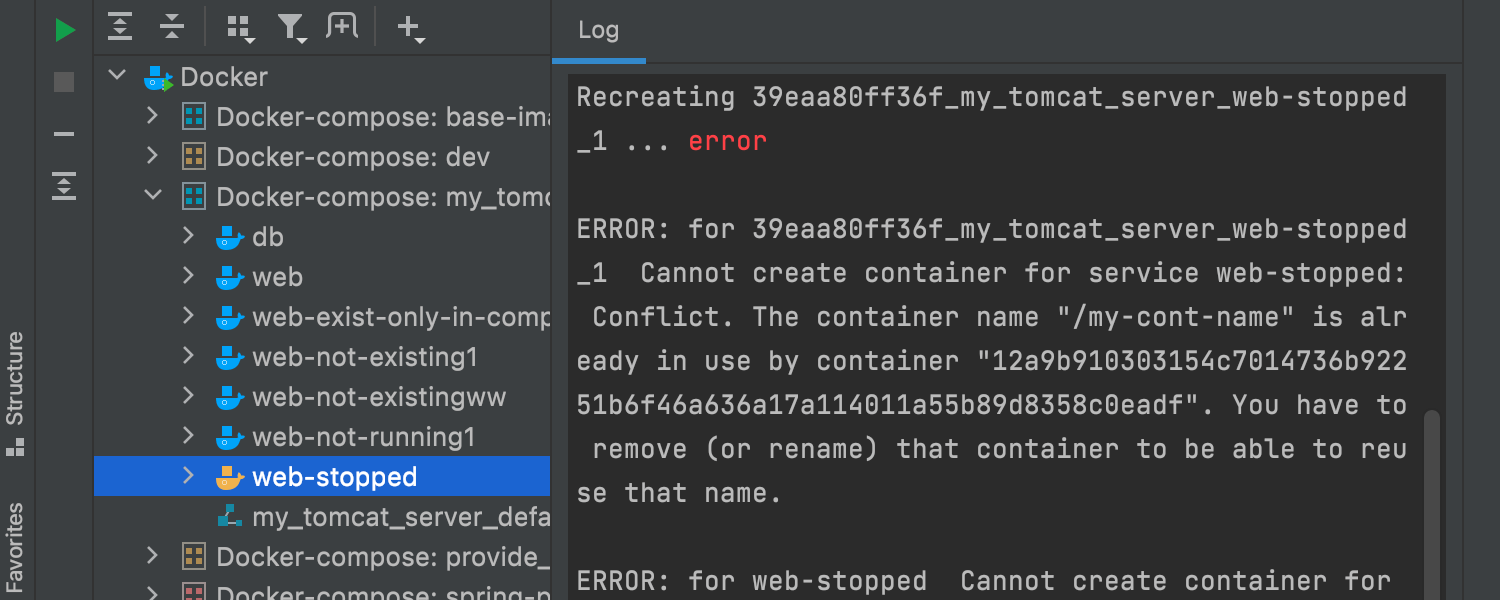
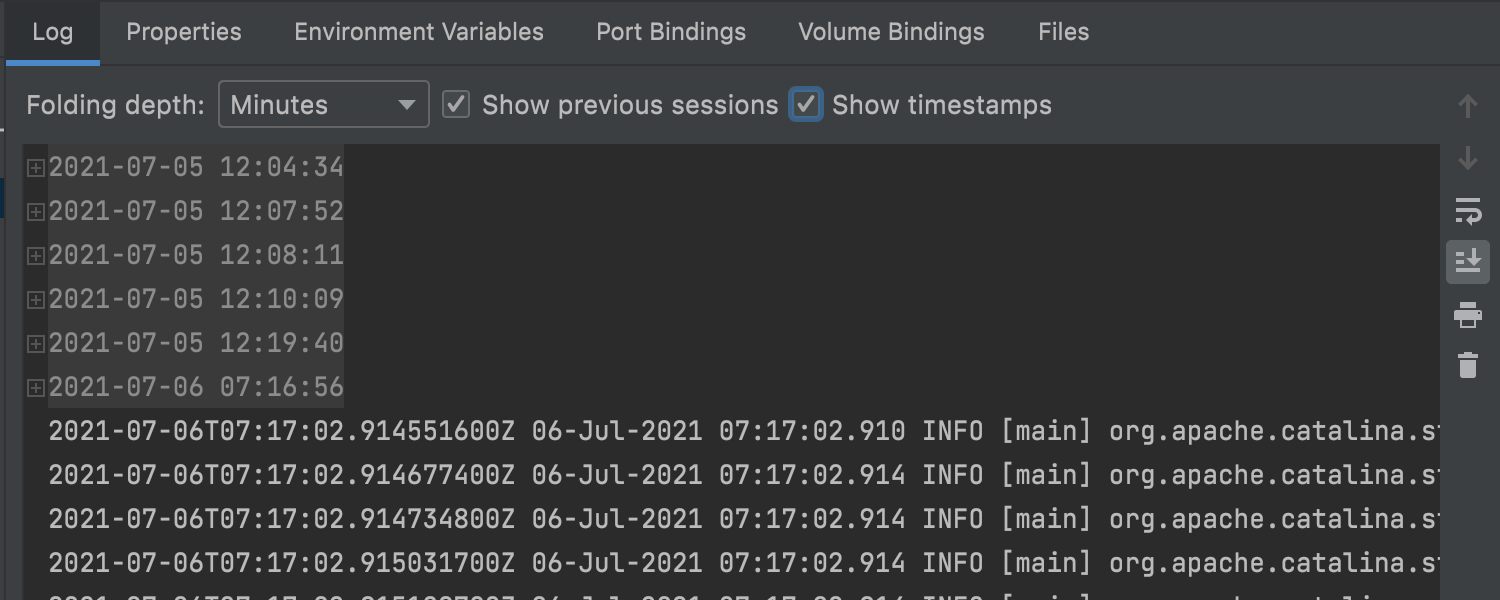
Improved logs
We’ve implemented some changes to the Docker Compose logs. Every service node features
a log, and the container logs include the option to show timestamps and previous sessions.
You can disable these options in
Preferences/Settings | Build, Execution, Deployment | Docker | Console by unticking
the Fold previous sessions in the Log console checkbox.
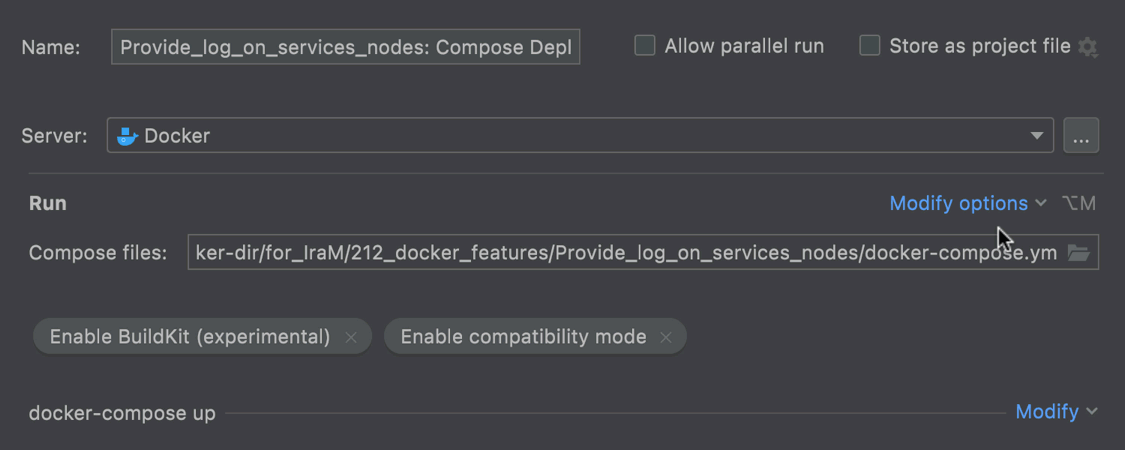
More options in Run/Debug Configurations
Additional options for Docker Compose are now available in Run/Debug Configurations.
You can Enable BuildKit, Enable compatibility mode, and
Specify project name when you click Modify options. When you name your
project, you can call it whatever you want, and it won’t inherit its name from the folder
that the Docker Compose application is located in by default.
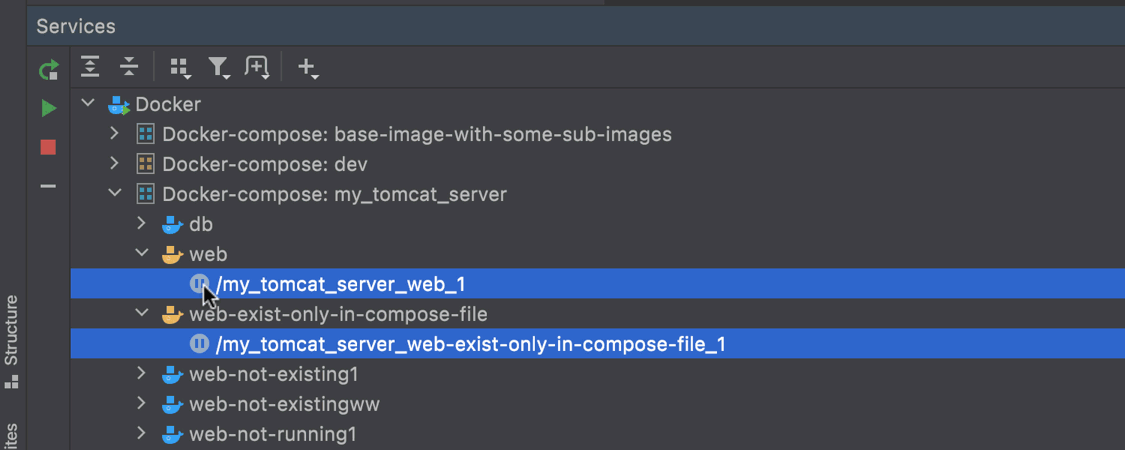
New actions for containers
Managing your Docker containers is now even easier thanks to the new buttons
that allow you to start, pause, unpause, and restart your containers. In addition to
this, you can apply the actions to several containers at once!
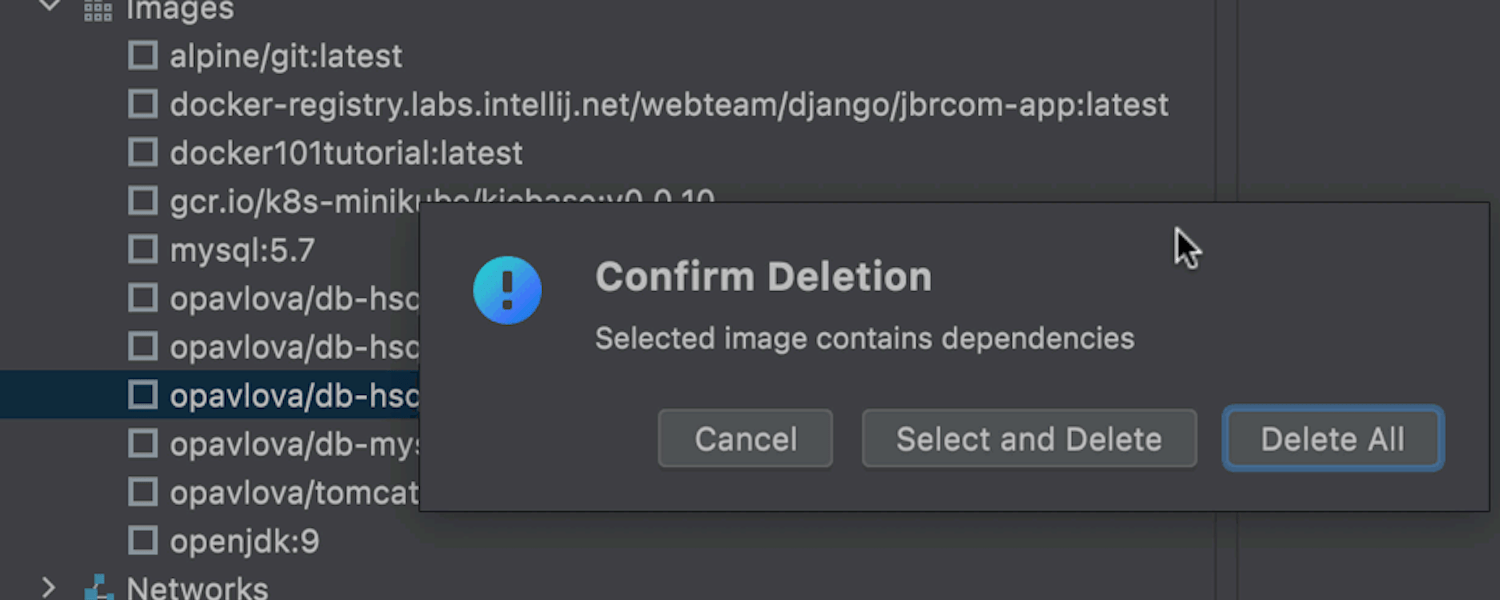
Smart way to delete images
When you delete Docker images with dependencies, you can specify which
dependencies you want to get rid of and which should stay.
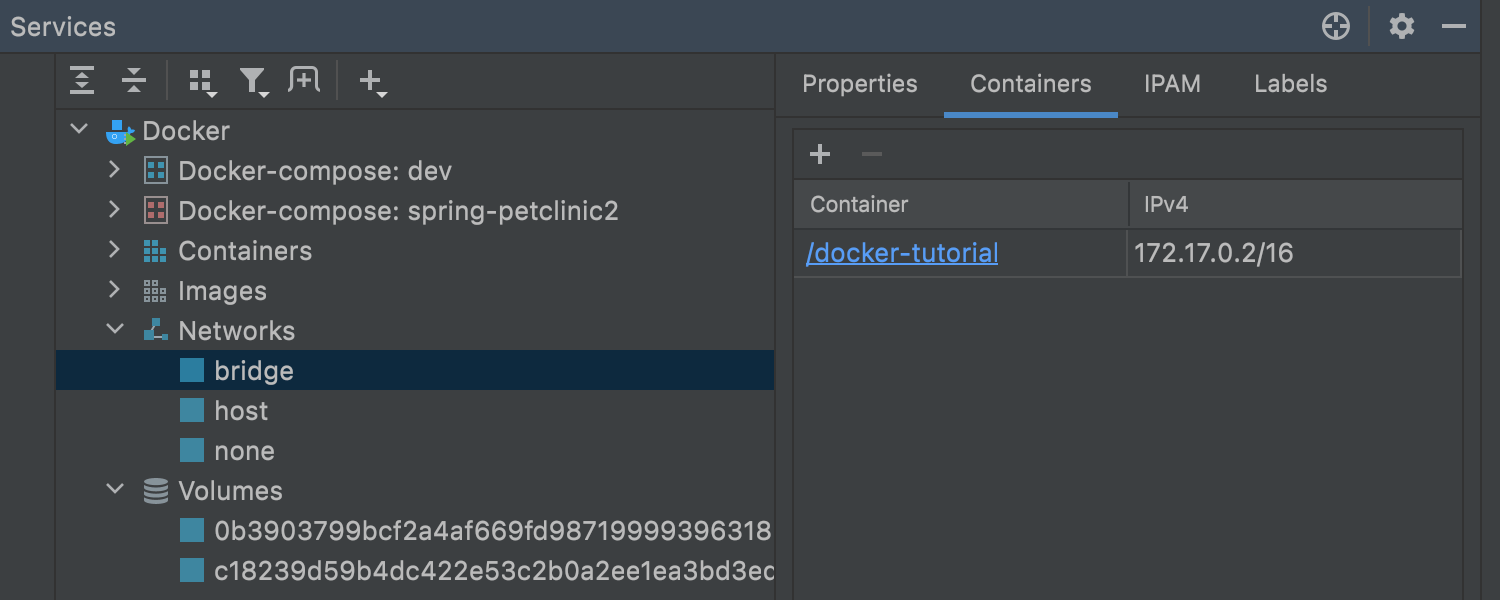
New Networks and Volumes nodes
We’ve added two new nodes to the Services tool window: Networks and
Volumes. The first node contains all the networks that are not related to the
Docker Compose application. The second includes all the
Docker Volumes. It is easy to delete volumes in the
same way as you would images, as described in the section above.
Database tools
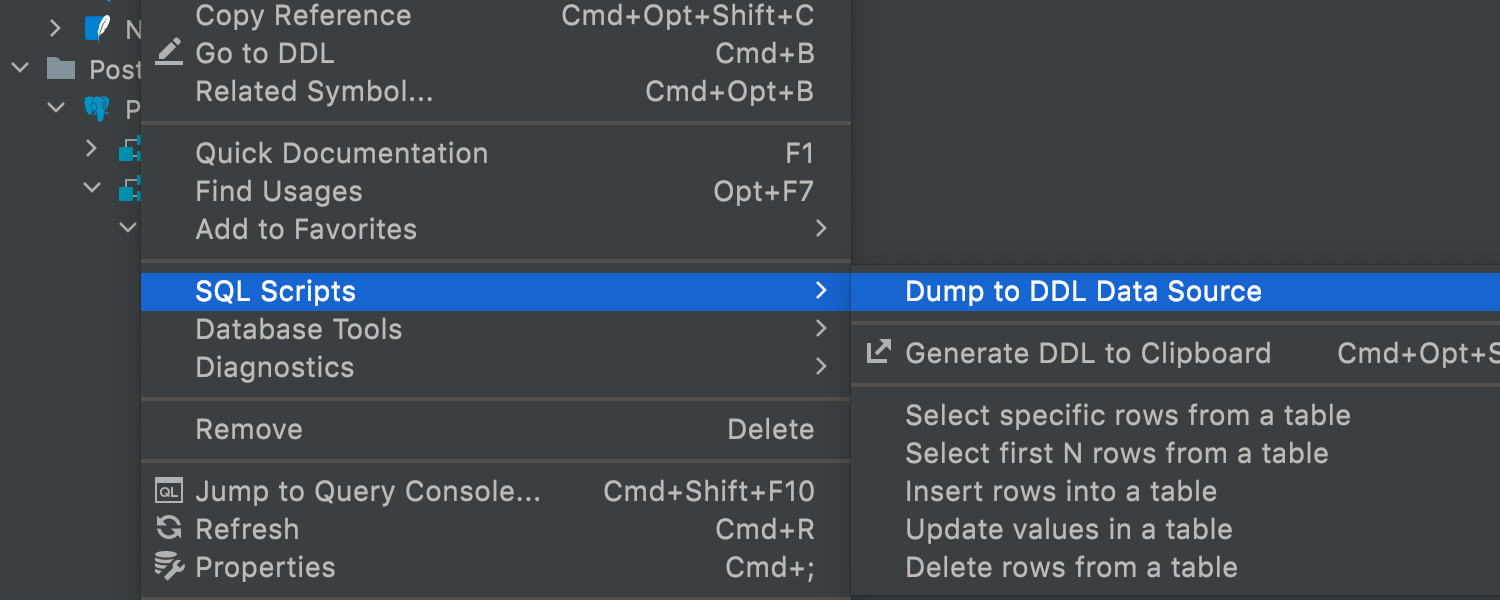
DDL data source
Ultimate
It is now possible to generate a DDL data source based on a real one. The DDL files
will be created on the disk and the new data source will be based on them. That way
you’ll always be able to regenerate these files and refresh the DDL data source.
Step-by-step instructions on how to apply this feature are available in our
blog post.

Managing the popping up of Services tool window
Ultimate
When a query returns no data, there’s no need for the Services tool window to
appear if it was hidden already. Now you can define which operations make the
Services tool window appear on your own in
Preferences / Settings | Tools | Database | General.
Kotlin
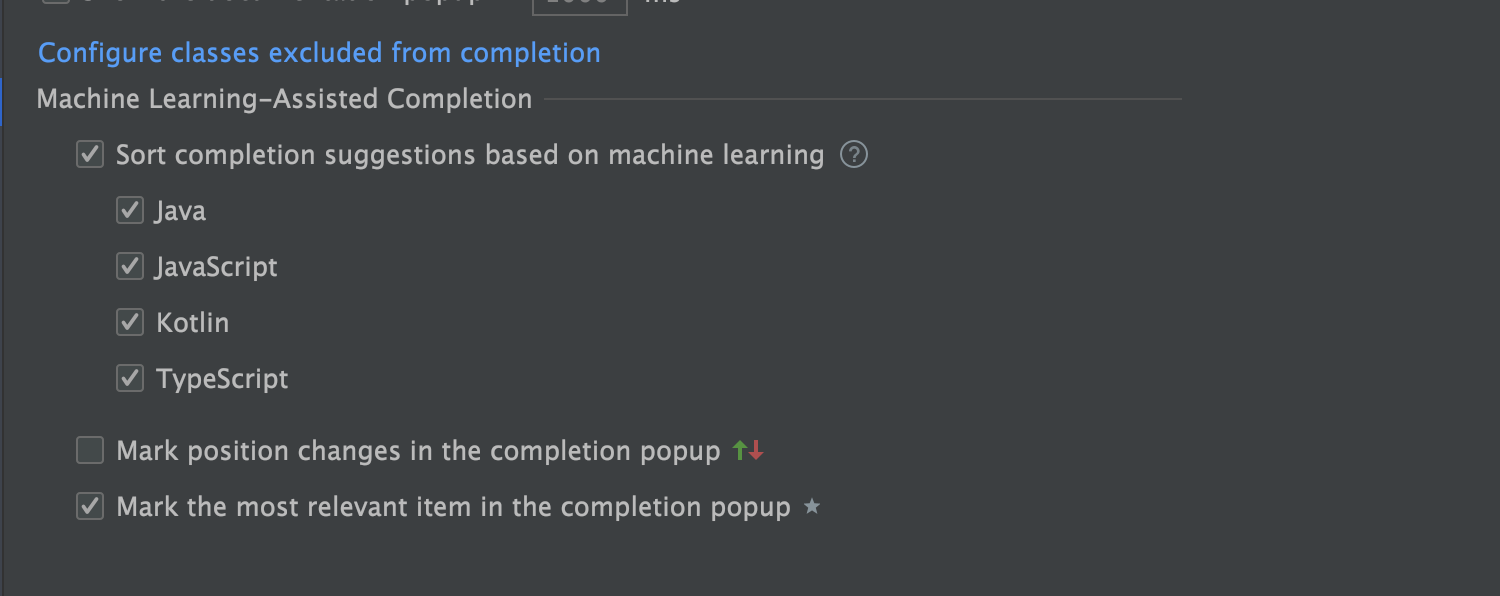
Automatic ML-completion
Starting from v2021.2, Kotlin code completion works based on the machine learning
mechanism by default. Code suggestions are prioritized more carefully as the IDE
relies on the choices of thousands of real users in similar situations. You can
configure ML-assisted completion in Preferences/Settings | Editor | Code Completion.

Run tests before code analysis finishes
Previously you had to wait for code analysis to finish before you could start running
your tests. In the current version, you can launch tests immediately after opening the
file by clicking the Run test icon in the gutter.
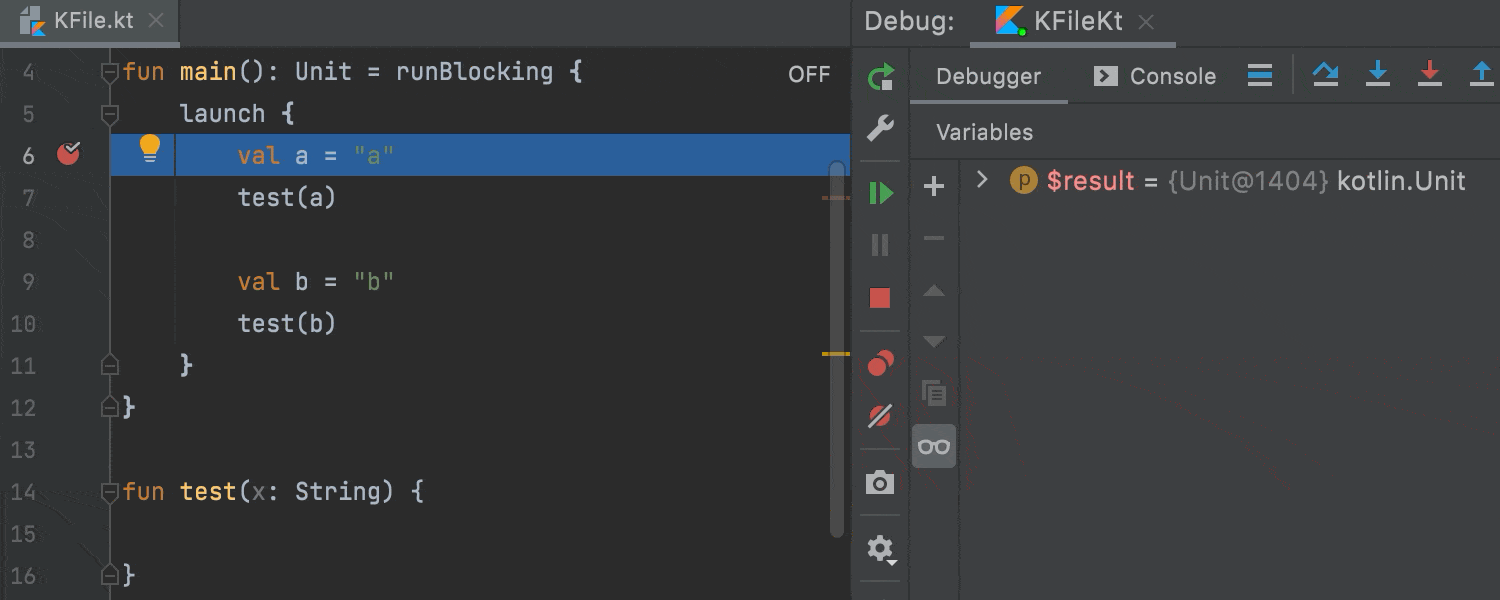
Debugger updates
We’ve introduced some useful improvements and updates to our coroutine agent in the
debugger. The coroutines agent is now available via the Coroutines tab in the
Debug tool window. It works for Java run configurations with a dependency on
kotlinx.coroutines, and Spring and Maven run configurations.
We’ve also fixed an issue when local variables were not used after passing a suspension
point and disappeared in the Variables view of the Debugger tool window.
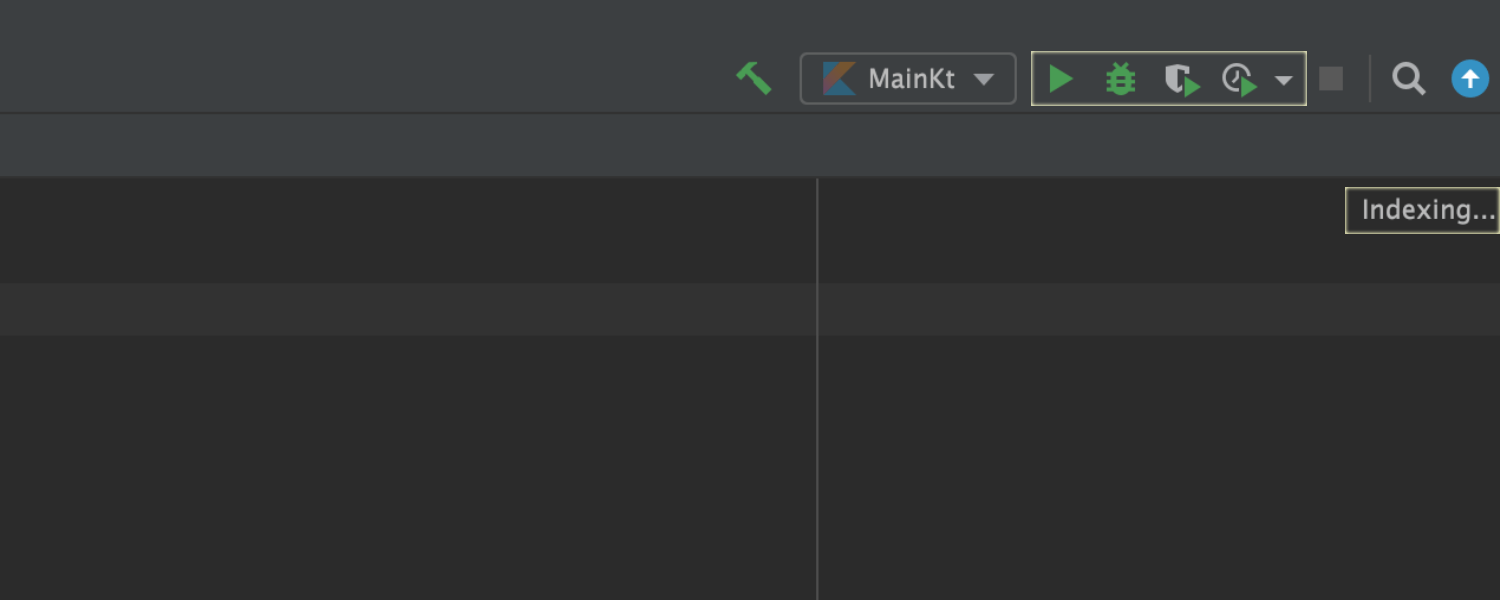
More room for action during indexing
Don’t waste another minute! While the IDE is indexing a project you can run and debug
your application. The buttons associated with Run/Debug Configuration are active
during indexing.
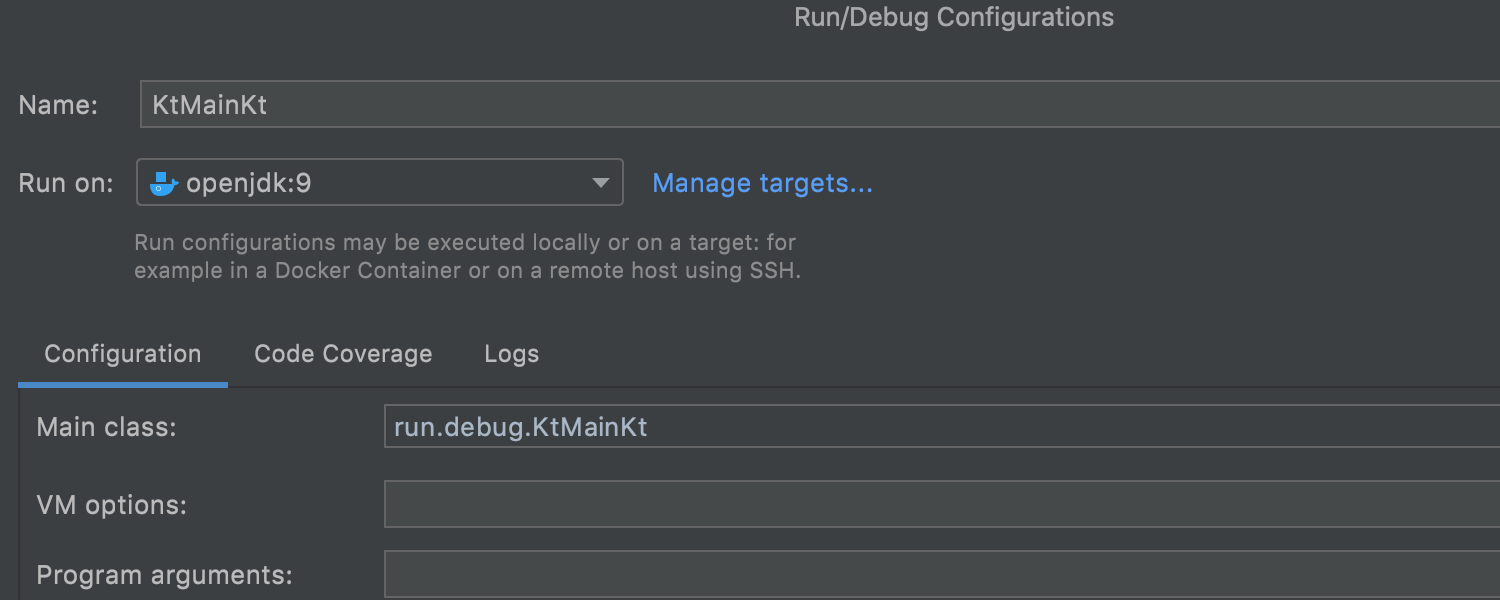
Kotlin support for WSL 2 and Run Targets
In IntelliJ IDEA 2021.1, we’ve introduced
support and the
Run Targets
feature. In v.2021.2, you can use these features for Kotlin.
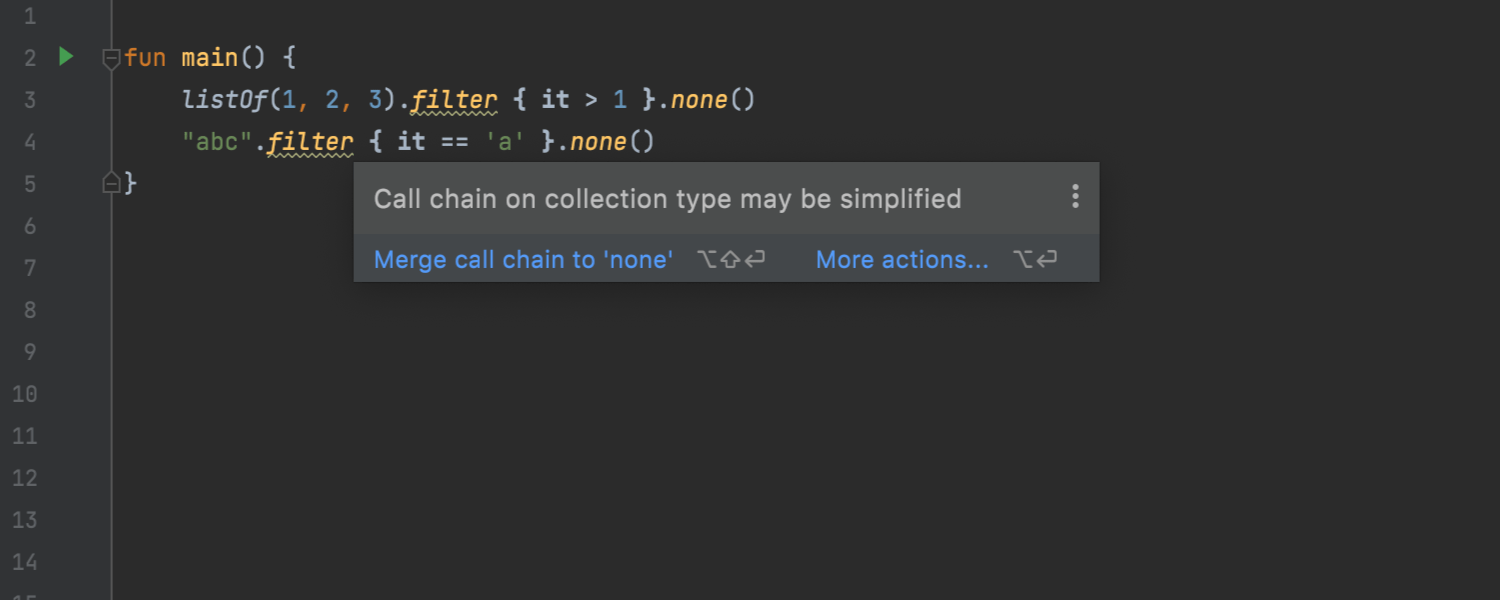
Inspection to simplify call chain on collection type
In this release, we’ve added a useful inspection that helps you simplify the syntax and
combine several calls into one when calling methods in a chain inside a collection.
Автоматическая сборка проектов на Gradle
В будущих уроках по изучению Kotlin мы будем использовать Gradle, чтобы мы могли использовать внешние библиотеки (зависимости) в наш проект.
Gradle является популярным инструментом в экосистеме Java для сборки и управления зависимостями. Это чрезвычайно мощный и универсальный инструмент для сборки, и его возможности выходят далеко за рамки данного курса.
Gradle используется в качестве системы сборки приложений на Android созданных с помощью Android Studio, которая, как упоминалось ранее, основана на IntelliJ IDEA.
Чтобы открыть Gradle проекты в уроке 23, выполните те же действия, что и для проектов на JVM Kotlin. Выберите File ▸ Open, затем переходите к корневой папке проекта и выбираете ее.
IntelliJ IDEA обнаружит, что проект основан на Gradle, а затем откроет и настроит проект соответствующим образом.
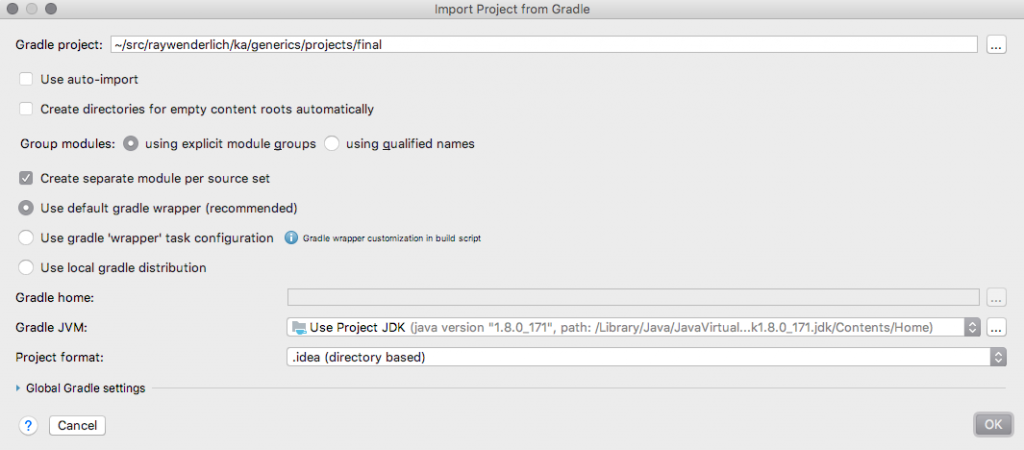
Скорее всего, вы сначала увидите диалоговое окно Import Project from Gradle, в котором вы можете принять значения по умолчанию и нажать OK:
Проект отрется и вы можете увидеть два уведомления в нижнем правом углу окна IntelliJ IDEA. В первом будет говориться, что нужно импортировать проекты Gradle (Gradle projects need to be imported):

Вы можете выбрать Import Changes и продолжить.
В другом уведомлении может говориться, что плагин Kotlin, который был установлен в IntelliJ IDEA, является более новым, чем тот, который был сконфигурирован с проектом:
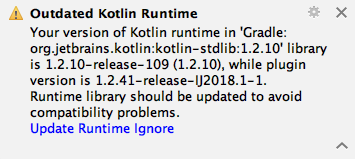
Если плагин Kotlin новее, чем тот, что в проекте, вы можете просто закрыть уведомление. Если кликнуть на Update Runtime, вам сообщать, что автоматические обновления недоступны, но вы можете проигнорировать это сообщение.
Space integration
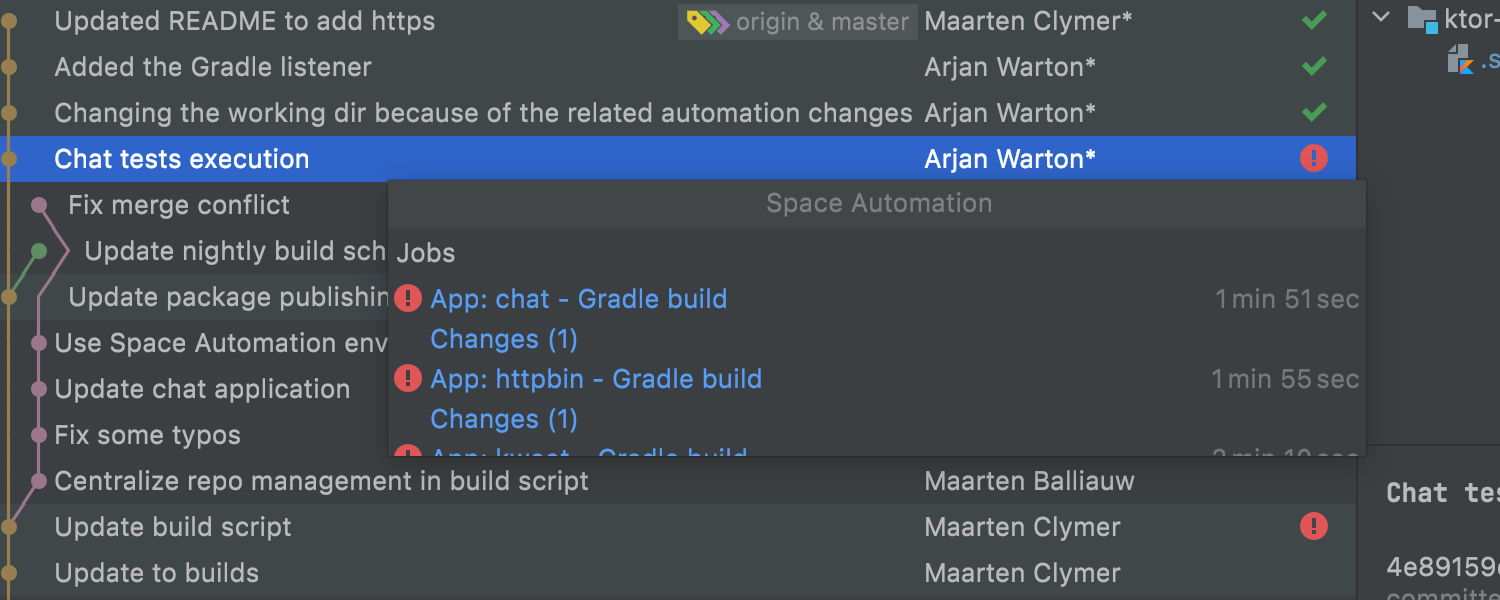
Space job statuses in the Git log
It is easy to track a job’s progress by just looking at the commits list, as we’ve
introduced icons for Space job statuses in the Log tab of the Git tool window. If
you click on an icon, the IDE will open a popup with the automation info for that job.
If you don’t need the status information, click the eye icon above the log and
select Show Columns | Space Automation.
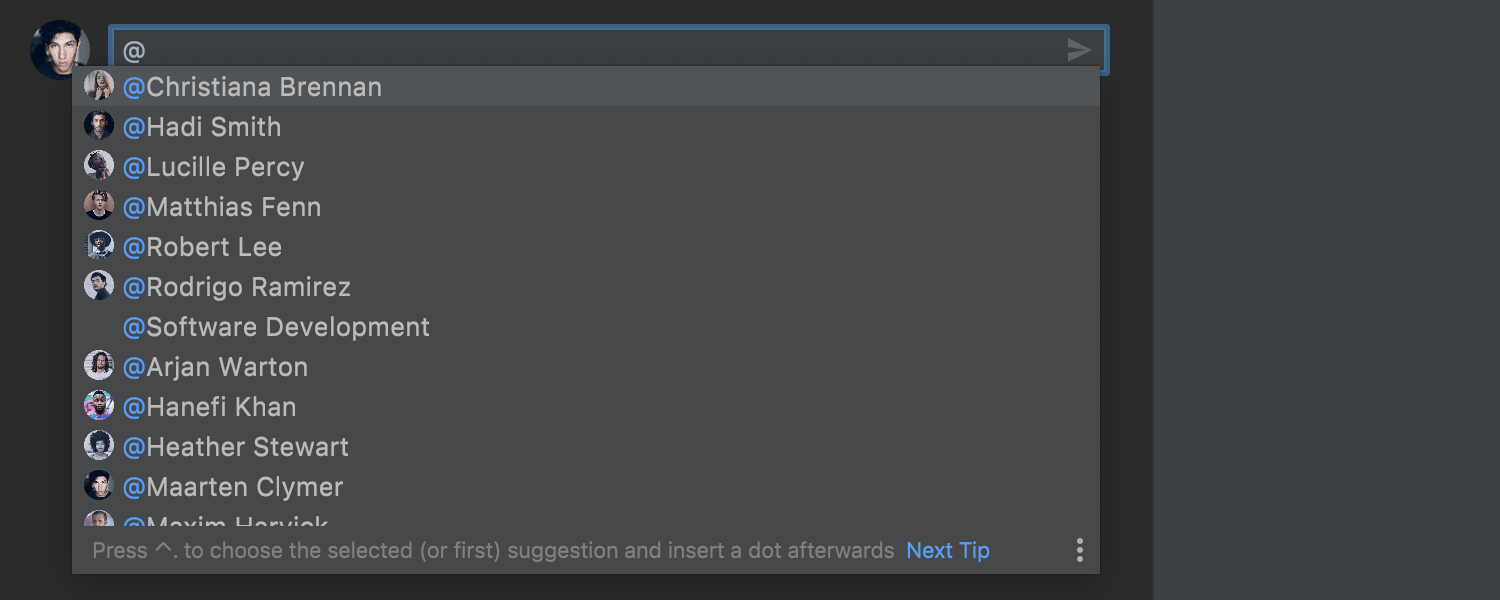
Mention teammates
It is now more convenient to communicate with teammates in Space code reviews, as you
can mention them with @ followed by the colleague’s name. This minor but helpful feature
works in the timeline and in code comments.
Profiler
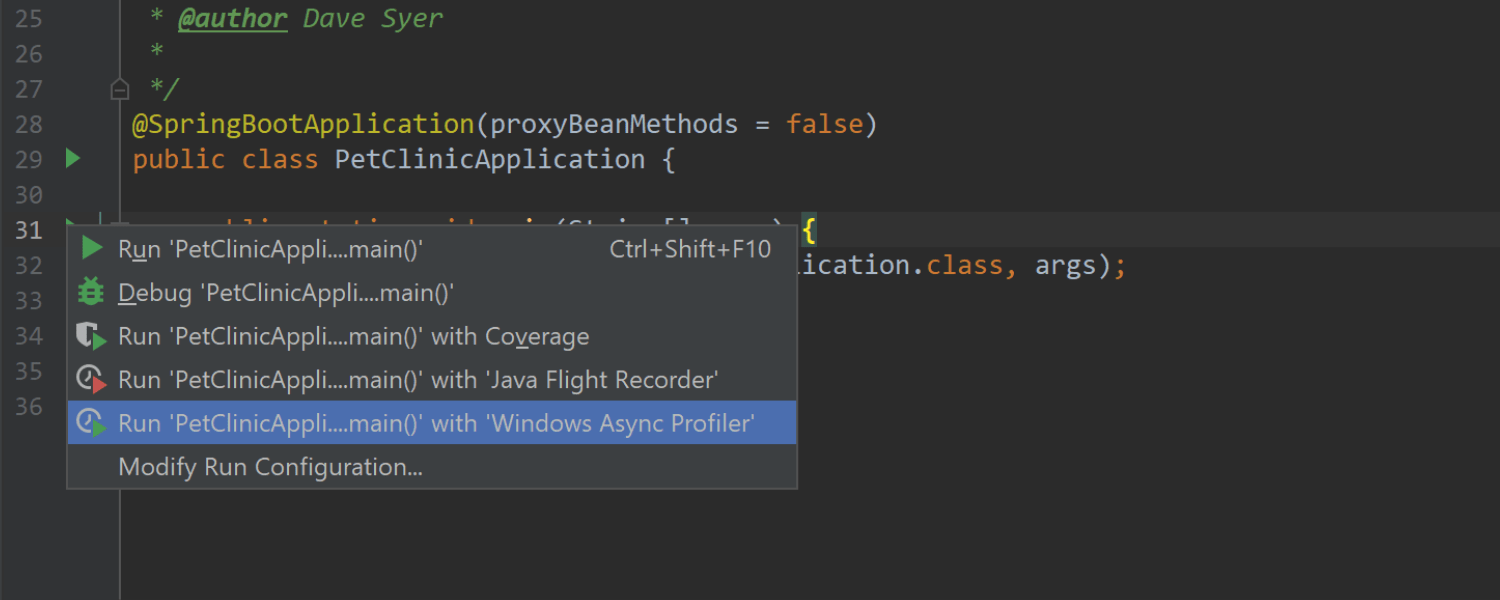
Support for Async profiler on Windows and Apple M1
Ultimate
Async Profiler is the profiling tool of choice for many developers because of its
accuracy and reliability. IntelliJ IDEA now fully supports the profiler on Windows
and Apple M1, in addition to Linux and non-M1 macOS, which means you can now use it
in most environments.
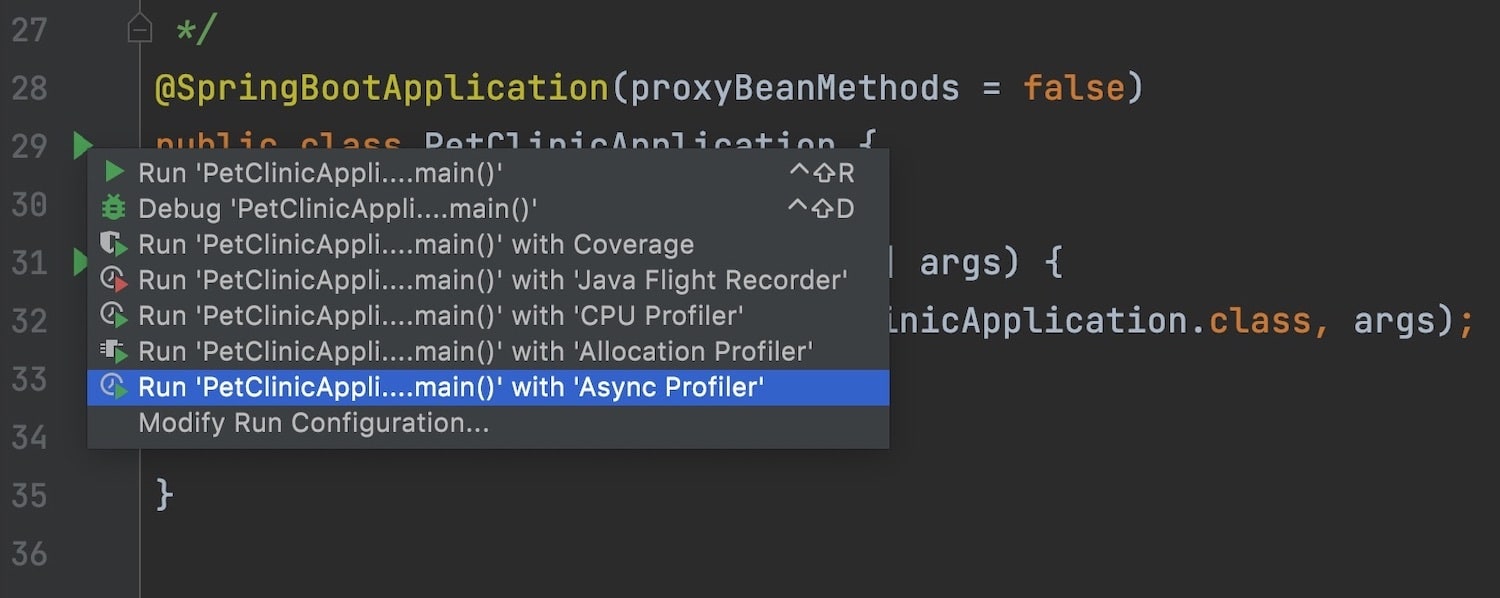
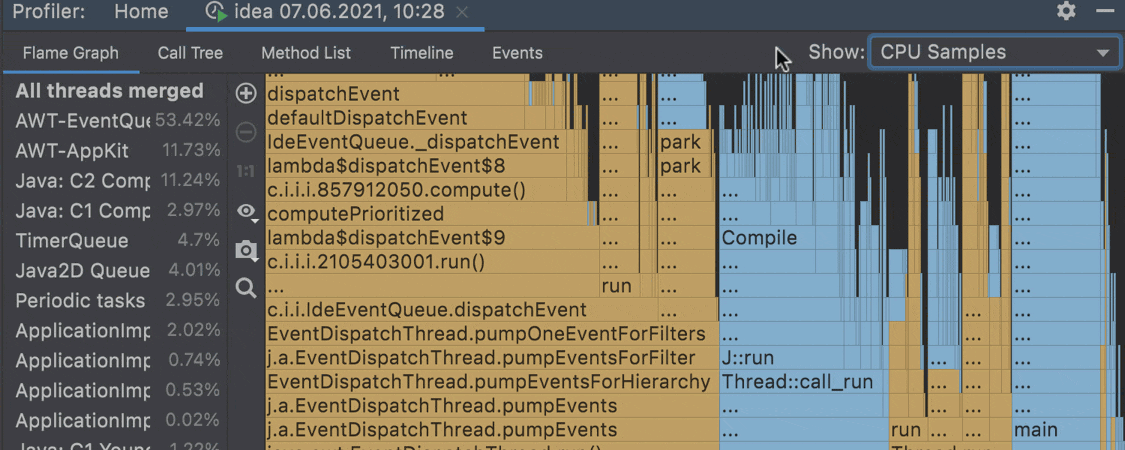
Support for Async profiler 2.0
Ultimate
IntelliJ IDEA has support for Async Profiler 2.0. It works via the new Async Profiler
configuration, combining the power of the CPU and Allocation profilers. In the
Flame Graph, Call Tree, and Method List tabs, the new Show
dropdown list lets you choose whether you want to be shown CPU samples or memory
allocations. The Timeline displays both of them. You can filter what to show by using
the controller in the top right-hand corner.
Install as a snap package on Linux
You can install IntelliJ IDEA as a self-contained snap package. Since snaps update automatically, your IntelliJ IDEA installation will always be up to date.
IntelliJ IDEA is distributed via two channels:
-
The stable channel includes only stable versions. To install the latest stable release of IntelliJ IDEA, run the following command:
sudo snap install intellij-idea-ultimate —classic
sudo snap install intellij-idea-educational —classic
sudo snap install intellij-idea-community —classic
The option is required because the IntelliJ IDEA snap requires full access to the system, like a traditionally packaged application.
-
The edge channel includes EAP builds. To install the latest EAP build of IntelliJ IDEA, run the following command:
sudo snap install intellij-idea-ultimate —classic —edge
sudo snap install intellij-idea-educational —classic —edge
sudo snap install intellij-idea-community —classic —edge
When the snap is installed, you can launch it by running the , , or command.
To list all installed snaps, you can run . For information about other snap commands, see the Snapcraft documentation.
Version control
IntelliJ IDEA supports the most popular version control systems, like Git, Subversion, Mercurial,
and Perforce, out of the box. You can clone a project from a VCS right from the Welcome screen,
examine the differences between two revisions, manage branches, commit and push changes, merge
conflicts, review the history, and more. For more details, watch this
overview
of the key VCS functionality in IntelliJ IDEA.

Git support
IntelliJ IDEA offers Git integration that lets you clone projects from Git, commit and
push changes, work with several branches, manage changelists, and stage updates before
committing them. In IntelliJ IDEA, you can access the history of the entire project and
of individual folders and files using the Log tab in the Git tool window,
or by using the respective History views. In the editor, it is possible to annotate
files with historical data as
git blame
does.

GitHub support
You can manage Git projects hosted on the GitHub platform right from IntelliJ IDEA.
It is possible to clone repositories, share projects, and share code through gists.
What’s more, IntelliJ IDEA supports creating, merging, and viewing pull requests. Watch
our video
to learn more about working with GitHub pull requests.
Пример программы на Kotlin!
В данном уроке мы просто напишем в редакторе код на Kotlin и запустим его, для чего необязательно разбирать все его части. Каждый элемент кода будет подробнее разобран в дальнейшем. Если у вас есть опыт программирования в Java, Swift или Python, вы быстро вникните в ход дела.
В панели редактора Editor файла hello.kt введите следующий код в точности, как он записан далее:
Java
fun main() {
println(«Hello, Kotlin!»)
}
|
1 2 3 |
fun main(){ println(«Hello, Kotlin!») } |
Мы написали функцию Kotlin под названием и добавили одну строку кода к функции внутри фигурных скобок, которая затем вызывает функцию под названием . Программа выводит на экран текст “Hello, Kotlin!”. Подробнее о том как работают функции будем рассматривать в будущих уроках.
Есть несколько способов запустить этот код, в том числе с помощью меню в IntelliJ IDEA, панель инструментов или через определенные комбинации клавиш.
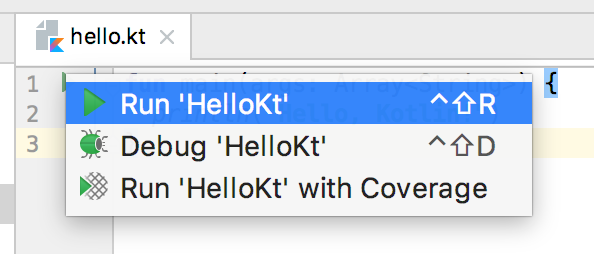
Самый простой способ запустить код — нажать маленькую зеленую кнопку Run/Play слева от функции на панели редактора.
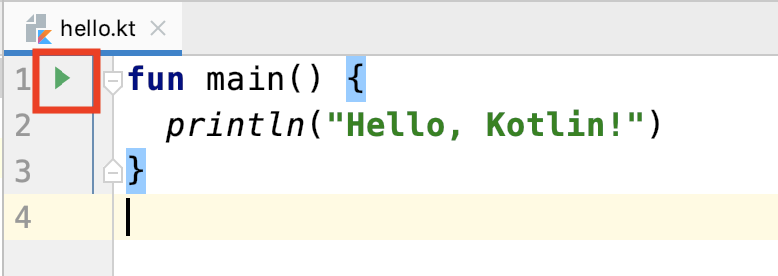
Нажмите на зеленую кнопку Run, после этого откроется меню. Выберите пункт Run ‘HelloKt’.
После этого компилятор Kotlin сделает парсинг кода, преобразует его в байт-код и затем запустит его на локальной JVM.
После этого в нижней части окна IntelliJ IDEA откроется панель для запуска Run, которую иногда называются консолью.
Вы увидите результат выполнения программы на панели Run — в данном случае это текст, который нужно отобразить на экране.
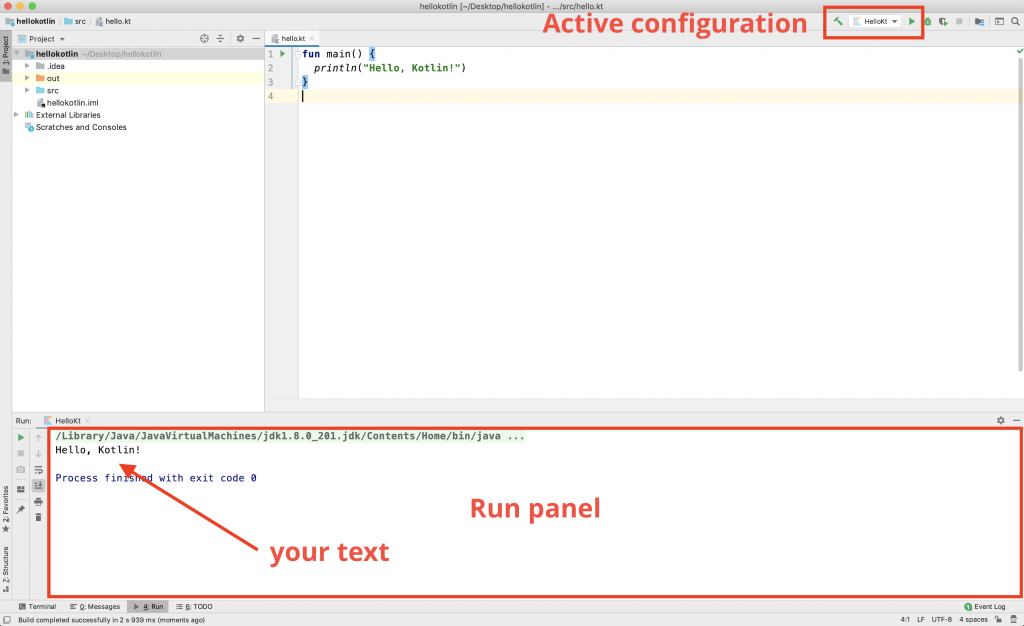
После первого запуска кода на панели инструментов появится активная конфигурация, и вы можете запустить код, нажав на зеленую кнопку Run на панели инструментов.
Неплохо! Вы создали свои первый Kotlin проект и запустили первую программу на Kotlin!
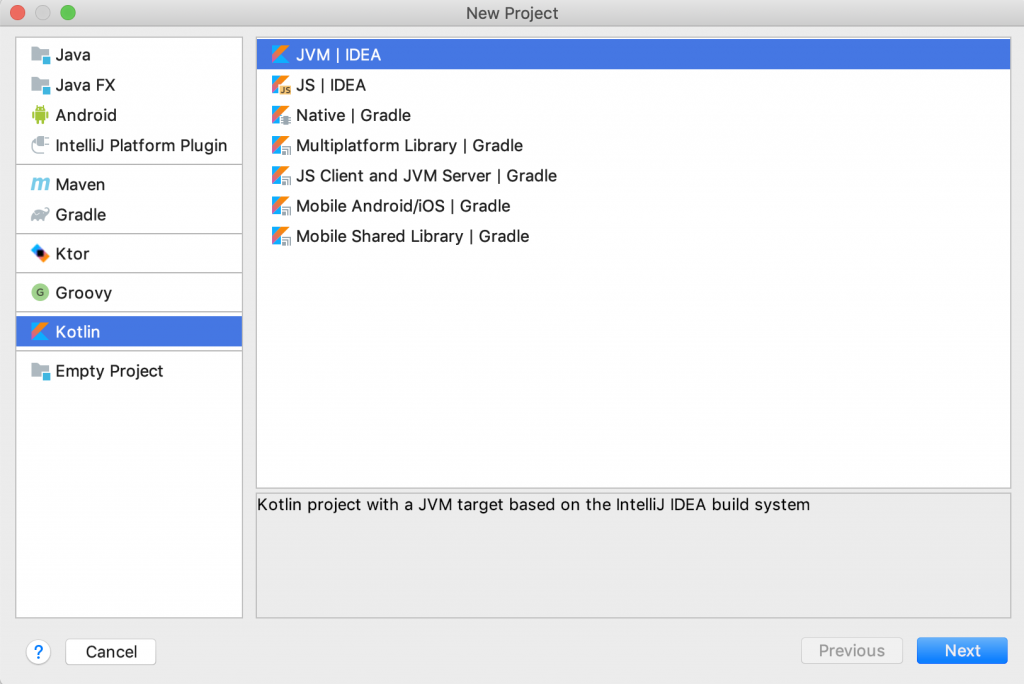
Создание простого проекта на Kotlin
В приветственном окне выберите пункт Create New Project. Вы увидите первый экран конфигурации.
Выберите Kotlin из списка опций слева, Kotlin JVM в качестве типа проекта и нажмите Next.
Вы должны увидеть следующее:
Затем вы увидите экран для проекта с названием и местом хранения файлов. Вы также увидите Project SDK, который должен быть установленной ранее версией JDK — или другой версией JDK, если у вас на ПК установлено более одной версии.
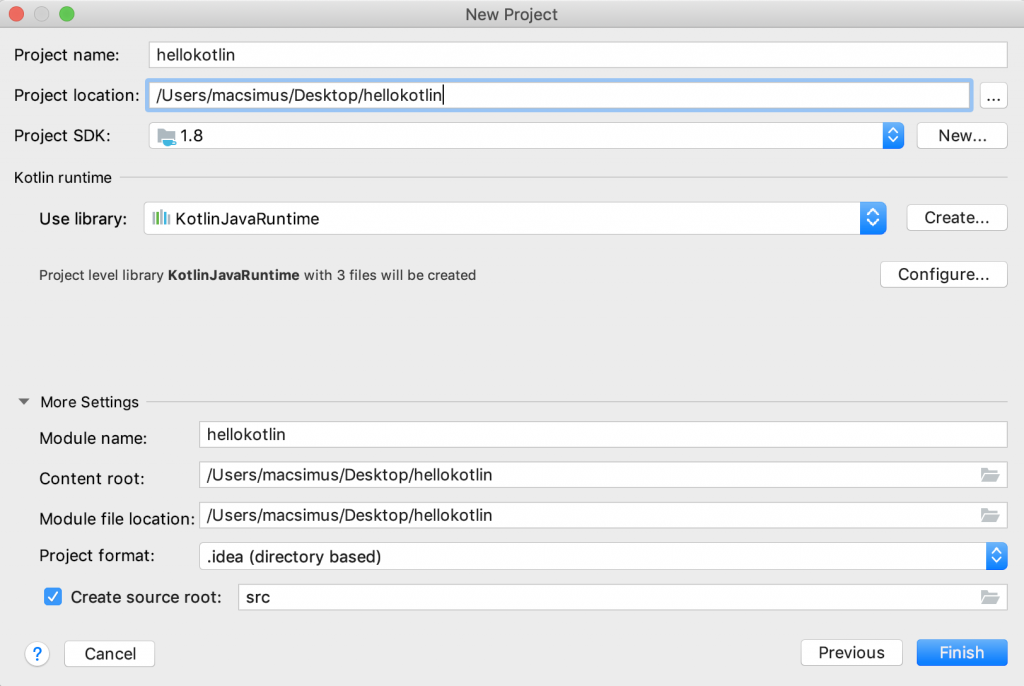
Введите hellokotlin для названия проекта, выберите место для проекта или просто оставьте значения по умолчанию. Ничего больше не указывайте и нажмите Finish.
IntelliJ IDEA создает и конфигурирует ваш проект.
По завершении вы попадете в окно Tip of the Day, или Совет дня, в котором каждый раз при открытии приложения показываются полезные советы по IntelliJ IDEA.
Вы должны увидеть следующее:
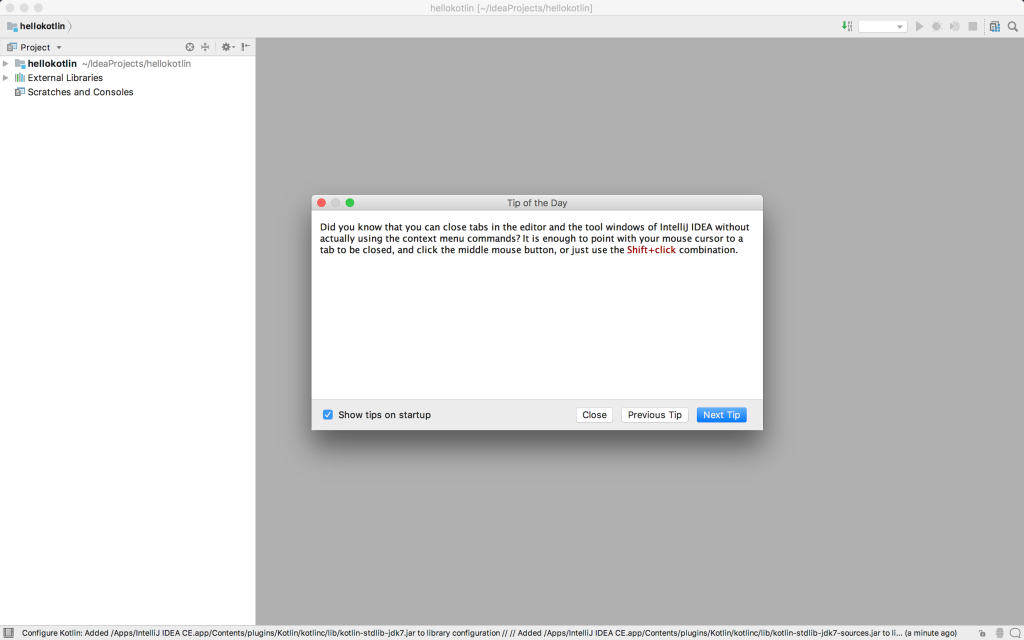
Закройте окно подсказки и проверьте панель Project слева от главного окна IntelliJ IDEA. На панели Project можно управлять всеми файлами, связанными с проектом, например файлами исходного кода Kotlin, у которых расширение .kt.
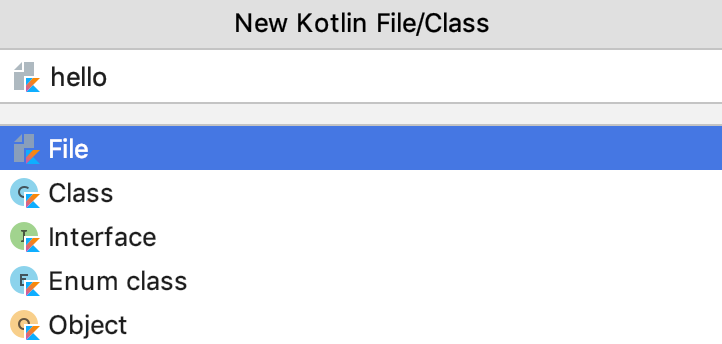
Кликните на стрелку рядом с hellokotlin, чтобы открыть его содержимое, и вы увидите папку src для проекта. Щелкните правой кнопкой мыши на папку src и выберите New ▸ Kotlin File/Class.
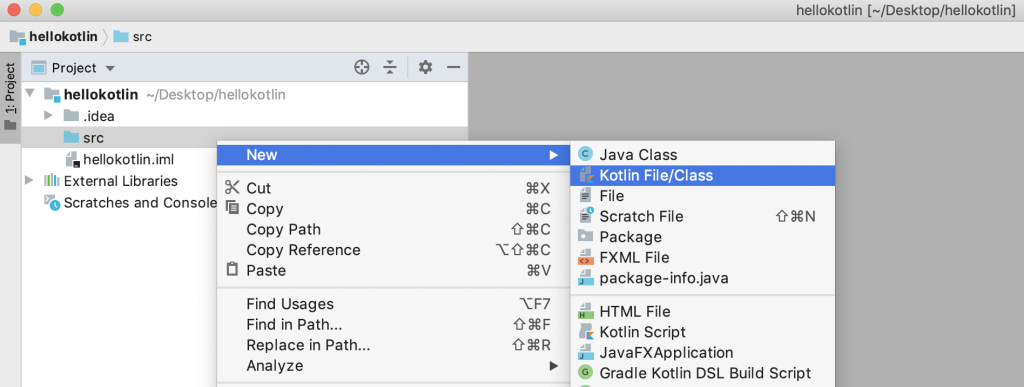
Должно открыться новое диалоговое окно New Kotlin File/Class. Введите hello и кликните OK.
Затем файл hello.kt откроется редакторе IntelliJ IDEA.
Базовый макет окна IntelliJ IDEA содержит панель Project слева, панель Editor посередине и Toolbar в верхней правой части, который можно использовать для запуска кода.

По ходу настройки проекта мы разобрали главные части окна IntelliJ IDEA. Пришло время для запуска Kotlin-кода!
Инструменты для работы с базами данных
-
Мы добавили интерфейс для изменения прав доступа при редактировании объектов. Это обновление доступно для PostgreSQL, Redshift, Greenplum, MySQL, MariaDB, DB2, SQL Server и Sybase.
-
Добавлены шаблоны Live Templates, с помощью которых можно генерировать простые операторы прямо из проводника баз данных.
-
Упростилась навигация: действие Go to declaration (Ctrl/Cmd+B), вызванное для объекта в SQL, теперь открывает DDL, а не проводник базы данных.
-
Мы улучшили сортировку данных.
-
Появилась возможность копировать, вырезать и вставлять источники данных при помощи всем известных сочетаний клавиш Ctrl/Cmd+C/V/X.
-
Теперь вы можете редактировать данные в коллекциях MongoDB. Также доступен предпросмотр запросов.
Kubernetes
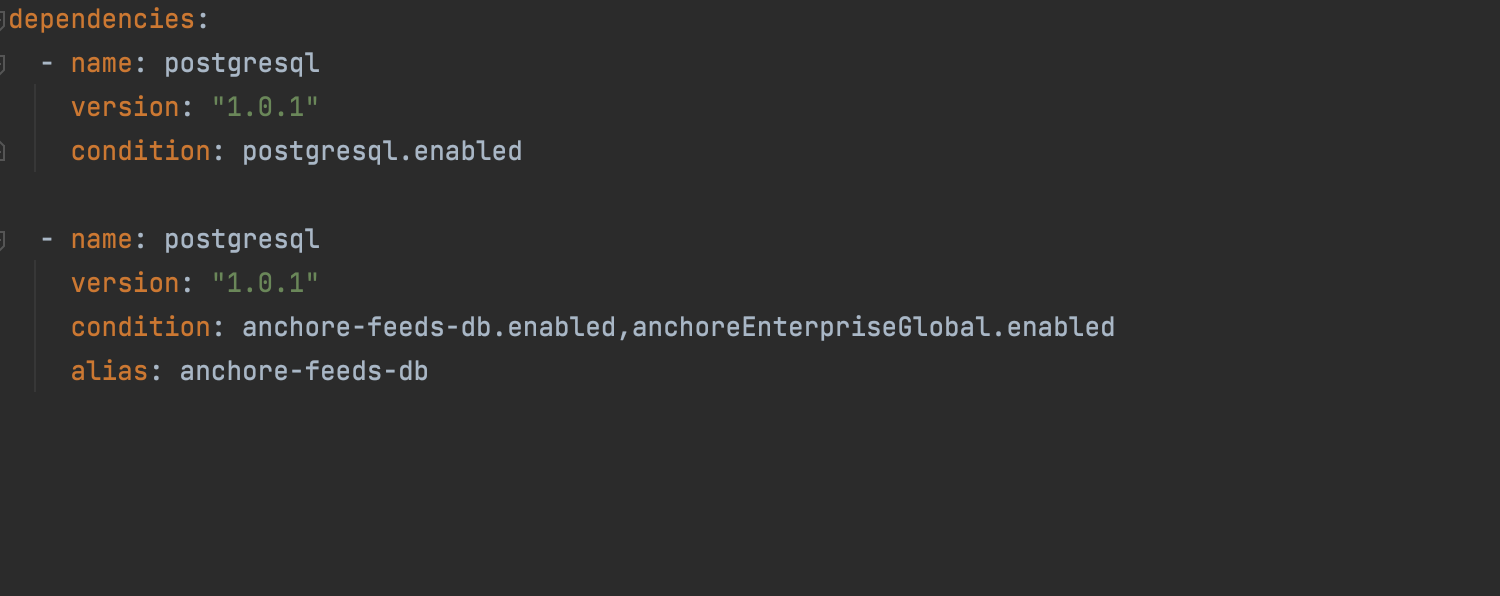
Support for alias in Helm chart dependencies
Ultimate
In IntelliJ IDEA 2021.2, you can use the alias field that belongs to the
dependencies section in Chart.yaml (api v2) or in requirements.yaml
(api v1). This field states an alternative name of the current dependency. You may need
to use alias if an existing dependency is used several times and you want to
distinguish between these usages. In addition, if the chart name uses symbols not
applicable in GoTemplate identifiers, alias can also help you fix it.

Custom namespaces
Ultimate
Sometimes when you work with a Kubernetes cluster, you will be granted access to
particular namespaces, but you won’t receive the list of all of the cluster namespaces.
In this case, you can now specify the list of available namespaces in
Preferences / Settings | Tools | Kubernetes.
Предварительная настройка
При первом запуске IntelliJ IDEA перед вами выскочит диалоговое окно с требованием указать путь до файла с настройками. Так как это наш первый опыт знакомства с IDE, то выбираем пункт «Do not import settings». Если данное окно вылезло после обновления или переустановки – выберите исходную директорию.

Следующим шагом настройки intellij idea будет выбор темы. ПО умолчанию их две – стандартная (светлая) и Darcula (тёмная).

Как уже было написано выше, IDEA поддерживает огромное количество вспомогательных инструментов. Разумеется, новичку они все не нужны. Поэтому следующим шагом будет их отключение для увеличения производительности. Для этого в очередном диалоговом окне выбираем «Disable All». Не переживайте, их можно подключить позднее в меню настроек.

Впрочем, среда программирования IntelliJ IDEA на этом и не думает успокаиваться, предлагая скачать дополнительные надстройки. Спасибо, нас это тоже не интересует!

Теперь, когда с установкой и настройкой IntelliJ IDEA покончено, можно приступить к работе. Начинается она, разумеется, с создания IntelliJ IDEA проекта.

С этим действием у вас вряд ли возникнут трудности, ведь новое диалоговое окно предлагает лишь 4 варианта: создать новый проект (Create New Project), открыть существующий (Open), импортировать проект (Import Project) или выйти из системы контроля версий (Check out from Version Control). Выбираем первый пункт. Подробнее о том, как создать проект IntelliJ IDEA, что делать уже внутри среды, лучше почитать на официальном сайте, потому что возможностей для кастомизации рабочего пространства здесь действительно много.
Проблемы и вопросы
Далее у вас наверняка возникнет несколько вопросов, один из которых касается активации IntelliJ IDEA. Ограниченная версия или 30-дневная триал-версия не требуют регистрации и дополнительных манипуляций. Но если вы хотите активировать купленную, необходимо выполнить следующие действия:
- На приветственном экране, откуда мы создаём проект, найти в нижней части меню Configure->Manage License. Если вы уже находитесь внутри, тогда на верхней панели Help->Register.
- Перед вами 3 возможных способа активации: через аккаунт (JetBrains account), с помощью кода (Activation Code), через сервер лицензий (License Server). В зависимости от того, каким образом вы или ваш работодатель приобретали лицензию и какими данными располагаете, выберите нужный пункт.
- Вводим необходимые данные, нажимаем кнопку «Activate» и наслаждаемся безграничной работой.
Следующий традиционный вопрос касается обновления IDE. Здесь алгоритм такой же, как при установке: скачать-запустить-следовать инструкциям или удалить-установить заново-сослаться_на_существующий_файл_настроек в самом первом диалоговом окне.
И конечно ни один форум не обходится без вопроса: «Не запускается, что делать?». Ответ традиционный — ещё раз внимательно читаем, как установить IntelliJ IDEA. Если все сделано правильно — программа гарантированно запустится. Если же неполадки возникают непосредственно при работе IDEA, скорее всего, дело в неправильно установленных плагинах, ответы ищите на официальных сайтах их разработчиков.
На всякий случай вот ещё инструкция, как удалить IntelliJ IDEA:
- стандартным способом через панель управления в Windows. При желании добить остатки в реестре по пути: “HKEY_CLASSES_ROOT\IntelliJIDEAProjectFile”;
- в Linux потереть файлы вручную, а также удалить директории настроек “config” и “system”, если они лежат не в корне.
- В MacOS стандартно удалить через иконку программы и почистить кэш по направлению “settings/caches/plugins/logs”.
Перед тем, как вы решите с головой погрузиться в мир новой IDE, помните, что это сложный продукт с резкой кривой обучаемости. Поэтому правильным выбором для обучения будут курсы по Java с практическими уроками IntelliJ IDEA. Так вы и в профессию быстрее втянетесь, и мощным инструментом овладеете.
Установка и настройка IntelliJ IDEA
IntelliJ IDEA можно скачать с сайта JetBrains. В наличии есть версии Community и Ultimate. Для работы с примерами из уроков подойдет версия Community, которая является бесплатной для скачивания.
Перейдите на сайт и скачайте IntelliJ IDEA 2019.2 или более позднюю версию. Выберите свою систему — macOS, Windows или Linux. Установите IntelliJ IDEA, следуя инструкции. Большинство скриншотов в уроках сделаны на системе macOS, но работа на Windows или Linux проходит точно так же.
Перед запуском IntelliJ IDEA требуется также установить Java Development Kit, или JDK, который нужен для запуска Kotlin кода на компьютере.
Системы контроля версий
-
В этом релизе представлены обновления для работы с пул-реквестами: ускорился процесс их создания, появилась возможность быстро открывать diff в редакторе и добавилась поддержка шаблонов пул-реквестов.
-
Появилась поддержка шаблонов Git-коммитов, и в них можно вносить любую информацию, которая должна быть в сообщении коммита.
-
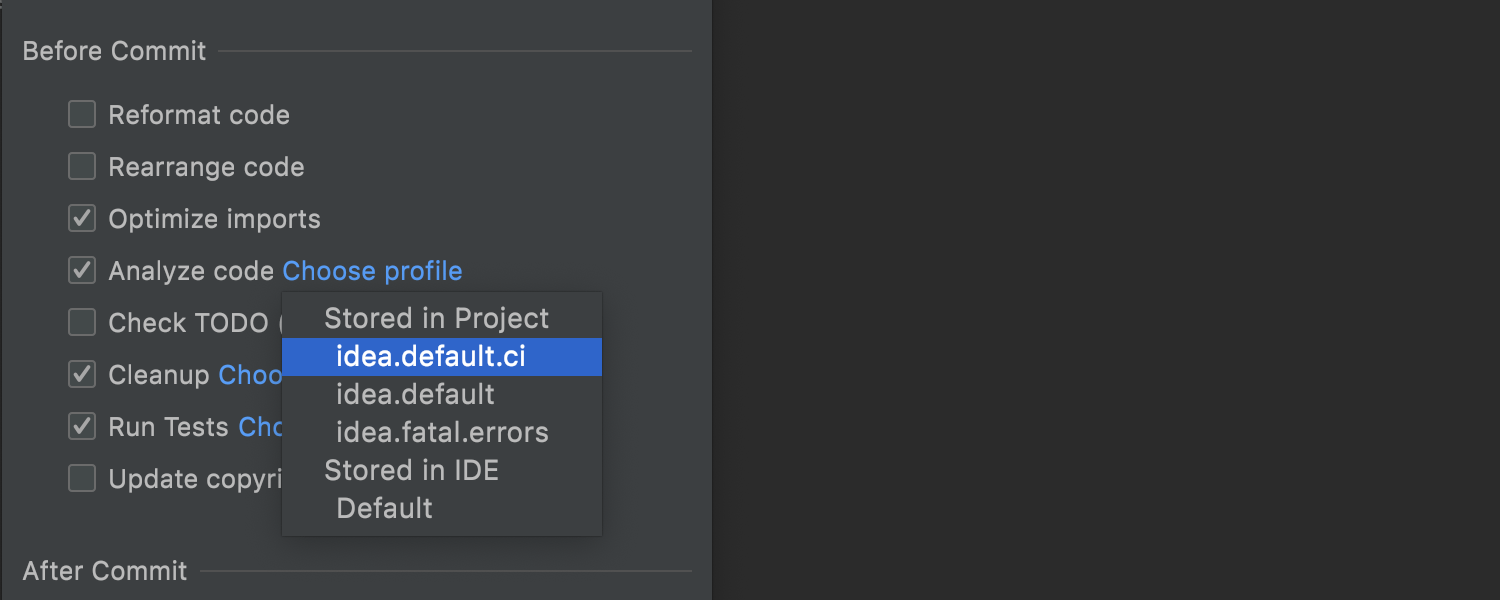
Теперь можно просто выбрать профиль инспекций кода перед коммитом. Нажмите на значок шестеренки, чтобы открыть параметры коммита, отметьте галочкой Analyze code, кликните Choose profile и выберите нужный профиль.
-
С помощью нового действия рядом с Show diff в можно получить файл из другой ветки.
-
Новое действие Save to Shelf позволяет скопировать изменения на вкладку Shelf, сохранив их при этом в локальной истории.
-
Perforce-плагин теперь полностью совместим с IntelliJ IDEA Community Edition и поставляется вместе с IDE.
IntelliJ IDEA offers a variety of features that make navigation fast and searching
easy, helping you stay focused on your code and allowing you to work quicker.
Have a look!

Search Everywhere
The Search Everywhere dialog is a tool for finding anything stored in your
codebase, such as classes and symbols. What’s more, you can search for files and even IDE
tool windows. To call for this dialog, press Shift twice and start typing the name
of whatever you are looking for.

Find in Files
Another powerful search tool is Find in Files, which makes it possible to search
for a text string in your project and apply a variety of options to narrow down your search.
For example, you can use various scopes, find occurrences, and exclude certain items from the
search.
To call this tool, highlight the string you want to find and press ⇧⌘F on macOS
or Ctrl+Shift+F on Windows and Linux. The IDE will automatically put it in the
search field.

Quick definition
In IntelliJ IDEA, it is very easy to check where and how symbols, such as tags,
classes, fields, methods, or functions, are defined in your project. You can do all this with the
Quick Definition popup, which you can access using a simple shortcut. Select the desired
symbol in the editor and press ⌥Space on macOS or Ctrl+Shift+I on Windows
or Linux.

Structural search and replace (SSR)
SSR
is a great tool for finding and replacing code patterns while taking the syntax and semantics
of code into account. The easiest way to use it is to start with the existing template, which
you can alter manually or add filters to narrow down your search. It is possible to save the
modified template as a new one.

Find Usages
It is best practice to find and analyze all the usages of a code element before changing it.
By default, if you select a symbol in the source code, IntelliJ IDEA will automatically
highlight all its usages in the current file. If you need to see the list of usages throughout
your project, place the caret inside the symbol and invoke the Find Usages action via
⌥F7 on macOS or Alt+F7 on Windows and Linux.
Системные требования
Требования к оборудованию:
- RAM от 2 ГБ, рекомендуется 4 ГБ оперативной памяти
- 1,5 ГБ свободного места на жестком диске + не менее 1 ГБ для кэшей
- Минимальное разрешение экрана 1024×768
Требования к ПО:
JRE 1.8 и JDK для Java. JRE 1.8 поставляется с дистрибутивом IntelliJ IDEA, но также их можно скачать отдельно на официальном сайте Oracle.
Windows — 32-разрядные или 64-разрядные версии Microsoft Windows 10, 8, 7 или Vista
Macos — macOS 10.8.3 или новее (поддерживаются только 64-разрядные системы) Linux (ubuntu) — OS Linux (обратите внимание, что 32-разрядный JDK не поставляется в комплекте, поэтому рекомендуется использовать 64-разрядную систему). Рекомендуется использовать среду рабочего стола KDE, Gnome или Unity
Version control
Changes to pre-commit checks
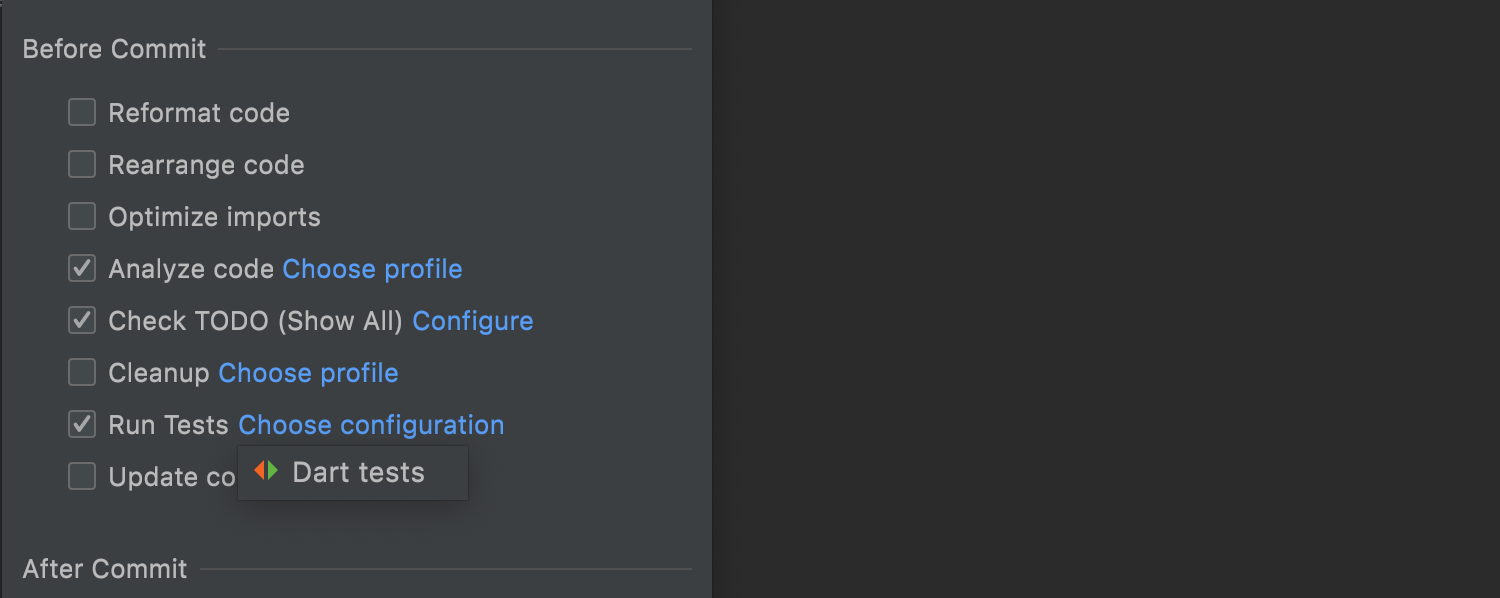
In v2021.2, we’ve expanded the list of possible pre-commit actions with the ability
to execute tests. When you tick the Run Tests checkbox in the Before Commit
section, your IDE will test the applied changes and notify you if anything goes wrong.
We’ve also added the ability to customize the Analyze code and Cleanup
options by clicking Choose profile next to them.
The progress and results of all the pre-commit checks appear in the Commit area,
without disturbing you with additional modal windows.
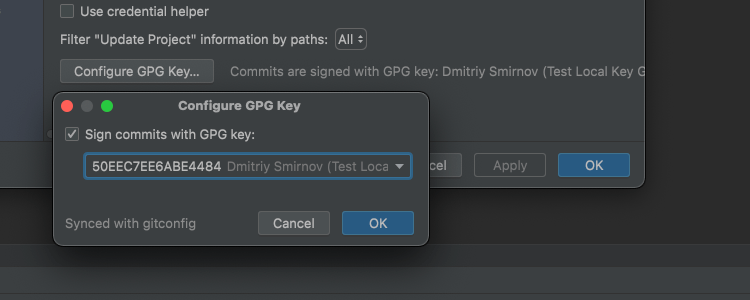
GPG signature
IntelliJ IDEA 2021.2 offers a way to secure your commits by enabling Git commit signing
with GPG. To do this, go to Preferences/Settings | Version Control | Git, click
Configure GPG Key, and then select it from the drop-down list. If you’re using a GPG key
for the first time, you’ll need to configure it.
Changes instead of Default Changelists in new projects
We will no longer use Default changelists as the name for the node that stores
uncommitted changes in new projects. Starting from version 2021.2, it is called
Changes. Additionally, Git operations will no longer trigger automatic creation
of changelists.
Unified Show Diff
IntelliJ IDEA displays the difference between the initial and changed files in the
editor by default, no matter where you’ve invoked the Show Diff action. If
tracking changes in a separate window is more convenient to you, just drag the desired
file from the editor.
System requirements
| Requirement | Minimum | Recommended |
|---|---|---|
| RAM | 2 GB of free RAM | 8 GB of total system RAM |
| CPU | Any modern CPU | Multi-core CPU. IntelliJ IDEA supports multithreading for different operations and processes making it faster the more CPU cores it can use. |
| Disk space | 2.5 GB and another 1 GB for caches | SSD drive with at least 5 GB of free space |
| Monitor resolution | 1024×768 | 1920×1080 |
| Operating system |
Officially released 64-bit versions of the following:
Pre-release versions are not supported. |
Latest 64-bit version of Windows, macOS, or Linux (for example, Debian, Ubuntu, or RHEL) |
