Как скачать keepass с официального сайта на русском языке, настроить и пользоваться
Содержание:
- Другие характеристики KeePass
- Как использовать Keepass
- Преимущества
- How does .NET improve portability?
- Paths and Date/Time Placeholders
- Why is KeePass 2.x being developed?
- Viewing/Editing Attachments
- Basic Auto-Type Information
- Multiple User Keys
- Options for Experts
- Target Window Filters
- KeePass / Password Management / Security
- Trigger System Introduction
- Portable and No Installation Required, Accessibility
- Начало работы с KeePass
- What are KeePass Classic and KeePass Professional?
- General information
- Управление паролями и их использование
- Why doesn’t KeePass lock after Auto-Type?
- Why doesn’t printing work in KeePass 1.x?
- Настройка KeePass
Другие характеристики KeePass
Несмотря на то, что менеджер паролей доступен на 47 языках, пользователь вынужден начать работу с сервисом на английском. Чтобы установить другие языки, необходимо скачать нужный, например, русский, отдельным файлом в формате zip, поместить его содержимое в раздел “Languages”, который находится в папке с программой. Только после этого в меню выбора языков появится необходимый. Также понадобится перезагрузить устройство.
Объём базы ключей KeePass неограничен. Это значит, что вы можете пользоваться ей всю жизнь, не опасаясь, что в какой-то момент в ней не хватит места для вашего нового пароля. Обычно рядовому пользователю достаточно и небольшого объёма, поскольку ключи не занимают много места.
Хранить базу данных пользователь сможет только на своём устройстве. Перенести её на облачный сервис провайдера возможности нет. Едва ли этот факт можно считать недостатком, поскольку хранить свои пароли в интернете может быть небезопасно.
Примечательно, что этот сервис ориентирован исключительно на частного пользователя и не предусматривает решений для предприятий. Например, у него нет возможности интеграции с AD (active directory).
Что касается дизайна, то он может вызвать недоумение у современных пользователей. Интерфейс напоминает программы 90-х годов, несмотря на то, что сервис продолжает обновляться. По какой причине разработчики официальной версии остановились на таком варианте внешнего вида — неизвестно. Впрочем, он никак не сказывается на функционале.
Как использовать Keepass
Перед началом пользования программой Keepass её нужно установить, настроить и русифицировать генератор паролей.
Установка. Нужно скачать и распаковать последнюю версию с официального сайта. Мы вам рекомендуем портативную версию с установкой на флеш-накопитель.

Желательно также настроить запуск программы при старте системы.
Сервис → Настройка → Интеграция → Запуск KeePass при старте системы.
И сделаем, чтобы он всегда открывался в свернутом и блокированном состоянии:
Сервис → Настройка → Дополнительно → Запуск в свернутом и заблокированном состоянии.
Очень удобно, что в Кипасе по умолчанию присутствует AutoType (Автоподбор), нажатием сочетания клавиш Ctrl+Alt+A {USERNAME} {TAB} {PASSWORD} {ENTER}.
Инструкция: как создать новую базу паролей
КeePass будет сохранять все пароли в созданной базе. Итак, для этого нужно создать базу -> выбрать в основном меню «Файл — Новый…» или щелкнуть мышкой левую пиктограмму на панели всех инструментов. Всплывет окно, в котором будет предложено ввести главный пароль или ключ диск. Ваша база паролей будет закодирована паролем, который вы тут наберёте. После чего нажмите .
https://youtube.com/watch?v=66CjUFAx8Eo
Теперь вы находитесь в главном окне. Слева группы паролей, а Справа записи о паролях.
Добавление записи
Теперь можно сохранить ваш первый пароль в этой базе паролей под названием KeePass! Нажмите правой кнопкой мышки в правом окне и потом выберите «Добавление записи…». Всплывёт следующее окно. В нём вы можете редактировать запись: введите придуманное название для нее, пользовательское имя, ссылку, пароль и др. Когда закончите заполнение, нажмите .
 Теперь вы можете видеть Вашу только что созданную запись в списке паролей в правой части.
Как пользоваться записью
Теперь Вы получили созданную запись в вашем списке паролей. Что с ней можно делать?
У вас есть несколько различных вариантов. К примеру, вы можете сделать копию имени пользователя из записи в буфер обмена ОС Windows. После того как вы его скопировали, вы можете отправить его и использовать в любой другой программе. Работает, и копирование паролей.
Плагины
KeePass имеет такую архитектуру, расширяемую функциональность сторонними модулями, так называемыми — плагинами. Самые популярные плагины можно скачать с домашней страницы KeePass (доступны экспорт или импорт из различных форматов данных, создание резервных копий баз данных, автоматизации, интеграция менеджера паролей с браузерами и т. д.). Нужно знать так же и о том, что плагины способны поставить под угрозу безопасность проги KeePass, так как они разработаны независимыми авторами-программистами и имеют доступ к базе данных KeePass. Она шифрует и ссылки, и логины и примечания.
Преимущества
- Очень высокая безопасность. Кроме технических деталей таких как: используемые алгоритмы кеширования и шифрования, важна для нас и поддержка двухфакторной аутентификации.
- Открыт исходный код. Есть такое мнение разработчиков и программистов, что надёжный и хороший криптографический софт просто не может быть закрытым. KeePass программа сертифицированная OSI Certified.
- Полная кроссплатформенность включая все операционные системы для мобильных устройств, исключение Symbian и WebOS.
- Что поражает так это бесплатность программы такого уровня, мощности и функциональности.
- Огромный плюс это — портативность. Кипас не нуждается в установке, легко может работать с флешки, она не создает и ничего не хранит в системе.
- Не нужна установка по строгой инструкции. Доступны два формата загрузки: инсталлятор и zip-файл. В сервис встроен генератор паролей.
How does .NET improve portability?
All Windows operating systems starting with Vista ship with .NET preinstalled.
Here, KeePass 2.x runs fine from USB sticks without having to install it and without
any additional prerequisites.
For Windows XP and earlier, .NET is available and can be installed by the user
(usually it’s already installed, e.g. using Windows Update).
As the mainstream support of Windows XP has already ended on 2009-04-14
and the extended support on 2014-04-08, XP in the meanwhile is irrelevant
for portability.
The portable / cross-platform future of .NET is very bright.
It allows the same codebase to be used on completely
unrelated systems, like Windows PCs, smart devices (PocketPC, Smartphone,
etc.) and even other operating systems
like Linux and Mac OS X through open .NET runtimes like
Mono.
All major features are available on Mono (Linux, Mac OS X, …),
too (especially global auto-type).
For most Linux systems, Mono is offered as
a package; it’s even already included in the GNOME ≥ 2.16 desktop.
Paths and Date/Time Placeholders
| Placeholder | Is Replaced By |
|---|---|
| Path of Internet Explorer, if installed. | |
| Path of Mozilla Firefox, if installed. | |
| Path of Opera, if installed. | |
| Path of Google Chrome (or Chromium on Unix-like systems), if installed. |
|
| Path of Safari, if installed. |
| Placeholder | Is Replaced By |
|---|---|
| KeePass application directory path. |
KeePass 2.x Only
| Placeholder | Is Replaced By |
|---|---|
| Name of the entry’s parent group. | |
| Full path of the entry’s parent group. | |
| Notes of the entry’s parent group. | |
| Name of the group that is currently selected in the main window. | |
| Full path of the group that is currently selected in the main window. | |
| Notes of the group that is currently selected in the main window. | |
| Full path of the current database. | |
| Directory of the current database. | |
| File name (including extension) of the current database. | |
| File name (excluding extension) of the current database. | |
| File name extension of the current database. | |
| Directory separator (‘\’ on Windows, ‘/’ on Unix). | |
| This is , if it exists, otherwise . |
| Placeholder | Is Replaced By |
|---|---|
| Current local date/time as a simple, sortable string. For example, for 2012-07-25 17:05:34 the value is 20120725170534. |
|
| Year component of the current local date/time. | |
| Month component of the current local date/time. | |
| Day component of the current local date/time. | |
| Hour component of the current local date/time. | |
| Minute component of the current local date/time. | |
| Second component of the current local date/time. | |
| Current UTC date/time as a simple, sortable string. | |
| Year component of the current UTC date/time. | |
| Month component of the current UTC date/time. | |
| Day component of the current UTC date/time. | |
| Hour component of the current UTC date/time. | |
| Minute component of the current UTC date/time. | |
| Second component of the current UTC date/time. |
Why is KeePass 2.x being developed?
Looking at the user feature requests, it becomes clear very soon that a complete
rewrite of KeePass 1.x is required in order to implement the suggested things.
For example, the complete core of KeePass 1.x is based on the fixed fields as
seen in the ‘Edit Entry’ window. Implementing custom strings fields in 1.x would
require such a lot of work that you can also rewrite it completely from scratch.
Other examples are support for real synchronization, improved auto-type system,
real entry history,
supporting more key sources for building the master key,
multiple attachments per entry,
database compression, better plugin system, etc.
Viewing/Editing Attachments
KeePass 2.x has an internal viewer/editor for attachments.
For details how to use it for working with texts, see
».
The internal viewer/editor works with the data in main memory.
It does not extract/store the data onto disk.
When trying to open an attachment that the internal viewer/editor cannot handle
(e.g. a PDF file), KeePass extracts the attachment to a (EFS-encrypted)
temporary file and opens it using the default application associated with this file type.
After finishing viewing/editing, the user can choose between importing
or discarding any changes made to the temporary file.
In any case, KeePass afterwards securely deletes the temporary file
(including overwriting it).
Basic Auto-Type Information
KeePass features an «Auto-Type» functionality. This feature allows you to define
a sequence of keypresses, which KeePass can automatically perform for you. The
simulated keypresses can be sent to any other currently open window of your choice (browser windows,
login dialogs, …).
By default, the sent keystroke sequence is ,
i.e. it first types the user name of the selected entry, then presses the Tab key,
then types the password of the entry and finally presses the Enter key.
For TAN entries, the default sequence is ,
i.e. it just types the TAN into the target window, without pressing Enter.
KeePass 1.x Only
You can freely define your own Auto-Type sequence: simply write the sequence into the
notes field of the entry, prefixed with «».
Your notes could look something like this:
You can write any notes here.
My e-mail I used to register: me@example.com

Auto-Type: {USERNAME}{TAB}{TAB}Some fixed string{TAB}{PASSWORD}{ENTER}

Here you can continue with your notes if you wish...
As you can see, the only important thing is that the auto-type sequence is prefixed
using «» and is one single line. An auto-type sequence cannot
be defined using two or more lines.
If you define two or more auto-type sequences, the first one is used.
KeePass 2.x Only
Auto-Type can be configured individually for each entry using the
Auto-Type tab page on the entry dialog (select an entry → Edit Entry).
On this page you can specify a default sequence and customize specific
window/sequence associations.Two-Channel Auto-Type Obfuscation is supported (making
Auto-Type resistant against keyloggers).
Additionally, you can create customized window/sequence associations, which override the
default sequence. You can specify different keystroke sequences for different windows for each entry.
For example, imagine a webpage, to which you want to login, that has multiple
pages where one can login. These pages could all look a bit different (on one
you could additionally need to check some checkbox – like often seen in forums).
Here creating customized window/sequence associations solves the problems: you simply
specify different auto-type sequences for each windows (identified by their window
titles).
Invoking Auto-Type:
There are three different methods to invoke auto-type:
- Invoke auto-type for an entry by using the
context menu command Perform Auto-Type while the entry is selected. - Select the entry and press Ctrl+V
(that’s the menu shortcut for the context menu command above). - Using the system-wide auto-type hot key. KeePass will
search all entries in the currently opened database for matching sequences.
All methods are explained in detail below.
Input Focus:
Note that auto-type starts typing into the control of the target window
that has the input focus. Thus, for example for the default
sequence you have to ensure that the input focus is set to the
user name control of the target window before invoking auto-type using any of
the above methods.
Multiple User Keys
- One master password decrypts the complete database.
- Alternatively you can use key files. Key files provide better security than
master passwords in most cases. You only have to carry the key file with you, for example
on a floppy disk, USB stick, or you can burn it onto a CD.
Of course, you shouldn’t lose this disk then. - For even more security you can combine the above two methods: the database then requires the key file
and the password in order to be unlocked. Even if you lose your key file, the database would
remain secure. - Additionally, you can lock the database to the current Windows user account. The
database can then only be opened by the same person who created it. - See also the keys information page.
Options for Experts
Most security options can be configured in the options dialog of
KeePass (menu ‘Tools’ → ‘Options’) and in the database settings
dialog (menu ‘File’ → ‘Database Settings’).
However, in KeePass 2.x, there additionally are a few security options
for experts that cannot be configured in the user interface.
For example, KeePass can protect its process with a
discretionary access control list (DACL), and
its windows can be protected against certain screen capture operations.
Activating these options for experts may result in compatibility problems and
may make KeePass unusable. Therefore, these options can only be activated by
editing the configuration file manually (using an XML or text editor).
This ensures that users know how they can deactivate the problematic options
(by editing the configuration file once more)
in order to make KeePass usable again.
If you know how the configuration
system of KeePass works, then see the
help page, on which these options are documented.
Target Window Filters
When creating a custom window/sequence association, you need to tell
KeePass how the matching window titles look like. Here, KeePass supports
simple wildcards:
| String with Wildcard | Meaning |
|---|---|
| STRING | Matches all window titles that are named exactly «STRING». |
| STRING* | Matches all window titles that start with «STRING». |
| *STRING | Matches all window titles that end with «STRING». |
| *STRING* | Matches all window titles that have «STRING» somewhere in the window title. This includes the string being directly at the start or at the end of the window title. |
KeePass 1.x Only
Other wildcards aren’t supported. The wildcard must not be in
the middle of a string.
For example,
won’t match ,
it will only match ,
i.e. the middle character is treated as ‘*’ text character
instead of a wildcard.
KeePass 2.x Only
Wildcards may also appear in the middle of patterns.
For example, would match
.
Additionally, matching using
regular expressions is supported. In order to
tell KeePass that the pattern is a regular expression, enclose it in
. For example, would
match , and .
By using wildcards, you can make your auto-type associations browser-independent.
See the usage examples for more information.
KeePass / Password Management / Security
KeePass and Password Management:
-
BSI Cyber Security Recommendations BSI-CS 003 2.0
Recommendations by the German Federal Office for Information Security
(Bundesamt für Sicherheit in der Informationstechnik),
in which KeePass is the recommended password manager. -
KeePass: So speichern Sie Ihre Passwörter sicher auf Ihrem PC
KeePass is recommended by the Swiss Federal Office of Information
Technology, Systems and Telecommunication (FOITT/BIT) and the
Federal IT Steering Unit (FITSU/ISB).
It is installed by default on all PCs of the federal administration of Switzerland. -
Certification de Sécurité de Premier Niveau (CSPN)
KeePass has received the CSPN
by the French Network and Information Security Agency
(Agence Nationale de la Sécurité des Systèmes d’Information, ANSSI). - Recommended free software for the public sector (French)List of the French Etalab (public administration), which includes KeePass.
- HP: The Do’s and Don’ts of Password ManagementAn article by HP about password management, recommending KeePass.
-
BBC: Heartbleed bug — What you need to knowKeePass is mentioned in the section ‘How do I make sure my password is robust?’
of a BBC article about the Heartbleed bug.
Trigger System Introduction
KeePass features a powerful event-condition-action trigger system.
With this system, workflows can be automated. For example, you could define
a trigger that automatically uploads your database to a backup server after
saving the file locally.
A trigger starts to run when any of the specified events matches.
When this happens, the conditions are checked. If all conditions
are fulfilled, the actions of the trigger are performed.
Actions are performed consecutively; if one action fails, typically the execution
of the event is aborted (i.e. all following actions aren’t performed).
A trigger must be both enabled and on in order to get executed.
The enabled state is set by the user; a disabled trigger has no
function. The on state is dependent on the state of the program. By
enabling the ‘Initially On’ option, a trigger is on by default.
If you enable the option ‘Turn off after executing actions’, the trigger
will be off after running once. There are actions to turn triggers on and off,
i.e. triggers can turn themselves and other triggers on and off, which allows
to define a complex state-dependent system of triggers.
Most strings in the trigger system are Spr-compiled, i.e.
placeholders
(except state-changing ones), environment variables, etc. can be used.
Sensitive Data.
Some trigger events/conditions/actions support fields for potentially
sensitive data (for instance the password field of the ‘Open database file’
action). As triggers are saved in a plain text
configuration file,
it is generally not recommended to directly enter sensitive data in trigger fields.
If a database is open when the trigger runs, the sensitive data can be
stored in the database and the trigger field can point to the data using
a field reference
(which KeePass resolves when evaluating the field).
In this way, only the field reference appears in the configuration file
and the actual sensitive data is stored in the encrypted database file.
I/O Connection Properties.
Most trigger actions having a file path/URL parameter only allow
specifying the path/URL and possibly credentials (user name and password)
for accessing the file; advanced connection properties (like
timeout, user agent, passive mode, etc.) cannot be specified here.
If advanced connection properties are required, open the file once
(using ‘File’ → ‘Open’) with the desired connection properties.
This will create an item in the ‘Open Recent’ file list
(which remembers connection properties).
When a trigger action is executed, KeePass loads the connection properties
from the corresponding item (same path/URL) in the ‘Open Recent’ file list.
Portable and No Installation Required, Accessibility
- KeePass is portable: it can be carried on an USB stick and runs on Windows
systems without being installed. - Installer packages are available, too, for the ones who like to have
shortcuts in their Windows start menu and on the desktop. - KeePass doesn’t store anything on your system. The program doesn’t create any new
registry keys and it doesn’t create any initialization files (INI) in your Windows directory.
Deleting the KeePass directory (in case you downloaded the binary ZIP package) or using the
uninstaller (in case you downloaded the installer package) leaves no trace of KeePass on your
system. - Ports for other systems like Android, iOS, etc. are available.
See the downloads page. - Accessibility: KeePass 2.x features an advanced option that
explicitly optimizes the user interface for screen readers.
Начало работы с KeePass
Пороли хранятся в базах данных с расширением .kdb для версии 1.хх и .kdbx для версии 2.хх. Создаются базы данных с именем по умолчанию Database для версии 1.хх и NewDatabase для версии 2.хх.
Создание новой базы данных
Выполните следующие пункты, чтобы создать новую базу данных для хранения паролей:
- Нажмите на иконку «Создать…» или выберите в меню «Файл» >> «Создать…».
- Придумайте надежный Мастер-пароль*, запомните** его (или сохраните в надежном месте) и впишите в соответствующее поле.
- Нажмите «OK», введите мастер-пароль повторно, снова нажмите «OK».
- Нажмите на иконку «Сохранить» или выберите в меню «Файл» >> «Сохранить».
- Выберите место, где будет храниться база паролей, смените*** ее название и сохраните.
*Вместо Мастер-пароля или совместно с ним можно использовать Ключевой файл (любой сложный файл, например, изображение). Если Ключевой файл будет утерян, модифицирован или поврежден, открыть базу данных будет невозможно.
**Если вы забудете Мастер-пароль, базу данных открыть уже никогда не сможете и все ваши пароли будут утеряны.
***Если у вас будет несколько баз данных, имя по умолчанию обязательно надо сменить, чтобы не путаться среди разных баз с одним именем, а также случайно не перезаписать одну другой.
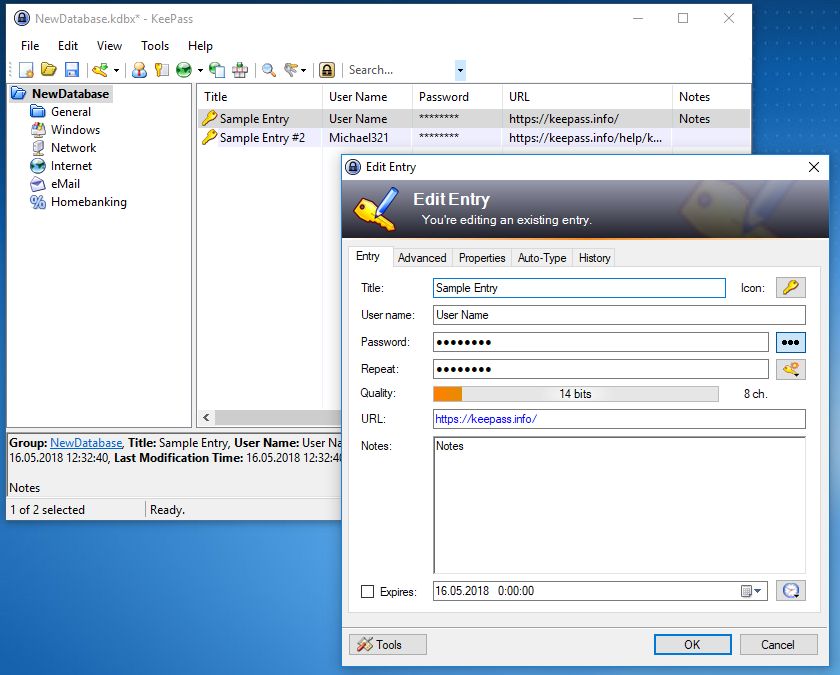
Добавление новой записи
Нажмите иконку «Добавить запись…» или выберите в меню «Правка» >> «Добавить запись…». Откроется окно добавления новой записи:

Окно добавления новой записи в KeePass
Как видно на изображении, каждая запись может состоять из названия, логина, пароля, URL и комментария (заметки). Для новой записи хороший менеджер KeePass уже сгенерировал надежный пароль, который при необходимости можно заменить на свой, нажав перед этим на кнопку с тремя точками справа от поля с паролем.
Заполните форму и нажмите кнопку «OK». Новая запись будет создана. Сохраните ее, нажав на иконку «Сохранить». Если забудете, при закрытии приложения менеджер паролей предложит сохранить данные.
Вход в базу данных осуществляется по Мастер-паролю, который вы придумали при ее создании.
- Через контекстное меню, кликнув правой кнопкой мыши по записи.
- Кликом по соответствующей иконке на панели инструментов, предварительно выделив нужную запись в списке.
- Дважды кликнув левой кнопкой мыши по логину, паролю или ссылке непосредственно в строке записи.
Сменить Мастер-пароль или Ключевой файл можно перейдя по ссылкам меню «Файл» >> «Изменить мастер-ключ…».
Более подробно вы можете ознакомиться с хорошим менеджером паролей и его возможностями в Справочном центре KeePass на его официальном сайте.
What are KeePass Classic and KeePass Professional?
During the initial development of 2.x (i.e. while there was no public alpha version
available), it was called «KeePass Professional». The current 1.x version should
be renamed to «KeePass Classic». This naming should emphasize that 2.x isn’t
simply the successor of 1.x. Shortly before the first alpha version was released, there
were long discussions about the naming and we finally decided to call the new version
«2.x».
This was done particularly with regard to future development. The naming was changed,
but the intention remains the same: 2.x isn’t the successor of 1.x, and 1.x isn’t dead.
General information
When downloading KeePass, you have the choice between 3 different packages:
- KeePass-1.xx-Setup.exe: An installer program for Windows.
- KeePass-1.xx.zip: A KeePass ZIP package (portable version).
- KeePass-1.xx-Src.zip: The source code.
The installer and the portable version are described in detail below.
The source code package contains everything you need to compile KeePass. It includes
the C++ source code and header files, resource files,
sources for building the installer, etc.
In contrast to many other applications, KeePass does not require any functions of
the latest Windows operating system, like theming on XP or like a .NET application that
requires the .NET Framework. For example, KeePass does support theming, but it’s optional.
KeePass runs perfectly on older systems without any feature limitations.
Updating KeePass:
When a new KeePass version has been released, you can update your existing KeePass
installation, without losing any configuration settings. The steps are
depending on which package you are using (installer or portable), see below.
Translations should also be updated when you install a new KeePass version.
You can find the latest translation files here:
KeePass Translations.
Управление паролями и их использование
Управление паролями
После того, как вы создали или открыли базу данных, вы можете вводить новые пароли и легко переносить их в поля входа на веб-сайты или в другие приложения.
Для лучшего структурирования все данные доступа организованы в группы. Чтобы создать новую новую запись пароля, сначала переключитесь на одну из предопределенных групп. Или создайте новую группу. Нажмите значок «плюс» в нижнем правом углу, а затем на папку. Введите имя и подтвердите ввод с помощью «Ok».
Переключитесь на соответствующую группу, нажав имя группы. Затем выберите последовательно знак плюса и ключ, чтобы ввести новый пароль. В зависимости от типа ввода доступны различные шаблоны. Например, существуют настраиваемые формы для адресов электронной почты, кредитных карт или сетей Wi-Fi. Для обычной записи с именем пользователя и паролем используйте «запись по умолчанию».
Введите как минимум имя пользователя и пароль. Для веб-сайтов рекомендуется также указать URL-адрес. Сохраните запись, нажав на значок дискеты в верхней части окна.
Если вы теперь хотите использовать сохраненный пароль, то имя пользователя и пароль должны вставляться один за другим через буфер обмена в соответствующую форму входа. Откройте требуемую запись в Keepass2Android. Затем коснитесь трех точек после имени пользователя и выберите «Копировать в буфер обмена». Перейдите в приложение, где вам нужно ввести данные и вставить имя пользователя из буфера обмена в правильное поле
Затем вернитесь к управлению паролями и повторите процедуру для пароля.
Важно. Буфер обмена через определенные промежутки времени очищается Keepass2Android по соображениям безопасности
Это предотвращает использование кешированных данных другими процессами. Кроме того, приложение блокируется, если оно не использовалось в течение определенного времени. Вы можете самостоятельно отрегулировать периоды времени. Для этого перейдите в меню настроек «Keepass2Android» и перейдите в раздел «Безопасность». Здесь вы можете установить значения для блокировки буфера обмена и время отключенияприложения.
 Для того, чтобы управлять своими паролями на ПК, вам понадобится версия KeePass под Windows.
- Как не потерять пароли, фотки и прочие данные при продаже iPhone или iPad
- Выбираем лучший менеджер паролей
Фото: компании-производители
Why doesn’t KeePass lock after Auto-Type?
KeePass 1.x Only
I have enabled the «Use alternative auto-type method (minimize window)»
and
«Lock workspace when minimizing the main window» options. Why doesn’t
KeePass lock after auto-typing?
In this very special case, the window minimization only is a way to lose the
focus, i.e. the window below comes to the foreground. The minimization is not
user-initiated (it’s only a side-effect of auto-type),
nor a consequence of an external minimization command, therefore
it is not (and should not be) affected by the automatic workspace locking handler.
If you worry about having KeePass minimized and unlocked, enable the
«Automatically lock workspace after the following number of seconds»
option and specify a reasonable amount.
KeePass 2.x Only
This does not apply to KeePass 2.x.
Why doesn’t printing work in KeePass 1.x?
Symptoms: When trying to print a password list in KeePass 1.x,
nothing happens after clicking OK in the ‘Print Options’ dialog.
Cause: KeePass 1.x uses the application associated with
files to print the password list. If this application doesn’t support the
«print» shell verb (like Mozilla Firefox), nothing happens.
Resolution: Associate files with a different
application that supports the «print» shell verb (like Internet Explorer).
Alternative Resolution / Workaround:
Click ‘File’ → ‘Print Preview’ in KeePass 1.x and
manually print the document in the application that just opened the file.
Настройка KeePass
Есть огромное количество пользователей, которые используют данный менеджер паролей, но не все умеет правильно настроить программу. А настройка в случае с этой программы является очень важным делом. Правильная настройка поможет защитить ваши пароли.
Безопасность
На вкладке «Безопасность» есть несколько очень важных настроек, которые необходимо отметить.
- Блокировать при бездействии
- Блокировать при общем бездействии
- Автоочистка буфера обмена
- Блокировать при использовании удаленного доступа
- и т.д.
Смотрите рисунок ниже, где я отметил самые важные настройки, которые необходимо отметить для обеспечения лучшей защиты менеджера паролей.
Настройка KeePass: Безопасность
Все остальное на ваше усмотрение.
Политика
На вкладке «Политика» вы можете разрешить или запретить выполнения некоторых операций. Таких как:
- Распечатку паролей
- Экспорт информации
- Копирование информации
- Загрузка плагинов
- Изменение мастер-пароля
- и т.д.
Настройка KeePass: Политика
В данной вкладке вы можете отключить все в зависимости от ваших нужд. К примеру, если у вас нет необходимости в распечатке информации из программы, можете спокойно отключить данную опцию убрав галочку. Тоже самое по поводу использование плагинов и экспорта записей.
Чем больше ненужного отключите в этой вкладке, тем более надежнее будет менеджер паролей и пароли, которые вы храните в нем.
Дополнительно
На вкладке «Дополнительно» есть не мало очень важных настроек, таких как:
- Запоминание и автоматическое открытие недавно открытого файла-паролей
- Автоматический поиск файл ключей
- Запоминание директории, в которой последний раз находился файл-паролей.
- и т.д.
 Настройка KeePass: Дополнительно
Я рекомендую выставить настройки вкладки «Дополнительно» так, как это показано на рисунке выше. Настоятельно не рекомендую отмечать пункт «Запоминать и автоматически открывать последнюю базу паролей…»
