Blog
Содержание:
- Generate the plugin
- OpenTX downloads
- Help and feedback
- Migration
- How can I migrate from Bitnami to OpenProject?
- How can I migrate from Jira/Confluence to OpenProject?
- How can I migrate from Community Edition or Enterprise on-premises to Enterprise cloud?
- How can I migrate from Enterprise cloud to Enterprise on-premises?
- How can I migrate from Community Edition to Enterprise on-premises?
- How can I migrate from Enterprise on-premises to Community Edition?
- Start your projects
- SUSE Linux Enterprise Server (SLES) Installation
- Full-text extraction not supported
- Steps to release a plugin
- Frontend plugins
- Upgrade notes for 8.x to 9.x
- Help and feedback
- Organize and visualize your project
- FAQ regarding OpenProject BIM edition
- Step 3: Apache2 web server
Generate the plugin
You can generate a new plugin directly from OpenProject. Think of a good name and a place (in your filesystem) where the plugin should go. In this example, we have a directory right next to the directory. Then do
This generates the plugins into the directory . The new plugin is a rails engine, which can be published as a gem.
You may want to update the generated plugin’s gemspec ().
Example Plugin
There is an example plugin which does some of the basic things (adding menu items, hooking into views, defining a project menu, etc.) and provides further info in its README.
Instead of generating a new plugin you can also just clone the example plugin and adapt it.
OpenTX downloads
OpenTX 2.3 branch
Latest OpenTX major version with added support for the FrSky X10 Express, X9D+ 2019, X-Lite S/Pro, X9 Lite and Jumper T12 radios, the new FrSky ACCESS system, and lots of new features including significant latency improvements with FrSky radios/modules. Please read this page for more details about other changes. As usual with each major release new SD card contents are needed, information is on the page.
OpenTX 2.2 branch
Previous major version, now stable and still supported for normal use, but no new features or bugfixes will be implemented. 2.2 added support for the FrSky Horus X12S and X10 and Taranis Q X7 radios (plus X-Lite starting with 2.2.2). This version drops support for AVR-based radios, for those see 2.1 below. Please read this page for more details about other changes. As usual with each major release new SD card contents are needed, information is on the page.
OpenTX 2.2.4
(2019-07-11)
Nightly builds
The nightly builds are automatic builds that are build every day. As
during development, critical bugs might be introduced, these versions
should not be used for flying. Additionally a backup of EEPROM
should be done before flashing these firmware. The nightly builds are
only intented to verify if bugfixes/new features work as expected. We
provide no changelogs for these builds. To get a rough idea about the
changes you can look at the
git commit log.
macOS nightly builds,
Windows nightly builds
and
Linux nightly builds
OpenTX 2.1 branch
Deprecated, no more support will be given but firmware downloads are still available for the time being. It is the last version to support AVR-based radios (9X/9XR with stock board, Gruvin9x, DIY MEGA2560). 2.1 introduced completely new telemetry handling compared to 2.0, and also requires a different sound pack (see below). The original upgrade notes from 2.0 to 2.1 can be found here.
This branch is the first to support the FrSky Taranis X9E (tray version).
OpenTX 2.1.9
(2016-09-15)
OpenTX 2.0 branch
Deprecated, no more support will be given but firmware downloads are still available for the time being. 2.0 introduced the Virtual Inputs system.
This branch is the first to support the FrSky Taranis X9D+ and the Turnigy 9XR-Pro.
OpenTX 2.0.20
(2016-09-15)
OpenTX 1.x branch
This branch is the first to support the original FrSky Taranis X9D, and is now deprecated. Firmware downloads are not possible anymore, the below companion is only provided for reference.
companion9x v1.52
(2014-01-10)
Firmware downloads are exclusively available from within OpenTX Companion’s “Download” dialog. OpenTX Companion needs to be configured for the proper radio type and with the firmware options you choose, so that a customised firmware file with these options can be prepared for you by our build server and downloaded to your PC. OpenTX Companion is then used to load the firmware to your radio.PLEASE NOTE that the firmware you run on the radio and companion you use on the PC to edit settings must be of the same branch!
Sound packs
Sound packs can be downloaded either through companion (the Download dialog will point you to the correct directory for the selected radio type), or from the links below:
Sound packs for OpenTX 2.0Sound packs for OpenTX 2.1SD card contents for OpenTX 2.2, with sound packsSD card contents for OpenTX 2.3, with sound packs
Help and feedback
If you did not find what you were looking for
Search in docs
If you need help from the community or want to support others
Post on OpenProject forum
If you are eligible for professional support and have more questions
Request support
If you find an easily fixable error or need for improvement in the documentation
Edit this page
If you would like to suggest bigger updates or improvements to this documentation
Create an issue
If you want to contribute to translate this documentation to another language
Translate on crowdin
If there’s something you don’t like or understand about this feature
Create an issue
If you want to propose a new feature that OpenProject does not offer yet
Submit feature proposal
To further help OpenProject to shape and test new features
Join beta testing
To view OpenProject premium features and pricing
View pricing page
If you want to try all premium features in the OpenProject Cloud Edition 14 days for free
Free trial OpenProject Cloud Edition
If you want to try all premium features in your on premise Community installation 14 days for free
Free trial OpenProject Enterprise Edition (on premise)
Migration
How can I migrate from Bitnami to OpenProject?
To migrate from Bitnami to Enterprise cloud please provide these:
- data as database dump (.sql file)
- attachment folder
You can use the first two steps of . Please contact us to discuss your migration.
To migrate from Bitnami to Enterprise on premises please use . We offer (paid) installation support to help you migrate to OpenProject (for the Enterprise on-premises edition). Please contact us to request it.
How can I migrate from Jira/Confluence to OpenProject?
At the moment there are these ways to migrate:
- our API
- our Excel sync
- Using a Markdown export app you can export pages from Confluence and paste them (via copy & paste) into OpenProject in e.g. the wiki. This should preserve at least most of the layout. Attachments would then have to be added manually.
For more information please contact us.
How can I migrate from Community Edition or Enterprise on-premises to Enterprise cloud?
We will need a database dump from you which we will upload to your new Enterprise cloud. Please contact us to plan the migration and get more instructions.
How can I migrate from Enterprise cloud to Enterprise on-premises?
We will provide a database dump which you can upload into your Enterprise on-premises edition. This way you can keep all your data.
How can I migrate from Community Edition to Enterprise on-premises?
If you you will receive an Enterprise token. Use it to activate the Enterprise premium features. For detailed activation instructions please refer to the Enterprise activation guide. You can keep your data that you created in the Community Edition.
How can I migrate from Enterprise on-premises to Community Edition?
If you cancel your subscription for Enterprise on-premises you will be downgraded to Community Edition automatically as soon as the subscription period ends. You can keep all your data but won’t be able to use the and won’t be eligible for support any more.
Start your projects
Create and open projects
First of all, you would want to . Log in to OpenProject and on the first page in the top left corner under “Select a Project” you can create a new project by clicking “+ Project”. Alternatively, on the same start page, in the PROJECTS widget you can create a new project by clicking on the green button “+ Project”.


Once you or other team members created some projects in OpenProject, you can log in and choose a project to open. In order to , click the “Select a project” button in the upper left corner of the header and select the project you want to open. You can also start by typing in a project name to filter by the project’s title.

Please note that you have to be a member of a project to be able to see and select it.
Project hierarchy
OpenProject allows you to and create projects with subprojects. In order to create a subproject, you can do so in the project setting of the main project.

Or you create a project and define its superordinate (parent) project in the advanced settings.

Projects and subprojects are displayed according to their hierarchy in the drop-down menu.

Project portfolio
To get an overview of all projects that you are involved in, you can check the status and a more details under “View all projects” in the top left corner underneath “Select a project”. This overview shows you all projects with status and description. Use filters to customize the view and show the information you need. You can also create custom fields to add any custom information you want.

Project templates
In order to save time and be coherent across projects, use the . You just create a new project and then save it as a template. You can also make a project you are already working with a project template by changing the project settings to “set as a template”. With a project template you set up everything that you want to have available for future projects, for example:
- Project members
- Modules
- Default project structure in the Gantt chart
- Work package templates.
- …
Import tasks
In case you are managing your projects in Excel or any other project management software, OpenProject offers you an to upload your tasks into the OpenProject application. First export your tasks from the legacy project management system and then use the Excel Sync to upload them to OpenProject.
SUSE Linux Enterprise Server (SLES) Installation
SLES 12
Add the OpenProject package source:
Download the OpenProject package:
Then finish the installation by reading the section.
Note: On SLES12 full-text extraction for attachments by default.
Full-text extraction not supported
For some distributions we do not provide the required dependencies for full-text extraction of attachments. If you need this feature, please install the required dependencies () manually. For more information, please see the plaintext gem. Once installed, check to see if OpenProject is able to pick up these dependencies.
After you have successfully installed the OpenProject package, you can now perform the initial configuration of OpenProject, using the wizard that ships with the OpenProject package.
Steps to release a plugin
The following steps are necessary to release a new plugin:
Code Review
A code review should check the whole code and remove glitches like:
- Inappropriate comments
- Deactivated code
- Minor cases of code smell
Resolve licensing and copyright issues
- Check the license and the copyright of the plugin to be released
Usually, this should be GPLv3 and we are the copyright owner. However, some plugins might have additional authors or might originate from code with a different license. These issues have to be resolved first. Also check the years in the copyright. If you need to find all contributors of a repository including their contribution period use the following rake task:
- Add a copyright notice to all the source files
There is a rake task in the core to perform this job. Use (e.g. ) to add the copyright header in to all relevant plugin files. If no such file exists, from the core is used.
- Check for existence of and if referenced by the copyright notice.
Complete the readme file or add one if not existing
There should be a file README.md containing:
- A description about what the plugin is actually doing
- Requirements to use the plugin
- Instructions how to install and uninstall a plugin
- Notes where to report bugs
- Notes where to contribute
- Credits
If you’re unsure about if/who to give credit, you should take a look into the changelog:
For your convenience you may use the following rake task, that extracts all authors from a repository
- Licensing information. It is probably best to use READMEs of already released plugins as a template.
Complete the gemspec
- Add the license to the gemspec of the plugin if not already there.
- Add any files that should be included to the gemspec (e.g. the folder, the folder if there are any migrations, the , and the ).
- Check authors and email point to the right authors.
- The homepage should be the homepage of the plugin.
- Check if summary and description are there.
- Check if all dependencies are listed (this might be difficult, I know): There should be a sentence in the README, that this is an OpenProject-Plugin and requires the core to run. Apart from that, state only dependencies that are not already present in core.
- While you are at it, also check if there is any wiring to core versions necessary in engine.rb; also check, that the url of the plugin is wired correctly.
- Push the version of the plugin, mostly by just removing any .preX specials at the end.
- Don’t forget to add a changelog entry.
- Commit everything.
- Also create a release tag (named ‘release/<version>’ for example ‘release/1.0.2′) to name the new version.
- Push the tag with .
Publish the gem at Rubygems
- Ensure gemspec fields are complete and version number is correct
- . This asks for your user/password
- Go to https://rubygems.org, log in, go to the dashboard, click on the uploaded gem, click edit. Set URLs, at least source code URL and Bug Tracker URL
- You are done .
- Be careful when publishing a gem.Once it is published, it cannot be replaced in the same version. It is only possible to take a version out of the index and publish a new version.
Create public visibility
- Make the github repository public.
- Make the plugin project public. Do a little cleanup work first by removing modules not needed. Currently, Activity, Issue Tracking, Time Tracking, Forums, and Backlogs are default. Also, the My Project Page should only show Project Description and Tickets blocks.
- Create a news article about the newly released plugin and its features.
- Twitter with a link to the news article.
- If the plugin is referenced in our feature tour, add a download link to the plugin in the feature tour
Frontend plugins
Plugins that extend the frontend application may be packaged as npm modules. These plugins must contain a in the root directory of the plugin.
Plugins are responsible for loading their own assets, including additional images, styles and I18n translations.
Translations are processed by I18n.js through Rails and will be picked up from .
Pure frontend plugins are currently not possible without modifications to the OpenProject core . We instead recommend to create a hybrid gem plugin instead (see below).
Upgrade notes for 8.x to 9.x
These following points are some known issues regarding the update to 9.0.
MySQL is being deprecated
OpenProject 9.0. is deprecating MySQL support. You can expect full MySQL support for the course of 9.0 releases, but we are likely going to be dropping MySQL completely in one of the following releases.
For more information regarding motivation behind this and migration steps, please see this blog post. In the post, you will find documentation for a mostly-automated migration script to PostgreSQL to help you get up and running with PostgreSQL.
Package repository moved into opf/openproject
The OpenProject community installation is now using the same repository as the OpenProject development core.
Please update your package source according to our installation section.
You will need to replace with together with a change from to in order to perform the update.
If you have currently installed the stable 8.x release of OpenProject by using the package source, you will need to adjust that package source.
APT-based systems (Debian, Ubuntu)
- Update the reference to in to .
- Update the reference to in to .
- Perform the Upgrade steps as mentioned above in Upgrading your OpenProject installation
YUM-based systems (CentOS, RHEL)
- Update the reference to in to .
- Update the reference to in to .
- Perform the Upgrade steps as mentioned above in Upgrading your OpenProject installation
SUSE Linux Enterprise Server 12
- Update the reference to in to .
- Update the reference to in to .
- Perform the Upgrade steps as mentioned above in Upgrading your OpenProject installation
Help and feedback
If you did not find what you were looking for
Search in docs
If you need help from the community or want to support others
Post on OpenProject forum
If you are eligible for professional support and have more questions
Request support
If you find an easily fixable error or need for improvement in the documentation
Edit this page
If you would like to suggest bigger updates or improvements to this documentation
Create an issue
If you want to contribute to translate this documentation to another language
Translate on crowdin
If there’s something you don’t like or understand about this feature
Create an issue
If you want to propose a new feature that OpenProject does not offer yet
Submit feature proposal
To further help OpenProject to shape and test new features
Join beta testing
To view OpenProject premium features and pricing
View pricing page
If you want to try all premium features in the OpenProject Cloud Edition 14 days for free
Free trial OpenProject Cloud Edition
If you want to try all premium features in your on premise Community installation 14 days for free
Free trial OpenProject Enterprise Edition (on premise)
Organize and visualize your project
Projects vary and require a different view by project. Depending on what type of project you are managing, you might want to use a work package list view, agile boards, Gantt chart, backlogs, task board or a roadmap. OpenProject offers both traditional and agile project management and even allows to combine both to a hybrid project management approach.
We would like to show you the major OpenProject modules that offer different project views. However, as mentioned, you can also combine them.
Work package view
Work packages are the base for your project collaboration in OpenProject. They are items in a project (such as tasks, features, risks, user stories, bugs, change requests) and capture various additional attributes, such as status, assignee, priority, due date. The shows all work packages in a list with selected attributes in the columns. You can customize the view by filtering by attributes and choosing the attributes shown in the columns.
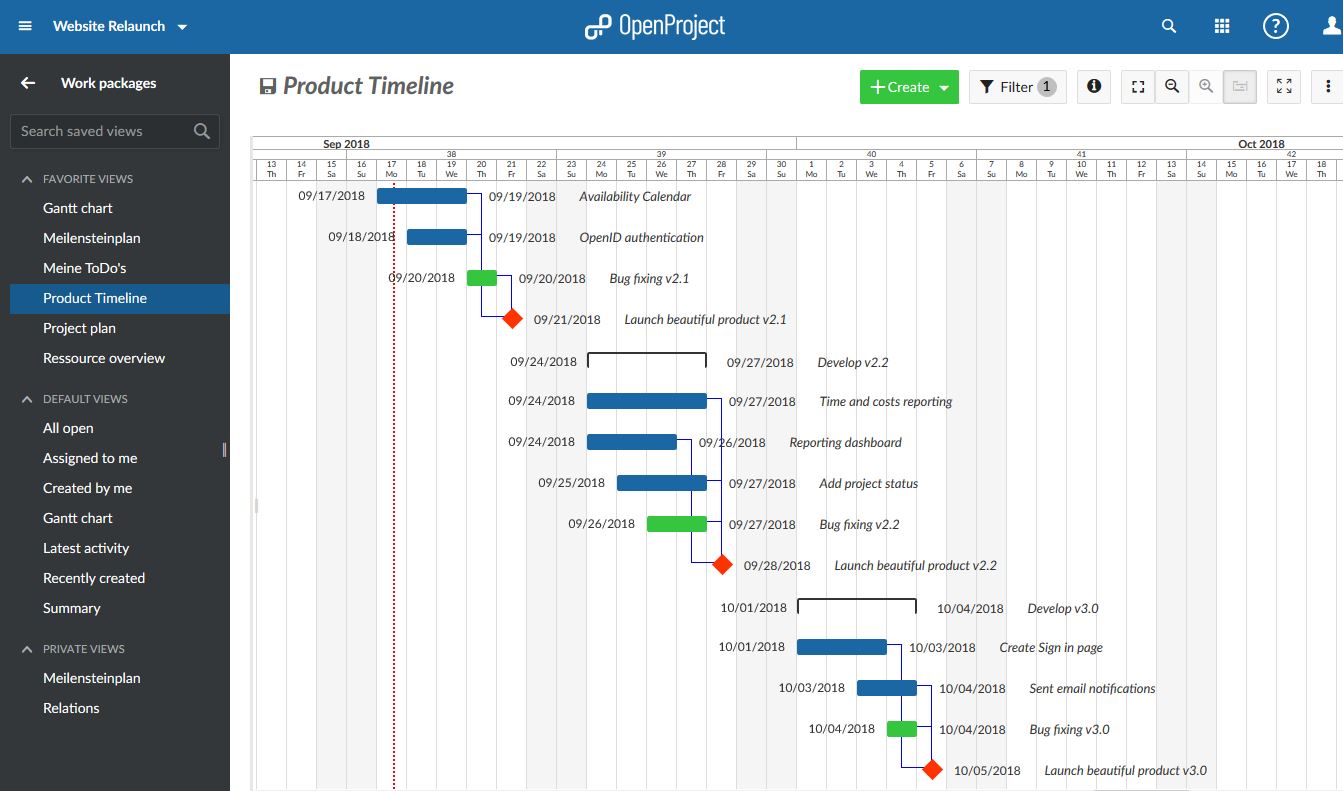
Gantt chart
The displays the work packages in a timeline. You can collaboratively create and manage your project plan. Have your project timelines available for all team members and share up-to-date information with stakeholders. You can add start and finish date and adapt it with drag and drop in the Gantt chart. Also, you can add dependencies, predecessor or follower within the Gantt chart.
Agile Boards
Boards support agile project management methodologies, such as Scrum or Kanban. Our agile boards can be for anything you would like to keep track of within your projects: Tasks to be done, Bugs to be fixed, Things to be reviewed, Features to be developed, Risks to be monitored, Ideas to be spread, anything! The boards consist of lists (columns) and cards. You can choose between a basic board and various action boards. The following board shows a Kanban example where you move your work packages from one status to the next. If you want to find out more about the different agile boards , please click .
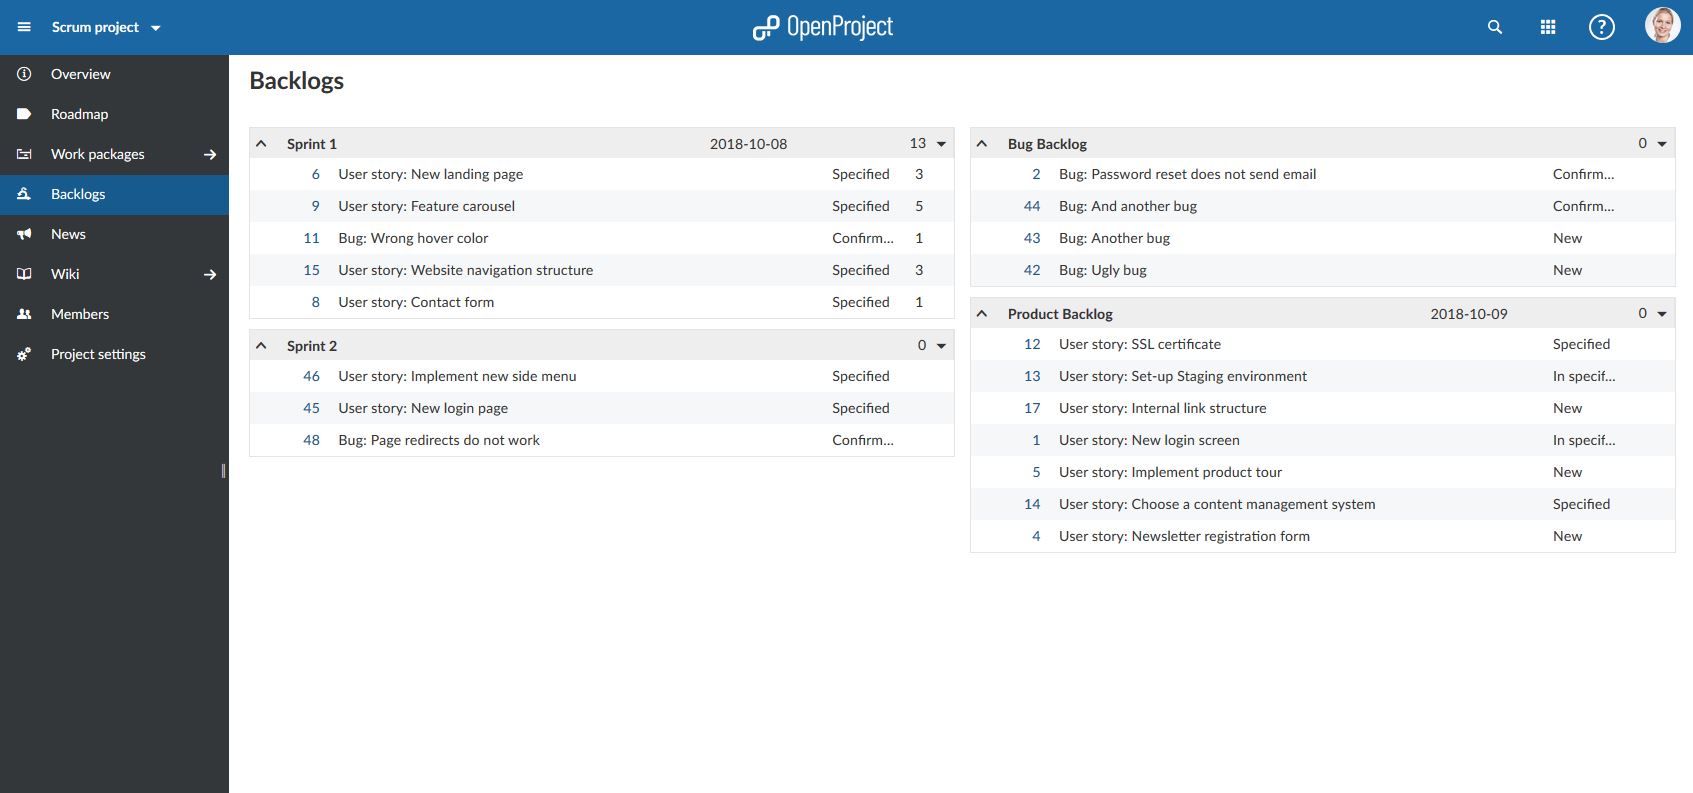
Backlogs
The starting point for effective work in Scrum teams is a well-maintained and prioritized product backlog as well as the creation of sprint backlogs. In OpenProject, you can easily record and specify requirements represented by user stories. Moreover, you can respond to inquiries and sort them by priority for implementation.
Task Board
To support daily scrum meetings, all of a team’s tasks and sprint impediments are recorded in a digital task board. The digital task board thus allows team members to get a fast overview of the current state of a sprint.

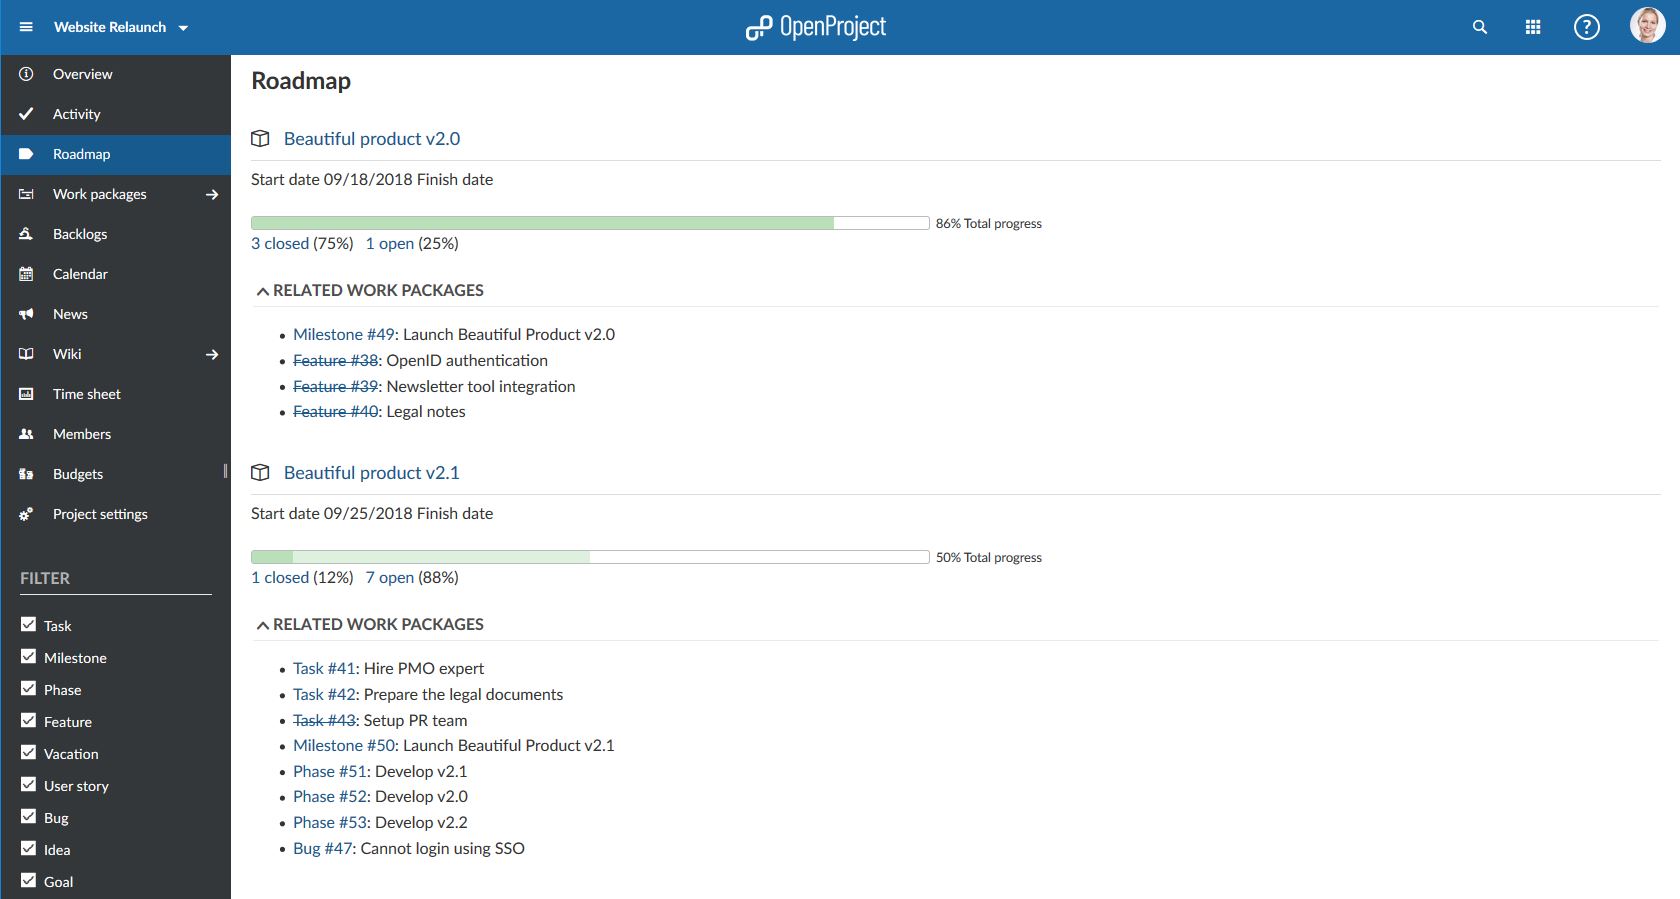
Roadmap
Share your product roadmap with your stakeholders, get feedback about your ideas and break it down into a detailed release plan. In the roadmap, you can see all work packages and their status listed by versions at a glance. For each version, the related work package can be assessed from the list displayed in the roadmap view. Subjects which are crossed out represent closed work packages.
FAQ regarding OpenProject BIM edition
Is there a way to use OpenProject BIM for free, too?
Yes, (only) as part of the Community Edition you can use OpenProject BIM for free. Please have a look here to find out how to activate the BIM modules in your on-premises installation.
Does clicking on a BCF-issue zoom you to the appropriate location in the model?
Yes, the so-called camera position is stored in the BCF-issues, so that exactly the same camera position is assumed when you click on the BCF-issue. These are called viewpoints. If you have several models, e.g. architecture and technical building equipment, these must be activated (made visible) before you click on the BCF-issue. In the same way, BCF-elements of the model can be hidden or selected via the viewpoint.
In our introductory video to the OpenProject BIM Edition the basics are shown very well. In particular, the integration of BCF management into the rest of the project management of a construction project is the strength of OpenProject.
Can I add photos from my mobile/phone to BIM issues?
Yes. Take a photo with your camera and save it on your phone. Then open the correct work package in your browser or create a new one. Append the photo as an attachment to the work package.
Step 3: Apache2 web server
OpenProject comes with an internal ruby application server, but this server only listens on a local interface. To receive connections from the outside world, it needs a web server that will act as a proxy to forward incoming connections to the OpenProject application server.
This wizard step allows you to auto-install an Apache2 web server to function as that proxy.

The available options are:
Install Apache2 web server (default)
We recommend that you let OpenProject install and configure the outer web server, in which case we will install an Apache2 web server with a VirtualHost listening to the domain name you specify, optionally providing SSL/TLS termination.
In case you select to auto-install Apache2, multiple dialogs will request the parameters for setting it up:
Domain name

Server path prefix
If you wish to install OpenProject under a server path prefix, such as , please specify that prefix here with a leading slash. For example: . If OpenProject should respond to as specified in the previous dialog, simply leave this dialog empty and confirm by pressing .

SSL/TLS configuration
OpenProject can configure Apache to support HTTPS (SSL/TLS). If you have SSL certificates and want to use SSL/TLS (recommended), select Yes.
In that case, you will be shown three additional dialogs to enter the certificate details:
- The absolute SSL certificate path
- The absolute SSL private key path
- The path to the Certificate Authority bundle for the certificate (optional, leave empty unless needed)

External SSL/TLS termination
If you terminate SSL externally before the request hits the OpenProject server, you need to follow the following instructions to avoid errors in routing. If you want to use SSL on the server running OpenProject, skip this section.
If you have a separate server that is terminating SSL and only forwarding/proxying to the OpenProject server, you must select “No” in this dialog. However, there are some parameters you need to put into your outer configuration.
- If you’re proxying to the openproject server, you need to forward the HOST header to the internal server. This ensures that the host name of the outer request gets forwarded to the internal server. Otherwise you might see redirects in your browser to the internal host that OpenProject is running on.
- In Apache2, set the directive
- In NginX, use the following value:
- If you’re terminating SSL on the outer server, you need to set the header to let OpenProject know that the request is HTTPS, even though its been terminated earlier in the request on the outer server.
- In Apache2, use
- In Nginx, use
- Finally, to let OpenProject know that it should create links with ‘https’ when no request is available (for example, when sending emails), you need to set the following setting: followed by an . This ensures that OpenProject responds correctly with secure cookies even though it was not configured for https in the server configuration.
Skip (not recommended)
The installer will not set up an external web server for accessing. You will need to either install and set up a web server such as Apache2 or Nginx to function as the web server forwarding to our internal server listening at by proxying.
Only choose this option if you have a local Apache2 installed that the OpenProject package may not control, or need to use a different web server such as Nginx. Please note that not all functionality (especially regarding Repositories) are supported on Nginx.
When installing with an existing Apache2, you can take a look at the source of our installation templates for guidance on how to set up the integration.
Here’s an exemplary configuration that might work for you.
For a minimal nginx config, please see this gist as as starting point.
Please note: If you reconfigure the OpenProject application and switch to , you might run into errors with the Apache configuration file, as that will not be automatically remove. Please double-check you removed references to the if you do reconfigure.
