Redmine
Содержание:
- Notes on Windows installation
- Themes last updated in 2017
- Improving the plugin views
- Information
- Система ролей
- Кому и для чего нужен Redmine?
- Macros
- Macros
- Creating a new Plugin
- Text formatting
- Adding new permissions
- Themes updated in 2016
- Макросы
- PMO
- Модули
- Themes last updated in 2019
- Styling text using CSS
Notes on Windows installation
There is an prebuilt installer of Ruby MRI available from http://rubyinstaller.org.After installing it, select Start Command Prompt with Ruby in the start menu.
When running command as described in this guide, you have to set the environment variable using a separate command.
I.e. commands with the following syntaxes:
RAILS_ENV=production <any commmand>
<any commmand> RAILS_ENV=production
have to be turned into 2 subsequent commands:
set RAILS_ENV=production
<any commmand>
You may need to manually install the mysql gem using the following command:
gem install mysql
And in some case it is required to copy the libmysql.dll file in your ruby/bin directory.Not all libmysql.dll are ok this seem to works http://instantrails.rubyforge.org/svn/trunk/InstantRails-win/InstantRails/mysql/bin/libmySQL.dll.
Important note for Win7 and laterOn Win7 and later, is commented out in the hosts file and IPV6 is the default. As the mysql2 gem does no support IPV6 addresses, a connection can’t be established and you get the error «».You can confirm this by pinging , if ping targets «::1:» IPV6 is being used.
Replace with in database.yml.
5http://serverfault.com/questions/4689/windows-7-localhost-name-resolution-is-handled-within-dns-itself-why
6http://www.victor-ratajczyk.com/post/2012/02/25/mysql-fails-to-resolve-localhost-disable-ipv6-on-windows.aspx
7https://github.com/brianmario/mysql2/issues/279
Themes last updated in 2017
SASS Theme
-
Sass is a theme forked from the vanilla Redmine v3.3 stylesheet and converted to SASS (sources are available).Its purpose is to improve moderately the vanilla theme.
- Author: Fabrice Salvaire
- License: CC by-nc-na
- Latest release: 2017-07-25
- Compatible with: Modern Browser and Redmine v3.4
- Screenshots:
- Project Overview
- Project Roadmap
- Project Issues
- Issue
- Wiki
Priority Issue theme
-
Priority Issue theme is based on the default Redmine theme
- Author: Fourat Achour
- Latest release: 2017-01-02
- Compatible with: Redmine 3.1.1
- Public SCM: https://github.com/SiFAST/redmine-priority-theme
- Screenshots:
- Sprint board
- Issues List
- Issue Card
Improving the plugin views
Adding stylesheets
Let’s start by adding a stylesheet to our plugin views.Create a file named in the directory:
When starting the application, plugin assets are automatically copied to to make them available through your web server. So any change to your plugin stylesheets or javascripts needs an application restart.
The introduced classes need to be used by the links. So change in file the link declarations to:
Then, append the following lines at the end of so that your stylesheet get included in the page header by Redmine:
Note that the option is required when calling the helper.
Javascripts can be included in plugin views using the helper in the same way.
Information
In this screen you can configure the basic (though important) settings for the selected project.

General setting
Name: project display name.
Description: description that appears on the project overview.
Identifier: used by the application for various things (eg. in URLs). It must be unique and cannot be composed of only numbers. Once the project is created, this identifier cannot be modified.
Homepage: homepage-link that appears on the project overview.
Public: if checked, the project can be viewed by all the users, including those who are not members of the project. If unchecked, only the project members have access to it, according to their role.
Subproject of: lets you define a parent project to the project being created. Projects can be unlimitedly nested.
If there are any configured by the administrator, they’ll show up behind the «Public»-setting noted above.
Trackers
Redmine lets you define which of the (thus also their respective ) you are able to use within this specific project.
Trackers: select the trackers that you want to use for issues of the project. Only the administrator can define new trackers.
Custom fields
Custom fields: select the issues custom fields that you want to use for issues of the project. Only the administrator can define new custom fields.
Note that some of these custom fields can be only configured (e.g. unchecked) if the issue custom field is not defined as a global issue custom field (which can be done by the administrator by checking the «For all projects» checkbox in the custom field create/edit view).
Система ролей
Есть две системные роли в Redmine: ‘Non member’ and ‘Anonymous’. Они для внутреннего использования Redmine и поэтому не могут быть удалены.
- Non member: эта роль позволяет определить для зарегистрированного пользователя права доступа на проект, участником которого он не является.
- Anonymous: эта роль позволяет определить права доступа на проект для анонимного пользователя.
Заметим, что эти две роли применяются только для общедоступных проектов так как анонимные пользователи и зарегистрированные пользователи, которые не являются участниками приватных проектов не могут даже видеть приватные проекты.
Как следствие того факта, что роли Anonymous и Non member не могут быть отнесены к конкретному пользователю или группе, но назначаются автоматически, права доступа для этих ролей являются глобальными для данной установки Redmine. Чтобы быть более конкретным: Вы можете создавать различные роли разработчика (reporter1, reporter2 ,…) со слегка различными разрешениями с учетом специфических потребностей конкретных проектов. Однако, вы не можете разграничить роли Anonymous и Non member по отдельным проектам, например, чтобы Non member мог создавать сообщения в форуме в рамках одного проекта, но не мог этого делать в другом проекте.
Некоторые права доступа не могут быть предоставлены этим ролям. Например, право доступа «Управление участниками» не может быть предоставлено Anonymous или Non member пользователям.
Кому и для чего нужен Redmine?
Для руководителя — это возможность оперативного управления:
-
- прослеживаемость процессов работы над проектами;
- распределение временных затрат в разрезе проектов и задач;
- просмотр загрузки сотрудников на месяц или период.
Для исполнителя — упорядоченная работа благодаря:
- хранению всей сопутствующей по проекту документации — договоры, соглашения, счета, коммерческие предложения и другое;
- прослеживанию полного цикла отношений (требований) с заказчиком;
- теги и фильтры позволят за пару кликов найти необходимую информацию, вне зависимости от размера базы данных;
- wiki для каждого проекта;
- форумы для каждого проекта.
Система Redmine предоставляет следующие функциональные возможности:
- ведение множества проектов одновременно;
- гибкая система доступа, основанная на ролях;
- система отслеживания ошибок;
- диаграммы Ганта и календарь;
- ведение новостей проекта, документов и управление файлами;
- оповещение об изменениях с помощью RSS-потоков и электронной почты;
- вики для каждого проекта;
- форумы для каждого проекта;
- учёт временных затрат;
- настраиваемые произвольные поля для инцидентов, временных затрат, проектов и пользователей;
- лёгкая интеграция с системами управления версиями (SVN, CVS, Git, Mercurial, Bazaar и Darcs);
- создание записей об ошибках на основе полученных писем;
- возможность самостоятельной регистрации новых пользователей;
- многоязычный интерфейс (в том числе русский);
- поддержка СУБД MySQL, Microsoft SQL Server, PostgreSQL, SQLite, Oracle.
На сегодня главные задачи, которые решает система Redmine в НИЛ «КСА»:
- документирование процесса проектирования;
- ведение записей;
- справочная и информационная база;
- календарь и органайзер проекта;
- планирование задач и этапов;
- контроль достижения результатов;
- оповещение в случае сбоев и задержек.
Все работы по проектированию выполняются с использованием системы Redmine.
Macros
Redmine includes a macros system that lets you add custom functions to insert dynamic content in formatted text. You can learn about writing your own macros in RedmineMacros. Redmine also includes a few builtin macros:
-
Sample macro.
-
Displays a list of all available macros, including description if available.
-
Displays a list of child pages. With no argument, it displays the child pages of the current wiki page. Examples:
-
Include a wiki page. Example:
or to include a page of a specific project wiki:
-
Inserts of collapsed block of text. Example:
-
Displays a clickable thumbnail of an attached image. Examples:
{{thumbnail(image.png)}} {{thumbnail(image.png, size=300, title=Thumbnail)}} -
Sample macro
Creating a new Plugin
You may need to set the RAILS_ENV variable in order to use the command below:
$ export RAILS_ENV="production"
On windows:
$ set RAILS_ENV=production
Creating a new plugin can be done using the Redmine plugin generator.Syntax for this generator is:
bundle exec rails generate redmine_plugin <plugin_name>
So open up a command prompt and «cd» to your redmine directory, then execute the following command:
$ bundle exec rails generate redmine_plugin Polls
      create  plugins/polls/app
      create  plugins/polls/app/controllers
      create  plugins/polls/app/helpers
      create  plugins/polls/app/models
      create  plugins/polls/app/views
      create  plugins/polls/db/migrate
      create  plugins/polls/lib/tasks
      create  plugins/polls/assets/images
      create  plugins/polls/assets/javascripts
      create  plugins/polls/assets/stylesheets
      create  plugins/polls/config/locales
      create  plugins/polls/test
      create  plugins/polls/test/fixtures
      create  plugins/polls/test/unit
      create  plugins/polls/test/functional
      create  plugins/polls/test/integration
      create  plugins/polls/test/system
      create  plugins/polls/README.rdoc
      create  plugins/polls/init.rb
      create  plugins/polls/config/routes.rb
      create  plugins/polls/config/locales/en.yml
      create  plugins/polls/test/test_helper.rb
The plugin structure is created in . Edit to adjust plugin information (name, author, description and version):
Then restart the application and point your browser to http://localhost:3000/admin/plugins.After logging in, you should see your new plugin in the plugins list:

Note: any change to the file of your plugin requires to restart the application as it is not reloaded on each request.
Text formatting
For things such as headlines, bold, tables, lists, Redmine supports Textile syntax. See http://redcloth.org/hobix.com/textile/ for information on using any of these features. A few samples are included below, but the engine is capable of much more of that.
JPL(Jean-Philippe Lang)
JPL
Font style
- bold
- italic
- bold italic
strike-through- Plain superscript
- Plain subscript
- normal bold italic normal;E=mc 2
- normalbolditalicnormal;E=mc2
- Escaping: *bold* _italic_ @inlinemono@ Alternative using HTML-codes: *bold* _italic_ @inlinemono@
-
*some lines* some "link":http://www.redmine.org
-
some lines some link
Color
- red green yellow blue’ish
- redgreenyellowblue’ish
- Lightgreen Background Yellow Background
- Lightgreen BackgroundYellow Background
Inline images
- !image_url! displays an image located at image_url (textile syntax)
- !>image_url! right floating image
- !image_url(Image title)! displays an image with an alt/title attribute
- !image_url!:URL displays an image located at image_url with link URL added
If you have an image attached to your wiki page, it can be displayed inline using its filename: !attached_image.png!
You can also apply a CSS style to the image in the same ways as styling SPANs. The code !{width: 100%}attached_image.png! will make the image adjusts to the parent’s width.
Headings
Redmine assigns an anchor to each of those headings thus you can link to them with «#Heading», «#Subheading» and so forth.
Paragraphs
displays;
left aligned
left ident 1em
left ident 2emas well as for following lines
right aligned
right ident 3em
This is centered paragraph.
<pre>*Your text won't become bold*</pre>
*Your text won't become bold*
Blockquotes
Start the paragraph with bq.:
You can also use > at the beginning of each line and stack them for nested quotes:
>> Rails is a full-stack framework for developing database-backed web applications according to the Model-View-Control pattern.
>> To go live, all you need to add is a database and a web server.
> Great!
* Item 1
* Item 2
** Item 21
** Item 22
* Item 3
- Item 1
- Item 2
- Item 21
- Item 22
- Item 3
# Item 1
# Item 2
# Item 3
## Item 3.1
## Item 3.2
- Item 1
- Item 2
- Item 3
- Item 3.1
- Item 3.2
Tables
|_.UserID      |_.Name          |_.Group     |_. attribute list   |
|Starting with | a              |   simple   |row                 |
|\3=.IT                                      |<. align left       |
|1             |Artur Pirozhkov |/2.Users    |>. align right      |
|2             |Vasya Rogov     |=. center   |
|3             |John Smith      |Admin
                                 (root)      |^. valign top       |
|4             |-               |Nobody
                                 (anonymous) |~. valign bottom    |
displays (all multiple spaces are replaced by 1 space):
| UserID | Name | Group | attribute list |
|---|---|---|---|
| Starting with | a | simple | row |
| IT | align left | ||
| 1 | Artur Pirozhkov | Users | align right |
| 2 | Vasya Rogov | center | |
| 3 | John Smith | Admin (root) | valign top |
| 4 | — | Nobody (anonymous) | valign bottom |
If you want to include pipe characters inside your table (e.g. for Wiki links), you need to prevent textile from interpreting them:
| Input | Output |
|---|---|
| <notextile>|</notextile> | | |
If you want to specify the width of the table, you need to put table{width:100%}. just before your table definition:
table{width:100%}.
| This table will use
all horizontal space |
This way the table will extend to the whole page width …
| This table will useall horizontal space |
… compared with the standard width:
| This table will useonly the required space |
Table of content
Please keep in mind, that the toc-tag needs an empty line above and underneath it and no other text before and after it.
Example:
Adding new permissions
For now, anyone can vote for polls. Let’s make it more configurable by changing the permission declaration.We’re going to declare 2 project based permissions, one for viewing the polls and an other one for voting. These permissions are no longer public ( option is removed).
Edit to replace the previous permission declaration with these 2 lines:
Restart the application and go to http://localhost:3000/roles/permissions:
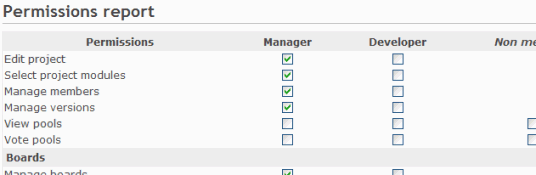
You’re now able to give these permissions to your existing roles.
Of course, some code needs to be added to the PollsController so that actions are actually protected according to the permissions of the current user. For this, we just need to append the filter and make sure that the @project instance variable is properly set before calling this filter.
Here is how it would look like for the action:
Retrieving the current project before the action could be done using a similar way.After this, viewing and voting polls will be only available to admin users or users that have the appropriate role on the project.
If you want to display the symbols of your permissions in a multilingual way, you need to add the necessary text labels in a language file.Simply create an *.yml (eg. ) file in and fill it with labels like this:
In this example the created file is known as , but all other supported language files are also possible too.As you can see on the example above, the labels consists of the permission symbols and with an additional added at the front.
Restart your application and point the permission section.
Themes updated in 2016
Tasks colors from Mantis
-
Tasks colors from Mantis possible to integrate to most themes (default classic theme). It make your favorite redmine theme with well-understandabe well-established tasks colors bring from Mantis bug tracking system.
- Author: Serguei Okladnikov
- Release: 2016-07-26
- Website: https://github.com/oklas/redmine-color-tasks
- Public SCM: https://github.com/oklas/redmine-color-tasks
- Screenshots:
- Default theme with the standart classic theme
- Overloading example with NYSenate Gitlab-looking theme
ChiliProject Look and Feel
- ChiliProject Look & Feel adds the original ChiliProject theme and menu style to Redmine (ChiliProject was a fork of Redmine between 2011-2013: some of the nice functionality ideas have since been written as plugins for core Redmine http://www.chiliproject.eu/projects/chiliproject-eu/wiki/Current_plugins
- Compatible with: 4.0.x, 3.2.x, 3.1.x, 3.0.x
- Latest release: 2015-03-10
- Public SCM: https://github.com/chiliproject-eu/chiliproject_look_and_feel
- Website: http://www.chiliproject.eu/projects/chiliproject-eu/wiki/ChiliProject_Look_and_Feel_Plugin
- Demo: http://www.chiliproject.eu/projects/chiliproject-eu/wiki/ChiliProject_Look_and_Feel_Plugin
- Screen shot: Can be seen live at http://www.chiliproject.eu
Dwarf Theme
-
Dwarf — responsive HD Redmine theme for screens between 1600 and 1920. Side nav bar, 2-column content layout, nicer dropdowns,
- Website: https://github.com/themondays/Dwarf
- GitHub: Dwarf
- Author: Jared Denison
- Public SCM: https://github.com/themondays/Dwarf
- Public ITS: https://github.com/themondays/Dwarf/issues
- Release: 2016-01-30
- Compatible with: Redmine 2.0.4 — 3.x
- Screenshots:
- Promo
- Issues List
- Issue Card
Minelab
-
Minelab A theme inspired by Gitlab, written in Sass, uses Bourbon for cross browser compatibility, Neat for responsive grids and Font Awesome to replace all the stock icons (forked for Redmine 3 from https://hardpixel.github.io/minelab)
- Author: hardpixel
- Latest commit: 2016/03/15
- Public SCM: https://github.com/jjanusch/minelab
- Screenshots: http://hardpixel.github.io/minelab/
Progressive Projects List theme
-
Progressive Projects List theme extends default theme with usability features in Projects: Bold subproject names on project listing, Make «not my» projects grey on project list, so my projects stand out. (all via application.css)
- Author: Dmitry Babenko
- Latest release: 3.0.1, 2016-01-04
- Compatible with: Redmine 3.2, 3.1, 3.0, 2.6, 2.5, 2.4, 2.3, 2.2, 2.1
- Features:
- Show overall projects status in progress bars
- Show project status in progress bars at project overview page
- Quick links to issues, new issue, version, etc directly from the projects list
- Show due date of the projects and versions
- Recently viewed projects sidebar block
- Public SCM: https://github.com/stgeneral/redmine-progressive-projects-list
- Screenshots of ProjectList page:
- Projects with status bars: http://stgeneral.github.io/redmine-progressive-projects-list/images/screenshots/v020/progressive-projects-list-v020-progress.png
- and also with menus per bar: http://stgeneral.github.io/redmine-progressive-projects-list/images/screenshots/v020/progressive-projects-list-v020-menus-n-progress.png
- and more: http://stgeneral.github.io/redmine-progressive-projects-list/screenshots.html
Макросы
Список доступных макросов и их описание (по-английски) вызывается следующим макросом:
`macro_list`
Отображает блок «содержание» страницы, который формируется автоматически на основе выставленных в тексте :
`TOC`

{{>TOC}} // блок справа
Дочерние страницы
Выводит список ссылок на все (англ.) для страницы:
`child_pages`
Выводит список дочерних страниц для любой страницы:
{{child_pages(RedmineIssues)}}
Пример:
-
RedmineIssueList
- RedmineIssueChangelog
- RedmineIssueSummary
-
RedmineRoadmap
RedmineVersion
Начинает список со ссылки на страницу:
{{child_pages(RedmineIssues, parent=1)}}
Пример:
-
RedmineIssues
-
RedmineIssueList
- RedmineIssueChangelog
- RedmineIssueSummary
-
RedmineRoadmap
RedmineVersion
-
RedmineIssueList
Выводит дочерние страницы заданной глубины вложенности:
{{child_pages(RedmineIssues, depth=2)}}
-
RedmineIssueList
- RedmineIssueChangelog
- RedmineIssueSummary
-
RedmineRoadmap
RedmineVersion
{{child_pages(RedmineIssues, depth=1, parent=1)}}
-
RedmineIssues
- RedmineIssueList
- RedmineRoadmap
Включение текста
Выводит содержимое указанной страницы:
{{include(PMO)}}
Пример (для удобства включение обрамлено горизонтальными разделителями «—» )
PMO
Project Management Offices need to provision and track workloads between competing projects. Redmine is a great project collaboration tool for software teams.
- Workload (weekly timesheet and future assignments per developper with summary information)
- Taskjuggler (for scheduling future tasks leveredged by a first-class scheduling program)
Redmine 0.9 also takes better into account task dependencies. The Taskjuggler round-trip extension and plugin is user for controling developper overload. Workload eases planning of future tasks in man-days.
These plugins are currently under beta development and participation is very much welcome !
Если включаемая страница не найдена или у текущего пользователя нет доступа на её просмотр, будет выведено сообщение об ошибке:
Error executing the include macro (Page not found)
Предпросмотр изображения
Выводит блок шириной 100 px для предварительного просмотра прикрепленного изображения:
{{thumbnail(scm_diff.png)}}
Можно задать ширину блока и всплывающую подсказку:
{{thumbnail(scm_diff.png, size=300, title=Thumbnail)}}
Модули
На этом экране можно выбрать, какие модули Вы хотите использовать для проекта.
Отключение модуля не приводит к удалению связанных данных. Оно просто предотвращает доступ к нему пользователей. После отключения модуля он может быть повторно включён со всеми его данными. Вы можете, например, отключить модуль ‘Задачи’ для отдельного проекта. Существующие задачи не удалятся. Вы сможете получить доступ к ним, если вы повторно включите модуль.
Основные модули
- Задачи: предоставляет возможность Отслеживания задач, включая , , план действий и обзор версий
- Учёт времени: предоставляет возможность Отслеживания времени
- Новости: предоставляет функцию Новостей
- Документы: предоставляет функцию Документов
- Файлы: предоставляет функцию Файлов
- Wiki: предоставляет возможности Вики
- Хранилище: предоставляет возможности Хранилища
- Форумы: предоставляет возможности Форума
- Calendar: предоставляет функцию Календаря
- Диаграмма Ганта: предоставляет возможности Диаграммы Ганта
Дополнительные модули могут быть добавлены к системе с помощью модулей Redmine. Модули могут быть установлены только администратором.
Themes last updated in 2019
Circle theme
-
Circle is a freshly designed soft color palette redmine theme with flat styles and form elements styles. Hide sidebar button and dropdown menu items
- Author: RedmineUP
- Latest release: v.2.1.5 — 2019-12-23
- Compatible with: Redmine 2.x — 4.1.x
- Screen shots:
- Issue page
- Agile board
- Issues list
- Contact list
Flatly light
-
Flatly light is a modern and elegant flat theme, with slide out side panel
- Author: Petr Stepchenko
- Latest release: 0.2.4, 2019-11-08
- Compatible with: Redmine 2.5.x — 3.4.3
- Public SCM: https://github.com/Nitrino/flatly_light_redmine
- Public ITS: https://github.com/Nitrino/flatly_light_redmine/issues
- Screenshots:
- https://raw.githubusercontent.com/Nitrino/flatly_light_redmine/master/screenshots/screen_1.png
- https://raw.githubusercontent.com/Nitrino/flatly_light_redmine/master/screenshots/screen_2.png
- https://raw.githubusercontent.com/Nitrino/flatly_light_redmine/master/screenshots/screen_3.png
minimalflat2
-
minimalflat2 is Minimal and Flat. Responsive (Redmine 3.2 onwards). Modern color scheme by Flat UI & Espresso, Expandable tree view of the project list,
- Support: Redmine v4.0.4 or later
- Author: akabeko
- Latest release: v1.6.1, 2019/7/17
- Public SCM: https://github.com/akabekobeko/redmine-theme-minimalflat2
- Screenshot: Projects Editor Issue Settings For mobile Menu
Nuno Kappa (Commercial theme)
-
Nuno Kappa is powerful, responsive and will give your Redmine professional and eye-catching look.
- Author: Nunothemes.com & Softbless
- Latest release: v.1.0 — 2019-07-09. Changelog
- Compatible with: Firefox, Safari, Chrome, Edge, Redmine 2.6 — 4.0
- Multiple Color Scheme (Blue, Red, Magenta, Yellow, Green and Orange)
- Supported Plugin : Knowledge Base, Redmine Local Avatar Plugin, DMSF, Xapian Search Plugin, Redmine Checklist, Redmine Agile Plugin, Clipboard Image Paste, A common libraries, Custom Menu Redmine, Redmine Auto Done 100%, Redmine Code Review plugin, Redmine Default Due Date Plugin, Redmine Email Images plugin, Redmine email inline images plugin, Issue Importer, Redmine Issue Templates plugin, Redmine Landing Page plugin, Redmine Mail Reminder plugin, Redmine Mentions, Menu Links Plugin, Redmine Recurring Tasks, Redmine Slack.
- Website
- Screenshots:
- Red Color Scheme :
- List Issue
- Detail Issue
- Activity
- New Issue
- Mobile List Issue
- Blue Color Scheme :
- List Issue
- Detail Issue
- Activity
- New Issue
- Mobile List Issue
- Red Color Scheme :
Styling text using CSS
Textile can style text using CSS. Examples as follows:
Three primary colors of light are %{color: #f00}red%, %{color: #0f0}green% and %{color: #00f}blue%.

p{border: solid 1px #000; padding: 0.5em;}. The quick brown fox jumps over the lazy dog.

table{width: 100%}.
|={width: 30%; background-color: #aaf;}. column 1 |={width: 70%}. column 2 |
displays:
Three primary colors of light are red, green and blue.
The quick brown fox jumps over the lazy dog.
| column 1 | column 2 |
Allowed CSS properties
Redmine allows the following properties. Other properties are not allowed for security reasons (see r2192).
- background
- background-*
- border
- border-*
- color
- float
- font
- font-*
- height
- margin
- margin-*
- max-height
- max-width
- min-height
- min-width
- padding
- padding-*
- text
- text-*
- width
