Welcome
Содержание:
- Selecting Multiple Targets
- ICMP
- Инструкция по использованию
- Simply the best
- Running the agent as a service
- Getting Started Guide
- How PingPlotter Works
- Licensing
- Location Location Location
- What is PingPlotter Cloud?
- Error handling and troubleshooting
- Example:
- Oh crap! It’s hop one! I broke it!
- Configuring the Windows agent
- The road ahead
- 03-01-2021 — PingPlotter Version 5.19.1 Update
- Installing the UNIX Agent
- Installing the Windows Agent
- Navigation
- UDP
- 5.14.2 Beta Release Notes
- Comments
Selecting Multiple Targets
You can select multiple targets and apply changes to them (pause, change the trace interval, use a different configuration, or add them to a summary screen). This is a pretty easy process, too. Hold down either the “CTRL” (for Windows) or the Command (for Mac) key on your keyboard, and click on a few different targets. If the targets you’re needing to select are in order, you can click one, hold down the shift key, and click on the last one in the list to get the whole group.
Once you’ve got multiple targets selected, any changes made in the target bar will be automatically applied to the selected targets. There are also a few options (pause, resume) available via the right click menu.
ICMP
The Internet Control Message Protocol, or ICMP, has an entirely different function than TCP and UDP. Unlike these types, ICMP is not a traditional data packet protocol. ICMP is a special type of packet used for inter-device communication, carrying everything from redirect instructions to timestamps for synchronization between devices.
What ICMP is probably best known for, however, is echo requests. This is pretty much what it sounds like. One device sends out an ICMP packet to another, telling the recipient to send a reply confirming it received the request. The recipient then responds with a new ICMP packet, the echo reply, confirming the request.
If you haven’t guessed, ICMP is the primary packet type used by software like PingPlotter. ICMP is built specifically for testing networks with minimal overhead. In almost every situation, you want to begin your network testing with ICMP, as it gives a good baseline to begin troubleshooting. If you feel like a route is ignoring ICMP traffic, it then makes sense to continue testing with a different packet type. Otherwise, ICMP is often more than enough to find and fix a network issue.
Инструкция по использованию
Когда пользователь часто сталкивается с проблемами разрыва соединения или при передаче данных теряются пакеты информации, поможет тестирование канала веб-связи с помощью «ПингПлоттера». Приложение определит слабые узлы, а чтобы программа исправно работала, следует выполнить такой алгоритм:
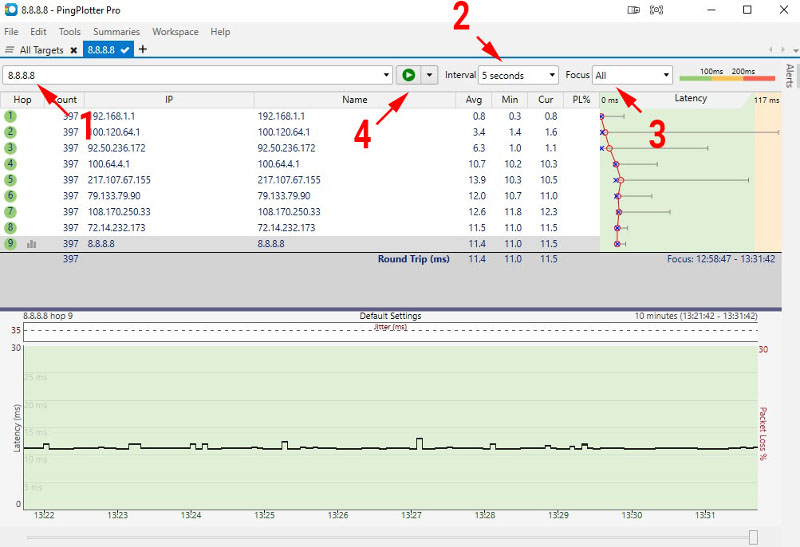
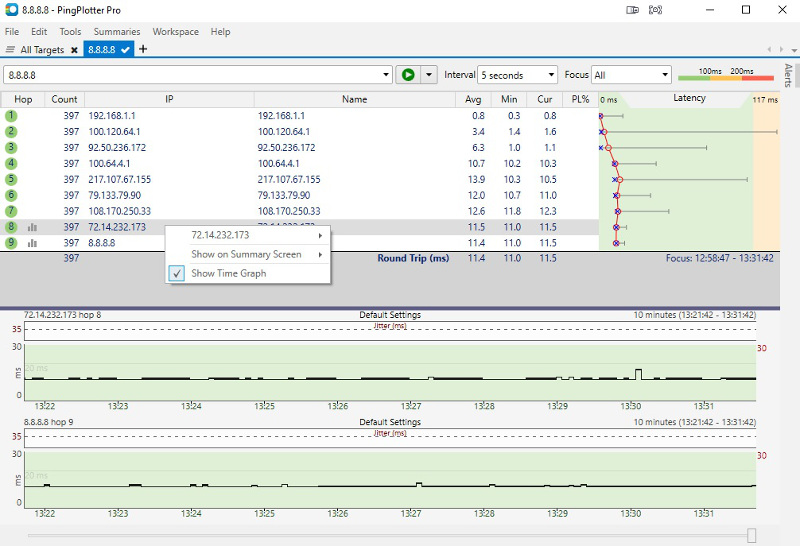
В нижней области окна программы будет выведен график полученного пинга и, по умолчанию, диаграмма задержек до целевого адреса IP. Графический отчет можно задать для каждого IP через выбор адреса и клик правой клавишей мыши. После этого откроется окно, где нужно выбрать команду Show TimeGraph. Надо проявить терпение и выждать от 5 до 10 минут, чтобы получить максимально подробный график. Сетевые разрывы отобразятся красными линиями.
В принципе, в этот момент можно остановить проверку и экспортировать изображение с диаграммой в формате PNG. Это действие выполняется через клик на кнопку File вверху слева и последующий выбор Save Image. Если нужно сохранить данные в виде текста, следует кликнуть по клавише Export to Text File.
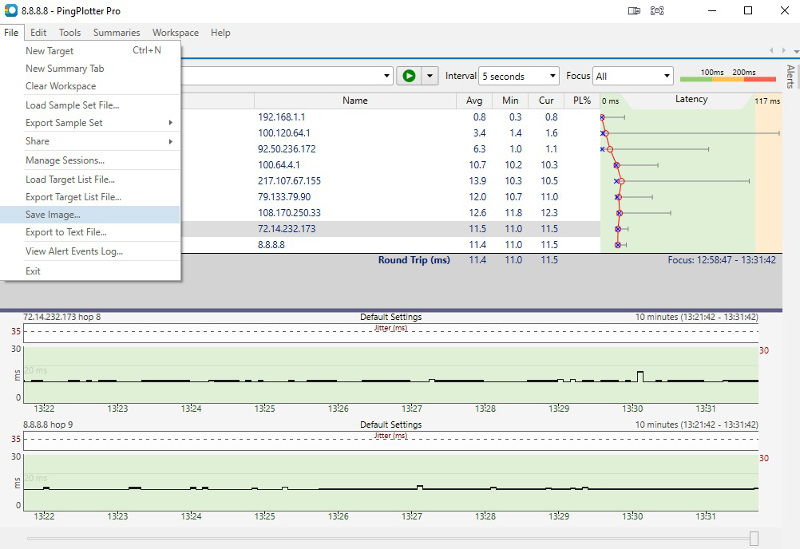
Далее появится окошко, где будут стоять настройки по умолчанию. Достаточно будет просто нажать Export и получить график в png-формате и текстовый документ.
Источник
Simply the best
Ping and traceroute can tell you a lot, but they really aren’t the best tools for the job. When it comes to solving problems, monitoring performance, or just learning more about your network or someone else’s, it’s hard not reach straight for PingPlotter. It’s fast, resource-friendly, and collects important data in ways few other tools can — because who needs a ping tool when you could have PingPlotter instead?
Speaking of which, finding the best tool is just the first step in becoming the master of your domain (puns!). We have a number of handy resources to help you get the most out of your networking tool, regardless of what you use. Our wisdom hub has guides on troubleshooting best practices, identifying common network problems, and more. We also have a monthly newsletter full of networking know-how and interesting stories from all across the world of IT.
Running the agent as a service
If you want to be able to trace from a machine at any time, you can install the agent as a Windows Service.
To install as a service, browse to the agent’s install directory using a command prompt and then enter the following command:
PingPlotter_Remote_Agent /install
After doing this the agent will show up in the control panel services applet, or you can start the service manually with this command: net start PP_RemoteAgent
To uninstall the service (remember that because there is no installer / uninstaller for now, you’ll need to manually remove it), stop the service, then run this command:
PingPlotter_Remote_Agent /uninstall
You can also use the «/reinstall» parameter to register the agent in a new location.
If any of these commands have an error, then you’ll get a popup message telling you about that error. If you have no errors, then the command will complete with no popup messages. If you do get an error, you can check in the «PP_Remote_Agent_error.log» file to see what the error was.
Note that under Windows Vista and newer, you will not have access to the user interface when running as a service. For best results, stop the agent, run it as an application to change its settings and do testing. When you have everything working the way you expect, close the application and restart the service.
Getting Started Guide
How PingPlotter Works
Now that PingPlotter is installed and running, all your network problems are fixed and you solved world peace and everyone gets a free puppy!
Err…not quite. Networks are complex things. When you connect to something on the internet (like a website, streaming service, or game server), you might imagine a bunch of zeros and ones going from your device to the destination. If so, you’re right!
Well, sort of.
In truth, small chunks of data (called packets) ‘hop’ from one device to the next on an Indiana Jones-style flight path toward your target. At any point along the journey, your data could get held up or just plain lost, causing a myriad of symptoms we simply refer to as “suck.”
The problem is, you can’t normally see what your data’s doing. It just heads out of your device and then ¯\_(ツ)_/¯. This is what makes network issues so frustrating. Is it your router? Your internet provider? A service outage? It’s hard to know what’s up.
That’s where PingPlotter comes in. PingPlotter sends out small ping packets to map and monitor every hop between you and your desired destination. Now you can see exactly where and how things are getting hung up. By using what PingPlotter finds in combination with some network know-how (we’ll help with that part, too), you can find the real problem and fix it for good.
I’m sure there’s more to PingPlotter than that!
If you’d like to know EXACTLY how PingPlotter functions, we have a full-bodied explanation for your reading pleasure. It’s pretty cool!
Learn more
Licensing
Can I buy a single license and use it on more than one computer?
Yes, a single license can be installed on a handful of machines. However, you’ll only be able to run a single instance of PingPlotter one at a time. For example, two machines with the same licensed version would work, just not simultaneously.
Do you have a concurrent use license?
Not at the moment. You have the option to install PingPlotter on a machine, then uninstall and reinstall on a different machine as you need it.
How is PingPlotter licensed?
Single Licenses
A single user license is good for one user (person), and can be installed on a computer, uninstalled and moved to another machine. It’s also able to be installed on more than one computer at a time, however, only one instance of PingPlotter will work at a time (not simultaneously).
Multi-computer licenses operate strictly by the number of computer installs.
How many licenses does my team need?
For Individuals
Single-user licenses are ideal for an individual IT person supporting an office or small client base. This license allows them to troubleshoot and monitor several targets.
For Teams
If a team of people need their own instance of PingPlotter, a single-user license for each person would suit them best. Allowing them to troubleshoot and monitor their own situation. If a team of people will be using the same computer (with their own user profile), then a license for each user is recommended. For teams of people needing access on several machines, multiple-computer licenses are for you. This scenario would allow several computers to all have their own independent functions with PingPlotter, troubleshooting and monitoring their own set of targets.
A license for each individual user profile (if they require separate configurations/targets/etc.). Or, if each user profile uses the exact same instance (same configurations/targets/etc.) a single license would work.
Location Location Location
When it comes time to diagnose the network issue, the first thing you need to know is where it’s originating from.
Remember this graph? We identified the captured data was a good snapshot of a possible issue, so let’s dive a little deeper.
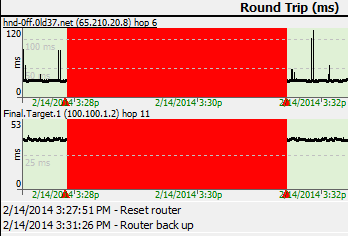
If the final hop is the most important, the first hop is a close second. Why? That’s simple: it’s you! Nasty red stuff at hop one usually means something on your end is causing the frowny face. If the start of a route is squeaky clean, you can begin to rule out internal factors.
The next steps are directly tied to where the problem starts. Take a look at your collected data and see on which hop the latency and/or packet loss seems to originate:
What is PingPlotter Cloud?
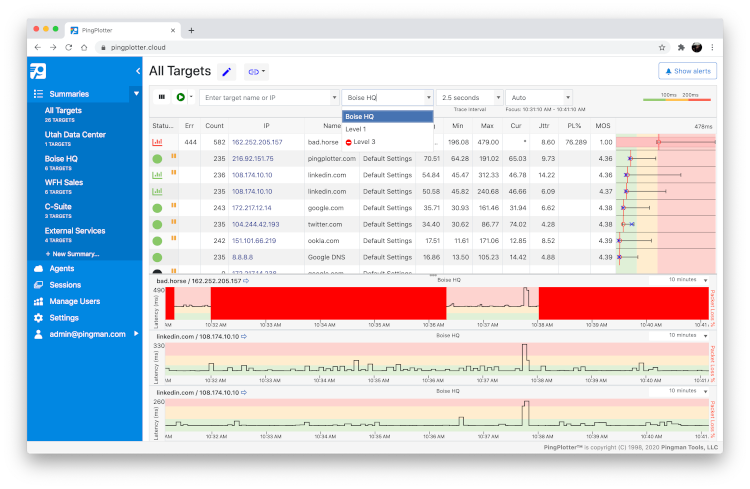
PingPlotter is a network diagnostic tool used to troubleshoot and monitor the active network path between a device and a specific endpoint. PingPlotter identifies every hop between two devices, allowing you to pinpoint the area where the connection deteriorates. We’ve integrated this tool that everyone knows and loves into our cloud platform, aptly named PingPlotter Cloud.
PingPlotter Cloud is the platform that allows you and your team to monitor and troubleshoot remote devices from anywhere. By deploying remote agents to workstations, servers, or cloud VMs, you can test connections for hundreds of distributed devices from a central location using your favorite web browser.
Seamless deployment. Set up lightweight PingPlotter Agents anywhere in the world using activation links or pre-configured installers and collect their network data using the PingPlotter Cloud Interface.
Your privacy matters. PingPlotter Cloud doesn’t support unnecessary back doors into your monitored devices. When you start a network test, the data that’s collected is the data that’s shown.
Active usage pricing. PingPlotter Cloud pricing is based upon how many active (or paused) trace sessions you need at one time, not user counts or device limits. Subscribe monthly or annually and edit your plan as your needs change!
Error handling and troubleshooting
A remote agent adds additional complexity to any deployment, and PingPlotter’s is no exception to this. In an attempt to keep things as simple as possible, and still satisfy our needs, we use existing technologies — web servers, HTTP, existing command-line tools (for UNIX, where good ones exist), etc.
This means that in most cases we’re dealing with familiar territory when troubleshooting. All the remote agent capabilities can be accessed via a web browser. If PingPlotter is having problems reaching a remote agent, then you can use your web browser to check and verify. You can also use PingPlotter (not the remote agent) to constantly monitor the availability of the server and route to the remote agent.
If the remote agent is inaccessible for some reason, there is a network failure between the PingPlotter machine and the agent for example, any alerts you have configured will not fire. If you want an alert to fire, you need to set up PingPlotter to monitor the agent machine itself.
There are a number of configuration challenges that might hit you here, but these should be familiar to you if you’ve done much network and/or application troubleshooting. ZoneAlarm, for example, might block access between PingPlotter and the agent machine. Other firewall issues could also come up. If you view the remote agent as a web server, the troubleshooting techniques you’ve used elsewhere should help you here too.
If PingPlotter is unable to reach the agent, because of an authentication problem or network failure, the error will appear above the trace window on the targets it applies to. This message might be an HTML error (e.g., 401 authentication failed), or a network failure message. These events will show up in PingPlotter’s time graph the same way a route change does, with the background color on the time graph matching background colors elsewhere rather than having the graph scale colors painted on.
Example:
Lets say that we have three offices: a «main» office in Boise, a branch in Amsterdam, and one in Tokyo. With a single instance of PingPlotter running at our Boise office, we already know that we can monitor the connection between us, and the other two offices. We can also monitor our connection from the Boise office to our business and VoIP server.
When using remote agents deployed on machines in both the Amsterdam and Tokyo office, we can now also measure the connection from both of those offices to both the business server, and VoIP server as well — all from the single instance of PingPlotter that’s running back at our headquarters in Boise!
Oh crap! It’s hop one! I broke it!
If the network trouble seems to be originating from your end, there’s good news and bad news.
Bad news first: The ball’s in your court. You’re going to need to dig a bit deeper and figure out what’s causing the problem.
The good news? The ball’s in your court! Since the problem’s happening within your sphere of influence, you will hopefully be able to take care of it right away.
To figure out the cause of the network issue, you need to start looking closely at the symptoms of the problem and the patterns you see in PingPlotter’s data. We’ve collected a list of the usual suspects here, complete with graphs to help compare your data. Once you find a cause that matches, you’ll be all set to put this problem to bed!
Configuring the Windows agent
Because the Windows agent is a full-fledged server unto itself, you may want to have it behave differently depending on where you’re installing it.
Server Port
The default server port of the Windows agent is 7465. If this doesn’t work for some reason in your network, you can change it by right-clicking on the tray icon and selecting the «Settings…» option. Clicking on the «Apply» button makes that change immediately, and if the server is unable to start on that port an error will occur.
Security
You might not want to expose the agent to anyone or limit access to it. This can be done via the username / password settings in both the agent and the remote trace setup in PingPlotter. The authentication system uses standard HTTP basic authentication. If the agent requires a username / password, and it doesn’t match what’s specified in PingPlotter, an error will show up in PingPlotter. If no username or password is required by the agent, then the username / password settings in PingPlotter will be ignored.
The road ahead
This new interface is just the beginning of what’s planned for the near future. Since we’ve had a tendency to keep our cards close to the chest, we wanted to give you some insight into what we’re actively developing, especially when it comes to the web.
Our primary goal is getting the web interface as close to one-to-one with the PingPlotter client as possible. One of the biggest draws of the web interface is the ease-of-access for remote deployments, as software clients can be a hassle to use when remoting in from off-site. One of the best ways to use PingPlotter is to deploy it remotely, and we want to make that experience the best there is.
We still have a little ways to go with web/client parity:
- First, there are settings. Currently, engine settings (such as packet types or NIC selection), need to be set client-side. We want to have the full breadth of system options available from the web, and we’re not too far from having it ready.
- Second, we’re hard at work incorporating another core feature: alerts. While we plan to have the full toolbox implemented, PingPlotter wouldn’t be PingPlotter without its robust alert system. Making sure alerts are functioning reliably is a top priority.
Outside of parity, we have a number of features we plan to implement in the near future:
- The biggest — and most requested feature by far — is read-only support. We’ve had almost daily requests for a read-only web interface, and it’s definitely in the works.
- This pairs with another critical component on our roadmap, which is multi-user login support. It’s hard to have a read-only interface without access restrictions, and you can’t restrict access if you can’t manage users. We’re going to have a lot to say about this one in 2020, so be sure to stay connected with us.
We can’t give specifics on timeframes or timelines, but we think this glimpse into the future will help you get the most out of the web interface today while looking forward to what’s coming next.
03-01-2021 — PingPlotter Version 5.19.1 Update
New Features
- Updated packet generator — PingPlotter’s packet generator has been updated to improve its accuracy for sub-millisecond latencies over long periods of persistent testing.
- Comments in the web UI — Just like in the platform, you can add comments to specific points in Timeline Graphs. You can also set alerts to automatically add comments under specific conditions.
- Agent-based summaries in the web UI — PingPlotter Cloud Agents are now given unique target summaries, making it easier to manage traces on remote devices. In addition, you can now create LiveShare links for Agent summaries, allowing viewers to see the complete status of their network connection.
Improvements
- Changed the Save Image alert to use a 24-hour time in file name instead of a 12-hour time
- Improved CloudConnect Agent install process to be less confusing when deploying to remote devices
- Special characters are now supported when naming an Agent through the web UI
- (Web UI) Made CloudConnect Agent management easier to navigate
- (Web UI) The target input history dropdown is now customizable and remembers previous entries
- (Web UI) Timeline Graph scrolling is much more smooth and logical
- (Web UI) Added an All LiveShare viewer page
- (Web UI) Added settings for latency color scale
- (Web UI) Updated control panel reactivity to work better on more screen sizes
- (Web UI) Improved the Trace Graph dropdown menu
- (Web UI) Improved resource usage and performance
Installing the UNIX Agent
The PingPlotter remote agent for UNIX is a Perl or PHP script that uses the UNIX traceroute command to gather sample set(s) and pass the results to PingPlotter via a web server. Because of all the various flavors of UNIX that exist, and the possible differences when it comes to the output of the traceroute command, you may need to modify the script for your particular source machine. We’ve primarily tested under FreeBSD and Debian. Contact us if you have problems here.
- Download the unix agent script from the agent download page.
- Extract the perl script (trace.pl) or php script (trace.php) into a web-accessible directory on a UNIX web server that is capable of serving the appropriate script.
- If necessary, set the script to be executable by your web server, (chmod 755, or similar, and don’t forget to check the permissions for the directory).
- Test it from a web browser to make sure it’s accessible. Example: http://www.yourwebserver.com/pp_pro_agent/trace.pl (or trace.php if you’re using the php version).
- Test a full trace from the web browser. This requires the ?IP= parameter (?ip=parameter will fail, the ‘IP’ needs to be capitalized). This would look like this to trace to 192.168.1.1: http://www.yourserver.com/pp_pro_agent/trace.pl?IP=192.168.1.1 Ideally you’ll want to use a valid IP address here, of course — one that works on the remote agent’s network.
- Verify the output. If it’s working, you should get output that looks something like this:
PingPlotter remote trace agent, V0.4
1 192.168.1.1 0.684 ms
You’ll probably have more hops than this. This is just an example if you were using an IP local to your server.
If you have an error, look at the source code for the script for some different alternatives and help.
Installing the Windows Agent
The PingPlotter remote agent for Windows is a self-contained executable that includes a small server and some portions of the PingPlotter core trace engine. This agent can run as an application or as a service under Windows XP or newer.
Note: Presently the Windows agent does not come packaged with an installer or uninstaller.
- Download the Windows remote agent from the agent download page.
- Extract the agent (PingPlotter_Remote_Agent.exe) to a working directory (e.g., c:\Program Files\PingPlotter Remote Agent).
- Browse to the directory where you extracted the agent and launch it. The agent will show up in the system tray.
- Ensure your firewall(s) allow access to the agent on TCP port 7465, or change the server port for the agent. To change the port, as well as other settings for the agent, double-click on the tray icon.
- From your PingPlotter machine, launch your web browser and access the agent at http://(your agent machine name):7465.
- Verify the output. It should look something like this (in your browser):
PingPlotter Pro Remote Windows Agent V0.8.2.18
Tracing to:
Error: Must specify an IP Address
Continue on to the
The windows agent has a few options, to see about its use, see the section.
If there is more data collected than we can show on a timeline graph (for example, if you’ve got 48 hours worth of data, but have your graph scale set to “10 minutes”), you can click (and hold down) your mouse button on the graph, and drag it back and forth. This allows you to move back in history and examine the samples during those times.
On Windows, if you click on a graph and scroll down, you’ll move back on the time graph, scrolling up will move the graph forward. If you click the scroll wheel, scrolling up or down will toggle through the time period options on the graph (so you can basically zoom in, or zoom out using this method). On Mac, with a magic mouse you can hold a left click and scroll to zoom in/out on the timeline graph.
UDP
The User Datagram Protocol, or UDP, is a bit different from what you might expect from a transport protocol. Unlike TCP, UDP is a connectionless communication method. This means UDP datagrams can be sent without establishing a connection between two devices, allowing them to be sent without consideration for rate or sequence.
For UDP, the primary focus is speed. Since UDP datagrams are coordinated by the application and not the protocol, they can be received and processed as they come. This is critical for things like video streams or VOIP, where processing info as fast as possible is more critical than reassembling the data in perfect order.
In PingPlotter, using UDP to test things like livestreams or other time-sensitive applications can give you a better idea where your data is being held up.
5.14.2 Beta Release Notes
Known Issues
- Selecting multiple traces does not currently function
- Setting a focus period causes the Timeline Graph to stop updating
- Timeline Graph sorting does not currently function
- Latency warning colors on the Trace Graph only function on default settings
- Several actions, including Rename Summary, Edit Notes, and Edit Name only update after a page refresh
- Resizing column width within the web interface does not currently work as expected
- Adding/Removing columns within the web interface does not currently work correctly
- SMTP Tests don’t always work as intended (Windows)
- Deleting a session from Manage Sessions will sometimes cause an error (Windows)
- Importing a .pp_sample file doesn’t always import successfully (Windows)
- Alert setup doesn’t always function correctly (macOS)
Comments
If you’re using PingPlotter for long-term monitoring, you may sometimes run across a situation where your network was effected by something you know about (power outage, big file download, that time you threw your router out the window, etc). You may also run into situations that you don’t control, but know the cause of (or can speculate on). Being able to take notes about these situations and tie it to your data can prove to be very, very helpful.
To create a note, all you need to do is right click on a timeline graph (at a point you want to create a note), and select the “Create Comment” option. A prompt will appear asking you to create your comment, and then PingPlotter will draw a red triangle on the lower edge of the timeline graph. If you float your mouse over the triangle you can see the note:
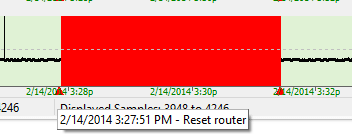
Right clicking on the comment triangle will also allow you to edit or delete it.
When you save data as an image from PingPlotter, your comments will get attached to the image (along with the times they happened). If you’re sending a image to a network provider, this can be especially valuable — as it helps explain the events on the data that you’re sending to them: