Понимание process monitor
Содержание:
- Using Process Monitor to Track File and Registry Changes
- Portmon 3.x
- Procmon.exe file information
- How it Works: Windows 95 and 98
- Как использовать Process Monitor
- Запись и открытие лога
- Фильтрация данных, которые собирает Process Monitor
- What is New in the Process Monitor Latest Version?
- How to download and install Process Monitor for Windows 10 PC/laptop
- Best Features of Process Monitor for Windows PC
- Как установить и собрать Procmon в Linux
- How to run Process Monitor on schedule
- Best practices for resolving procmon issues
- More information
- Procmon Tracing
- Examples
- Изучение одного события
- What is Process Monitor
Using Process Monitor to Track File and Registry Changes
In this article, we will show how to track accesses and changes to files and registry on your local computer using Process Monitor.
Let’s say, you need to track access to the registry key HKEY_CURRENT_USER\Software\test and file c:\ps\procmon_example.txt.
When Process Monitor starts, it begins capturing all events according to the default filters.
Stop capturing events by unchecking the option File > Capture Events (Ctrl+E) and clear the current ProcMon log (Edit > Clear Display).
Now you need to configure the Process Monitor filters (Filter > Filter). The filters allow you to specify various criteria for events to be added or excluded from the monitoring.
The default filter already excludes events of a standard Windows system activity and the procmon.exe process itself. In most cases, you don’t need to remove these filters. We’ll add some additional filters.
Create a filter for monitoring access to the registry key: Path > contains > \SOFTWARE\test > Include. Click Add to add a new filter to the list.
Now add a file access event filter: Path > is > c:\ps\procmon_example.txt > Include.
Make sure the following options are enabled in the ProcMon toolbar: Show Registry Activity, Show File System Activity. The Show Network Activity and Show Process, and Threads Activity options can be disabled.
Start event monitoring File > Capture Event.
As an example, let’s create a reg parameter key in the specified registry key using the command prompt:
reg add hkcu\software\test /v Path /t REG_EXPAND_SZ /d ^%systemroot^%
Then, let’s write some data into the procmon_example.txt file using the command line:
echo %date%>>c:\ps\procmon_example.txt
And using PowerShell:
Get-Process|out-file C:\ps\procmon_example.txt
Switch to the ProcMon window. As you can see, it contains events for creating a registry key by the reg.exe process (Operation > RegCreateKey). It also contains events of creation (Create File) and writing to a file (WriteFile) by the processes cmd.exe and powershell.exe.
The list of events contains the system process msmpeng.exe (Antimalware Service Executable). This is the core process of the antimalware detection engine in Windows Defender. To exclude the events of this process from the ProcMon log, right-click on the process name msmpeng.exe and select Exclude “….”.
This process will be added to the ProcMon filter with the Exclude value. It means that the ProcMon log won’t display any activity from this process.
In this way, exclude any other trusted processes that are accessing your file or registry key. Now, if any process running on Windows tries to read or write to a tracking file or registry key, you will see this event in Process Monitor.
For example, you want to monitor only write events to a file. Click in the ProcMon window on the line with the WriteFile operation type, and add this event to the Include filter.
Thus, any object or event in ProcMon can be added to the filters, so that the minimum set of events that you need to analyze access to a file or registry are displayed in front of you.
Portmon 3.x
Version 3.x of Portmon marks the introduction of a number of powerful
features.
-
Remote monitoring: Capture kernel-mode and/or Win32 debug output
from any computer accessible via TCP/IP — even across the Internet.
You can monitor multiple remote computers simultaneously. Portmon
will even install its client software itself if you are running it
on a Windows NT/2K system and are capturing from another Windows
NT/2K system in the same Network Neighborhood. -
Most-recent-filter lists:Portmon has been extended with
powerful filtering capabilities and it remembers your most recent
filter selections, with an interface that makes it easy to reselect
them. -
Clipboard copy: Select multiple lines in the output window and
copy their contents to the clipboard. -
Highlighting: Highlight debug output that matches your
highlighting filter, and even customize the highlighting colors. - Log-to-file: Write debug output to a file as its being captured.
-
Printing: Print all or part of captured debug output to a
printer. - One-file payload:Portmon is now implemented as one file.
The on-line help-file describes all these features, and more, in detail.

Procmon.exe file information
 Procmon.exe process in Windows Task Manager
The process known as Process Monitor belongs to software Sysinternals Procmon or Sysinternals Utilities by (technet.microsoft.com/en-us/sysinternals).
Description: Procmon.exe is not essential for the Windows OS and causes relatively few problems. Procmon.exe is located in a subfolder of the user’s profile folder—in most cases C:\Users\USERNAME\Downloads\ProcessMonitor\.
Known file sizes on Windows 10/8/7/XP are 2,164,360 bytes (25% of all occurrences), 2,046,608 bytes and .
It is not a Windows core file. The program has no visible window. Procmon.exe is digitally signed.
Procmon.exe is able to monitor applications and record keyboard and mouse inputs.
Therefore the technical security rating is 42% dangerous, but you should also take into account the user reviews.
Uninstalling this variant:
If problems with Procmon or Sysinternals Utilities come up, you could do the following: 1) uninstall it from your computer using the Control Panel applet Uninstall a Program 2) use the software publisher’s support site .
Recommended: Identify procmon.exe related errors
If procmon.exe is located in a subfolder of «C:\Program Files», the security rating is 28% dangerous. The file size is 2,046,608 bytes (33% of all occurrences), 2,143,392 bytes or 2,483,904 bytes.
The file has a digital signature. The program is not visible. The procmon.exe file is not a Windows system file.
Procmon.exe is able to monitor applications.
If procmon.exe is located in a subfolder of Windows folder for temporary files, the security rating is 18% dangerous. The file size is 2,510,528 bytes (50% of all occurrences) or 2,489,024 bytes.
The program is not visible. It is not a Windows core file. The file has a digital signature.
Procmon.exe is able to monitor applications.
Uninstalling this variant:
If problems with Sysinternals Utilities come up, you could do the following: 1) uninstall it from your computer using the Control Panel applet Uninstall a Program 2) use the software publisher’s support.
External information from Paul Collins:
«procmon» definitely not required. Added by the BIONET.40A TROJAN!
How it Works: Windows 95 and 98
On Windows 95 and 98, the Portmon GUI relies on a dynamically loaded
VxD to capture serial and parallel activity. The Windows VCOMM (Virtual
Communications) device driver serves as the interface to parallel and
serial devices, so applications that access ports indirectly use its
services. The Portmon VxD uses standard VxD service hooking to
intercept all accesses to VCOMM’s functions. Like its NT device driver,
Portmon’s VxD interprets requests to display them in a friendly
format. On Windows 95 and 98 Portmon monitors all ports so there is no
port selection like on NT.
Download Portmon (226 KB)
Run now from Sysinternals Live.
Как использовать Process Monitor
После извлечения файлов Process Monitor вы увидите разные файлы для запуска утилиты. Если вы используете 64-разрядную систему Windows, выберите файл с именем Procmon64.exe. Если нет, выберите файл Procmon.exe.

Из главного окна монитора процессов вы можете запустить представление, подобное приложению Process Explorer. Это представление в виде дерева процессов. Чтобы просмотреть это, просто выберите небольшой значок документа с изображением древовидной диаграммы на нем.

Некоторая информация, которую вы можете увидеть в этом представлении, включает родительский процесс и все запущенные им процессы. Вы можете увидеть его команду запуска, разработчика приложения (если доступно), как долго оно работает и дату его запуска.
Он не так информативен, как Process Explorer, но позволяет быстро увидеть большую часть той же информации.
Создать фильтр монитора процессов
Вернувшись на главный экран (окно событий процессов), щелкните правой кнопкой мыши любой из процессов и выберите «Изменить фильтр», чтобы обновить фильтр процесса.

В этом окне показано, как работает фильтрация в Process Monitor. Первое раскрывающееся меню позволяет выбрать объект для фильтра. В данном случае это имя процесса. В следующем раскрывающемся списке указан оператор, например, есть, нет, меньше и т. Д. В этом поле вы можете ввести или выбрать фильтр, а также указать, хотите ли вы включить или исключить эти записи.

Когда вы выбираете «Добавить», он добавит этот новый фильтр в ваш список и соответствующим образом изменит общий вид процессов.
Чтобы создать новый фильтр, выберите меню «Фильтр» и выберите «Фильтр».
Откроется то же окно, но с пустым фильтром. Просто выберите каждое раскрывающееся меню, введите элемент фильтра, который вы хотите исключить или включить, и добавьте его в свой список фильтров.

После того, как вы нажмете ОК, он обновит ваше основное представление, чтобы включить новый фильтр.
Самая полезная функция Process Monitor – это регистрация системных событий во время некоторых действий. Вы можете регистрировать системные события следующим образом:
- Нажмите значок лупы «Захват», чтобы остановить запись.
- Выберите ластик на бумаге Значок «Очистить», чтобы очистить журнал.
- Снова нажмите значок захвата, чтобы начать запись.
- Выберите Фильтр и Включить расширенный вывод.
- Воссоздайте проблему.
- Еще раз щелкните значок «Захват», чтобы остановить запись.
- Выберите значок «Сохранить на диске», чтобы сохранить журнал на свой компьютер.
Вы можете просмотреть журнал, чтобы увидеть все события процесса, которые произошли, когда вы воссоздали проблему или ошибку, которую вы пытаетесь устранить.
Изучение глубже с помощью событий
Когда вы выбираете определенные события в Process Monitor, вы можете изучить более подробную информацию через меню Event.
Выберите событие, которое хотите изучить. Затем выберите меню «Событие» и выберите «Свойства».

Это показывает все свойства для события. Вкладка «Событие» показывает в основном то, что было в главном окне Process Monitor. На вкладке «Процесс» отображаются такие вещи, как путь к приложению и командная строка запуска, а также модули, используемые процессом. На вкладке «Стек» представлены модули, хранящиеся в памяти процессом, и их детали.
Вы можете получить доступ только к вкладке «Стек», выбрав вместо этого «Стек» в меню «События».
Если вы хотите внимательно следить за одним событием, выберите его, а затем выберите меню «Событие» и выберите «Переключить закладку».

Это выделит событие, чтобы его было легче отслеживать.
Вы также можете увидеть записи реестра для любого процесса, выбрав меню «Событие» и выбрав «Перейти к».

Это быстрый способ увидеть любые записи реестра, которые вы можете переключить для настройки этого приложения.
В правой части панели инструментов вы увидите пять значков, которые можно использовать для точной настройки фильтров по умолчанию.

Вы можете использовать их для включения или выключения каждого из следующих фильтров:
- Регистрационная деятельность
- Активность файловой системы
- Сетевая активность
- Активность процессов и потоков
- Профилирование событий
Запись и открытие лога
Учтите, что при длительном отслеживании размер лога может измеряться гигабайтами. По умолчанию Process Monitor записывает лог в файл подкачки. Если у вас маленький системный раздел, имеет смысл сохранять лог в файл на другом разделе диска.
Для сохранения лога в файл нажмите сочетание клавиш CTRL+B и укажите имя и желаемое расположение файла.
Изменения вступают в силу после перезапуска захвата активности. Теперь можно смело оставить Process Monitor включенным на длительное время, не опасаясь за лимит дискового пространства.
Остановить отслеживание активности можно сочетанием клавиш CTRL+E.
Впоследствии вы всегда сможете загрузить в утилиту лог из сохраненного файла. Закройте Process Monitor и дважды щелкните файл лога с расширением PML. Содержимое лога отобразится в окне Process Explorer.
Человек, обратившийся на форум с проблемой, так и не вернулся сообщить, помог ли ему мой совет. Но он был с таким вопросом не первый и, наверняка, не последний. Если вопрос возникнет у вас, вы сможете ответить на него с помощью Process Monitor.
О видео
Читатели блога выразили поддержку моей идее дополнять статьи видеоматериалами. Я подумал, что этот случай очень хорошо подходит, и записал ролик длиной менее 4 минут.
Если честно, создание такого видео занимает намного больше времени, чем написание статьи. Поэтому я в любом случае не готов заменять печатный текст видеоматериалами. Но мне кажется, что в данном случае видео интереснее и понятнее. А что вы думаете по этому поводу?
Видео длится около четырех минут, и я старался сделать его быстрым и емким. Ведь в реальности подготовка к поимке приложения занимает буквально одну минуту. Вас устраивает скорость изложения?
Более подробный рассказ о Process Monitor и другие примеры его практического использования вы можете посмотреть в видео моего коллеги Василия Гусева, если у вас есть свободные 40 минут 🙂
Фильтрация данных, которые собирает Process Monitor
Как мы уже упоминали пару раз, фильтры, которые предоставляет Process Monitor, позволяют вам точно контролировать, какие события вы собираетесь захватывать, что значительно упрощает вам работу по выяснению того, что важно в списке. Если вы знаете, что вас не интересуют все события, генерируемые, например, explorer.exe, то было бы разумно просто отфильтровать их, удалив из списка.. Вы можете очень быстро выполнить фильтрацию по любому столбцу, используя контекстное меню и функции Include («Включить») или Exclude («Исключить») — если вы включите элемент, список будет содержать только события, соответствующие этому конкретному элементу или любым другим, которые вы специально включили, но не будут содержать что-нибудь ещё
Если вы исключите элемент, будет отображаться всё, кроме событий, которые соответствуют конкретному элементу, который вы исключили.
Вы можете очень быстро выполнить фильтрацию по любому столбцу, используя контекстное меню и функции Include («Включить») или Exclude («Исключить») — если вы включите элемент, список будет содержать только события, соответствующие этому конкретному элементу или любым другим, которые вы специально включили, но не будут содержать что-нибудь ещё. Если вы исключите элемент, будет отображаться всё, кроме событий, которые соответствуют конкретному элементу, который вы исключили.
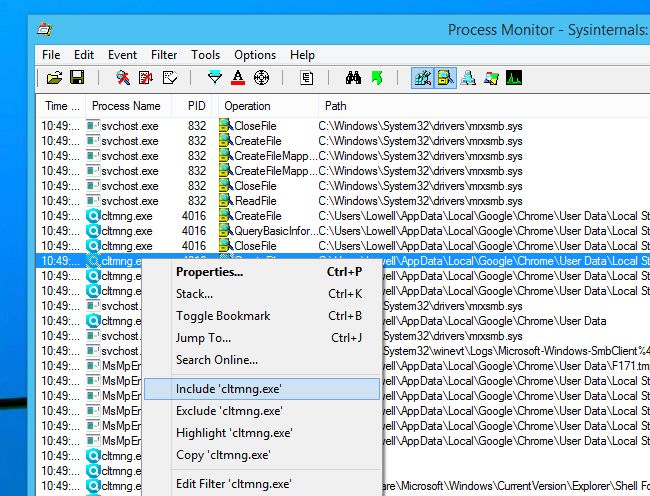
В этом случае мы решили включить процесс cltmng.exe, и теперь все, что мы видим в списке, связано с этим процессом.

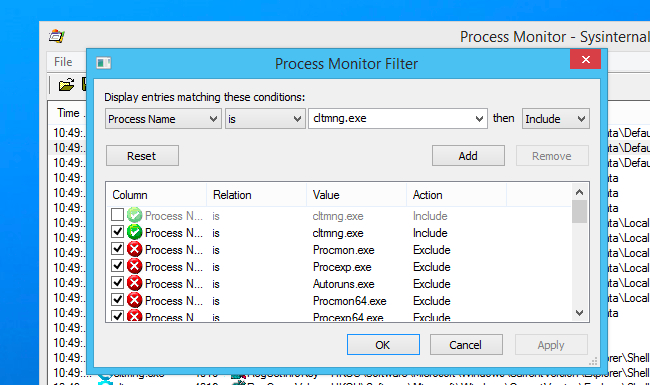
Вы также можете использовать опцию Edit Filter («Редактировать фильтр») в меню или получить доступ к разделу Filters («Фильтры») меню, чтобы отобразить список фильтров и отредактировать их. Вы можете выбрать из раскрывающихся диалоговых окон и сопоставить по любому из доступных полей, выбрать, будет ли значение, которое вы вводите в поле, совпадать точно, или просто «начинается с», или ряд других параметров. Затем вы можете выбрать, включать или исключать события, соответствующие этим критериям.
Только не забудьте нажать кнопку Add («Добавить») после того, как вы определили фильтр, и прежде чем нажимать «ОК» или Apply («Применить»), потому что в противном случае ваш новый фильтр фактически не будет активирован. Поверьте, это частая ошибка!
Вы также можете удалить или отредактировать фильтры, выбрав их в списке, а затем изменив или удалив их.
What is New in the Process Monitor Latest Version?
✓ Compatibilities improvement for new Windows update.
✓ Fixes bugs.
How to download and install Process Monitor for Windows 10 PC/laptop
Now let’s just move to the next section to share the steps you have to follow to download Process Monitor for Windows PC. So here we go:
- Download the Process Monitor installer file from the link above.
- Save the downloaded file to your computer.
- Double-click on the downloaded Process Monitor installer file.
- Now, a smart screen might appear and ask for a confirmation.
- Click “Yes” to confirm.
- Finally, follow the installation instructions until you get a confirmation notification of a successful installation process.
So those are all the processes that you have to follow to download Process Monitor for Windows PC. Then let’s go on to the next section where we will discuss Process Monitor itself. So you can understand the application and its features. So here we go:
Best Features of Process Monitor for Windows PC
Process Monitor is one of the most popular Benchmarking alongside Afterburner, PCMark, and NZXT CAM. This app has its advantages compared to other Benchmarking applications. Process Monitor is lightweight and easy to use, simple for beginners and powerful for professionals. Process Monitor application is free to download and offers easy-to-install, easy-to-use, secure, and reliable Benchmarking applications.
This application’s primary functions are comprehensive and go beyond the features offered by others that can be considered as its rivals.
- Process Monitor for PC – fast, reliable, and robust by Microsoft SysInternals.
- Process Monitor Free & Safe Download.
- Process Monitor latest version for the best experience.
- User-friendly Interface.
- Easy to Use.
- Lightweight and consume low resources.
- It works/compatible with almost all Windows versions, including Windows Vista / Windows 7 / Windows 8 / Windows 10.
- Free of Cost!
- Privacy and Security!
- Best for Benchmarking application.
- PC User’s choice!
Как установить и собрать Procmon в Linux
Системные Требования
- Операционная система: Ubuntu 18.04 LTS с ядром> = 4.18 и ядром
- cmake> = 3.13 (только время сборки)
- libsqlite3-dev> = 3.22 (только во время сборки)
Установить Procmon
Подпишитесь на Microsoft key and feed:
wget -q https://packages.microsoft.com/config/ubuntu/$(lsb_release -rs) /packages-microsoft-prod.deb -O packages-microsoft-prod.deb sudo dpkg -i packages-microsoft-prod. деб
Затем используйте следующую команду для установки Procmon:
sudo apt-get update sudo apt-get install procmon
Соберите Procmon из исходников
Установить зависимость:
sudo apt-get -y установить bison build-essential flex git libedit-dev libllvm6.0 llvm-6.0-dev libclang-6.0-dev python zlib1g-dev libelf-dev
Соберите и установите BCC:
git clone –branch tag_v0.10.0 https://github.com/iovisor/bcc.git mkdir bcc / build cd bcc / build cmake. -DCMAKE_INSTALL_PREFIX = / usr make sudo make install
Сборка Procmon:
git clone https://github.com/Microsoft/Procmon-for-Linux cd Procmon-for-Linux mkdir build cd build cmake. делать
Сборка пакета Procmon:
Пакеты распространения для Procmon в Linux собираются с использованием cpack. Чтобы собрать пакет deb для Procmon в Ubuntu, вам просто нужно запустить:
cd build cpack.
How to run Process Monitor on schedule
You can create a scheduled task to start and to stop Process Monitor using Windows Task Scheduler.
To start Process Monitor on schedule:
- Download Process Monitor from Windows Sysinternals page and extract it.
- Go to Control Panel -> Administrative Tools and open Task Scheduler.
- Click Task Scheduler Library.
- Under Actions, click Create Basic Task.
- Provide a name for the task (for example, Start Process Monitor) and click Next.
- In When do you want the task to start, click One time (or select a frequency depending on the nature of your issue).
- Enter the time when you want the task to be run and click Next.
- In What action do you want the task to perform, select Start a program and click Next.
- Browse for the Process Monitor executable (procmon.exe). Add these arguments:/accepteula /quiet /BackingFile <log path>
where <log path> is the pat to the resulting log file (for example C:\log.pml)
Make sure you have enough disk space where you are saving the log file. - Click Next.
- Check the Open the Properties dialog for this task when I click finish check box and click on Finish.
- The properties dialog is shown. Click Change User or Group, select SYSTEM, and click OK.
Now you need to create a task that stops Process Monitor in a while:
- Open the Task Scheduler again.
- Create a new basic task.
- Provide a name for the task, for example Stop Process Monitor.
- In When do you want the task to start, click One time (or select a frequency depending on the nature of your issue).
- Enter the time when you want the task to be stopped (for example, 5 minutes after starting Process Monitor) and click Next.
- In What action do you want the task to perform, select Start a program and click Next.
- Browse for the Process Monitor executable (procmon.exe). Add this argument:/terminate
- Click Next.
- Check the Open the Properties dialog for this task when I click finish check box and click on Finish.
- The properties dialog is shown. Click Change User or Group, select SYSTEM, and click OK.
Best practices for resolving procmon issues
A clean and tidy computer is the key requirement for avoiding problems with procmon. This means running a scan for malware, cleaning your hard drive using 1cleanmgr and 2sfc /scannow, 3uninstalling programs that you no longer need, checking for Autostart programs (using 4msconfig) and enabling Windows’ 5Automatic Update. Always remember to perform periodic backups, or at least to set restore points.
Should you experience an actual problem, try to recall the last thing you did, or the last thing you installed before the problem appeared for the first time. Use the 6resmon command to identify the processes that are causing your problem. Even for serious problems, rather than reinstalling Windows, you are better off repairing of your installation or, for Windows 8 and later versions, executing the 7DISM.exe /Online /Cleanup-image /Restorehealth command. This allows you to repair the operating system without losing data.
To help you analyze the procmon.exe process on your computer, the following programs have proven to be helpful: ASecurity Task Manager displays all running Windows tasks, including embedded hidden processes, such as keyboard and browser monitoring or Autostart entries. A unique security risk rating indicates the likelihood of the process being potential spyware, malware or a Trojan. BMalwarebytes Anti-Malware detects and removes sleeping spyware, adware, Trojans, keyloggers, malware and trackers from your hard drive.
More information
The latest version of the Process Monitor utility is always available at Microsoft TechNet Sysinternals Download Page.
Process Monitor can be run on Windows Vista and higher, Windows Server 2008 and higher.
You can open PML files only with the Process Monitor itself.
/EnableBootLogging
Procmon configures drivers to run as a boot start driver next to the system startup, before all other drivers.
Activity will be logged in %windir%\Procmon.PMB driver until shutdown or running Procmon again. If you will not run Procmon during boot session, you’ll capture a trace of the entire boot-to-shutdown cycle.
To enable logging for subsequent boots, you must explicitly enable it again each time.
You can automate the converting of the unsaved boot log by /ConvertBootLog pml-file
Keeping procmon running affter logoff.PsExec -s -d Procmon.exe
-d option allows PsExec to exit without waiting for the target process to exit
Analysis tools
- Process activity summary — CPU utilization, File I/O operations, registry operations, network operations, memory
- File summary — for each unique file system path, the dialog box displays how much total time was spent performing I/O to the file, the number of opens, closes, reads, writes, Get ACL, Set ACL and other operations, the total number of operations performed and number of bytes read from and written to the file. Noneexpandable one indicates operations performed on the directory itself, expandable displays the sums of all operations performed on its files and subdirectories.
- Registry summary
- Stack Summary
- Network summary
- Cross Reference Summary — lists all paths displayed by the current filter that have been accessed by more than 1 proces.
- Count Occurences — shows count by selected colums. (for ex. Process name — count). If filter applied works depending on the filter properties.
Procmon Tracing
Procmon Earlier Than ICM 4.0
-
You can use procmon to turn up tracing on the PIM, MIS, and CTISVR processes.
Syntax—procmon custid nodeid processname .
Example usage is procmon bt pg1a pim1.
-
Type mhelp at the >> prompt to access help for Procmon. For example, >> mhelp.
-
Add Tracing—In order to add tracing, use the sxtrace, scrtrace, and satrace commands; use with /all. Example usage for sxtrace is >>sxtrace /all. You must also save the trace by issuing the svxtrace, svcrtrace, and svatrace commands. It is recommended that you add and save all three trace levels when you troubleshoot Spectrum issues.
-
Remove Tracing—In order to remove tracing, use the cxtrace, ccrttrace, and catrace commands; use with /all. Example cxtrace usage is >>cxtrace /all. It is always better to remove tracing upon completion of troubleshooting.
-
Ems logs—With all tracing, you should increase the EmsLogFileMax and EmsAllLogFilesMax settings in regedt32. The path to these values is:
Note: This value is displayed over two lines due to space limitations.
Procmon in ICM 4.0 and Later
-
You can use procmon to turn up tracing on the PIM, MIS, and CTISVR processes.
Syntax—procmon custid nodeid processname. Example usage is procmon bt pg1a pim1.
-
In order to access help for Procmon, type mhelp at the >> prompt; for example, >> mhelp.
-
Tracing—The ltrace command displays all the available tracing options. Apply Transaction Link tracing (sxtrace) by typing trace xact* at the >> prompt. Apply Agent tracing with the trace spectrum* command.
Examples
Write a mini dump of a process named ‘notepad’ (only one match can
exist):
C:\>procdump notepad
Write a full dump of a process with PID ‘4572’:
C:\>procdump -ma 4572
Write 3 mini dumps 5 seconds apart of a process named ‘notepad’:
C:\>procdump -s 5 -n 3 notepad
Write up to 3 mini dumps of a process named ‘consume’ when it exceeds
20% CPU usage for five seconds:
C:\>procdump -c 20 -s 5 -n 3 consume
Write a mini dump for a process named ‘hang.exe’ when one of it’s
Windows is unresponsive for more than 5 seconds:
C:\>procdump -h hang.exe hungwindow.dmp
Write a mini dump of a process named ‘outlook’ when total system CPU
usage exceeds 20% for 10 seconds:
C:\>procdump outlook -p «\Processor(_Total)\% Processor Time» 20
Write a full dump of a process named ‘outlook’ when Outlook’s handle
count exceeds 10,000:
C:\>procdump -ma outlook -p «\Process(Outlook)\Handle Count» 10000
Write a MiniPlus dump of the Microsoft Exchange Information Store when
it has an unhandled exception:
C:\>procdump -mp -e store.exe
Display without writing a dump, the exception codes/names of w3wp.exe:
C:\>procdump -e 1 -f «» w3wp.exe
Write a mini dump of w3wp.exe if an exception’s code/name contains
‘NotFound’:
C:\>procdump -e 1 -f NotFound w3wp.exe
Launch a process and then monitor it for exceptions:
C:\>procdump -e 1 -f «» -x c:\dumps consume.exe
Register for launch, and attempt to activate, a modern ‘application’. A
new ProcDump instance will start when it activated to monitor for
exceptions:
C:\>procdump -e 1 -f «» -x c:\dumpsMicrosoft.BingMaps_8wekyb3d8bbwe!AppexMaps
Register for launch of a modern ‘package’. A new ProcDump instance will
start when it is (manually) activated to monitor for exceptions:
C:\>procdump -e 1 -f «» -x c:\dumps Microsoft.BingMaps_1.2.0.136_x64__8wekyb3d8bbwe
Register as the Just-in-Time (AeDebug) debugger. Makes full dumps in
c:\dumps:
C:\>procdump -ma -i c:\dumps
See a list of example command lines (the examples are listed above):
C:\>procdump -? -e
Изучение одного события
Просмотр объектов в списке — это отличный способ быстро увидеть множество различных точек данных одновременно, но это определенно не самый простой способ изучения отдельного фрагмента данных, а в список. К счастью, вы можете дважды щелкнуть любое событие, чтобы получить дополнительную информацию.
Вкладка «Событие» по умолчанию дает вам информацию, которая в значительной степени похожа на ту, что вы видели в списке, но добавит немного больше информации для вечеринки. Если вы посмотрите на событие файловой системы, вы сможете увидеть определенную информацию, такую как атрибуты, время создания файла, доступ, который был предпринят во время операции записи, количество записанных байтов и продолжительность.

Переключение на вкладку «Процесс» дает много полезной информации о процессе, который сгенерировал событие. Хотя вы обычно хотите использовать Process Explorer для работы с процессами, может быть очень полезно иметь много информации о конкретном процессе, который сгенерировал конкретное событие, особенно если это то, что произошло очень быстро, а затем исчезло из список процессов. Таким образом, данные собираются.

Вкладка «Стек» — это то, что иногда будет чрезвычайно полезно, но зачастую это будет совсем не полезно. Причина, по которой вы захотите взглянуть на стек, состоит в том, что вы можете устранить неполадки, изучив столбец Module на предмет того, что выглядит не совсем правильно.
Например, представьте, что процесс постоянно пытается запросить или получить доступ к файлу, который не существует, но вы не знаете, почему. Вы можете просмотреть вкладку Stack и посмотреть, есть ли какие-то модули, которые выглядят неправильно, а затем исследовать их. Вы можете обнаружить устаревший компонент или даже вредоносное ПО, вызывающее проблему.

Или вы можете обнаружить, что здесь нет ничего полезного для вас, и это тоже хорошо. Есть много других данных для просмотра.
What is Process Monitor
Process Monitor is an advanced monitoring tool that shows real-time file system, registry, and process activity. It combines the features of two legacy Sysinternals utilities, Filemon and Regmon, and adds a number of other enhancements.
Process Monitor can be used to track system and software activity to troubleshoot some of the product issues, especially when it is necessary to track what particular application or process accesses a file or a registry key.
The main Process Monitor window lists all system operations along with their exact time, process name, ID and the result for every single operation:

To access advanced information on any single operation right-click on the operation line and choose Properties:

When analyzing a Process Monitor log, it is recommended to filter out entries. For example, you can right-click on Successes under Results, and exclude it. You can also filter out Processes and generally any field you like.
You can choose to store Process Monitor data in a file on disk instead of virtual memory (e.g if running Process Monitor consumes too much RAM or slows down the computer):
1. Go to File -> Backing files:

2. Specify the file where you want event data to be stored

