Visual studio 2022
Содержание:
- Microsoft Visual Studio 2017 Professional 15.7.6 (Offline Cache, Unofficial)
- Visual Studio для Windows 10 скачать бесплатно на русском
- Visual Studio
- Шаг 3. Установка установщика Visual Studio
- Поделитесь с нами вашими мыслями
- Шаг 8. Начало разработки
- Visual Studio 2010 Features
- Достоинства и недостатки
- Обзор
- New Features for .NET
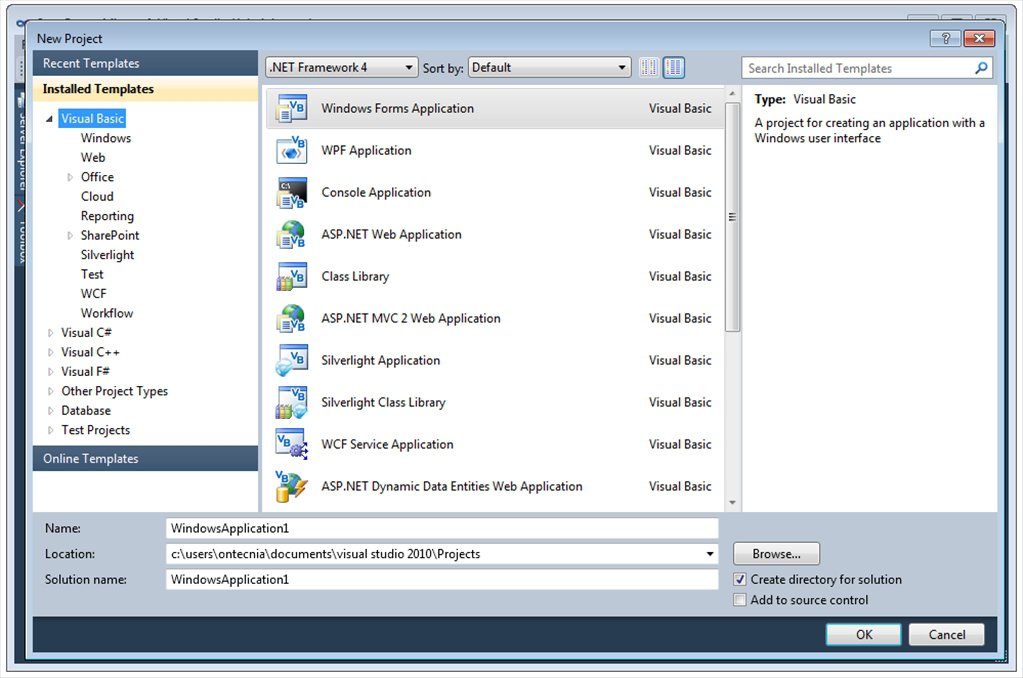
- Step 3 — Install the Visual Studio installer
- Отладка
- Git Productivity
- Test Experience Accessibility improvements
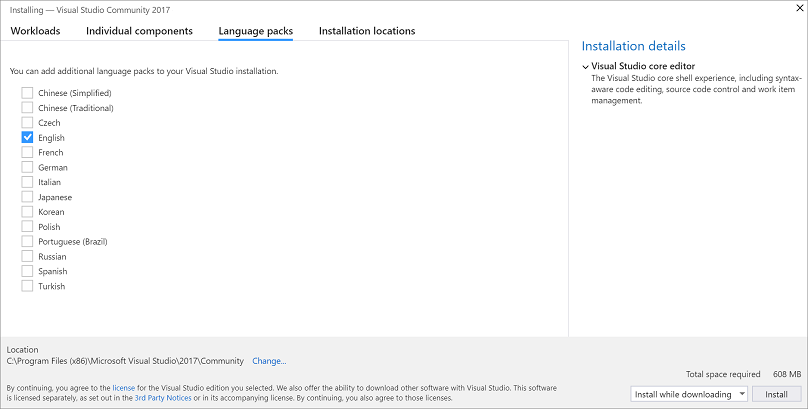
- Шаг 6. Установка языковых пакетов (необязательно)
- Step 7 — Select the installation location (Optional)
- Get support
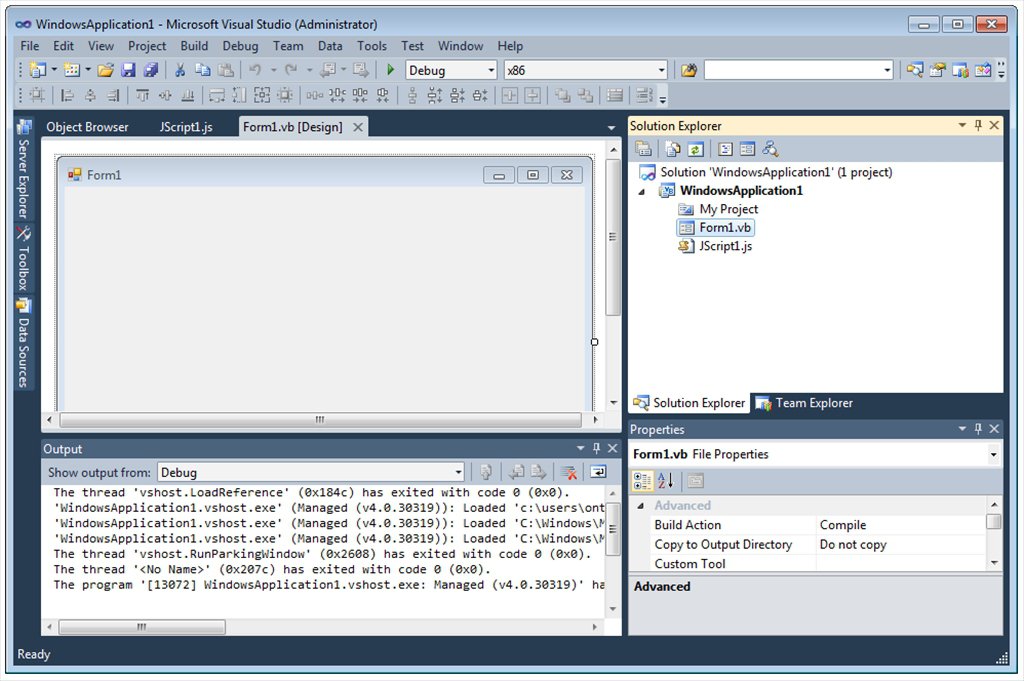
- Step 8 — Start developing
- Step 4 — Choose workloads
- New Features for Containers
Microsoft Visual Studio 2017 Professional 15.7.6 (Offline Cache, Unofficial)
 Microsoft Visual Studio Professional — полный набор инструментов, с помощью которых процесс реализации инновационных замыслов разработчика легко воплощается в жизнь. Visual Studio предоставляет минимальный функционал, при помощи которого можно создавать уникальные программные продукты.Системные требования:Процессор с тактовой частотой не ниже 1,8 ГГц. Рекомендуется использовать как минимум двухъядерный процессор.2 ГБ ОЗУ; рекомендуется 4 ГБ ОЗУ (минимум 2,5 ГБ при выполнении на виртуальной машине)Место на жестком диске: от 1 ГБ до 80 ГБ, в зависимости от установленных компонентов.Видеоадаптер с минимальным разрешением 720p (1280 на 720 пикселей); для оптимальной работы Visual Studio рекомендуется разрешение WXGA (1366 на 768 пикселей) или выше.Windows 10 версии 1507 или выше: Домашняя, Профессиональная, для образовательных учреждений и Корпоративная (выпуски с долгосрочным обслуживанием и S не поддерживаются)Windows Server 2016: Standard и DatacenterWindows 8.1 (с обновлением 2919355): Core, Профессиональная и КорпоративнаяWindows Server 2012 R2 (с обновлением 2919355): Essentials, Standard, DatacenterWindows 7 с пакетом обновления 1 (с последними обновлениями Windows): Домашняя расширенная, Профессиональная, Корпоративная, Максимальная Торрент Microsoft Visual Studio 2017 Professional 15.7.6 (Offline Cache, Unofficial) подробно:Процедура лечения:В меню AutoRun нажмите по серийному номеру, он копируется в буфер, затем перейдите в Visual Studio в меню Справка —> Зарегистрировать продукт —> Разблокировать с помощью ключа продукта и вставьте серийный номер с буфера.Особенности:В Visual Studio 2017 мы найдем функции, присутствующие во многих других IDE, но в этой также есть возможность настраивать его, создавая наши собственные расширения, которые ускоряют наши задачи и приспосабливаются к требованиям всех пользователей.Эта новая версия включает в себя новые функции, относительно предыдущих версий, таких как 2012, 2013 или 2015. Ниже представлены основные функции и возможности:·Новый опыт установки.·Улучшения IDE для сокращения времени начальной загрузки и загрузки решений и запуска сеансов.·Различные улучшения в редакторах C++, C#, Visual Basic, F#, jаvascript и TypeScript.·Усовершенствования систем отладки программы и диагностики проблем.·Различные инструменты тестирования.·Встроенный компилятор расширений.·Обнаружение шаблонов для проектов и элементов.·Усовершенствования различных инструментов для работы с .NET Core, ASP .NET Core, Xamarin, Apache Cordova, Unity,·Data Tools и SQL Server, среди других.·Azure SDK для .NET.Контрольные суммы образа:CRC32: FC4CC0AEMD5: F6F672E0DCAC9B9E6FC7D4C16AFA9B23SHA-1: 1406D5B627124B5DC07BE4DD724A707933E5153E
Скриншоты Microsoft Visual Studio 2017 Professional 15.7.6 (Offline Cache, Unofficial) торрент:
Скачать Microsoft Visual Studio 2017 Professional 15.7.6 (Offline Cache, Unofficial) через торрент:
microsoft-visual-studio-2017-professional-15_7_6-offline-cache-unofficial.torrent (cкачиваний: 7195)
Visual Studio для Windows 10 скачать бесплатно на русском
| Версия Visual Studio | ОС | Язык | Размер | Тип файла | Загрузка |
|---|---|---|---|---|---|
|
Microsoft Visual Studio 2012 Ultimate |
Windows 10 | Русский |
1543.61mb |
iso |
Скачать |
|
Microsoft Visual Studio 2017 for Mac для Mac |
Mac | Русский |
27.3mb |
dmg |
Скачать |
|
Microsoft Visual Studio 2015 |
Windows | Русский |
6380.31mb |
iso |
Скачать |
|
Microsoft Visual Studio 2017 Web-Installer |
Windows | Русский |
1.1mb |
exe |
Скачать |
|
Microsoft Visual Studio 2010 Ultimate |
Windows | Русский |
2550.11mb |
iso |
Скачать |
Visual Studio
Microsoft Visual Studio — набор специализированных утилит и инструментов, предназначенных для разработчиков приложений.
Содержит в себе большинство необходимого инструментария разработчика для выпуска полноценных программ, в том числе и с графическим UI. С помощью Visual Studio можно создавать приложения для всех популярных платформ, как десктопных так и мобильных: iOS, iPadOS, macOS и еще ряда других.
Общая информация о программе
Среда разработки предназначена для написания, проведения тестов и запуска кода. Широкий набор различных утилит, включенных в Visual Studio, позволяет выполнять проектирование и разработку полноценных приложений с использованием графического пользовательского интерфейса без привлечения стороннего ПО. Помимо разработки программ для настольных и десктопных операционных систем, поддерживается разработка веб-приложений.
Без того немалый функционал можно расширить за счет использования сторонних плагинов. В последних версиях приложения большой упор сделан на расширение средств для коллективной разработки. Внесено много улучшений и дополнений для обеспечения эффективной командной работы над проектами любого масштаба.
Функциональные возможности Microsoft Visual Studio
В Visual Studio представлены как стандартные в подобном софте инструменты — отладчик, редактор кода, — так и собственные наработки. Кроме этого, доступны решения сторонних компаний, реализованные в виде подключаемых плагинов. Для повышения продуктивности используются большое количество автоматизированных возможностей: машинные подсказки, автоматическая очистка кода, рефакторинг. Функция IntelliSense позволяет работать с документацией к программе в интерактивном режиме, получая необходимую информацию непосредственно во время написания кода. Как и во всех продуктах от Microsoft, в приложении есть строка умного поиска, благодаря которой найти нужный пункт меню или описание функционала становится значительно легче.
Список основных возможностей и преимуществ выглядит следующим образом:
- собственный компилятор;
- возможность для развертывания приложения собственными средствами;
- редактор кода, включающий в себя инструменты автозавершения и форматирования;
- отладка кода.
Автоматизированные возможности рефакторинга кода, включающего поддержку различных языков, помогают упростить процесс написания кода. В целом, Microsoft Visual Studio является хорошим выбором как для начинающих, так и для разработчиков профессионального уровня.
Шаг 3. Установка установщика Visual Studio
Запустите файл начального загрузчика, чтобы установить Visual Studio Installer. Новый установщик имеет меньший размер и включает все необходимое для установки и настройки Visual Studio.
-
В папке Загрузки дважды щелкните файл начального загрузчика, имя которого совпадает с именем одного из следующих файлов или похоже на них:
- vs_community.exe для Visual Studio Community.
- vs_professional.exe для Visual Studio Professional;
- vs_enterprise.exe для Visual Studio Enterprise;
Если появляется оповещение системы контроля учетных записей, нажмите кнопку Да.
-
Мы попросим вас принять условия лицензии и заявление о конфиденциальности корпорации Майкрософт. Нажмите Продолжить.
Поделитесь с нами вашими мыслями
Мы показали вам лишь несколько основных моментов нашей незавершенной работы над Visual Studio 2022. Как всегда, вы можете перейти в новое сообщество разработчиков, чтобы просмотреть существующие запросы функций, проголосовать и комментировать или создать свои собственные.
Следите за новостями о доступности 64-разрядной версии Visual Studio 2022 Preview 1, которая будет включать наши улучшения пользовательского интерфейса и специальные возможности. (И помните! Как и любая другая работа, эти функции все еще находятся в разработке, поэтому некоторые из них появятся в Visual Studio 2022 после первого общедоступного выпуска.)
Шаг 8. Начало разработки
-
Когда установка Visual Studio завершится, нажмите кнопку Запустить, чтобы приступить к разработке в Visual Studio.
-
Выберите Файл, а затем Создать проект.
-
Выберите тип проекта.
Например, чтобы создать приложение C++, нажмите Установленные, разверните узел Visual C++, а затем выберите тип проекта C++, который нужно создать.
Чтобы создать приложение C#, нажмите Установленные, разверните узел Visual C#, а затем выберите тип проекта C#, который нужно создать.
-
Когда установка Visual Studio завершится, нажмите кнопку Запустить, чтобы приступить к разработке в Visual Studio.
-
На начальном экране выберите Создать проект.
-
В поле поиска введите тип приложения, которое вы хотите создать, чтобы просмотреть список доступных шаблонов. Список шаблонов зависит от рабочих нагрузок, выбранных во время установки. Чтобы просмотреть различные шаблоны, выберите разные рабочие нагрузки.
Можно также фильтровать поиск по определенному языку программирования с помощью раскрывающегося списка Язык. Вы также можете выбирать фильтры из списка Платформа и Тип проекта.
-
Новый проект откроется в Visual Studio, и вы можете приступить к написанию кода!
Visual Studio 2010 Features
Visual Studio Code Portable
The visual Code Portable being the initial code editor, multi-platform for a development tool, as well as supports all big platforms including Linux, OSX, and Windows. This powerful and fastest code editor tool helps you in zoom the code, underscore process reference and search data easily, navigating devices, supports keyboard, customization, snippet, and multiple language support, etc.
Fast Debugging
The editor offers very smart debugging tools for detecting and fixing bugs quickly. The debug code is already attached as well as publish along with the running apps which debug through breaking spots, calling loads, as well as an interactive console.
Addition of Programmed Languages
Unlimited programmed languages from easy to the most reflective can be added through pressing F#, C++, and Silverlight. Here you can try several processors in computing libraries that make free of using threads or pool treads.
Compatible with Windows
With varied compatibility with all types of devices, the app has special compatibility with Windows 7, Windows Vista, and Windows XP are mainly operating systems to run the app very smoothly and reliably. In addition, it requires a 32-bit and 64-bit setup.
Shareware License
The Microsoft Visual Studio 2010 with a shareware license available for Windows 32-bit as well as the 64-bit operating system of a laptop and PC, presented for all software users as a free trial for a specific period, free download with potential restrictions. It is belonging to the code editor/ide category.
Customizable Interface
The interface with several customization options as well as multi-screen support enables the users to customize it through adding new languages, themes, debugging tools, and connect different other services. These extensions work separately without slowing down the operating system.
Code Snippets & Built-in Commands
The fastest authoring via using code snippets for HTML, Jscript, and ASP.Net, view packages and launch your app through easy web employment and for Windows 7 multiple features such as multi-touch, jump lists, Aero thumbnails in the taskbar, and a lot more. The IntelliSense option highlights method references that help to import modules, function definitions, and completion based on variable types. A built-in command Git helps you to use the editor to review diffs, stage files, and make commits.
Main Features
- A standalone set up for editing, debugging and creating the objects based on .Net platform
- Developed by Redmond multinational
- Integrated with all major platforms such as Windows, Windows Server, SharePoint
- Fast Debugging
- Addition of Programmed Languages
- Compatible with Windows
- Shareware License
- Customizable Interface
- Code Snippets & Built-in Commands
Достоинства и недостатки
Давайте также рассмотрим ключевые плюсы и минусы среды разработки в виде двух небольших списков.
Достоинства:
- Хорошо продуманный пользовательский интерфейс на русском языке.
- Простая и быстрая инсталляция.
- Наличие собственного отладчика кода.
- Подходит для всех версий Windows, в частности, Professional, Ultimate и других.
- Можно использовать различные дополнения, например, Redistributable Package, SP1, Community, Express и другие.
- Регулярные обновления от разработчиков.
- Удобная система подсказок, что особенно актуально для неопытных пользователей.
Недостатки:
- Не поддерживается на Windows Vista.
- Часто наблюдаются сбои.
- Версия Pro платная.
Обзор
На этой странице перечислены минимальные требования к системе для семейства продуктов Visual Studio 2019. Сведения о совместимости см. в разделе Целевая платформа и совместимость Visual Studio 2019. См. дополнительные сведения по повышению производительности Visual Studio.
Новые возможности
Новые возможности Visual Studio 2019
Интегрированная среда разработки Visual Studio, Заметки о выпуске Visual Studio 2019 или Новые возможности Visual Studio 2019.
Скачать
Нажмите кнопку, чтобы скачать последнюю версию Visual Studio 2019. Инструкции по установке и обновлению Visual Studio 2019 см. в документации по обновлению до последнего выпуска Visual Studio 2019. Кроме того, см. инструкции по установке в автономном режиме.
Совет
Требования к системе для предыдущих версий Visual Studio см. в разделах по Visual Studio 2017, Visual Studio 2015, Visual Studio 2013 или .
Как обстоят дела?
Мы будем рады узнать ваше мнение! Вы можете сообщить о проблемах, щелкнув пункт Сообщить о проблеме в правом верхнем углу установщика или самой IDE-среды Visual Studio. Классу находится в правом верхнем углу. Вы можете отслеживать проблемы в сообществе разработчиков Visual Studio, где можно задать интересующие вопросы, найти нужные ответы и отправить предложения по продуктам. Вам доступна бесплатная по вопросам с установкой.
New Features for .NET
IntelliSense has several new completions that help automate common workflow tasks.
Completions for Casts, Indexers, and Operators
IntelliSense now offers completions for casts, indexers, and operators. Look for these new options in the standard completions list.
IntelliSense now features completions for cast, indexor, and operators.
Automatically Insert Method Call Arguments
There is now a completion option that automatically inserts arguments when writing a method call.
IntelliSense now provides argument insertion completions.
This feature is off by default so you will need to enable it in Tools > Options > Text Editor > C# > IntelliSense and select Tab twice to insert arguments (experimental).
To use this feature, start writing a method call and press tab twice (tab+tab). Notice that the method call includes arguments based on the method’s default values. Use parameter info to cycle through the list of arguments that you would like inserted by pressing the up and down arrow keys. Start typing an argument to bring up the IntelliSense completion list and type semicolon, which will commit the argument and add a semicolon to the end of the method call.
User Interface for EditorConfig Files
EditorConfig now has a user interface.
Update .editorconfig files with a user interface.
Open any .NET EditorConfig file from your solution. Notice that the new UI will automatically open and display code style and code quality configuration options for both C# and Visual Basic.
Visualize Inheritance Chains
There is now a visual representation for navigating and inspecting the inheritance chain.
Visualize inheritance chains without leaving your current code.
This option is off by default so you will need to turn it on in Tools > Options > Text Editor > C# > Advanced and select Show inheritance margin. Enabling inheritance margin will add new icons to the margins representing your code’s implementations and overrides.
Click the inheritance margin icon to display inheritance options that you can navigate to.
Navigate the inheritance chain using icons in the margin.
Step 3 — Install the Visual Studio installer
Run the bootstrapper file to install the Visual Studio Installer. This new lightweight installer includes everything you need to both install and customize Visual Studio.
-
From your Downloads folder, double-click the bootstrapper that matches or is similar to one of the following files:
- vs_community.exe for Visual Studio Community
- vs_professional.exe for Visual Studio Professional
- vs_enterprise.exe for Visual Studio Enterprise
If you receive a User Account Control notice, choose Yes.
-
We’ll ask you to acknowledge the Microsoft License Terms and the Microsoft Privacy Statement. Choose Continue.
Отладка
Посмотрите видео ниже, чтобы узнать, как быстро находить проблемный код при отладке. Длительность видео: 3:54 мин.
Повышение производительности
Мы адаптировали уникальную функцию точек останова в данных в C++ и адаптировали их для приложений .NET Core.
Поэтому независимо от рабочей платформы (C++ или .NET Core) использование точек останова в данных может быть хорошей альтернативой размещению обычных точек останова. Точки останова в данных также отлично подходят для таких сценариев, как поиск, когда глобальные объекты изменяются, а также добавляются в список или удаляются из него.
Благодаря тому, что в Visual Studio 2019 обработка символов является внепроцессной, разработчики крупных приложений C++ могут выполнять отладку приложений, не испытывая проблем, связанных с нехваткой памяти.
Поиск во время отладки
Наверное, вам приходилось искать одну строку из набора значений в окне контрольных значений. В Visual Studio 2019 мы добавили поиск в окнах «Контрольные значения», «Локальные» и «Видимые», чтобы помочь вам быстрее находить нужные объекты и значения.
Также можно выбрать формат отображения значения в окнах «Контрольные значения», «Локальные» и «Видимые». Выберите (дважды щелкнув) один из элементов в любом окне и добавьте запятую («,») для доступа к раскрывающемуся списку спецификаторов формата, каждый из которых включает описание предполагаемого результата.
Дополнительные сведения см. в статье Enhanced in Visual Studio 2019: Search for Objects and Properties in the Watch, Autos, and Locals Windows (Улучшения в Visual Studio 2019: поиск объектов и свойств в окнах «Контрольные значения», «Видимые» и «Локальные»).
Отладчик моментальных снимков
Получайте моментальные снимки при выполнении приложения в облаке, чтобы в точности знать, что происходит. (Эта возможность доступна в только в Visual Studio Enterprise.)
Мы добавили поддержку целевых приложений ASP.NET (приложения Core и классические приложения), которые выполняются на виртуальных машинах Azure. Также мы добавили поддержку приложений, которые выполняются в Службе Azure Kubernetes. Средство Snapshot Debugger позволяет значительно сократить затраты времени на устранение проблем, возникающих в рабочих средах.
Дополнительные сведения см. в статье Отладка интерактивных приложений ASP.NET Azure с использованием Snapshot Debugger и записи блога Introducing Time Travel Debugging for Visual Studio Enterprise 2019 (Представление отладки перехода по времени для Visual Studio Enterprise 2019).
Поддержка Microsoft Edge Insider
Новые возможности в 16.2. Вы можете задать точку останова в приложении JavaScript и начать сеанс отладки с помощью браузера Microsoft Edge Insider. При этом в Visual Studio откроется новое окно браузера с включенной отладкой, с помощью которого можно пошагово выполнять приложения JavaScript в Visual Studio.
Инструмент «Закрепляемые свойства»
Новые компоненты в версии 16.4: Теперь можно легко находить объекты по их свойствам при отладке с помощью нового инструмента «Закрепляемые свойства». Просто наведите указатель мыши на свойство, которое нужно отобразить в окне отладчика в окне просмотра, автоматических действий и локальных действий, а затем щелкните значок закрепления. После этого в верхней части окна сразу же появится нужная информация.
См. сведения о закрепляемых свойствах (отладка и отображение управляемых объектов удобным для пользователя способом).
Git Productivity
We’ve continued to enhance the Git tooling in Visual Studio and are excited to announce some long-awaited updates. We’ve improved how you switch repositories, view commits, interact with diffs, and synchronize your branches.
The status bar now features an enhanced branch picker, a repository picker, and a sync button. Select a commit to open an embedded view of its details and the file changes in the Git Repository window without having to navigate to other windows. You can compare commits in the same way! This view also allows you to pop out commits into their own windows if you want to deep-dive into changes.
Finally, the Git Changes window has a new overflow menu with commands to manage remotes, push tags, and manage branches. Get a walkthrough of all these features and more, in our latest Git blog post.
Git tooling enhancements make it easier to manage repos, branches, and interact with diffs! See full size.
Visual Studio 2019 16.10 preview 2 adds a nice collection of productivity-enhancements for all Visual Studio users. Download the preview today to try out the new features and don’t forget to report a problem or give us feedback on Developer Community!
Test Experience Accessibility improvements
We made several updates to improve the usability and keyboard accessibility of the test detail pane and log files in the Test Explorer.
View Console Logs in the Test Explorer
Console.WriteLine messages now show in the Test Explorer.
Console.WriteLine now shows in the Test Explorer.
Output appears as a collapsible section in the test detail summary pane. Long output is truncated with an option to open the log in a separate window. Stack traces are truncated to 20 frames, and will only show the first and last 10 frames for long traces. An important part of the truncation design was focused on reducing VS freezes when test runs have large output. Tests that have large output will no longer block the UI thread.
Navigate Links from Log Files
Test output can now preserve tags so hyperlinks and stacktrace links are navigable from the log files. These links are now keyboard friendly as well.
Hyperlinks and stacktrace links are now navigable and keyboard friendly.
Automatically Create Log Files
Log files are created for a single test result when output is over 300 characters, or if there are over 10 files attached to the test result. Log files now open in preview so it’s easier to manage your tabs. Both the Test Explorer and log files support Ctrl PgUp/PgDn for navigating the cursor and Shift + Ctrl PgUp/PgDn for selection.
Automatic log file creation with links, previewing, and selection!
The log file editor now uses the IVsTextView interface and can now open very large text files. This should eliminate the need for users to “Copy All” truncated logs and open them in a separate editor. For MSTest, we also include a single log file that aggregates output instead of having individual log files for each data row.
Шаг 6. Установка языковых пакетов (необязательно)
По умолчанию при первом запуске установщик пытается использовать язык операционной системы. Чтобы установить Visual Studio на нужном языке, выберите в Visual Studio Installer вкладку Языковые пакеты и следуйте указаниям.
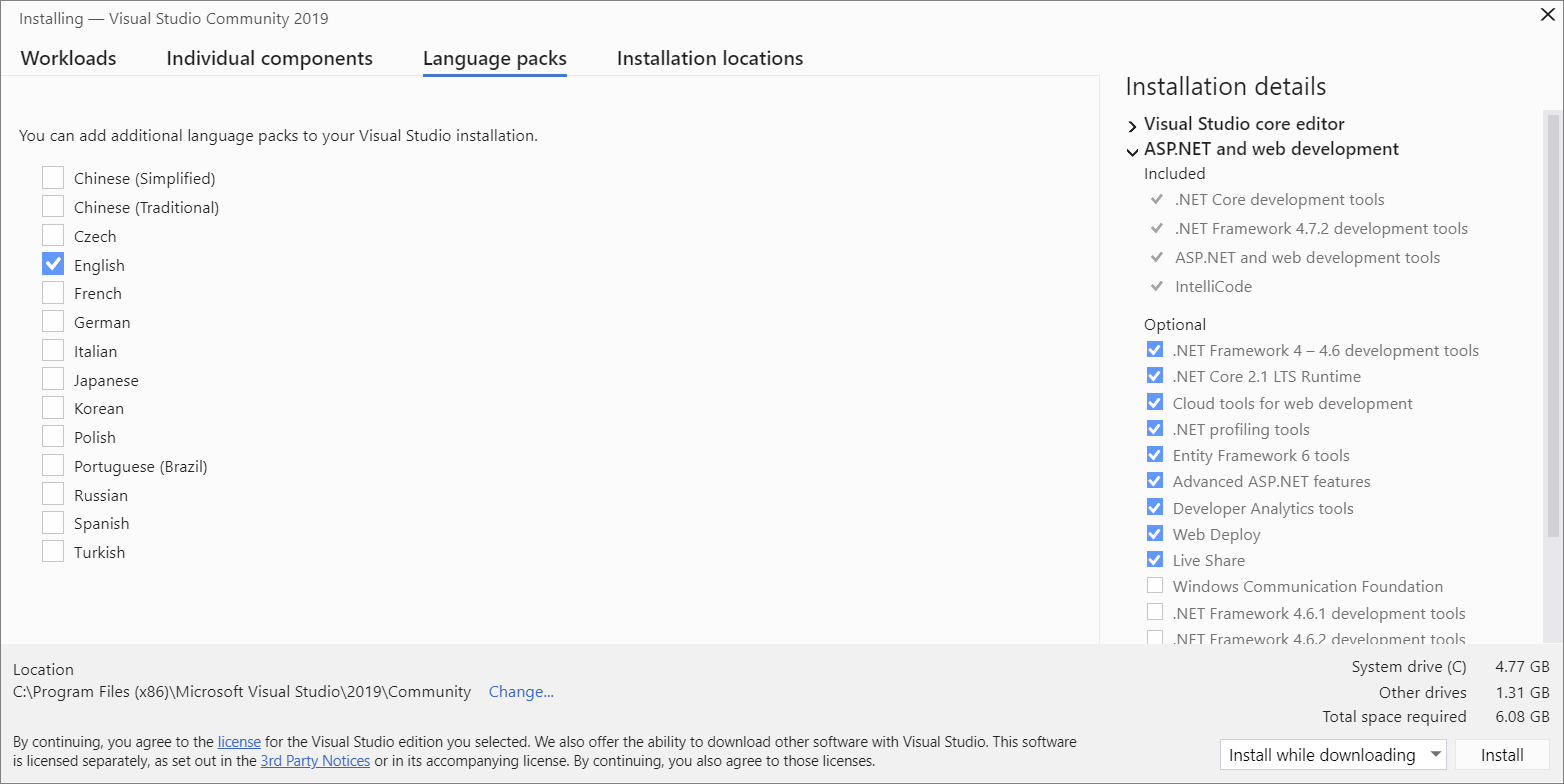
Изменение языка установщика из командной строки
Язык по умолчанию можно изменить еще одним способом — запустив установщик из командной строки. Например, можно принудительно запустить установщик на английском языке, выполнив команду . Программа установки запомнит этот параметр и использует его при следующем запуске. Установщик поддерживает следующие токены языков: zh-cn, zh-tw, cs-cz, en-us, es-es, fr-fr, de-de, it-it, ja-jp, ko-kr, pl-pl, pt-br, ru-ru и tr-tr.
Step 7 — Select the installation location (Optional)
New in 15.7: You can now reduce the installation footprint of Visual Studio on your system drive. You can choose to move the download cache, shared components, SDKs, and tools to different drives, and keep Visual Studio on the drive that runs it the fastest.
You can reduce the installation footprint of Visual Studio on your system drive. You can choose to move the download cache, shared components, SDKs, and tools to different drives, and keep Visual Studio on the drive that runs it the fastest.
Important
You can select a different drive only when you first install Visual Studio. If you’ve already installed it and want to change drives, you must uninstall Visual Studio and then reinstall it.
For more information, see the Select installation locations page.
Get support
Sometimes, things can go wrong. If your Visual Studio installation fails, see Troubleshoot Visual Studio installation and upgrade issues for step-by-step guidance.
We also offer an (English only) support option for installation-related issues.
Here are a few more support options:
- Report product issues to us via the Report a Problem tool that appears both in the Visual Studio Installer and in the Visual Studio IDE.
- Suggest a feature, track product issues, and find answers in the Visual Studio Developer Community.
- Use your GitHub account to talk to us and other Visual Studio developers in the Visual Studio conversation in the Gitter community.
Step 8 — Start developing
-
After Visual Studio installation is complete, choose the Launch button to get started developing with Visual Studio.
-
Choose File, and then choose New Project.
-
Select a project type.
For example, to build a C++ app, choose Installed, expand Visual C++, and then choose the C++ project type that you want to build.
To build a C# app, choose Installed, expand Visual C#, and then choose the C# project type that you want to build.
-
After Visual Studio installation is complete, choose the Launch button to get started developing with Visual Studio.
-
On the start window, choose Create a new project.
-
In the search box, enter the type of app you want to create to see a list of available templates. The list of templates depends on the workload(s) that you chose during installation. To see different templates, choose different workloads.
You can also filter your search for a specific programming language by using the Language drop-down list. You can filter by using the Platform list and the Project type list, too.
-
Visual Studio opens your new project, and you’re ready to code!
Step 4 — Choose workloads
After the installer is installed, you can use it to customize your installation by selecting the feature sets—or workloads—that you want. Here’s how.
-
Find the workload you want in the Visual Studio Installer.
For example, choose the «.NET desktop development» workload. It comes with the default core editor, which includes basic code editing support for over 20 languages, the ability to open and edit code from any folder without requiring a project, and integrated source code control.
-
After you choose the workload(s) you want, choose Install.
Next, status screens appear that show the progress of your Visual Studio installation.
-
Find the workload you want in the Visual Studio Installer.
For example, choose the «ASP.NET and web development» workload. It comes with the default core editor, which includes basic code editing support for over 20 languages, the ability to open and edit code from any folder without requiring a project, and integrated source code control.
-
After you choose the workload(s) you want, choose Install.
Next, status screens appear that show the progress of your Visual Studio installation.
Tip
At any time after installation, you can install workloads or components that you didn’t install initially. If you have Visual Studio open, go to Tools > Get Tools and Features… which opens the Visual Studio Installer. Or, open Visual Studio Installer from the Start menu. From there, you can choose the workloads or components that you wish to install. Then, choose Modify.
New Features for Containers
This release includes some exciting features for users of the Docker container tooling. You can now run any combination of services defined in your compose files, and enjoy improved container and image management in the Containers window.
Run Launch Services Defined in your Compose Files
We listened to your feedback, and now our Docker Compose tooling in Visual Studio provides the ability to run any combination of services defined in your Compose files. Open the Debug dropdown or right-click on your docker-compose project and select Manage Docker Compose Launch Settings to get started.
Use the new menu option to manage Docker Compose launch settings.
The tooling finds all services defined in your Compose files and displays a dialog where you can choose services to start at launch. As you create a Launch Profile, you have the option to either select from the Docker Compose profiles declared in your Compose files, or individually select the services you want to start.
Individually select the services you want to start.
Any Launch Profile can be saved and run from the Debug dropdown in Visual Studio. This means you can create multiple options for launching your application’s services!
Advanced Interactions with Containers and Images
In Preview 2, we added many new features to the Containers tool window. We made it easier to view and interact with containers and images. Navigate to View > Other Windows > Containers in Visual Studio to open the Containers tool window and try out the new features!
Containers are now grouped by Compose project, which makes it easier to identify which containers are associated with your application. We also added a Labels tab in both Containers and Images so you can see which labels you are using during development.
View container labels in the Labels tab.
Our new Volumes tab allows you to see the volumes of a running container and even open the files in Visual Studio.
View and access volume files in the Volumes tab.
Finally, the Containers tool window also supports tagging an image! Right click on an image and select Tag.
Tag an image in the Containers tool window.
