Пишем первое приложение для samsung smart watch и os tizen
Содержание:
- Installing Additional Packages
- Issuing a Tizen Certificate
- Enhancement of Development Environment and Core Component
- Building the Project
- Updating with the CLI Package Manager
- Starting the Package Manager
- Openness, Optimization, and Opportunities
- Running Your Application
- Develop applications
- Обновление браузера
- Building Your Application
- Публикация приложения: Seller Office и Tizen Store
- Проблемы и нюансы при разработке под SmartTV с использованием React.js
- Visual Studio Tools for Tizen Installation
Installing Additional Packages
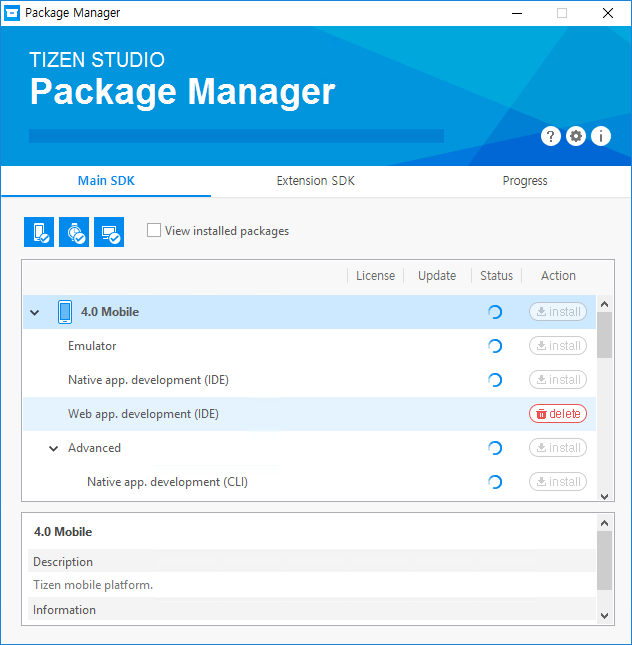
If you want to install a specific platform or tool, in the Main SDK and Extension SDK tabs, simply click install next to that platform or tool. The Package Manager installs all packages that are required for that platform or tool.
You can also install individual packages from a platform or tool. Unfold the list for the platform or tool, and click install next to the packages you want.
Figure: Installing platform packages
While a package is installing, you can cancel the installation in the Progress tab by clicking the x button next to the package. Due to package dependencies, canceling the installation of a single package can cancel the installation of other packages.
Figure: Canceling installation
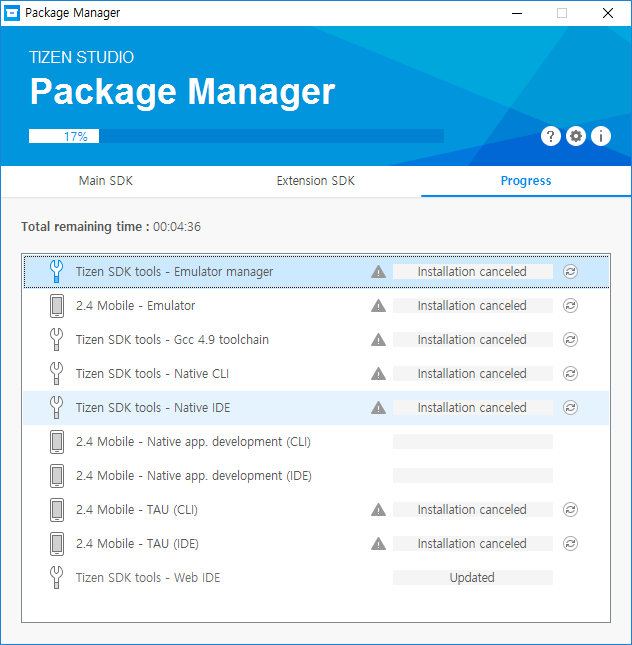
If you want to retry a canceled or failed installation, click the retry () button. Due to package dependencies, retrying the installation of a single package can cause the installation of other packages.
Issuing a Tizen Certificate
The command generates a Tizen certificate for your application. If you want to upload your application to the Tizen Store or install the application to a Tizen device, you must generate a Tizen certificate.
Syntax:
tizen certificate
Options:
| Option | Description |
|---|---|
| , | Specifies an alias name of the certificate. |
| , | Specifies the password of the certificate. |
| , | Specifies the user’s country code, which consists of 2 letters. |
| , | Specifies the user’s state. |
| , | Specifies the user’s city. |
| , | Specifies the user organization. |
| , | Specifies the user’s organization unit. |
| , | Specifies the user name. |
| , | Specifies the user email. |
| , | Specifies the file name without a file extension. A certificate file is created with the file name. If you skip this option, the default file name, , is used on creating the certificate file. |
| Specifies the output directory path to create the certificate. If you skip this option, the default output directory path, , is used on saving the certificate file. |
Examples:
Enhancement of Development Environment and Core Component
-
Tizen .NET
It is the development environment for developing high quality and high performance application in C#. There is an enhancement in the Tizen Development environment in Tizen 5.5.
The latest Xamarin.Forms 4.0 and the latest .NET Core 3.0 are now supported. Xamarin.Forms on Tizen .NET is a complete cross-platform UI toolkit that allows you to create native UI. The latest .NET Core supports unloading DLL, AOT, pre-loading, pre-initialization, Tiered complications and MPGO for enhancing application launching time. Also, there is memory optimization by reducing relocation of DLL files, pre-loading for resource sharing and so on. The .NET Core 3.0 Runtime is faster, lighter than its previous version. With all these enhancements, the application launching time is reduced by 28% and memory usage is reduced by 20%. New Tizen extension for the official visual studio for Mac is also released in Tizen 5.5. The key features of the Tizen extension are the Tizen.NET application development environment, the Tizen IDE tools, and the application debugging using .NET Core debugger.
-
Watchface Complication API
Tizen 5.5 provides an easy way to create custom complications in a watch face. These APIs provide various kinds of complication types. You can deploy various kinds of complication services such as health, battery, air pollution, and so on by using these APIs.
-
Supports Lottie animation
The Lottie animations are supported in Tizen 5.5. Lottie was named by AirBnB. It is a library that renders ‘After Effects animations’ in real time. The animation is exported as a Lottie file which has a JSON format. The file contains information about visual shapes such as rectangle, circle, path and fill methods like the traditional vector graphics elements.
-
Multi-assistant Framework
It aims to support various AI assistants at the same time for better usability. The framework defines a common interface for making an assistant of the multi-assistant framework. It also provides an expandable wake-up engine that recognizes invocation keyword for each assistant and supports to add a new keyword.
-
Multi-device distributed web engine
It is designed for both memory resource requirements mitigation and JavaScript execution speed enhancement to overcome the resource constraints of the low-end devices. With the prior multi-process design of the web engine, the memory usage of the renderers becomes significant as multiple tabs are created. CPU resource consumption of the renderer processes is also substantial as web applications get complicated. To manage hardware resources and to make resource usage predictable in low-end devices, the multi-device distributed web engine introduces features for offloading renderer processes over the network to resource-free devices while the browser process runs on the local low-end device.
-
User Awareness Framework
Smart devices could provide useful services based on the user presence context. Tizen 5.5 supports User Awareness Framework based on multiple sensors. Currently, Wi-Fi, BLE, motion, and light sensors are supported and it could be extended to support other types of sensors based plug-in architecture.
Building the Project
The command builds the Tizen native or Web project. To build the native project, 3 options are needed: architecture, compiler, and configuration. If you do not set these options, the default values are used. You can check or set the default build options with the command.
Syntax:
tizen <sub-command>
Sub-commands:
| Sub-command | Description |
|---|---|
| Build the Tizen native project.
Options are:
|
|
| Build the Tizen Web project.
Options are:
|
Examples:
- Build the native project with the , , and options.
Windows:
> tizen build-native -a x86 -c llvm -C Debug -- C:\Users\workspace\basic
> dir C:\Users\workspace\basic\Debug
Ubuntu and macOS:
$ tizen build-native -a x86 -c llvm -C Debug -- ~/workspace/basic
$ ls ~/workspace/basic/Debug
- Build the native project with the default configuration and the bixby add-on framework.
Windows:
> tizen build-native -f bixby -- C:\Users\workspace\basic
> dir C:\Users\workspace\basic\Debug
Ubuntu and macOS:
$ tizen build-native -f bixby -- ~/workspace/basic
$ ls ~/workspace/basic/Debug
- Build the native project with a rootstrap.
Windows:
> tizen build-native -r mobile-2.4-device.core -C Release -- C:\Users\workspace\basic
> dir C:\Users\workspace\basic\Release
Ubuntu and macOS:
$ tizen build-native -r mobile-2.4-device.core -C Release -- ~/workspace/basic
$ ls ~/workspace/basic/Release
- Build the Web project with default options.
Windows:
> tizen build-web -- C:\Users\workspace\basicWeb
> dir C:\Users\workspace\basicWeb\.buildResult
Ubuntu and macOS:
$ tizen build-web -- ~/workspace/basicWeb
$ ls ~/workspace/basicWeb/.buildResult
Updating with the CLI Package Manager
Run the CLI Package Manager with the command using the following syntax:
package-manager-cli update
Table: Update command parameters
| Parameter | Description |
|---|---|
| Accepts the license terms. | |
| Skips the Java version check. | |
| Proxy configuration value. Use one of the following values: direct, auto, or ip:port. | |
| If you want to install packages from a local SDK image, specify the full path of the SDK image file. | |
| Administrator (sudo) password for authentication. Ubuntu only. | |
| This option is only useful for updating Tizen Studio to the latest version after you downgraded it manually to an earlier version. Otherwise, the Package Manager updates it to the latest version with or without this option. |
Starting the Package Manager
Before starting the Package Manager, close all Tizen Studio programs.
To run the Package Manager:
- On Windows, select Start > All Programs > Tizen Studio > Tools > Package Manager.
- On macOS, select Launchpad > Package Manager.
- On Ubuntu, select Dashboard Home > Package Manager.
Figure: Package Manager main window
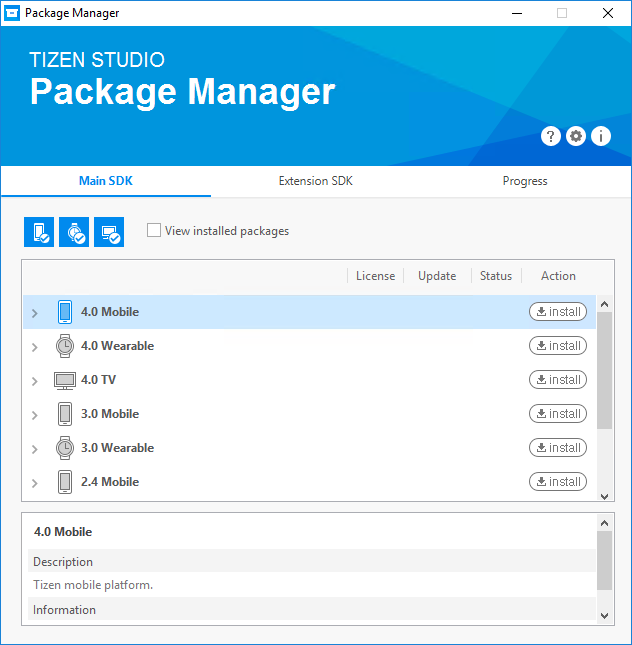
The Package Manager is composed of 3 areas:
-
Header area contains the tool title and 3 buttons:
- Click Inside Trouble Shooting () to access guides that help you resolve common issues related to the Package Manager.
- Click Configuration () to change Package Manager settings, such as package repository locations and proxy options.
- Click Information () to access information about the Package Manager, such as the version number, the installation path, the package repository URL, the distribution name, and the package snapshot.
-
Main area has 3 tabs:
- In the Main SDK tab, you can install or remove platforms and tools. The profile filter buttons () allow you to filter the package list based on the profiles selected.
- In the Extension SDK tab, you can install or remove extension tools and packages, such as the Samsung Certificate Extension.
- In the Progress tab, you can see which packages are being installed or removed.
In the Main SDK and Extension SDK tabs, you can restrict the list to the installed packages by selecting the View installed packages check box.
Figure: Package list
-
Description area shows a detailed description for a platform or package that has been clicked in the list in the main area.
Figure: Description area
Openness, Optimization, and Opportunities
Tizen is a Linux-based, open-source software platform. Anyone can contribute and freely develop the system software and applications, which is beneficial for both device manufacturers and application developers. Furthermore, by supporting Web applications with open Web technologies, Tizen provides developers with flexibility and extensibility. Based on the open ecosystem, users can expect various experiences from Tizen devices and services. With its openness, Tizen can pursue continuing progress and expanding ecosystem.
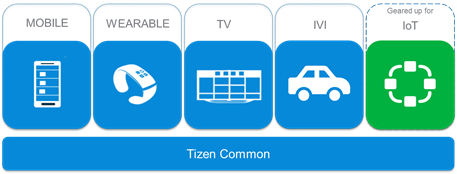
Tizen is built to work on diverse devices and profiles are defined accordingly. Currently, 4 profiles are supported: mobile, wearable, TV, and IVI (In-Vehicle Infotainment). Features of each profile provide product-optimized functionality and performance.
From Tizen 3.0, all profiles are built on top of a common, shared infrastructure called Tizen Common. Based on the common components, devices and features under new categories or profiles can be easily added up for emerging technologies. Therefore, Tizen is adaptable and customizable for new products. In the foreseeable future, for example, IoT devices and services will be prevalent and Tizen is taking proactive steps toward the opportunities in the new markets.
Running Your Application
You can run the application on the emulator or a real target device.
Running on the Emulator
To run the application on the emulator:
- Launch an emulator instance in the Emulator Manager:
-
In the Tizen Studio menu, select Tools > Emulator Manager.
- In the Emulator Manager, select a wearable emulator from the list and click Launch.
If no applicable emulator instance exists, .
The emulator is launched in its own window. You can also see the new emulator instance and its folder structure in the Device Manager.
-
- Generate a security profile.
Before you run the application, you must sign your application package with a certificate profile in the Tizen Studio.
- Run the application:
-
In the Project Explorer view, right-click the project and select Run As > Tizen Native Application.
Alternatively, you can also select the project in the Project Explorer view and do one of the following:
- Press the Ctrl + F11 key.
- Click the run icon in the toolbar.
If you have created multiple emulator instances, select the instance you want from the combo box in the toolbar before selecting to run the application. If you select an offline emulator, it is automatically launched when you select to run the application.
-
Confirm that the application launches on the emulator.
NoteIf the emulator display has switched off, you cannot see the application launch. To switch the display on, click the Power key (in the lower-right corner of the emulator).
While the application is running, the Log view in the Tizen Studio shows the log, debug, and exception messages from the methods defined in the log macros. To see the view, in the Tizen Studio menu, go to Window > Show View > Log.
-
For more information on using the emulator features, see Using Emulator Control Keys, Menu, and Panel and Using Extended Emulator Features.
Running on a Target Device
To run the application on a target device:
- Connect the wearable target device to your computer:
- Define settings on the device:
-
Go to Settings > Connections, and switch on Bluetooth.
- Go to Settings > Connections, and switch on Wi-Fi.
The device and the computer must be connected to the same Wi-Fi network.
Note the IP address the device is using.
- Go to Settings > Gear info, and switch on the debugging mode.
-
- Use the Remote Device Manager to connect the wearable device:
-
In the Device Manager, launch the Remote Device Manager by clicking the related icon.
- In the Remote Device Manager window, click +.
- In the Add Device window, enter the device and network details (use the IP address you noted before), and click Add.
- In the Remote Device Manager window, switch the new device on by clicking the switch under Connect.
-
- The device asks for user confirmation. To allow Gear to read log data, copy files to and from your computer, and install the application manually, click the accept mark.
- In the Device Manager, confirm that the device is connected (shown in the device list).
- Define settings on the device:
- Generate an author certificate.
Before you run the application, you must sign your application package with a certificate profile in the Tizen Studio.
- Run the application:
- In the Device Manager, select the device.
- In Project Explorer view, right-click the project and select Run As > Tizen Native Application.
Alternatively, you can also select the project in the Project Explorer view and do one of the following:
- Press the Ctrl + F11 key.
- Click the run icon in the toolbar.
If you have both a connected device and existing emulator instances, select the device from the combo box in the toolbar before selecting to run the application.
-
Confirm that the application launches on the target device.
NoteThe application is launched using the default debug run configuration. To create and use another configuration:
- In the view, right-click the project and select .
- In the window, click the icon (), define the configuration details, and launch the application by clicking .
Develop applications
The following sections explain how to use Visual Studio Code Extension for Tizen to develop your applications.
Create Tizen .NET project
To create a Tizen .NET project:
- Create a new directory as the root directory for your project.
- In Visual Studio Code, open the project directory you created.
- Open the Command Palette and enter tizen create.
- Select Tizen .NET: Create a Tizen .NET project.
- Select a Tizen .NET project template from the template list.
- Enter the project name.
- For a building target, select a solution file with the extension or a project file with the extension.
Build your project
To build your project:
- Open the Command Palette and enter tizen build.
- Select Tizen .NET: Build a Tizen .NET project.
- Review the build results in the Output window, and check the location of the package file ().
Deploy and run your application in emulator
To deploy and run your application:
-
To launch the Tizen Emulator Manager, open the Command Palette and enter tizen run.
-
Select Tizen .NET: Launch Tizen Emulator Manager.
-
Create and launch an emulator instance in the Emulator Manager.
-
To deploy your application to the target, enter tizen install in the Command Palette and select Tizen .NET: Install a Tizen .NET application on the Tizen device.
-
To run the application on the emulator, enter tizen run in the Command Palette and select Tizen .NET: Run a Tizen .NET application on the Tizen device.
Debug your application in emulator
To debug your application:
- .
- In the Visual Studio Code Activity Bar, click the Debug icon ().
- In the Debug view, open the Configuration drop-down menu and select Add Configuration.
- Select Tizen LLDB in the list of configurations.
- Start the debugging session by pressing F5.
Обновление браузера
После успешного скачивания браузера можно пользоваться им какое-то время. Затем высока вероятность, что начнутся проблемы – страницы медленно открываются, приложение вылетает, работа его нестабильна. Причин может быть две – заполнен кэш или устарела версия ПО. Обновить встроенный браузер на телевизоре samsung smart tv можно только вместе с прошивкой. Сделать это можно через Интернет или использовать USB-накопитель.
Но обновление необходимо, только если вышла новая версия ПО – при установке через Интернет удастся проверить это автоматически. Но что делать, если можно провести апгрейд только через флэшку? В этом случае нужно зайти в настройки телевизора и узнать версию настоящего ПО, а затем на официальном сайте самсунга сравнить его со свежим обновлением. Если они совпали – пока следует отложить процедуру, в противном случае, нужно готовить флэшку.
Через интернет
Более простой способ – обновление через Интернет.
- В режиме Smart Hub открыть меню.
- Перейти в пункт Поддержка.
- Выбрать раздел Обновление ПО.
- Нажать на Обновить сейчас или Обновить по сети – в зависимости от модели может появиться одна из надписей.
- Произойдет автоматическая проверка на наличие обновлений. Если они будут обнаружены, появится окно с просьбой подтвердить действие.
- После утвердительного ответа начнется обновление.
Пока происходит установка новой прошивки ни в коем случае нельзя выключать телевизор. По окончании процесса – он может занять несколько минут или более получаса, система перезагрузится.
Через флешку
Обновление через флешку выручит, если нет возможности подключить телевизор к интернету или скорость подключения слишком медленная. Единственное условие – перед процедурой флешку нужно отформатировать. Для этого существует простой порядок действий:
- Вставить накопитель в разъем компьютера.
- Открыть «Мой компьютер», кликнуть на флешку правой кнопкой мыши или зайти в Свойства.
- Найти раздел Форматирование.
- В пункте Файловая система выбрать «FAT 32».
- Нажать на Начать.
После этого флешка будет читаема для телевизора и с нее будут удалены все имеющиеся файлы. Поэтому лучше держать для обновлений прошивки телевизора отдельный накопитель. После того, как форматирование будет завершено, можно приступать к основным действиям:
Распаковать архив, указав путь на отформатированную флешку.
Вытащить накопитель из разъема ПК и вставить в разъем телевизора (тот, что с пометкой HDD).
Зайти в меню смарт тв. Открыть раздел Поддержки в настройках и выбрать пункт «Обновление ПО». Среди вариантов выбрать тот, который через USB.
После этого система обработает запрос в течение нескольких минут и запустит обновление. В это время нельзя выключать телевизор, дождаться перезагрузки после завершения процесса.
Обновление сторонних браузеров
Рано или поздно даже сторонние браузеры нужно обновлять – иначе программа будет зависать, выдавать плохое качество изображения. В отличие от встроенного типа, эти приложения можно обновлять отдельно, а не вместе с прошивкой. Для этого снова в меню программ Smart Hub нужно найти искомый браузер и кликнуть на него – если обновления есть, они установятся. Конечно, это займет гораздо меньше времени, чем апгрейд прошивки, но все равно делать в этом время ничего не рекомендуется.
Реально даже упростить себе жизнь и сделать этот процесс автоматическим. Для этого нужно перейти в настройки приложения и в разделе обновлений выбрать строку «обновлять автоматически». После этого не придется следить за новыми версиями, а приложения будут работать стабильно.
Building Your Application
After you have created the application project, you can implement the required features. In this example, only the default features from the project template are used, and no code changes are required.
When your application code is ready, you must build the application. The building process performs a validation check and compiles your files.
You can build the application in the following ways:
-
Automatically
The automatic build means that the Tizen Studio automatically rebuilds the application whenever you change a source or resource file and save the application project.
To use the automatic build:
- Select the project in the Project Explorer view.
- In the Tizen Studio menu, select Project > Build Automatically.
A check mark appears next to the menu option.
You can toggle the automatic build on and off by reselecting Project > Build Automatically.
-
Manually
The manual build means that you determine yourself when the application is built.
To manually build the application, right-click the project in the Project Explorer view and select Build Project.
Figure: Manually building the application
Alternatively, you can also select the project in the Project Explorer view and do one of the following:
- In the Tizen Studio menu, select Project > Build Project.
- Press the F10 key.
You can have more than one build configuration. To see the current active configuration or change it, right-click the project in the Project Explorer view and select Build Configurations > Set Active. The default configuration is . For more information, see Building Applications.
After you have built the application, run it.
Публикация приложения: Seller Office и Tizen Store
Настало время опубликовать свое приложение в Tizen Store. Для этого нужно подготовить или запросить у клиента несколько вещей:
1. Логотипы приложения в соответствии с UX-руководствами:
-
Полноэкранная заставка из двух слоев: сам логотип в PNG-формате с полупрозрачностью и фон. Размеры – 1920x1080px, не более 300 килобайт.
-
Иконка для результатов поиска размером 512х423px, не более 300 килобайт.

2. Полноразмерные скриншоты основных экранов приложения — 4 штуки

3. DOC-файл на английском с описанием экранов и поведения приложения по шаблону:
-
Структура UI — схема навигации между страницами приложения.
-
Примеры использования основных возможностей приложения.
-
Меню и функции — маркировка и описание основных функций.
-
Пульт — описание функций, которые присвоены кнопкам пульта.
-
Языковые опции — отметка о поддержке языковых версий.
Вроде бы все строго, есть официальный чек-лист разработчика, но, как показывает практика, вполне подходит и более простой документ в свободной форме со скриншотами UI и описанием поведения кнопок и основных функций.
4. Указать версию приложения в config.xml <widget … … version=“1.0.0”> и подготовить подписанный wgt-файл.
We’re good to go! Весь остальной квест не требует предварительной подготовки. Можно переходить непосредственно к регистрации.
После успешного завершения регистрации начнется процесс ручного тестирования со стороны Cамсунга. Живые люди будут заводить баги во внутреннем баг-трекере, прикреплять туда молчаливые видео и жестами указывать на моменты фиаско.
В итоге приложение появится в Samsung Store, даже если в нем нашлись незначительные дефекты, вроде “Many of channels don’t work. Black screen with loader is visible”. 🙂
Но с критическими дефектами, вроде “Infinite loading”, приложение не попадет к пользователям.
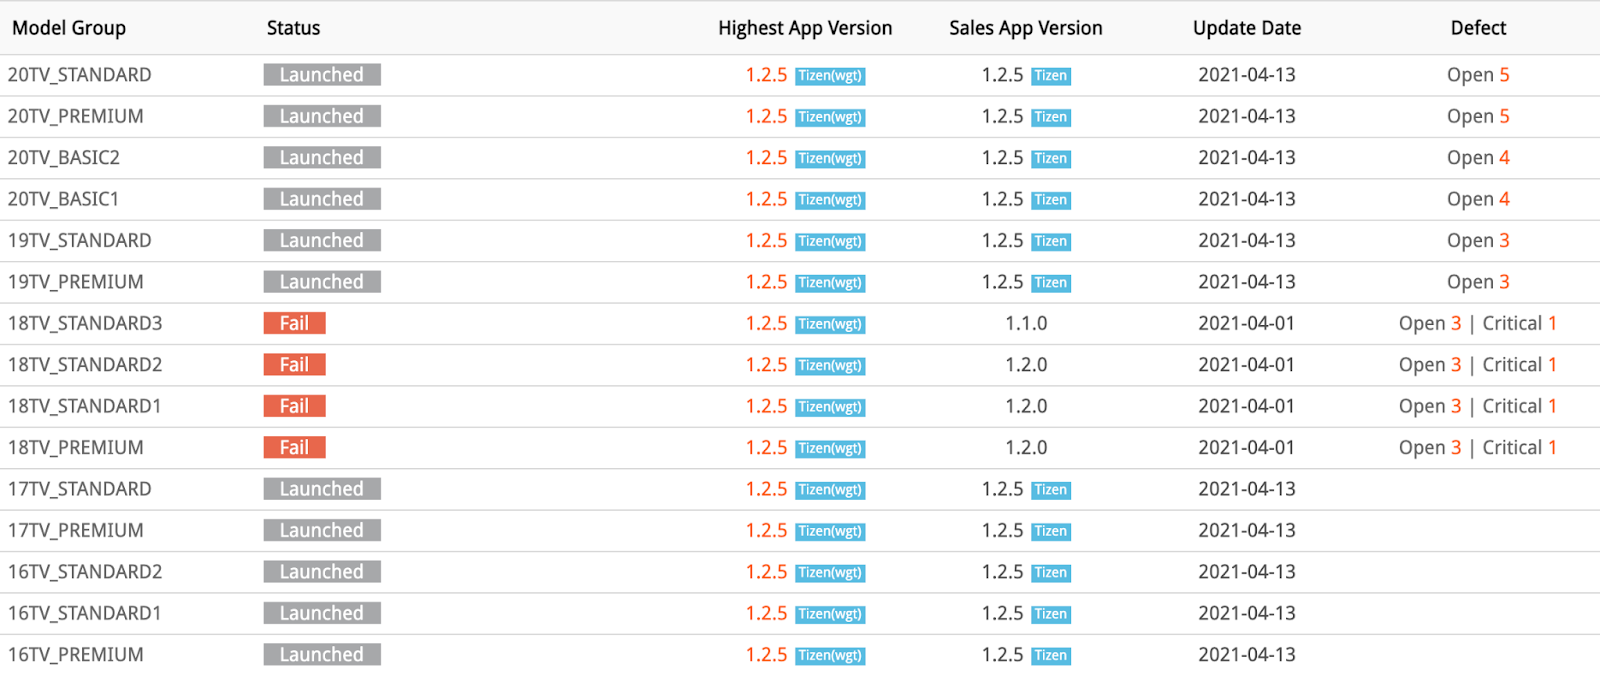 Скриншот: система отслеживания ошибок на портале Samsung для для Tizen-разработчиков
После исправления критических багов можно праздновать свой успех! Теперь приложение можно найти по названию или ключевым словам в сквозном поиске телевизора.
Проблемы и нюансы при разработке под SmartTV с использованием React.js
Из песочницы
Хочу поделиться опытом разработки приложения с просмотром видео контента для SmartTV (Tizen и WebOS) и с какими проблемами мы столкнулись.
На современных телевизорах, как мы знаем, можно устанавливать разные приложения, для облегчения работы с какими-то ресурсами и контентом. В большинстве случаев, эти приложения под капотом это обычный браузер, на теликах это Chromium.
Так как это браузер, то ничего нам не мешало использовать React.js для разработки, что повлияло на некоторые проблемы с производительностью.
Я не буду рассказывать о том, как именно нужно делать с примерами кода, я расскажу о нюансах и решениях, которые были приняты.
Visual Studio Tools for Tizen Installation
To use the Tizen SDK tools, you must install the Visual Studio Tools for Tizen extension and the baseline SDK.
Installing the Extension
The Visual Studio Tools for Tizen extension is registered in the Visual Studio Marketplace. You can install extensions from the Visual Studio Marketplace in the Visual Studio IDE.
-
In the Visual Studio IDE menu, go to Tools > Extensions and Updates.
-
In the Visual Studio Marketplace, search for Tizen.
-
Click Download and close the Visual Studio IDE.
The installation starts.
Installing the Tizen Baseline SDK
After installing the Visual Studio Tools for Tizen extension, you must set up the Tizen Baseline SDK:
-
In the Visual Studio IDE menu, go to Tools > Tizen > Tizen Package Manager.
-
Select Install new Tizen SDK.
-
Read the license document and click I Agree.
-
Enter the root directory path where you want to install and click Next.
The Tizen SDK installer is downloaded and the baseline SDK is installed automatically.
Finally, the Tizen Package Manager installs the Tizen SDK tools.
Setting the Tizen Baseline SDK Path
You can use the Tizen Package Manager to set up the Tizen Baseline SDK path or each tool path directly:
-
To set up the Tizen Baseline SDK path:
-
In the Visual Studio IDE menu, go to Tools > Tizen > Tizen Package Manager.
-
Select Use installed Tizen SDK.
-
Enter the root directory of your existing Tizen Studio installation.
-
-
To set up each tool path directly:
-
In the Visual Studio IDE menu, go to Tools > Options > Tizen > Tools.
-
Enter the root directory of your existing Tizen Studio installation in the Tool Path field.
The other tools paths are automatically set up.
-
Installing Emulator Images
If you do not have a real device, you can run applications in the Tizen Emulator.
To download emulator images, you can use the Tizen Package Manager or the Tizen Emulator Manager:
-
To use the Tizen Package Manager:
-
In the Visual Studio IDE menu, go to Tools > Tizen > Tizen Package Manager.
-
Select the profiles and versions you want to install and click Install.
-
-
To use the Tizen Emulator Manager:
-
In the Visual Studio IDE menu, go to Tools > Tizen > Tizen Emulator Manager.
-
Select the profiles and versions you want to install and click OK.
-
