Конвертируем видео с ffmpeg
Содержание:
- NVDEC/CUVID
- libmfx
- OpenCL
- AMD UVD/VCE
- External resources
- Developer Documentation
- FFmpeg-related Sponsoring Programs
- FFmpeg Developer Meetings
- Community Contributed Documentation
- Filter Metadata
- 4 Development
- Что такое ffmpeg?
- Input piping
- Способ 3: Собственноручная регистрация ffmpeg.dll в ОС
- Streaming your desktop
- FFMpeg
- ffmpeg сканер
- Другие процессы
- CPU usage / File size
- Compiling FFmpeg with external libraries
- Helper methods
- Ffmpeg.exe file information
- Universe
- 1.3. Использование специальных декодеров, реализующих декодирование на графических процессорах
- 2. Измерение скорости декодирования
- 3. Замечания о QSV декодерах
- Usage
NVDEC/CUVID
NVDEC offers decoders for H.264, HEVC, MJPEG, MPEG-1/2/4, VP8/VP9, VC-1. Codec support varies by hardware (see the GPU compatibility table).
Note that FFmpeg offers both NVDEC and CUVID s. They differ in how frames are decoded and forwarded in memory.
The full set of codecs being available only on Pascal hardware, which adds VP9 and 10 bit support. The note about missing from NVENC applies for NVDEC as well.
Sample decode using CUDA:
ffmpeg -hwaccel cuda -i input output
Sample decode using CUVID:
ffmpeg -c:v h264_cuvid -i input output
Full hardware transcode with NVDEC and NVENC:
ffmpeg -hwaccel cuda -hwaccel_output_format cuda -i input -c:v h264_nvenc -preset slow output
If ffmpeg was compiled with support for libnpp, it can be used to insert a GPU based scaler into the chain:
ffmpeg -hwaccel_device 0 -hwaccel cuda -i input -vf scale_npp=-1:720 -c:v h264_nvenc -preset slow output.mkv
The option can be used to specify the GPU to be used by the hwaccel in ffmpeg.
libmfx
libmfx is a proprietary library from Intel for use of Quick Sync hardware on both Linux and Windows. On Windows it is the primary way to use more advanced functions beyond those accessible via DXVA2/D3D11VA, particularly encode. On Linux it has some different feature set and helpful for some use-cases desiring maximum throughput.
See QuickSync.
OpenCL
OpenCL can be used for a number of filters. To build, OpenCL 1.2 or later headers are required, along with an ICD or ICD loader to link to — it is recommended (but not required) to link with the ICD loader, so that the implementation can be chosen at run-time rather than build-time. At run-time, an OpenCL 1.2 driver is required — most GPU manufacturers will provide one as part of their standard drivers. CPU implementations are also usable, but may be slower than using native filters in ffmpeg directly.
OpenCL can interoperate with other GPU APIs to avoid redundant copies between GPU and CPU memory. The supported methods are:
- DXVA2: NV12 surfaces only, all platforms.
- D3D11: NV12 textures on Intel only.
- VAAPI: all surface types.
- ARM Mali: all surface types, via DRM object sharing.
- libmfx: NV12 surfaces only, via VAAPI or DXVA2.
AMD UVD/VCE
AMD UVD is usable for decode via VDPAU and VAAPI in Mesa on Linux. VCE also has some initial support for encode via VAAPI, but should be considered experimental.
On Windows, UVD is accessible via standard DXVA2/D3D11VA APIs, while VCE is supported via AMF.
External resources
- multimedia.cx: How To Play Hardware Accelerated Video on A Mac
- libav-user: Hardware accelerated decoding
- Stack Overflow: How to use hardware acceleration with ffmpeg
Developer Documentation
- Development Policies and Guides
- Guide for Using Git
- Notes on Maintaining FFmpeg Source Code and Being a Maintainer
- FATE – Our Continuous Integration Platform / regression testing system
- Cleanup – A list of components that may be considered candidates for removal
- Debugging
- How to conduct merges from Libav
- How to apply patches from Patchwork
- Google Summer of Code
- GSoC 2021
- GSoC 2020
- GSoC 2019
- GSoC 2018
- GSoC 2017
- GSoC 2016
- GSoC 2015
- GSoC 2014
- Outreachy
- Outreachy — Dec 2016
- Outreachy — May 2016
- Outreachy — May 2015
- OPW — Dec 2014
FFmpeg Developer Meetings
- FFmeeting/2020-12
- FFmeeting/2020-02
- FFmeeting/2019-12
- FFmeeting/2016-05
- FFmeeting/2015-09
- FFmeeting/2014-10
- FFmeeting/2014-01
Community Contributed Documentation
The guides below have been written by users and for users to supplement the official FFmpeg Documentation. If you’re confused about something refer to the official documentation and if you’re still having problems we can help.
Filter Metadata
Filters may write metadata entries that can be used for debugging their functionality, or extracting additional information from the input file. For a general description, see .
Metadata keys are defined by the respective filters, and there is no globally accessible list. Some of them are mentioned in the filter documentation itself.
Here are some important metadata keys, all starting with , where is the name of the filter itself.
| Filter | Key | Description |
|---|---|---|
| Duration of the freeze period | ||
| End of the freeze period | ||
| Start of the freeze period | ||
| Duration of the silence period | ||
| End of the silence period | ||
| Start of the silence period | ||
4 Development
Yes. Check the doc/examples directory in the source
repository, also available online at:
https://github.com/FFmpeg/FFmpeg/tree/master/doc/examples.
Examples are also installed by default, usually in
.
Also you may read the Developers Guide of the FFmpeg documentation. Alternatively,
examine the source code for one of the many open source projects that
already incorporate FFmpeg at (projects.html).
It depends. If your compiler is C99-compliant, then patches to support
it are likely to be welcome if they do not pollute the source code
with s related to the compiler.
Yes. Please see the Microsoft Visual C++
section in the FFmpeg documentation.
No. These tools are too bloated and they complicate the build.
FFmpeg is already organized in a highly modular manner and does not need to
be rewritten in a formal object language. Further, many of the developers
favor straight C; it works for them. For more arguments on this matter,
read .
The build process creates , , etc. which
contain full debug information. Those binaries are stripped to create
, , etc. If you need the debug information, use
the *_g versions.
Yes, as long as the code is optional and can easily and cleanly be placed
under #if CONFIG_GPL without breaking anything. So, for example, a new codec
or filter would be OK under GPL while a bug fix to LGPL code would not.
FFmpeg builds static libraries by default. In static libraries, dependencies
are not handled. That has two consequences. First, you must specify the
libraries in dependency order: must come before
, must come after everything else, etc.
Second, external libraries that are used in FFmpeg have to be specified too.
An easy way to get the full list of required libraries in dependency order
is to use .
c99 -o program program.c $(pkg-config --cflags --libs libavformat libavcodec)
See doc/example/Makefile and doc/example/pc-uninstalled for
more details.
FFmpeg is a pure C project, so to use the libraries within your C++ application
you need to explicitly state that you are using a C library. You can do this by
encompassing your FFmpeg includes using .
See
FFmpeg is a pure C project using C99 math features, in order to enable C++
to use them you have to append -D__STDC_CONSTANT_MACROS to your CXXFLAGS
You have to create a custom AVIOContext using ,
see libavformat/aviobuf.c in FFmpeg and libmpdemux/demux_lavf.c in MPlayer or MPlayer2 sources.
see https://www.ffmpeg.org/~michael/
Even if peculiar since it is network oriented, RTP is a container like any
other. You have to demux RTP before feeding the payload to libavcodec.
In this specific case please look at RFC 4629 to see how it should be done.
is NOT the average frame rate, it is the smallest frame rate
that can accurately represent all timestamps. So no, it is not
wrong if it is larger than the average!
For example, if you have mixed 25 and 30 fps content, then
will be 150 (it is the least common multiple).
If you are looking for the average frame rate, see .
Make sure you have the fate-suite samples and the Make variable
or environment variable or the
option is set to the right path.
Do you happen to have a character in the samples path to indicate a
home directory? The value is used in ways where the shell cannot expand it,
causing FATE to not find files. Just replace by the full path.
This document was generated on September 9, 2021 using makeinfo.
Hosting provided by telepoint.bg
Что такое ffmpeg?
ffmpeg — это один из лучших мультимедийных фреймворков, который содержит различные инструменты, для решения разных задач. Например, ffplay — портативный медиа плеер, утилита ffmpeg может использоваться для обработки и инвертирования файлов, ffserver — для потоковой передачи данных, а ffprobe может анализировать мультимедийный поток.
В набор ffmpeg, кроме утилит, входят такие библиотеки: libavutil libavcodec libavformat libavdevice libavfilter libavresample libswscale libswresample libpostproc. Из-за своей архитектуры, этот набор инструментов очень безопасный, и с помощью него вы можете сделать почти все что угодно с видео или аудио. В этой статье мы будем рассматривать в основном утилиту ffmpeg. Давайте рассмотрим ее синтаксис:
$ ffmpeg -i
- Опции источника — указывают параметры чтения файла, настройки и так далее;
- Источник — опция -i задает источник, откуда будет читаться файл, источников может быть несколько и это может быть не только файл, но и устройство;
- Основные опции — задают параметры работы всей утилиты;
- Кодеки — кодек, который будет использоваться для сохранения видео и аудио;
- Преемник — файл или устройство, куда будут записаны данные.
Сейчас мы не будем подробно рассматривать опции, рассмотрим их потом, уже в самих командах.
Input piping
With input piping it is possible to write video frames directly from program memory without saving them to jpeg or png and then passing path to input of ffmpeg. This feature also allows for converting video on-the-fly while frames are being generated or received.
An object implementing the interface is used as the source of data. Currently, the interface has two implementations; for streams, and for raw video frames.
Working with raw video frames
Method for generating bitmap frames:
IEnumerable<IVideoFrame> CreateFrames(int count)
{
    for(int i = ; i < count; i++)
    {
        yield return GetNextFrame(); //method that generates of receives the next frame
    }
}
Then create a that utilises your video frame source
var videoFramesSource = new RawVideoPipeSource(CreateFrames(64))
{
    FrameRate = 30 //set source frame rate
};
await FFMpegArguments
    .FromPipeInput(videoFramesSource)
    .OutputToFile(outputPath, false, options => options
        .WithVideoCodec(VideoCodec.LibVpx))
    .ProcessAsynchronously();
If you want to use s as s, a wrapper class is provided.
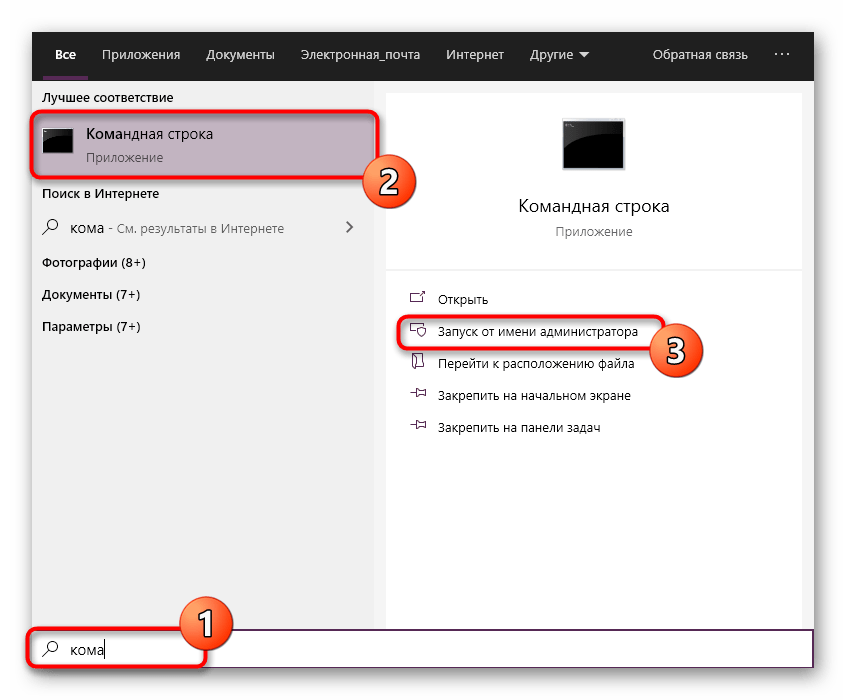
Способ 3: Собственноручная регистрация ffmpeg.dll в ОС
Вариант с повторной регистрацией ffmpeg.dll в системе не является самым эффективным, однако из-за простоты применения он и был поставлен на это место. От вас потребуется лишь запустить стандартную консоль и вписать две простые команды, чтобы убедиться в том, действительно ли ffmpeg.dll во время установки софта был зарегистрирован, и повторить инсталляцию в случае необходимости. Вся процедура умещается в трех шагах и выглядит так:
- Раскройте меню «Пуск». Там через поиск отыщите классическое приложение «Командная строка» и обязательно запустите его от имени администратора.
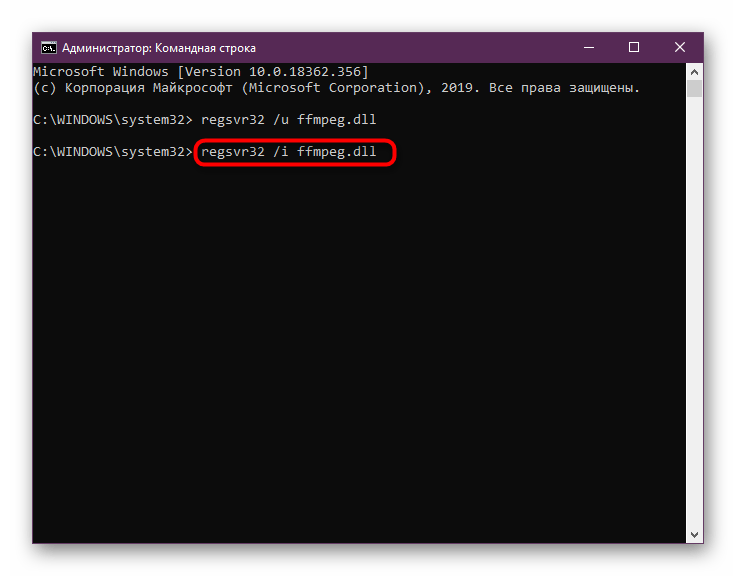
В появившемся окне впишите команду и активируйте ее, нажав на клавишу Enter. Это отменит уже существующую регистрацию файла.

Закройте появившееся уведомление, а затем используйте похожую команду для повторной регистрации.
По завершении данных действий можно сразу же продолжить попытки запуска проблемного ПО, чтобы убедиться в том, что они сработали. Если все прошло успешно, значит ошибка больше никогда не появится. В противном случае придется задействовать другие методы исправления.
Streaming your desktop
Examples below use for Linux. Windows users can use or . macOS can use . See FFmpeg Wiki: Capture Desktop for additional examples.
Without scaling the output
If you want the output video frame size to be the same as the input:
$ ffmpeg -f alsa -ac 2 -i hw:0,0 -f x11grab -framerate 30 -video_size 1280x720 \
-i :0.0+0,0 -c:v libx264 -preset veryfast -b:v 1984k -maxrate 1984k -bufsize 3968k \
-vf "format=yuv420p" -g 60 -c:a aac -b:a 128k -ar 44100 \
-f flv rtmp://live.twitch.tv/app/<stream key>
Scaling the output
If you want the output video frame size to be smaller than the input then you can use the :
$ ffmpeg -f alsa -ac 2 -i hw:0,0 -f x11grab -framerate 30 -video_size 1680x1050 \
-i :0.0+0,0 -c:v libx264 -preset veryfast -b:v 3000k -maxrate 3000k -bufsize 3000k \
-vf "scale=1280:-1,format=yuv420p" -g 60 -c:a aac -b:a 128k -ar 44100 \
-f flv rtmp://live.twitch.tv/app/<stream key>
The in the scale filter example will automatically calculate the correct value to preserve the height. In this case the output will have a frame size of 1280×800.
With webcam overlay/picture-in-picture (PiP)
This will place your webcam overlay in the top right:
$ ffmpeg -f x11grab -video_size 1680x1050 -framerate 30 -i :0.0 \
-f v4l2 -video_size 320x240 -framerate 30 -i /dev/video0 \
-f alsa -ac 2 -i hw:0,0 -filter_complex \
"scale=1024:-1,setpts=PTS-STARTPTS; \
 scale=120:-1,setpts=PTS-STARTPTS; \
 overlay=W-w-10:10,format=yuv420p"
-map "" -map 2:a -c:v libx264 -preset veryfast \
-b:v 3000k -maxrate 3000k -bufsize 4000k -c:a aac -b:a 160k -ar 44100 \
-f flv rtmp://live.twitch.tv/app/<stream key>
You can see additional details your webcam with something like: ffmpeg -f v4l2 -list_formats all -i /dev/video0 or with v4l2-ctl —list-formats-ext. See the documentation on the video4linux2 (v4l2) input device for more info.
Your webcam may already support whatever frame size you want to overlay onto the main video, so scaling the webcam video as shown in this example can be omitted (just set the appropriate v4l2 -video_size and remove the scale=120:-1,).
With webcam overlay and logo
This will place your webcam overlay in the top right, and a logo in the bottom left:
$ ffmpeg -f x11grab -video_size 1680x1050 -framerate 30 -i :0.0 \
-f v4l2 -video_size 320x240 -framerate 30 -i /dev/video0 \
-f alsa -ac 2 -i hw:0,0 -i logo.png -filter_complex \
"scale=1024:-1,setpts=PTS-STARTPTS; \
 scale=120:-1,setpts=PTS-STARTPTS; \
 overlay=W-w-10:10; \
 overlay=W-w-10:H-h-10,format=yuv420p"
-map "" -map 2:a -c:v libx264 -preset veryfast \
-maxrate 3000k -bufsize 4000k -c:a aac -b:a 160k -ar 44100 \
-f flv rtmp://live.twitch.tv/app/<stream key>
FFMpeg
Use FFMpeg to convert your media files.
Easily build your FFMpeg arguments using the fluent argument builder:
Convert input file to h264/aac scaled to 720p w/ faststart, for web playback
FFMpegArguments
    .FromFileInput(inputPath)
    .OutputToFile(outputPath, false, options => options
        .WithVideoCodec(VideoCodec.LibX264)
        .WithConstantRateFactor(21)
        .WithAudioCodec(AudioCodec.Aac)
        .WithVariableBitrate(4)
        .WithVideoFilters(filterOptions => filterOptions
            .Scale(VideoSize.Hd))
        .WithFastStart())
    .ProcessSynchronously();
Convert to and/or from streams
await FFMpegArguments
    .FromPipeInput(new StreamPipeSource(inputStream))
    .OutputToPipe(new StreamPipeSink(outputStream), options => options
        .WithVideoCodec("vp9")
        .ForceFormat("webm"))
    .ProcessAsynchronously();
ffmpeg сканер
Security Task Manager показывает все запущенные сервисы Windows, включая внедренные скрытые приложения (например, мониторинг клавиатуры или браузера, авто вход). Уникальный рейтинг надежности указывает на вероятность того, что процесс потенциально может быть вредоносной программой-шпионом, кейлоггером или трояном.
Бесплатный aнтивирус находит и удаляет неактивные программы-шпионы, рекламу, трояны, кейлоггеры, вредоносные и следящие программы с вашего жесткого диска. Идеальное дополнение к Security Task Manager.
Reimage бесплатное сканирование, очистка, восстановление и оптимизация вашей системы.
Другие процессы
ytdownloader.exe amdxata.sys netsession_win_ce5ba24.dll ffmpeg.exe fpcsevtsvc.exe powerbiosserver.exe snapman.sys tablacusapp.exe tfwah.dll expresscache.exe slimservicefactory.exe
CPU usage / File size
In general, the more CPU you use to compress, the better the output image will be, or the smaller of a file the output will be for the same quality.
Basically, the easiest way to save cpu is to decrease the input frame rate/size, or decrease the output frame rate/size.
Also you could (if capturing from live source), instruct the live source to feed a «smaller stream» (ex: webcam stream 640×480 instead of 1024×1280), or you could set a lower output «output quality» setting (q level), or specify a lower output desired bitrate (see Encode/H.264 for a background). Or try a different output codec, or specify new parameters to your codec (for instance, a different profile or preset for libx264). Specifying $ -threads 0 instructs the encoder to use all available cpu cores, which is the default. You could also resize the input first, before transcoding it, so it’s not as large. Applying a smoothing filter like hqdn3d before encoding might help it compress better, yielding smaller files.
You can also set a lower output frame rate to of course decrease cpu usage.
If you’re able to live capture in a pixel format that matches your output format (ex: yuv420p output from a webcam, instead of mjpeg), that might help with cpu usage, since it avoids an extra conversion. Using 64-bit instead of 32-bit executables (for those that have that choice) can result in a slight speedup. If you’re able to use -vcodec copy that, of course, uses the least cpu of all options since it just sends the frames verbatim to the output.
Sometimes you can change the «pixel formats» somehow, like using rgb16 instead of rgb24, to save time/space (or yuv420 instead of yuv444 or the like, since 420 stores less information it may compress better and use less bandwidth). This may not affect latency.
Compiling FFmpeg with external libraries
In order to build FFmpeg with support to external libraries, you need to make sure that the libraries and headers are placed in a location specified by the INCLUDE and LIB directories referenced by the VC compiler and linker. In case multiple libraries are used, you could use a common prefix to install all the libraries, so that you have to specify a single location.
Also, you may need to compile the libraries themselves with VC in order to make it possible to link them when building the FFmpeg DLLs.
The following subsections document how you can build some of the external libraries employed by FFmpeg using VC. Note that the setup step is the same for all the libraries (so it can be done just once, then you can build several libraries using the same MSYS terminal session).
libx264
The following example command will configure libx264:
CC=cl ./configure --enable-shared --prefix=<PREFIX>
make
make install-lib-shared
libopenh264
libopenh264 now provide meson build system, you can use meson to build with MSVC:
meson setup --buildtype release --prefix=<PREFIX> --cmake-prefix-path=<PREFIX> . <PATH_TO_OPENH264>
ninja
ninja install
Helper methods
The provided helper methods makes it simple to perform common operations.
Easily capture snapshots from a video file:
// process the snapshot in-memory and use the Bitmap directly
var bitmap = FFMpeg.Snapshot(inputPath, new Size(200, 400), TimeSpan.FromMinutes(1));

// or persists the image on the drive
FFMpeg.Snapshot(inputPath, outputPath, new Size(200, 400), TimeSpan.FromMinutes(1));
Join images into a video:
FFMpeg.JoinImageSequence(@"..\joined_video.mp4", frameRate: 1,
    ImageInfo.FromPath(@"..\1.png"),
    ImageInfo.FromPath(@"..\2.png"),
    ImageInfo.FromPath(@"..\3.png")
);
Combine an image with audio file, for youtube or similar platforms
FFMpeg.PosterWithAudio(inputPath, inputAudioPath, outputPath);
// or
var image = Image.FromFile(inputImagePath);
image.AddAudio(inputAudioPath, outputPath);
Other available arguments could be found in namespace.
Ffmpeg.exe file information
The process known as VdhCoApp or Vuze or Bigasoft Total Video Converter (version 4.6.0.5589) or SuperSimple Video Converter
belongs to software VideoDownloaderUltimate or RealPlayer or Pazera Free (version MP4 to AVI Converter) or DVDStyler or Bigasoft Total Video Converter or MediaHuman Video Converter or Any Video Converter Ultimate or Pazera Free FLV to AVI Converter
by or SARL ACLAP or Bigasoft.
Description: Ffmpeg.exe is not essential for the Windows OS and causes relatively few problems. Ffmpeg.exe is located in a subfolder of «C:\Program Files» or sometimes in the C:\Windows folder—mostly C:\Program Files\net.downloadhelper.coapp\converter\build\win\64\ or C:\Program Files (x86)\FormatFactory\FFModules\Encoder\.
Known file sizes on Windows 10/8/7/XP are 13,179,660 bytes (37% of all occurrences), 302,280 bytes and .
The ffmpeg.exe file is a file with no information about its developer. The program is not visible. It is not a Windows core file.
Ffmpeg.exe is able to monitor applications.
Therefore the technical security rating is 56% dangerous, however you should also read the user reviews.
Uninstalling this variant:
It is possible to use the software publisher’s support , verify that you have installed the latest version or uninstall the program using the Control Panel ⇒ Uninstall a Program ⇒ VdhCoApp or FormatFactory.
Recommended: Identify ffmpeg.exe related errors
-
If ffmpeg.exe is located in a subfolder of the user’s profile folder, the security rating is 87% dangerous. The file size is 390,656 bytes (62% of all occurrences), 13,179,660 bytes and .
There is no description of the program. The program has no visible window. The file is not a Windows system file.
Ffmpeg.exe is able to monitor applications.
Uninstalling this variant:
It is possible to use the software publisher’s support or uninstall the program using the Control Panel ⇒ Uninstall a Program ⇒ JDownloader 2 or Vuze. -
If ffmpeg.exe is located in a subfolder of «C:\Program Files\Common Files», the security rating is 51% dangerous. The file size is 354,664 bytes (50% of all occurrences) or 319,144 bytes.
The program has no file description. The program is not visible. Ffmpeg.exe is not a Windows system file.
Ffmpeg.exe is able to monitor applications.
Uninstalling this variant:
It is possible to use the software publisher’s support site, verify that you have installed the latest version or uninstall the program using the Control Panel ⇒ Uninstall a Program ⇒ Free Studio. - If ffmpeg.exe is located in a subfolder of Windows folder for temporary files, the security rating is 100% dangerous. The file size is 13,179,660 bytes.
Universe
If you then add the universe repositorities to your system, you will have available (for manually installing) the «-extra» packages for ffmpeg/libav. These extra packages contain codecs, formats and the like that have restricted distribution under patent law. This includes MP3 encoding with LAME, XviD, AND x264. running
sudo apt-get install libavcodec-extra-53 libavdevice-extra-53 libavfilter-extra-2 libavformat-extra-53 libavutil-extra-51 libpostproc-extra-52 libswscale-extra-2
Will get you the additional functionality. It also installs the following external codec libraries: libdirac-encoder0 libfaad2 libmp3lame0 libopenjpeg2 librtmp0 libx264-98 libxvidcore4
The additions to the codecs/formats list are shown at the bottom of this page.
1.3. Использование специальных декодеров, реализующих декодирование на графических процессорах
В состав FFmpeg входят два семейства кодеков, реализующих кодирование и декодирование на графических процессорах.
Одно семейство использует технологию Intel Quick Sync Video (QSV), реализованную на видеопроцессорах, интегрированных в процессоры Intel семейств i3, i5, i7, i9. Подробнее см. . Эти кодеки имеют суффикс . В рассматриваемой сборке FFmpeg есть следующие декодеры: , , , , .
Другое семейство использует технологии NVDEC, NVENC реализованные на платах Nvidia. Декодеры имеют суффикс . В рассматриваемой сборке FFmpeg есть следующие декодеры: , , , , , , , .
После открытия входного потока доступ к декодеру обычно реализуется следующим образом:
Но таким образом можно получить только декодер по умолчанию для данного идентификатора кодека. Для альтернативных декодеров нужно использовать имя декодера примерно таким образом:
Для использования альтернативных декодеров в командной строке надо использовать опцию с ключом расположив ее перед ключом примерно таким образом
ffmpeg -c:v h264_qsv -i INPUT ...
2. Измерение скорости декодирования
Для экспериментов по измерению скорости декодирования были выбраны два видеоролика, один закодирован в H264, другой в HEVC(H265). Размер кадра — 3840х2160 (Ultra HD), скорость — 30 к/с. Тестировались стандартные декодеры — , и соответствующие QSV декодеры — , . Стандартные декодеры настраивались в 4х вариантах: по умолчанию, два рабочих потока, четыре рабочих потока, аппаратное ускорение . В наших экспериментах показал лучшие результаты, чем , поэтому последний не участвовал в измерениях скорости декодирования. Для проведения тестов была написана программа которая извлекала пакеты из файла и декодировала их с максимально возможной скоростью, игнорируя метки времени и не выполняя рендеринг или иную обработку. Было два режима этой программы: в первом выполнялось только декодирование, в втором еще производилось конвертирование декодированного кадра в 32-битный формат с использованием библиотеки . (На выходе декодера кадр обычно имеет 12-битный планарный формат или .) Проводилось измерение времени, затраченного программой, и фиксировалось относительное время по отношению к номинальной длительности видеопотока (в процентах). Таким образом, если результат меньше 100%, то у нас есть шанс обработать видеопоток в реальном масштабе времени, если больше, то таких шансов нет. Также с помощью Диспетчера задач фиксировалась примерная загрузка ЦП и графического процессора. Использовалась 64-битная сборка FFmpeg.
| h264 | hevc | ||||||
|---|---|---|---|---|---|---|---|
| Config | # | Время | CPU | GPU | Время | CPU | GPU |
| default | 1 | 75 | 26 | 125 | 25 | ||
| 2 | 132 | 28 | 180 | 27 | |||
| threads=2 | 1 | 47 | 42 | 74 | 42 | ||
| 2 | 79 | 48 | 104 | 46 | |||
| threads=4 | 1 | 35 | 60 | 46 | 64 | ||
| 2 | 60 | 54 | 71 | 70 | |||
| dxva2 | 1 | 45 | 14 | 72 | 34 | 28 | 70 |
| 2 | 107 | 28 | 35 | 99 | 30 | 36 | |
| xxxx_qsv | 1 | 25 | 34 | 80 | 25 | 34 | 72 |
| 2 | 70 | 39 | 54 | 70 | 40 | 50 |
Большого обсуждения результаты, наверное, не требуют
Единственно на что стоит обратить внимание — это заметные затраты на преобразование в. И главное, что эти затраты сильно меняются в зависимости от тестовой конфигурации, хотя работа во всех случаях выполнялась очень близкая
Эксперименты проводились также для 32-битной сборки FFmpeg. Результаты довольно близкие, кроме одного случая: декодер в конфигурациях без аппаратного ускорения показал падение производительности в 2-3 раза. Весьма неожиданный результат.
Описанные тесты можно выполнить в командной строке. Надо использовать глобальную опцию и установить нулевой выход. Вот несколько примеров:
ffmpeg -benchmark -i INPUT -an -f null -
ffmpeg -benchmark -threads N -i INPUT -an -f null -
ffmpeg -benchmark -c:v h264_qsv -i INPUT -an -f null -
ffmpeg -benchmark -hwaccel dxva2 -i INPUT -an -f null -
ffmpeg -benchmark -i INPUT -an -pix_fmt bgra -f null -
На выходе будет показан фактический , а параметр покажет во сколько раз он выше номинального. Если не задана опция с ключом или для указано специальное значение , то декодер использует максимально возможное число потоков, загрузка ЦП при этом 100%.
3. Замечания о QSV декодерах
В рассматриваемой сборке FFmpeg есть следующие QSV декодеры: , , , , . Два последних оказались неработоспособными. Декодер выдавал искаженную картинку, а выдавал ошибку при передаче пакета на декодирование. Правда, эти декодеры не особо актуальны, но, все-таки, зачем выкладывать неработоспособные компоненты, не вполне понятно.
К оставшимся декодерам тоже есть претензии. В целом они работают, за исключением одного момента — они некорректно отрабатывают вызов . Ошибки нет, но после этого вызова позиционирование работает некорректно.
Usage
ffmpeg.wasm provides simple to use APIs, to transcode a video you only need few lines of code:
const fs = require('fs');
const { createFFmpeg, fetchFile } = require('@ffmpeg/ffmpeg');

const ffmpeg = createFFmpeg({ log: true });

(async () => {
  await ffmpeg.load();
  ffmpeg.FS('writeFile', 'test.avi', await fetchFile('./test.avi'));
  await ffmpeg.run('-i', 'test.avi', 'test.mp4');
  await fs.promises.writeFile('./test.mp4', ffmpeg.FS('readFile', 'test.mp4'));
  process.exit();
})();
Use other version of ffmpeg.wasm-core / @ffmpeg/core
For each version of ffmpeg.wasm, there is a default version of @ffmpeg/core (you can find it in devDependencies section of package.json), but sometimes you may need to use newer version of @ffmpeg/core to use the latest/experimental features.
Node
Just install the specific version you need:
$ npm install @ffmpeg/core@latest
Or use your own version with customized path
const ffmpeg = createFFmpeg({
  corePath: '../../../src/ffmpeg-core.js',
});
Browser
const ffmpeg = createFFmpeg({
  corePath: 'static/js/ffmpeg-core.js',
});
For the list available versions and their changelog, please check: https://github.com/ffmpegwasm/ffmpeg.wasm-core/releases