Cloning and forking repositories from github desktop
Содержание:
- Система контроля версий GIT
- Работа с репозиторием. Меняем файлы и сохраняем обратно
- Я не знаю, что вы только что сказали (Вариант 2)
- Fork репозитория
- Privacy Notices
- Introduction
- Summary
- Преимущества
- GitHub Integration Commands Quick Reference
- API
- Part 5: Making, committing, and pushing changes
- Introduction
- Installation
- Создаем свой первый проект и выкладываем на GitHub
- GitHub’s Logos
- GitHub Issues
- Step 3. Make and commit changes
- Install Git on Mac
- Step 5. Merge your Pull Request
- Part 2: Configuring and customizing GitHub Desktop
Система контроля версий GIT
Во время работы у программиста часто бывает следующая ситуация:
- Написал фрагмент кода, проверил, программа работает.
- Написал следующий фрагмент, проверил, а программа уже не работает.
Нужно понять, что именно нарушилось, а для этого нужно вернуться к работающей версии. Для этого нужно где-то сохранить копию предыдущей версии.
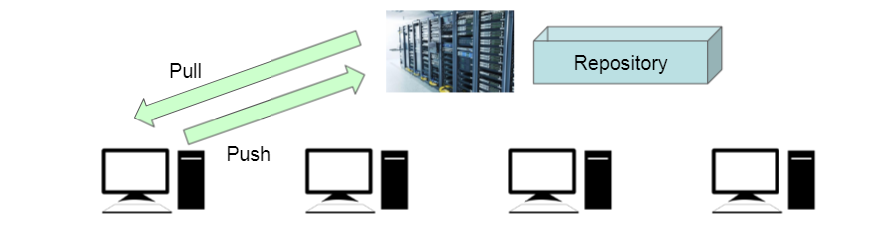
Для этого существуют системы контроля версий, которые называются VCS (Version Control System). Хотя каждая система управления версиями имеет свои специфические особенности, но общий принцип работы у всех один:
- Существует центральное хранилище (Repository), где хранится информация о всех версиях программы.
- Программист перед началом работы получает копию текущей версии (Pull).
- После внесения изменений в программу программист заносит в хранилище следующую версию (Push).
- При ведется журнал изменений и можно в любой момент получить любую версию программы.
На данный момент самой популярной системой контроля версий является GIT. Ядро Git представляет собой набор утилит командной строки с параметрами.
Среди проектов, использующих Git — ядро Linux, Android, jQuery, PHP.
Работа с репозиторием. Меняем файлы и сохраняем обратно
Вне зависимости от того, создали вы репозиторий или клонировали его, так выглядит GitHub Desktop с открытым репозиторием, в котором мы пока ничего не меняли.
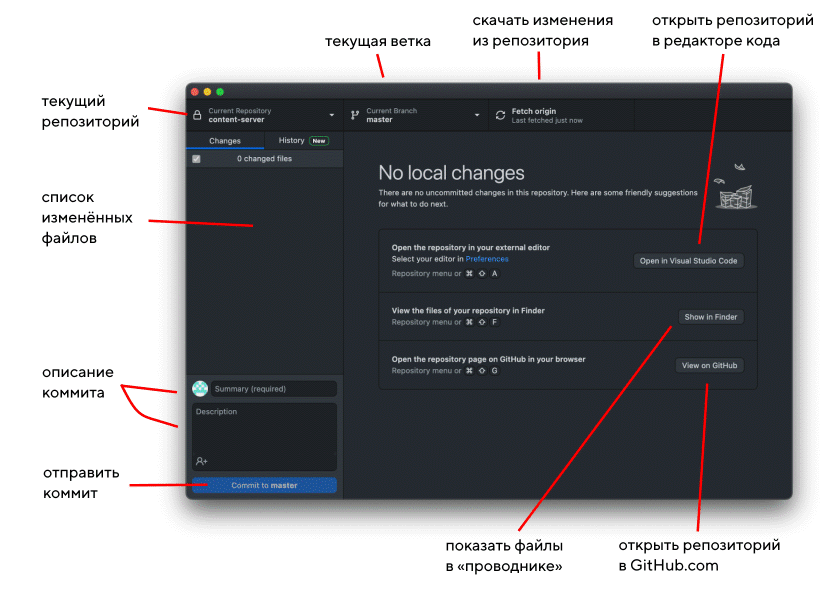
Слева — поле для измененных файлов, справа — служебная информация. Слева снизу — поле для коммитов.
Если не усложнять, то склонированный репозиторий это просто каталог на компьютере. Можно нажать «Show in Finder» на Mac или «Show in Explorer» в Windows и откроется папка, где лежат все файлы, которые есть в репозитории.
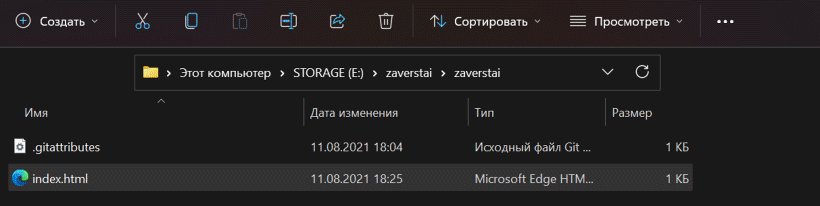
Давайте добавим какой-нибудь файл. Например, я добавил в локальный репозиторий (скопировал в папку) файл index.html, который взял отсюда. Вы можете загрузить файл с кодом вашего проекта или изменить уже существующий.
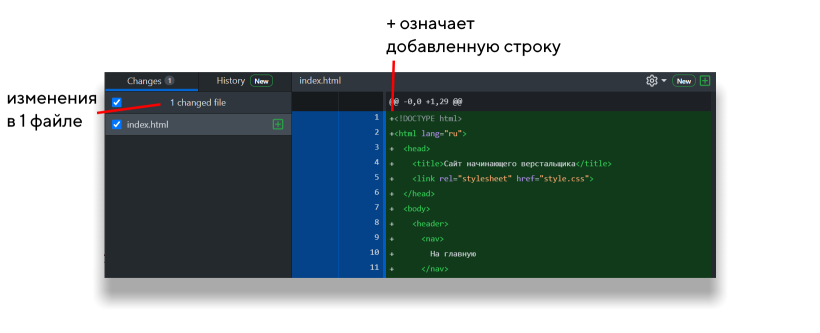
Сразу после добавления или изменения файла в окне GitHub Desktop будет видно, что изменилось — если мы добавили целый новый файл, то все строчки будут с плюсиками и зелёные. Это значит, что они были добавлены в файл и GitHub Desktop раньше их никогда не видел.
Я не знаю, что вы только что сказали (Вариант 2)
Я собираюсь предположить, что любой, кто интересуется вариантом 2, является новичком во всем этом и, возможно, имеет папку, полную файлов (или вы планируете иметь один), который вы хотите поместить на GitHub, и вы просто не знаете как это сделать.
Давайте сделаем это!
Скажем, вы хотите создать новый репозиторий. (Вероятно, так и есть! Именно здесь будет жить ваш проект. Если вы не собираетесь создавать новый репозиторий, вы, вероятно, захотите клонировать существующий репозиторий. Мы поговорим об этом позже, но именно так вы получаете чужой проект и информация, которая вам нужна для вашей работы или курса, который вы выбираете.)
Вашхранилищегде вы будете организовывать свой проект. Вы можете хранить папки, файлы, изображения, видео, электронные таблицы, записные книжки Jupyter, наборы данных и все остальное, что нужно вашему проекту. Прежде чем вы сможете работать с Git, вы должны инициализировать репозиторий для вашего проекта и настроить его так, чтобы Git управлял им. Вы можете сделать это прямо на сайте GitHub.
Это хорошая идея, чтобы включитьПРОЧТИ МЕНЯфайл с информацией о вашем проекте. Вы можете создать один в то же время, когда вы создаете свой репозиторий, щелкнув флажок.
- Перейдите на веб-сайт GitHub, посмотрите в верхнем правом углу, нажмите знак +, а затем нажмите «Новый репозиторий».
- Назовите репозиторий и добавьте краткое описание.
- Решите, хотите ли вы, чтобы это был публичный или частный репозиторий
- Нажмите «Инициализировать этот репозиторий с помощью README», если вы хотите включить файл README. (Я определенно рекомендую сделать это! Это первое, на что люди обратятся, когда проверят ваш репозиторий. Это также отличное место для размещения информации, которая вам необходима, чтобы понять или запустить проект.)

Новый репозиторий 
Создание вашего нового хранилища
Вы можете полностью начать работать прямо с этого момента, если хотите! Вы можете загружать файлы, редактировать файлы и т. Д. Прямо из своего репозитория на веб-сайте GitHub. Тем не менее, вы не можете быть удовлетворены только этой опцией.
Есть два способа внести изменения в ваш проект. Вы можете вносить изменения в свои файлы / записные книжки на своем компьютере, а также вносить изменения прямо на GitHub.
Допустим, вы хотите внести некоторые изменения в свой файл README прямо на GitHub.
- Сначала зайдите в свой репозиторий.
- Нажмите на имя файла, чтобы вызвать этот файл (например, нажмите «README.md», чтобы перейти к файлу readme).
- Нажмите значок карандаша в верхнем правом углу файла и внесите некоторые изменения.
- Напишите короткое сообщение в поле, которое описывает сделанные вами изменения (и расширенное описание, если хотите).
- Нажмите кнопку «Подтвердить изменения»

Редактирование вашего файла на GitHub 
Передача ваших изменений
Теперь изменения были внесены в файл README в вашем новом хранилище! (Я хочу обратить ваше внимание на маленькую кнопку, которую вы можете отметить на изображении выше, которая позволит вам создать новую ветку для этого коммита и запустить запрос на извлечение. Мы поговорим об этом позже!). Довольно легко, правда?
Довольно легко, правда?
Я предпочитаю работать с файлами на своем локальном компьютере, а не пытаться заставить все работать с веб-сайта GitHub, поэтому давайте настроим это сейчас.
Fork репозитория
Fork (форк) репозитория это возможность скопировать чужой репозитория на свой аккаунт и вносить любые изменения в него, без изменения оригинального репозитория. Можно сделать форк любого доступного репозитория. При создании форка нас спросят в какой аккаунт мы хотим его добавить.
В чем же отличие от клонирования репозитория? При клонировании мы только используем файлы оригинального репозитория и при создании коммита с какими-то изменениями, GitHub Desktop скажет нам, что у нас нет доступа на запись и сам предложит сделать форк. (Если доступ к этому репозиторию у нас есть, то сделать коммит мы сможем.) А если мы сделали форк, то изменения уйдут в нашу копию в нашем аккаунте.
Fork может быть полезен при разработки открытого ПО, например, мы сделали форк алгоритма сжатия, в нем мы изменили функцию сжатия и теперь алгоримт сжимает в 10 раз лучше. Мы можем сделать Pull request, т.е. запросить у хозяина оригинального репозитория с алгоритмом сжатия, интегрировать наши изменения в его репозиторий.
Privacy Notices
The Software automatically communicates with GitHub servers for three purposes: (1) updating the Software; (2) sending error reports; and (3) sending anonymized usage data so we may improve the Software. If you would like to learn more about the specific information we send, please visit https://desktop.github.com/usage-data/. You may opt out of sending the anonymized usage data, but if you do not want the Software to update automatically or send error reports, you must uninstall the Software.
- Automatic Software Updates. The Software communicates with GitHub (and sends information described at the URL above) to determine whether there are any patches, bug fixes, updates, upgrades or other modifications to improve the Software. You agree that the Software may automatically install any such improvements to the Software on your computer without providing any further notice or receiving any additional consent. This feature may not be disabled. If you do not want to receive automatic updates, you must uninstall the Software.
- Error Reports. In order to help us improve the Software, when the Software encounters certain errors, it will automatically send some information to GitHub about the error (as described at the URL above). This feature may not be disabled. If you do not want to send error reports to GitHub, you must uninstall the Software.
- Anonymized Usage Data. GitHub collects anonymized data about your usage of the Software to help us make it more awesome. Approximately once a day the Software sends such data (as described in more detail at the URL above) to GitHub’s servers. If you do not want to send anonymized usage data to GitHub, you may opt out by changing your settings in the Preferences view.
Introduction
GitHub Desktop extends and simplifies your GitHub.com workflow, using a visual interface instead of text commands on the command line. By the end of this guide, you’ll have used GitHub Desktop to create a repository, make changes to the repository, and publish the changes to GitHub.
After installing GitHub Desktop and signing into GitHub or GitHub Enterprise you can create and clone a tutorial repository. The tutorial will introduce the basics of working with Git and GitHub, including installing a text editor, creating a branch, making a commit, pushing to GitHub.com, and opening a pull request. The tutorial is available if you do not have any repositories on GitHub Desktop yet.
We recommend completing the tutorial, but if you want to explore GitHub Desktop by creating a new repository, this guide will walk you through using GitHub Desktop to work on a Git repository.
Summary
- You must agree to all of the terms of this EULA to use this Software.
- If so, you may use the Software for free and for any lawful purpose.
- This Software automatically communicates with GitHub servers for three reasons: (1) to receive and install updates; (2) to send error reports; and (3) to send anonymized usage information. You can view sample data to see what information is sent, and you may opt out of sending the anonymized usage data.
- This Software is provided «as-is» with no warranties, and you agree that GitHub is not liable for anything you do with it.
- You really ought to just go ahead and read the whole EULA. It’s not all that long. You should not only rely on this summary.
Преимущества
Мы рассмотрели только базовое использование Git, GitHub, GitHub Desktop, но уже можем выделить достаточно много преимуществ (на самом деле их намного больше, как и возможностей)
- Возможность фиксировать состояния проекта на необходимых этапах, и иметь доступ к ранним версиям
- Умение пользоваться Git очень часто встречается в вакансиях — будет вашим преимуществом
- На любом устройстве, в любой момент можете получить доступ до актуального проекта
- Возможность делиться своим проектом с другими пользователями GitHub
- Иметь проекты на GitHub большой плюс при поиске работы
- Возможность пользоваться всеми преимуществами Git без командной строки
GitHub Integration Commands Quick Reference
To properly integrate with GitHub, you must first configure :
For GitHub Enterprise users, run with the flag:
Listing Feeds
Listing A User’s Activity Feed
View your activity feed or another user’s activity feed, optionally through a pager with . The is available for many commands.
Listing A Repo’s Activity Feed
View all pull requests for your repos:
Filtering Issues
View all open issues where you have been mentioned:
View all issues, filtering for only those assigned to you, regardless of state (open, closed):
For more information about the filter and state qualifiers, visit the reference in COMMANDS.md.
Searching Issues and Repos
Searching Issues
Search issues that have the most +1s:
Search issues that have the most comments:
Search issues with the «help wanted» tag:
Search issues that have your user name tagged @donnemartin:
Search all your open private issues:
For more information about the query qualifiers, visit the searching issues reference.
Searching Repos
Search all Python repos created on or after 2015, with >= 1000 stars:
For more information about the query qualifiers, visit the searching repos reference.
View trending repos:
View trending devs (devs are currently only supported in browser):
Viewing Content
The command
View the previously listed notifications, pull requests, issues, repos, users etc, with HTML nicely formatted for your terminal, or optionally in your browser:
The command
View an issue:
The command
View a pull request:
List all available templates:
Set up your :
List all available templates:
Set up your or :
Call on Octocat to say the given message or an Easter egg:
Viewing Your Profile
View your profile with the command or with the following shortcut:
Create a comment:
Create an issue:
Create a repo:
Many commands support a option that displays results in a pager, where available.
Usage:
Option: View in a Browser
Many commands support a option that displays results in your default browser instead of your terminal.
Usage:
See the COMMANDS.md for a detailed listing of all GitHub integration commands, parameters, options, and examples.
Having trouble remembering these commands? Check out the handy to guide you through each command.
Note, you can combine with other utilities such as Git-Extras.
API
Create an instance of GithubContent to setup downloading of files.
Params
- {Object}: Options to set on instance. Additional options passed to github-base
- {String}: Set the owner to be used for each file.
- {String}: Set the repository to be used for each file.
- {String}: Set the branch to be used for each file. Defaults to
Example
var options = {
  owner: 'doowb',
  repo: 'github-content',
  branch: 'master' // defaults to master
};

var gc = new GithubContent(options);
Download a single file given the file name and repository options. File object returned will contain a property with the file path passed in and a property with the contents of the downloaded file.
Params
- {String}: file path to download
- {Object}: Additional options to base to github-base method.
- {Function}: Callback function taking and
- {Object} : to enable chaining
Example
gc.file('package.json', function(err, file) {
  if (err) return console.log(err);
  console.log(file.path);
  console.log(file.contents);
});
//=> package.json
//=> {
//=>   "name": "github-content"
//=>   ...
//=> }
Download an array of files using the previous settings and the passed in file names. File objects returned will contain a property with the file path passed in and a property with the contents of the downloaded file.
Params
- {String|Array}: files to download
- {Object}: Additional options to base to github-base method.
- {Function}: Callback function taking and
- {Object} : to enable chaining
Example
gc.files('package.json', 'index.js', function(err, files) {
  if (err) return console.log(err);
  console.log(files.length);
  console.log(files.path);
  console.log(files.contents);
});
//=> 2
//=> package.json
//=> {
//=>   "name": "github-content"
//=>   ...
//=> }
Part 5: Making, committing, and pushing changes
Now that you’ve created and published your repository, you’re ready to make changes to your project and start crafting your first commit to your repository.
-
To launch your external editor from within GitHub Desktop, click Repository, then click Open in EDITOR. For more information, see «Configuring a default editor.»
-
Make some changes to the README.md file that you previously created. You can add information that describes your project, like what it does and why it is useful. When you are satisfied with your changes, save them in your text editor.
-
In GitHub Desktop, navigate to the Changes view. In the file list, you should see your README.md. The checkmark to the left of the README.md file indicates that the changes you’ve made to the file will be part of the commit you make. In the future, you might make changes to multiple files but only want to commit the changes you’ve made to some of the files. If you click the checkmark next to a file, that file will not be included in the commit.
-
At the bottom of the Changes list, enter a commit message. To the right of your profile picture, type a short description of the commit. Since we’re changing the README.md file, «Add information about purpose of project» would be a good commit summary. Below the summary, you’ll see a «Description» text field where you can type a longer description of the changes in the commit, which is helpful when looking back at the history of a project and understanding why changes were made. Since you’re making a basic update of a README.md file, you can skip the description.
-
Click Commit to BRANCH NAME. The commit button shows your current branch so you can be sure to commit to the branch you want.
-
To push your changes to the remote repository on GitHub, click Push origin.
- The Push origin button is the same one that you clicked to publish your repository to GitHub. This button changes contextually based on where you are at in the Git workflow. It should now say with a next to it, indicating that there is one commit that has not been pushed up to GitHub.
- The «origin» in Push origin means that you are pushing changes to the remote called , which in this case is your project’s repository on GitHub.com. Until you push any new commits to GitHub, there will be differences between your project’s repository on your computer and your project’s repository on GitHub.com. This allows you to work locally and only push your changes to GitHub.com when you’re ready.
-
In the window to the right of the Changes view, you’ll see suggestions for actions you can do next. To open the repository on GitHub in your browser, click View on GitHub.
-
In your browser, click 2 commits. You’ll see a list of the commits in this repository on GitHub. The first commit should be the commit you just made in GitHub Desktop.
Introduction
GitHub Desktop is an application that enables you to interact with GitHub using a GUI instead of the command line or a web browser. GitHub Desktop encourages you and your team to collaborate using best practices with Git and GitHub. You can use GitHub Desktop to complete most Git commands from your desktop with visual confirmation of changes. You can push to, pull from, and clone remote repositories with GitHub Desktop, and use collaborative tools such as attributing commits and creating pull requests.
This guide will help you get started with GitHub Desktop by setting up the application, authenticating your account, configuring basic settings, and introducing the fundamentals of managing projects with GitHub Desktop. You will be able to use GitHub Desktop to collaborate on projects and connect to remote repositories after working through this guide.
You might find it helpful to have a basic understanding of Git and GitHub before getting started with GitHub Desktop. For more information, see the following articles.
- «Using Git»
- «Learning about GitHub»
- «Getting started with GitHub»
GitHub Desktop is an open source project. You can see the roadmap, contribute to the project, or open an issue to provide feedback or feature requests. For more information, see the repository.
Installation
Pip Installation
You can also install the latest from GitHub source which can contain changes not yet pushed to PyPI:
If you are not installing in a , you might need to run with :
For most linux users, can be installed on your system using the package.
For example, Ubuntu users can run:
See this ticket for more details.
Virtual Environment Installation
Install and :
Create a and install :
If the install does not work, you might be running Python 2 by default. Check what version of Python you are running:
If the call above results in Python 2, find the path for Python 3:
Install Python 3 if needed. Set the Python version when calling :
If you want to activate the again later, run:
To deactivate the , run:
Running as a Docker Container
Once you have docker installed you can run gitsome:
You can use Docker volumes to let gitsome access your working directory, your local .gitsomeconfig and .gitconfig:
If you are running this command often you will probably want to define an alias:
To build the Docker image from sources:
Starting the Shell
Once installed, run the optional autocompleter with interactive help:
Running the optional shell will provide you with autocompletion, interactive help, fish-style suggestions, a Python REPL, etc.
Running Commands
Run GitHub-integrated commands:
Note: Running the shell is not required to execute commands. After you can run commands from any shell.
Running the Command
To properly integrate with GitHub, must be properly configured:
For GitHub Enterprise Users
Run with the flag:
View more details in the section.
Enabling Bash Completions
By default, looks at the following .
To add additional bash completions, update the file with the location of your bash completions.
If does not exist, create it:
For example, if additional completions are found in , add the following line in :
You will need to restart for the changes to take effect.
Enabling Tab Completions Outside of
You can run commands outside of the shell completer. To enable tab completions for this workflow, copy the file locally.
Let bash know completion is available for the command within your current session:
To enable tab completion for all terminal sessions, add the following to your file:
Reload your :
Tip: is the short form of , so you can run this instead:
For Zsh Users
includes a module which is compatible with bash completions.
Download the file as above and append the following to your :
Reload your :
Optional: Installing or
Displaying the avatar for the and commands will require installing the optional or dependency.
Windows* and Mac:
*See the section for limitations on the avatar.
Supported Python Versions
- Python 3.4
- Python 3.5
- Python 3.6
- Python 3.7
is powered by which does not currently support Python 2.x, as discussed in this ticket.
Windows Support
has been tested on Windows 10 with and .
Although you can use the standard Windows command prompt, you’ll probably have a better experience with either cmder or conemu.
Создаем свой первый проект и выкладываем на GitHub
Давайте разберемся как это сделать, с помощью среды разработки Visual Studio Code (VS Code).
Перед началом предлагаю зарегистрироваться на GitHub.
Создайте папку, где будет храниться ваш проект. Если такая папка уже есть, то создавать новую не надо.
После открываем VS Code .
-
Установите себе дополнительно анализаторы кода для JavaScript и PHP
-
Откройте вашу папку, которую создали ранее
После этого у вас появится вот такой интерфейс
-
Здесь будут располагаться все файлы вашего проекта
-
Здесь можно работать с Git-ом
-
Кнопка для создания нового файла
-
Кнопка для создания новой папки
Давайте теперь перейдем во вкладу для работы с Git-ом.
Откроется вот такое окно:
-
Кнопка для публикации нашего проекта на GitHub
-
После нажатия на кнопку , появится всплывающее окно. Нужно выбрать второй вариант или там где присутствует фраза
После того, как выбрали «Опубликовать на GitHub публичный репозиторий» (пункт 2), программа предложит вам выбрать файлы, которые будут входить в первый commit. Проставляем галочки у всех файлов, если не проставлены и жмем . Вас перекинет на сайт GitHub, где нужно будет подтвердить вход в аккаунт.
Вы создали и опубликовали репозиторий на GitHub.
Теперь сделаем изменения в коде и попробуем их снова опубликовать. Перейдите во вкладку с файлами, отредактируйте какой-нибудь файл, не забудьте нажать (Windows) или (MacOS), чтобы сохранить файл. Вернитесь обратно во вкладу управления Git.
Если посмотреть на значок вкладки Git, то можно увидеть цифру 1 в синем кружке. Она означает, сколько файлов у нас изменено и незакоммичено. Давайте его закоммитим и опубликуем:
-
Кнопка для просмотра изменений в файле. Необязательно нажимать, указал для справки
-
Добавляем наш файл для будущего commit
-
Пишем комментарий
-
Создаем commit
-
Отправляем наш commit в GitHub
Поздравляю, вы научились создавать commit и отправлять его в GitHub!
Итог
Это первая вводная статья по утилите Git. Здесь мы рассмотрели:
-
Как его устанавливать
-
Как его настраивать
-
Как инициализировать репозиторий и создать commit через консоль
-
Как на примере VS Code, опубликовать свой код на GitHub
Забегая вперед, советую вам погуглить, как работают следующие команды:
P.S. Для облегчения обучения, оставлю вам ссылку на бесплатный тренажер по Git.
GitHub’s Logos
The license grant included with the Software is not for GitHub’s
trademarks, which include the Software logo designs. GitHub reserves
all trademark and copyright rights in and to all GitHub trademarks.
GitHub’s logos include, for instance, the stylized designs that
include «logo» in the file title in the «logos» folder.
The names GitHub, GitHub Desktop, GitHub for Mac, GitHub for
Windows, Atom, the Octocat, and related GitHub logos and/or stylized
names are trademarks of GitHub. You agree not to display or use
these trademarks in any manner without GitHub’s prior, written
permission, except as allowed by GitHub’s Logos and Usage Policy: https://github.com/logos.
GitHub Issues
GitHub Issues – одна из наиболее популярных в мире систем отслеживания багов.
Она предоставляет владельцам репозиториев возможность организовывать, отмечать тегами и привязывать проблемы к контрольным точкам.
Если вы найдете проблему в проекте, управляемом кем-то другим, она будет открытой до тех пор, пока вы не закроете ее (например, если выясните, в чем заключается проблема) или пока владелец репозитория не закроет ее.
Иногда вы будете получать окончательный ответ, а иногда проблема будет оставаться открытой и будет помечена некоторой информацией, которая ее классифицирует. Затем разработчик может вернуться к тегу, чтобы исправить проблему или улучшить кодовую базу с помощью ваших отзывов.
Большинству разработчиков не платят за поддержку их кода, выложенного на GitHub, поэтому нельзя ожидать быстрых ответов. Но некоторые репы с открытым исходным кодом публикуются компаниями, которые предоставляют услуги для этого кода. Они предлагают коммерческие предложения для версий с большим количеством функций или используют архитектуру на основе плагинов. Поэтому они платят разработчикам, работающим над проектом с открытым исходным кодом.
Step 3. Make and commit changes
Bravo! Now, you’re on the code view for your branch, which is a copy of . Let’s make some edits.
On GitHub, saved changes are called commits. Each commit has an associated commit message, which is a description explaining why a particular change was made. Commit messages capture the history of your changes, so other contributors can understand what you’ve done and why.
Make and commit changes
- Click the file.
- Click the pencil icon in the upper right corner of the file view to edit.
- In the editor, write a bit about yourself.
- Write a commit message that describes your changes.
- Click Commit changes button.
These changes will be made to just the README file on your branch, so now this branch contains content that’s different from .
Install Git on Mac
Most versions of MacOS will already have installed, and you can activate it through the terminal with . However, if you don’t have Git installed for whatever reason, you can install the latest version of Git using one of several popular methods as listed below:
Install Git From an Installer
- Navigate to the latest macOS Git Installer and download the latest version.
- Once the installer has started, follow the instructions as provided until the installation is complete.
- Open the command prompt «terminal» and type to verify Git was installed.
Note: is a popular and recommended resource for downloading Git on a Mac. The advantage of downloading Git from is that your download automatically starts with the latest version of Git. The download source is the same macOS Git Installer as referenced in the steps above.
Install Git from Homebrew
Homebrew is a popular package manager for macOS. If you already have Homwbrew installed, you can follow the below steps to install Git:
- Open up a terminal window and install Git using the following command: .
- Once the command output has completed, you can verify the installation by typing: .
Step 5. Merge your Pull Request
In this final step, it’s time to bring your changes together – merging your branch into the branch.
- Click the green Merge pull request button to merge the changes into .
- Click Confirm merge.
- Go ahead and delete the branch, since its changes have been incorporated, with the Delete branch button in the purple box.
Celebrate!
By completing this tutorial, you’ve learned to create a project and make a pull request on GitHub!
Here’s what you accomplished in this tutorial:
- Created an open source repository
- Started and managed a new branch
- Changed a file and committed those changes to GitHub
- Opened and merged a Pull Request
Take a look at your GitHub profile and you’ll see your new contribution squares!
To learn more about the power of Pull Requests, we recommend reading the GitHub flow Guide. You might also visit GitHub Explore and get involved in an Open Source project.
Last updated July 24, 2020
Part 2: Configuring and customizing GitHub Desktop
After you install GitHub Desktop, you can configure and customize the app to best suit your needs.
You can connect or remove accounts on GitHub or GitHub Enterprise, choose a default text editor or shell, edit your Git configuration, change the appearance of GitHub Desktop, customize system dialog boxes, and set privacy preferences in the GitHub Desktop Preferences window. For more information, see «Configuring basic settings.»

You can connect or remove accounts on GitHub or GitHub Enterprise, choose a default text editor or shell, edit your Git configuration, change the appearance of GitHub Desktop, customize system dialog boxes, and set privacy preferences in the GitHub Desktop Options window. For more information, see «Configuring basic settings.»

