Seo анализ сайта — screaming frog seo spider 12.1
Содержание:
- Get your URLs
- Other Updates
- 2) Google Sheets Export
- 1) Темный режим
- Small Update – Version 11.1 Released 13th March 2019
- 5) HSTS Support
- 3) Resume Previously Lost or Crashed Crawls
- Как пользоваться Screaming Frog SEO Spider
- 3) Multi-Select Details & Bulk Exporting
- 2) Insecure Content Report
- 4) Просмотрите источник переадресации, щелкнув вкладку «Inlinks»
- 2.0 Dancing Around Google Sheets
- 4) Improved Custom Extraction – Multiple Values & Functions
- 1) Configurable Database Storage (Scale)
- 5) Aggregated Site Structure
- 2) Select CSS Path, XPath or Regex for Scraping
- Внутренние ссылки
- 1) Command Line Option To Start Crawls
- Small Update – Version 10.2 Released 3rd October 2018
- Small Update – Version 2.21 Released 20th October 2013
- 3) Input Your Syntax
- 3) Image Sitemaps & Updated XML Sitemap Features
Get your URLs
To get started you’ll need to change all your existing domain URLs from this:https://www.screamingfrog.co.uk/
into thishttps://developers.google.com/speed/pagespeed/insights/?url=screamingfrog.co.uk/
So go ahead and grab an excel list of every single URL you’d like some page speed data on, if you don’t have a list already, just give your site a crawl and take it straight from the tool, or download via the sitemap.
Next, you’ll need to add a cell containing the default Page Speed Insights URL:https://developers.google.com/speed/pagespeed/insights/?url=
Once that’s in just use a quick formula in the adjacent cell to join them together into your nice PSI friendly URL.
=$A$1&B1
Once this is copied down it should look similar this:

Other Updates
Version 14.0 also includes a number of smaller updates and bug fixes, outlined below.
- There’s now a new filter for ‘Missing Alt Attribute’ under the ‘Images’ tab. Previously missing and empty alt attributes would appear under the singular ‘Missing Alt Text’ filter. However, it can be useful to separate these, as decorative images should have empty alt text (alt=””), rather than leaving out the alt attribute which can cause issues in screen readers. Please see our How To Find Missing Image Alt Text & Attributes tutorial.
- Headless Chrome used in JavaScript rendering has been updated to keep up with evergreen Googlebot.
- ‘Accept Cookies’ has been adjusted to ‘‘, with three options – Session Only, Persistent and Do Not Store. The default is ‘Session Only’, which mimics Googlebot’s stateless behaviour.
- The ‘URL’ tab has new filters available around common issues including Multiple Slashes (//), Repetitive Path, Contains Space and URLs that might be part of an Internal Search.
- The ‘‘ tab now has a filter for ‘Missing Secure Referrer-Policy Header’.
- There’s now a ‘HTTP Version’ column in the Internal and Security tabs, which shows which version the crawl was completed under. This is in preparation for supporting HTTP/2 crawling inline with Googlebot.
- You’re now able to right click and ‘close’ or drag and move the order of lower window tabs, in a similar way to the top tabs.
- Non-Indexable URLs are now not included in the ‘URLs not in Sitemap’ filter, as we presume they are non-indexable correctly and therefore shouldn’t be flagged. Please see our tutorial on ‘How To Audit XML Sitemaps‘ for more.
- Google rich result feature validation has been updated inline with the ever-changing documentation.
- The ‘Google Rich Result Feature Summary’ report available via ‘‘ in the top-level menu, has been updated to include a ‘% eligible’ for rich results, based upon errors discovered. This report also includes the total and unique number of errors and warnings discovered for each Rich Result Feature as an overview.
That’s everything for now, and we’ve already started work on features for version 15. If you experience any issues, please let us know via support and we’ll help.
Thank you to everyone for all their feature requests, feedback, and continued support.
Now, go and download version 14.0 of the Screaming Frog SEO Spider and let us know what you think!
2) Google Sheets Export
You’re now able to export directly to Google Sheets.
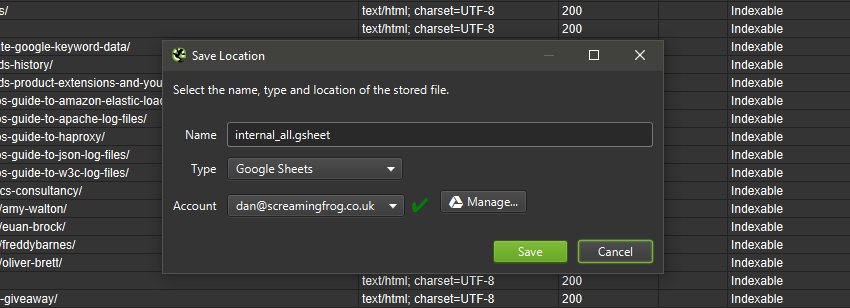
You can add multiple Google accounts and connect to any, quickly, to save your crawl data which will appear in Google Drive within a ‘Screaming Frog SEO Spider’ folder, and be accessible via Sheets.
Many of you will already be aware that Google Sheets isn’t really built for scale and has a 5m cell limit. This sounds like a lot, but when you have 55 columns by default in the Internal tab (which can easily triple depending on your config), it means you can only export around 90k rows (55 x 90,000 = 4,950,000 cells).
If you need to export more, use a different export format that’s built for the size (or reduce your number of columns). We had started work on writing to multiple sheets, but really, Sheets shouldn’t be used in that way.
This has also been integrated into and the . This means you can schedule a crawl, which automatically exports any tabs, filters, exports or reports to a Sheet within Google Drive.
You’re able to choose to create a timestamped folder in Google Drive, or overwrite an existing file.
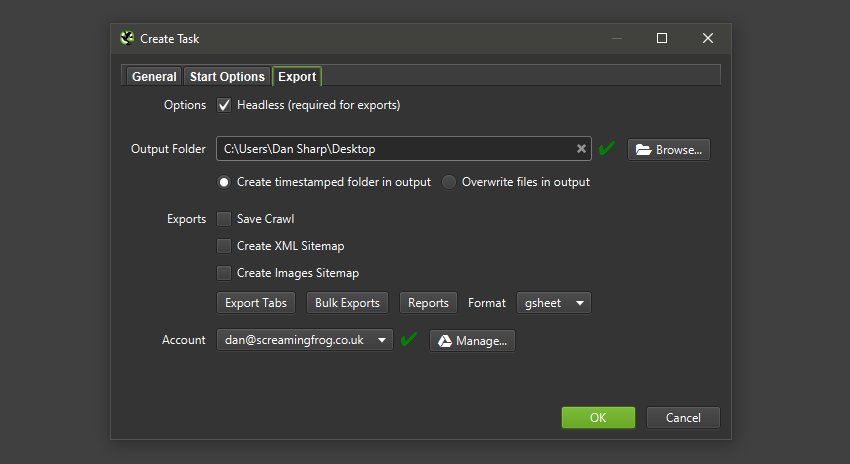
This should be helpful when sharing data in teams, with clients, or for Google Data Studio reporting.
1) Темный режим
Возможно, это не самая важная функция в этом выпуске, но она используется на всех скриншотах, поэтому имеет смысл поговорить в первую очередь. Теперь вы можете переключиться в темный режим через «Конфигурация > Пользовательский интерфейс > Тема > Темный».
Это не только поможет снизить нагрузку на глаза для тех, кто работает при слабом освещении (все, кто сейчас живет в условиях пандемии), но и выглядит очень круто – и, как предполагаю (сейчас я), значительно повысит ваши технические навыки SEO.
Те, кто не напрягает глаза, могут заметить, что разработчики также изменили некоторые другие элементы стилей и графики, например, те, что находятся на вкладках обзора справа и структуры сайта.
Small Update – Version 11.1 Released 13th March 2019
We have just released a small update to version 11.1 of the SEO Spider. This release is mainly bug fixes and small improvements –
- Add 1:1 hreflang URL report, available under ‘Reports > Hreflang > All hreflang URLs’.
- Cleaned up the preset user-agent list.
- Fix issue reading XML sitemaps with leading blank lines.
- Fix issue with parsing and validating structured data.
- Fix issue with list mode crawling more than the list.
- Fix issue with list mode crawling of XML sitemaps.
- Fix issue with scheduling UI unable to delete/edit tasks created by 10.x.
- Fix issue with visualisations, where the directory tree diagrams were showing the incorrect URL on hover.
- Fix issue with GA/GSC case insensitivty and trailing slash options.
- Fix crash when JavaScript crawling with cookies enabled.
5) HSTS Support
HTTP Strict Transport Security (HSTS) is a server directive that forces all connections over HTTPS. If any ‘insecure’ links are discovered in a crawl with a Strict-Transport-Security header set, the SEO Spider will show a 307 response with a status message of ‘HSTS Policy’.
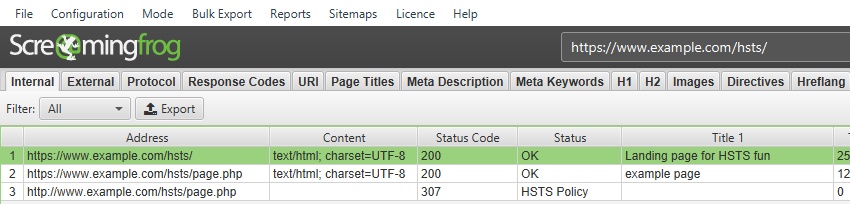
The SEO Spider will request the HTTPS version as instructed, but highlight this with a 307 response (inline with browsers, such as Chrome), to help identify when HSTS and insecure links are used (rather than just requesting the secure version, and not highlighting that insecure links actually exist).
The search engines and browsers will only request the HTTPS version, so obviously the 307 response HSTS policy should not be considered as a real temporary redirect and ‘a redirect to fix’. John Mueller discussed this in a Google+ post last year.
3) Resume Previously Lost or Crashed Crawls
Due to the feature above, you’re now able to resume from an otherwise ‘lost’ crawl in database storage mode.
Previously if Windows had kindly decided to perform an update and restart your machine mid crawl, there was a power-cut, software crash, or you just forgot you were running a week-long crawl and switched off your machine, the crawl would sadly be lost forever.
We’ve all been there and we didn’t feel this was user error, we could do better! So if any of the above happens, you should now be able to just open it back up via the ‘File > Crawls’ menu and resume the crawl.
Unfortunately this can’t be completely guaranteed, but it will provide a very robust safety net as the crawl is always stored, and generally retrievable – even when pulling the plug directly from a machine mid-crawl.
Как пользоваться Screaming Frog SEO Spider
Сама программа распространяется бесплатно, хоть и имеется платная версия — функционал при этом мало ограничен, что позволяет провести полноценный технический аудит сайта. Но прежде чем приступить к работе, необходимо немного ознакомится с настройками в Screaming Frog. Давайте разберем самые важные. Заходим Configuration > Spider и далее по вкладкам.
Basic
Чтобы ускорить анализ сайта, можно исключить из парсинга CSS стили, JavaScript, SWF (это проприетарный формат для флеш-анимации, векторной графики, видео и аудио в инете).
Limits
Тут нас интересует только Limit Search Depth — это настройка ограничения по вложенности страницы. Например, страницы больших сайтов с огромным количеством товаров в каталоге обычно имеют глубокую вложенность по url. Ставим подходящее нам ограничение и заметно экономим время.
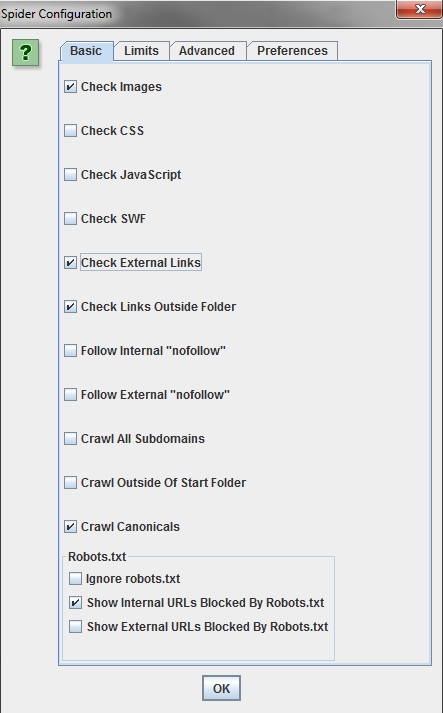
Advanced
Cтавим галочки так, как показано на скриншоте. Тем самым будем изучать только ту информацию, которую видят поисковые роботы.
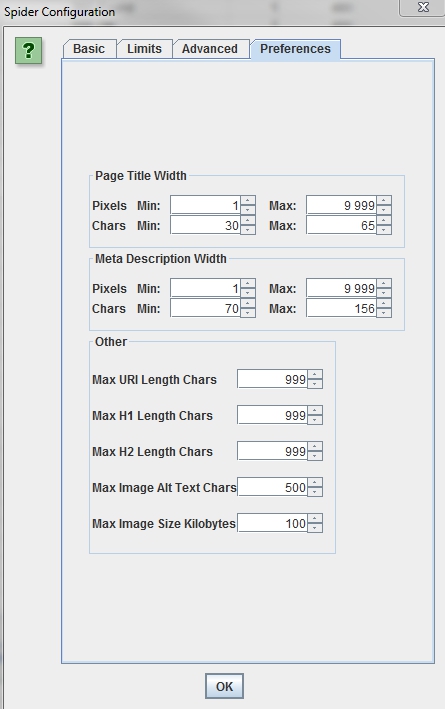
Preferences
Screaming SEO Frog предлагает указать пожелания по размеру метатегов, урла, заголовков h1/h2, длине атрибута alt и размера изображения. Можно указать большие значения, чтобы не упускать ничего.
Бывает, что необходимо проверить только определенные разделы или один, а может и наоборот — все, кроме некоторых или кроме одного. Чтобы проверить конкретные разделы, заходим в Configuration > Include, где указываем раздел. Если нужно исключить: Configuration > Exclude и аналагично указываем исключаемые разделы.
Если у вас новый сайт, который еще не готов к открытию (и админки как таковой еще нет), а провести технический аудит нужно — в SEO Screamig Frog можно указать логин и пароль. Чтобы не указывать админский доступ, можно создать ограниченный — гостевой
Обратите внимание
Если сайт закрыт в robots. txt, в настройках (вкладка Basic) необходимо включить опцию игнорирования данного файла.
Скорость парсинга
Еще одна основная настройка SEO Frog. При запуске парсинга в самом низу указывается средняя скорость и текущая. Если сайт не выдерживает большой скорости, то лучше в настройках указать определенное значение.
Все настройки готовы и теперь можно приступить к старту парсинга сайта. В верхней части SEO Frog указываем сайт, нажимаем Start и ждем. Время ожидания зависит от размера сайта, в основном это от 5 до 25 минут.
3) Multi-Select Details & Bulk Exporting
You can now select multiple URLs in the top window pane, view specific lower window details for all the selected URLs together, and export them. For example, if you click on three URLs in the top window, then click on the lower window ‘inlinks’ tab, it will display the ‘inlinks’ for those three URLs.
You can also export them via the right click or the new export button available for the lower window pane.
Obviously this scales, so you can do it for thousands, too.
This should provide a nice balance between everything in bulk via the ‘Bulk Export’ menu and then filtering in spreadsheets, or the previous singular option via the right click.
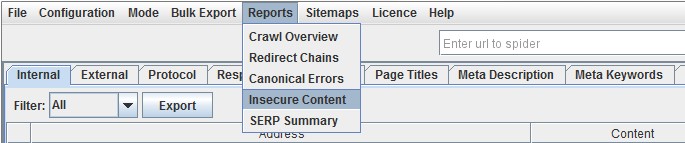
2) Insecure Content Report
We have introduced a ‘protocol’ tab, to allow you to easily filter and analyse by secure and non secure URLs at a glance (as well as other protocols potentially in the future). As an extension to this, there’s also a new ‘insecure content’ report which will show any HTTPS URLs which have insecure elements on them. It’s very easy to miss some insecure content, which often only get picked up on go live in a browser.
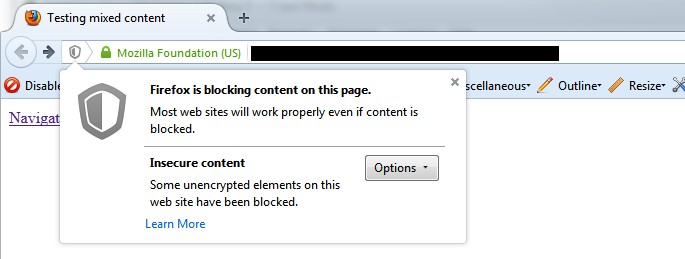
So if you’re working on HTTP to HTTPS migrations, this should be particularly useful. This report will identify any secure pages, which link out to insecure content, such as internal HTTP links, images, JS, CSS, external CDN’s, social profiles etc.
Here’s a quick example of how a report might look (with insecure images in this case) –

Please note, this report will only pick up on items we crawl, rather than everything rendered in a browser.
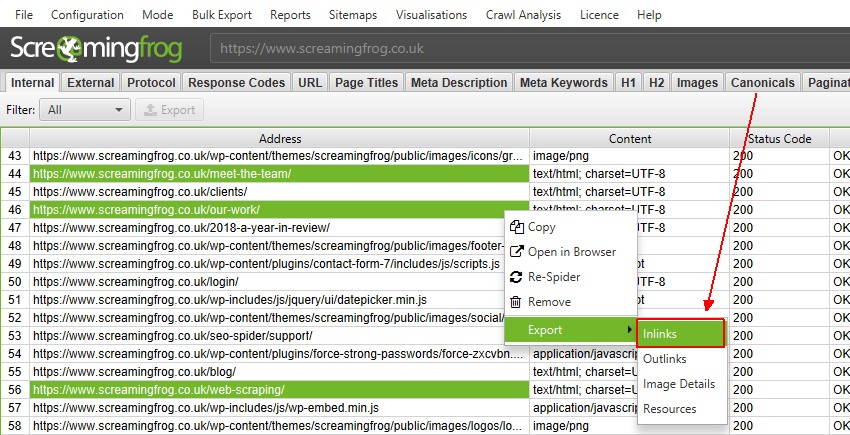
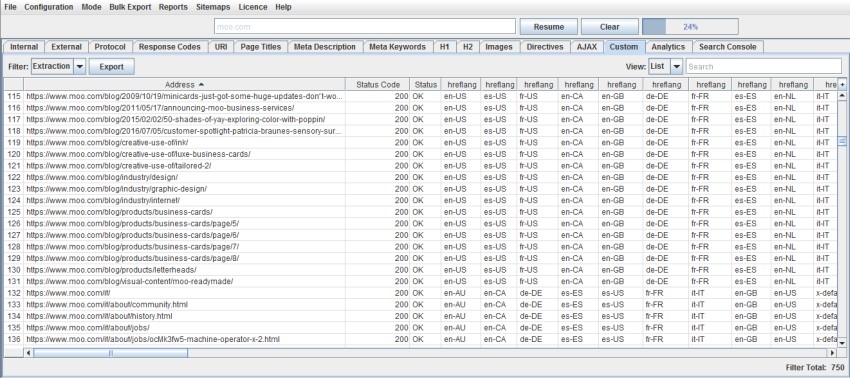
4) Просмотрите источник переадресации, щелкнув вкладку «Inlinks»
Очевидно, вам нужно знать источник обнаруженных перенаправляющих ссылок (какие URL-адреса на веб-сайте ссылаются на перенаправления), чтобы их можно было обновить в правильном месте. Для этого просто щелкните URL-адрес в верхней панели окна, а затем щелкните вкладку «Inlinks» внизу, чтобы заполнить нижнюю панель окна.
Как вы можете видеть в этом примере, есть перенаправление на наше руководство по парсингу (https://www.screamingfrog.co.uk/web-scraper/), на которое есть ссылка на этой странице – https: // www. screamingfrog.co.uk/seo-spider-4-0/.
Вот более подробный вид нижней оконной панели, в которой подробно описаны данные «входящих ссылок» –
2.0 Dancing Around Google Sheets
Where can you find your exported files?
- After the first scheduled crawl, the SEO Spider creates a folder named “Screaming Frog SEO Spider” in your Google Drive.
- There it creates a subfolder with the project name applied in step 1.2.1.
- After the first crawl one file named internal_all appears in this subfolder.
- It contains all data we setup in the step 1.1
If you did everything as described, your internal_all file contains 67 columns, most of them are empty, and information you need to plot data are placed in:
- Column A: URL
- Column BD: Response Header: Date,
- Column BN: Time To First Byte.
The last column BO contains URLs too, so we will use it.
Note if you’re exporting other data, then the column locations will be different and you’ll need to adjust as necessary.
2.1 How To Overcome File Overwriting
Now we have a master sheet with all our crawl data, we need to ensure it’s archived every time a crawl is run. Remember, we set the option “overwrite files in output”. This means, after each scheduled crawl we lose previous data as new data overwrites the old, and our master sheet will be updated – not ideal for this scenario.
Thankfully Ana Kravitz, created a Google Sheets add-on exactly for such cases. The add-on moves data from a selected range of one tab into another range of a further tab. It writes data into rows and into the next empty cell.
This means that every time our scheduled crawl runs, the master sheet will import the data from all exports, and then this addon will append this data into an archive tab containing all the historic crawl information.
After the installation open the export files and setup the archiving. On the screenshot below you see my add-on settings from the “internal_all” file:
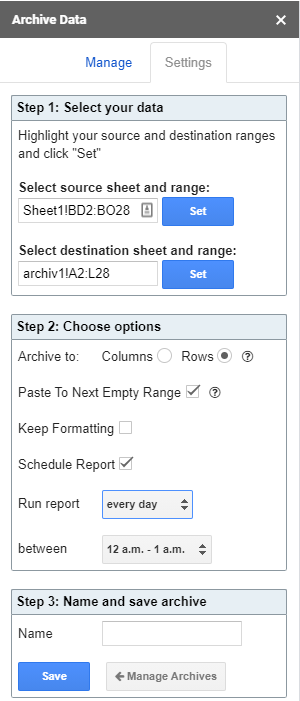
- As a source, we select our Internal:all tab with a range of Sheet!BD2:BO28
- As a destination, we select the tab “Archive”, with a range of archive1!A2:L28
- As options, we select “archive to rows” and “paste to next empty range”.
This makes sure that all data is stored in archived tabs after each scheduled crawl. My best practice is to schedule the archiving one hour after the crawl.
Important: If you archive data with the heading row, it will be repeated with every archiving. That’s why you archive only data, without the heading rows. So, don’t forget to fill column headings into the row 1 of the archive tab.
2.2 Merging Data – optional
This step is optional and only needed if reporting on data not contained within the Internal:All tab.
If for some reason you’d like to report on data that is not included in the Internal:All tab, you’ll need to make a master sheet combining that export with the date from the HTTP Headers export and then archive that master sheet.
This can be done using a formula =IMPORTRANGE() to grab all you’re URLs from another sheet.
=IMPORTRANGE(“Gsheet-id”, “Archive!A2:A”) Where Gsheet-id is replaced with the URL of the exported Gsheet. and A2:A is the column containing all your URLs
Next use =VLookup to match and import any given data point (such as the HTTP header date) against the URLs:
=IFERROR(VLOOKUP(A2,IMPORTRANGE(“ID-of-export-HTTP-headers”,”Sheet1!A2:N1000″),14,FALSE),””) where 14 is the column in the table containing date HTTP header information.
=IFERROR(VLOOKUP(A2,IMPORTRANGE(“ID-of-export-metrics”,”Sheet1!A2:N1000″),4,FALSE),””) where 4 is the column in the table containing our data.
Note, for other metrics you will need to change the Vlookup formula to match the column the data sits in – this is the number before the FALSE statement
Lastly, as you won’t know how many URLs the Spider will discover in each new crawl (from site changes etc..) you need to manually copy any Vlookup formulas downwards until you are sure there are enough rows for all crawled URLs. e.g. if you copy it down to the 10,000 rows that will cover most sites under 10,000 URLs. The =IFERROR will workout the blank cells so they aren’t filled with #N/A
Note: in column A you don’t need to pull the formula manually downwards – IMPORTRANGE will do it for you.
4) Improved Custom Extraction – Multiple Values & Functions
We listened to feedback that users often wanted to extract multiple values, without having to use multiple extractors. For example, previously to collect 10 values, you’d need to use 10 extractors and index selectors (, etc) with XPath.
We’ve changed this behaviour, so by default, a single extractor will collect all values found and report them via a single extractor for XPath, CSS Path and Regex. If you have 20 hreflang values, you can use a single extractor to collect them all and the SEO Spider will dynamically add additional columns for however many are required. You’ll still have 9 extractors left to play with as well. So a single XPath such as –

Will now collect all values discovered.
You can still choose to extract just the first instance by using an index selector as well. For example, if you just wanted to collect the first h3 on a page, you could use the following XPath –

Functions can also be used anywhere in XPath, but you can now use it on its own as well via the ‘function value’ dropdown. So if you wanted to count the number of links on a page, you might use the following XPath –

I’d recommend reading our updated guide to web scraping for more information.
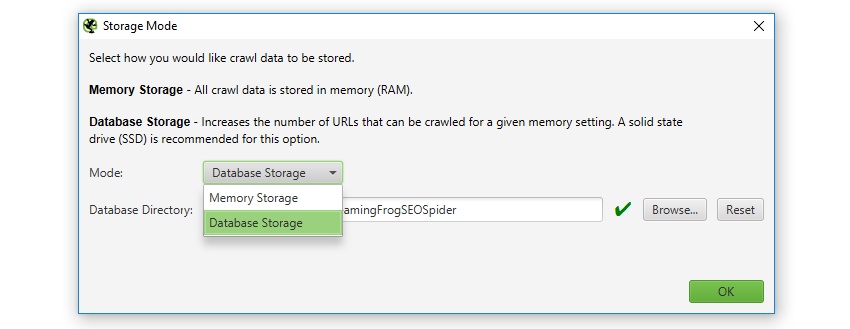
1) Configurable Database Storage (Scale)
The SEO Spider has traditionally used RAM to store data, which has enabled it to have some amazing advantages; helping to make it lightning fast, super flexible, and providing real-time data and reporting, filtering, sorting and search, during crawls.
However, storing data in memory also has downsides, notably crawling at scale. This is why version 9.0 now allows users to choose to save to disk in a database, which enables the SEO Spider to crawl at truly unprecedented scale for any desktop application while retaining the same, familiar real-time reporting and usability.
The default crawl limit is now set at 5 million URLs in the SEO Spider, but it isn’t a hard limit, the SEO Spider is capable of crawling significantly more (with the right hardware). Here are 10 million URLs crawled, of 26 million (with 15 million sat in the queue) for example.
We have a hate for pagination, so we made sure the SEO Spider is powerful enough to allow users to view data seamlessly still. For example, you can scroll through 8 million page titles, as if it was 800.
The reporting and filters are all instant as well, although sorting and searching at huge scale will take some time.

It’s important to remember that crawling remains a memory intensive process regardless of how data is stored. If data isn’t stored in RAM, then plenty of disk space will be required, with adequate RAM and ideally SSDs. So fairly powerful machines are still required, otherwise crawl speeds will be slower compared to RAM, as the bottleneck becomes the writing speed to disk. SSDs allow the SEO Spider to crawl at close to RAM speed and read the data instantly, even at huge scale.
By default, the SEO Spider will store data in RAM (‘memory storage mode’), but users can select to save to disk instead by choosing ‘database storage mode’, within the interface (via ‘Configuration > System > Storage), based upon their machine specifications and crawl requirements.
Users without an SSD, or are low on disk space and have lots of RAM, may prefer to continue to crawl in memory storage mode. While other users with SSDs might have a preference to just crawl using ‘database storage mode’ by default. The configurable storage allows users to dictate their experience, as both storage modes have advantages and disadvantages, depending on machine specifications and scenario.
Please see our guide on how to crawl very large websites for more detail on both storage modes.
The saved crawl format (.seospider files) are the same in both storage modes, so you are able to start a crawl in RAM, save, and resume the crawl at scale while saving to disk (and vice versa).
5) Aggregated Site Structure
The SEO Spider now displays the number of URLs discovered in each directory when in directory tree view (which you can access via the tree icon next to ‘Export’ in the top tabs).
This helps better understand the size and architecture of a website, and some users find it more logical to use than traditional list view.
Alongside this update, we’ve improved the right-hand ‘Site Structure’ tab to show an aggregated directory tree view of the website. This helps quickly visualise the structure of a website, and identify where issues are at a glance, such as indexability of different paths.
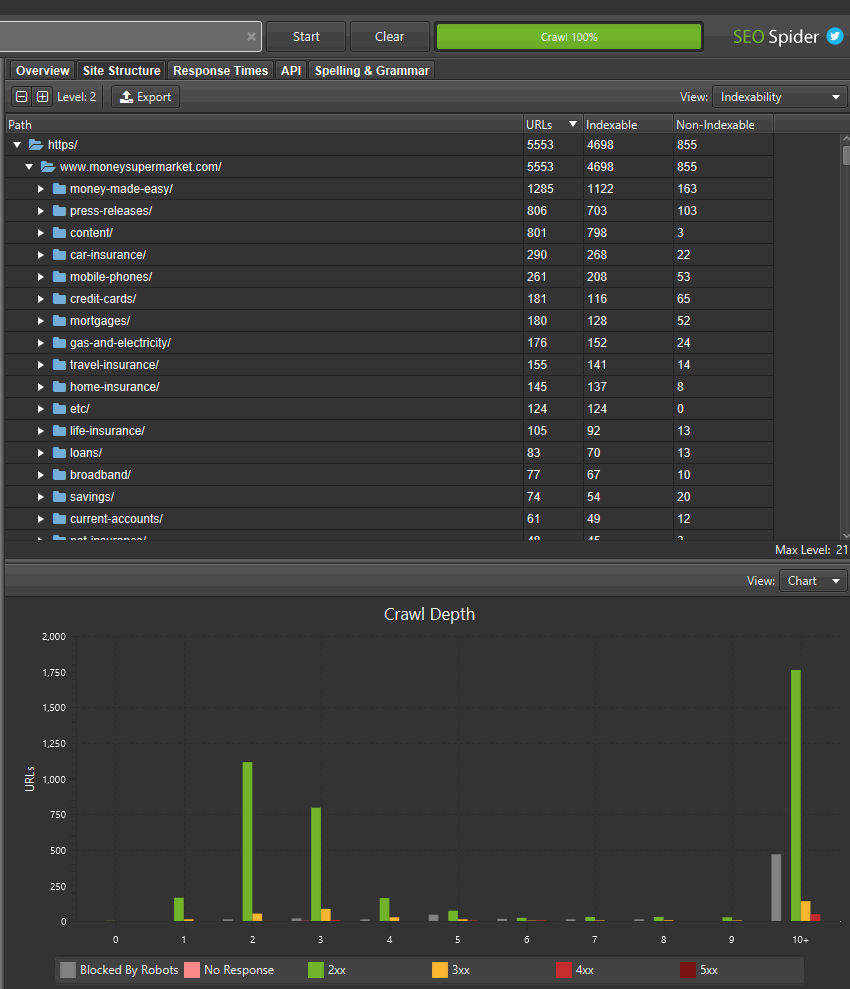
If you’ve found areas of a site with non-indexable URLs, you can switch the ‘view’ to analyse the ‘indexability status’ of those different path segments to see the reasons why they are considered as non-indexable.
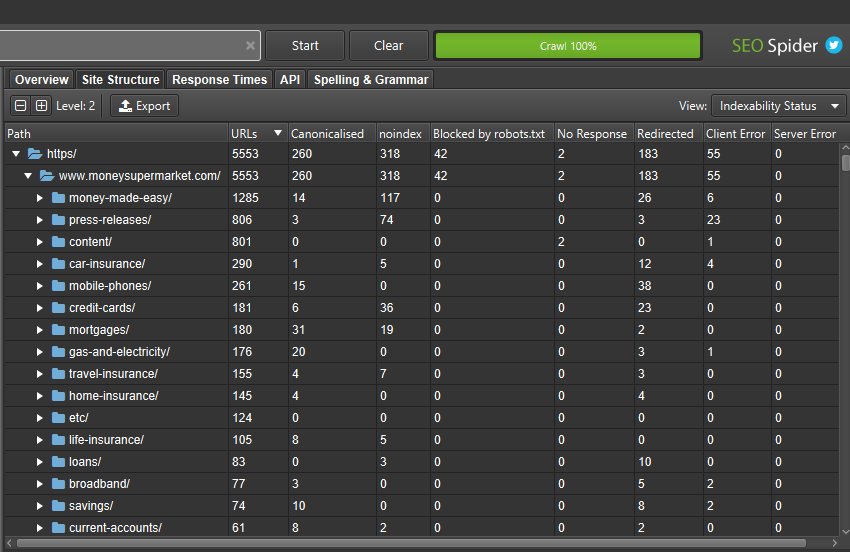
You can also toggle the view to crawl depth across directories to help identify any internal linking issues to areas of the site, and more.
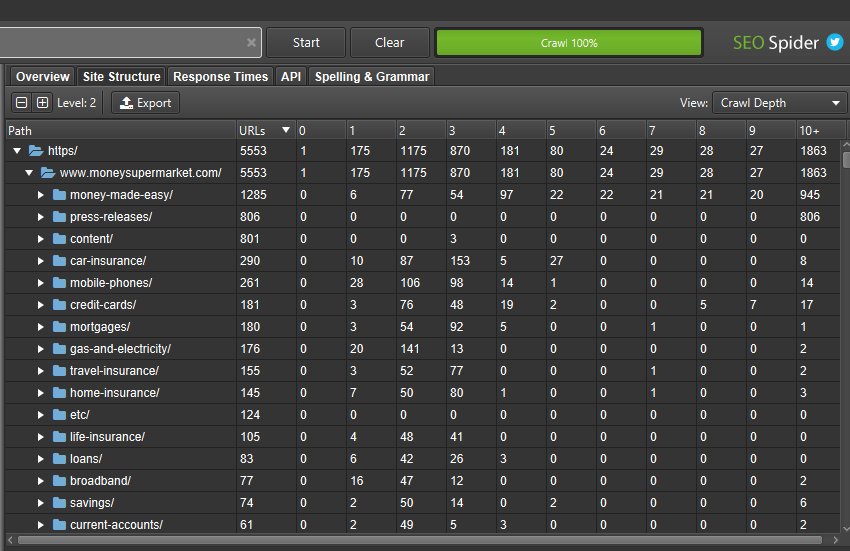
This wider aggregated view of a website should help you visualise the architecture, and make better decisions for different sections and segments.
2) Select CSS Path, XPath or Regex for Scraping
The Screaming Frog SEO Spider tool provides three methods for scraping data from websites:
- XPath – XPath is a query language for selecting nodes from an XML like document, such as HTML. This option allows you to scrape data by using XPath selectors, including attributes.
- CSS Path – In CSS, selectors are patterns used to select elements and are often the quickest out of the three methods available. This option allows you to scrape data by using CSS Path selectors. An optional attribute field is also available.
- Regex – A regular expression is of course a special string of text used for matching patterns in data. This is best for advanced uses, such as scraping HTML comments or inline JavaScript.
CSS Path or XPath are recommended for most common scenarios, and although both have their advantages, you can simply pick the option which you’re most comfortable using.
When using XPath or CSS Path to collect HTML, you can choose exactly what to extract using the drop down filters –
- Extract HTML Element – The selected element and all of its inner HTML content.
- Extract Inner HTML – The inner HTML content of the selected element. If the selected element contains other HTML elements, they will be included.
- Extract Text – The text content of the selected element and the text content of any sub elements.
- Function Value – The result of the supplied function, eg count(//h1) to find the number of h1 tags on a page.
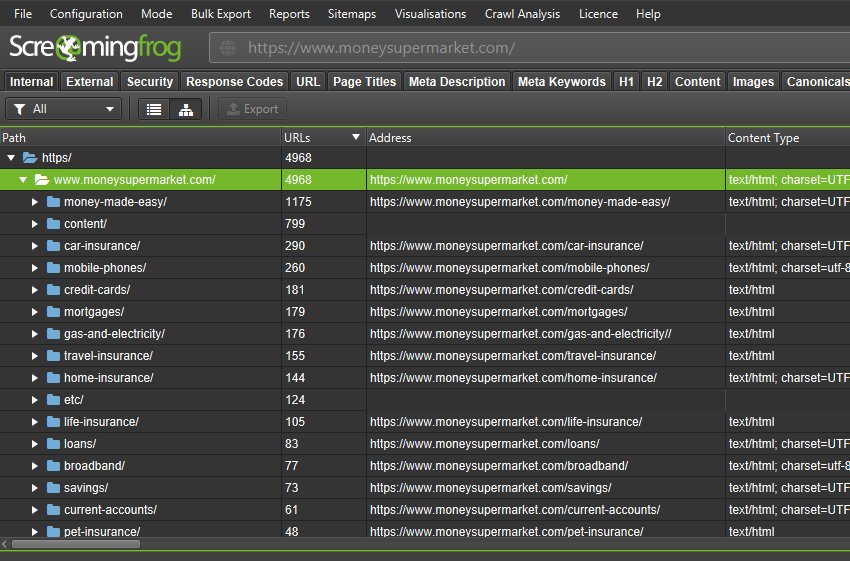
Внутренние ссылки
Что делать, когда требуется получить информацию о внешних и внутренних ссылках сайта (анкорах, директивах, перелинковке и пр.).
Если вам не нужно проверять на сайте изображения, JavaScript, Flash или CSS, то исключите эти опции из режима сканирования, чтобы сберечь ресурсы памяти.
После завершения Пауком сканирования, используйте меню «Advanced Export», чтобы из базы «All Links» экспортировать CSV. Это предоставит вам все ссылочные локации и соответствующие им анкорные вхождения, директивы и пр.
Для быстрого подсчета количества ссылок на каждой странице перейдите во вкладку «Internal» и отсортируйте информацию через опцию «Outlinks». Все, чтобы будет выше 100-ой позиции, возможно, потребует дополнительного внимания.
Как найти неработающие внутренние ссылки на страницу или сайт.
Как и всегда, не забудьте исключить изображения, JavaScript, Flash или CSS из объектов сканирования, дабы оптимизировать процесс.
После окончания сканировния Пауком, отфильтруйте результаты панели «Internal» через функцию «Status Code». Каждый 404-ый, 301-ый и прочие коды состояния будут хорошо просматриваться.
При нажатии на каждый отдельный URL в результатах сканирования в нижней части окна программы вы увидите информацию. Нажав в нижнем окне на «In Links», вы найдете список страниц, ссылающихся на выбранный URL-адрес, а также анкорные вхождения и директивы, используемые на этих страницах. Используйте данную функцию для выявления внутренних ссылок, требующих обновления.
Чтобы экспортировать в CSV формате список страниц, содержащих битые ссылки или перенаправления, используйте в меню «Advanced Export» опцию «Redirection (3xx) In Links» или «Client Error (4xx) In Links», либо «Server Error (5xx) In Links».
Как выявить неработающие исходящие ссылки на странице или сайте (или все битые ссылки одновременно).
Аналогично делаем сначала акцент на сканировании HTML-содержимого, не забыв при этом оставить галочку в пункте «Check External Links».
По завершении сканирования выберите в верхнем окне вкладку «External» и при помощи «Status Code» отфильтруйте содержимое, чтобы определить URL с кодами состояния, отличными от 200. Нажмите на любой отдельный URL-адрес в результатах сканирования и после выберите вкладку «In Links» в нижнем окне – вы найдете список страниц, которые указывают на выбранный URL. Используйте эту информацию для выявления ссылок, требующих обновления.
Чтобы экспортировать полный список исходящих ссылок, нажмите на «Export» во вкладке «Internal». Вы также можете установить фильтр, чтобы экспортировать ссылки на внешние изображения, JavaScript, CSS, Flash и PDF. Чтобы ограничить экспорт только страницами, сортируйте посредством опции «HTML».
Чтобы получить полный список всех локаций и анкорных вхождений исходящих ссылок, выберите в меню «Advanced Export» позицию «All Out Links», а после отфильтруйте столбец «Destination» в экспортируемом CSV, чтобы исключить ваш домен.
Как найти перенаправляющие ссылки.
По завершении сканирования выберите в верхнем окне панель «Response Codes» и после отсортируйте результаты при помощи опции «Redirection (3xx)». Это позволит получить список всех внутренних и исходящих ссылок, которые будут перенаправлять. Применив фильтр «Status Code», вы сможете разбить результаты по типам. При нажатии «In Links» в нижнем окне, вы сможете увидеть все страницы, на которых используются перенаправляющие ссылки.
Если экспортировать информацию прямо из этой вкладки, то вы увидите только те данные, которые отображаются в верхнем окне (оригинальный URL, код состояния и то место, в которое происходит перенаправление).
Чтобы экспортировать полный список страниц, содержащих перенаправляющие ссылки, вам следует выбрать «Redirection (3xx) In Links» в меню «Advanced Export». Это вернет CSV-файл, который включает в себя расположение всех перенаправляющих ссылок. Чтобы показать только внутренние редиректы, отфильтруйте содержимое в CSV-файле с данными о вашем домене при помощи колонки «Destination».
Совет: Поверх двух экспортированных файлов используйте VLOOKUP, чтобы сопоставить столбцы «Source» и «Destination» с расположением конечного URL-адреса.
Пример формулы выглядит следующим образом:
=VLOOKUP(,’response_codes_redirection_(3xx).csv’!$A$3:$F$50,6,FALSE). Где «response_codes_redirection_(3xx).csv» — это CSV-файл, содержащий перенаправляющие URL-адреса и «50» — это количество строк в этом файле.
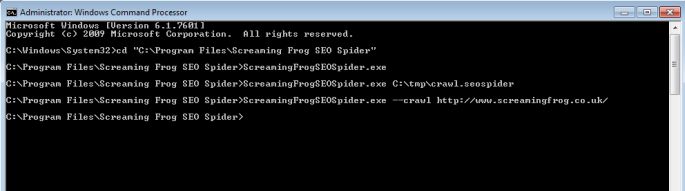
1) Command Line Option To Start Crawls
We are working on a scheduling feature and full command line option. In the meantime, we have made a quick and easy update which allows you to start the SEO Spider and launch a crawl via the command line, which means you can now schedule a crawl.
Please see our post for more information on scheduling a crawl.
Supplying no arguments starts the application as normal. Supplying a single argument of a file path, tries to load that file in as a saved crawl. Supplying the following:
--crawl http://www.example.com/
starts the spider and immediately triggers the crawl of the supplied domain. This switches the spider to crawl mode if its not the last used mode and uses your default configuration for the crawl.
Note: If your last used mode was not crawl, “Ignore robots.txt” and “Limit Search Depth” will be overwritten.
Windows
Open a command prompt (Start button, then search programs and files for ‘Windows Command Processor’)
Move into the SEO Spider directory:
cd "C:\Program Files\Screaming Frog SEO Spider"
To start normally:
ScreamingFrogSEOSpider.exe
To open a crawl file (Only available to licensed users):
ScreamingFrogSEOSpider.exe C:\tmp\crawl.seospider
To auto start a crawl:
ScreamingFrogSEOSpider.exe --crawl http://www.example.com/
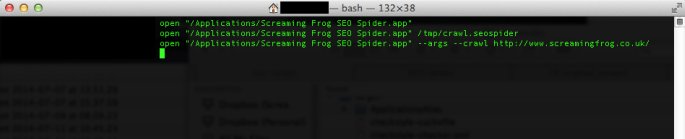
MAC OS X
Open a terminal, found in the Utilities folder in the Applications folder, or directly using spotlight and typing: ‘terminal’.
To start normally:
open "/Applications/Screaming Frog SEO Spider.app"
To open a saved crawl file:
open "/Applications/Screaming Frog SEO Spider.app" /tmp/crawl.seospider
To auto start a crawl:
open "/Applications/Screaming Frog SEO Spider.app" --args --crawl http://www.example.com/
Linux
The following commands are available from the command line:
To start normally:
screamingfrogseospider
To open a saved crawl file:
screamingfrogseospider /tmp/crawl.seospider
To auto start a crawl:
screamingfrogseospider --crawl http://www.example.com/
Small Update – Version 10.2 Released 3rd October 2018
We have just released a small update to version 10.2 of the SEO Spider. This release is mainly bug fixes and small improvements –
- –headless can now be run on Ubuntu under Windows.
- Added configuration option “Respect Self Referencing Meta Refresh” (Configuration > Spider > Advanced). Lots of websites have self-referencing meta refereshes, which can be classed as ‘non-indexable’, and this can now simply be switched off.
- URLs added to the crawl via GA/GSC now got through URL rewriting and exclude configuration.
- Various scheduling fixes.
- The embedded browser now runs in a sandbox.
- The Force-Directed Diagram directory tree now considers non-trailing slash URLs as potential directories, and doesn’t duplicate where appropriate.
- Fix bug with ‘Custom > Extraction’ filter missing columns when run headless.
- Fix issue preventing crawls saving with more than 32k of custom extraction data.
- Fix issue with ‘Link Score’ not being saved/restored.
- Fix crash when accessing the Forms Based Authentiction.
- Fix crash when uploading duplicate SERP URLs.
- Fix crashes introduced by update to macOS 10.14 Mojave.
Small Update – Version 2.21 Released 20th October 2013
We have released a very small update to version 2.21 of the Screaming Frog SEO spider, which essentially fixes a few small bugs & updates a couple of features from feedback we received. These include –
- Individual cell selection, so contents can be individually copied and pasted.
- Now when you upload a list of URLs and use the ‘‘ configuration, the resulting export will now include ALL URLs from the original upload, not just those that redirect. This should make it easier to audit URLs in a site migration by seeing them all in one place with a single report.
- There was a bug with relative URLs and the new configuration which has been corrected.
- We have fixed a couple of smaller total & percentage calculations in the .
3) Input Your Syntax
Next up, you’ll need to input your syntax into the relevant extractor fields. A quick and easy way to find the relevant CSS Path or Xpath of the data you wish to scrape, is to simply open up the web page in Chrome and ‘inspect element’ of the HTML line you wish to collect, then right click and copy the relevant selector path provided.
For example, you may wish to start scraping ‘authors’ of blog posts, and number of comments each have received. Let’s take the Screaming Frog website as the example.
Open up any blog post in Chrome, right click and ‘inspect element’ on the authors name which is located on every post, which will open up the ‘elements’ HTML window. Simply right click again on the relevant HTML line (with the authors name), copy the relevant CSS path or XPath and paste it into the respective extractor field in the SEO Spider. If you use Firefox, then you can do the same there too.
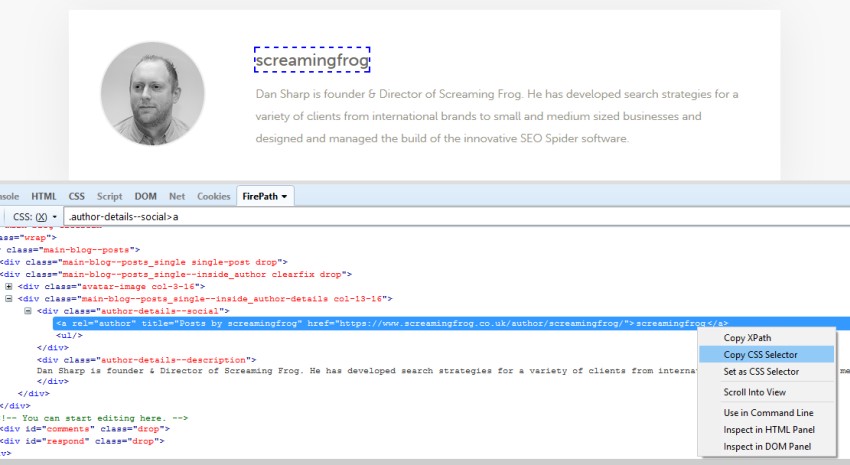
You can rename the ‘extractors’, which correspond to the column names in the SEO Spider. In this example, I’ve used CSS Path.

The ticks next to each extractor confirm the syntax used is valid. If you have a red cross next to them, then you may need to adjust a little as they are invalid.
When you’re happy, simply press the ‘OK’ button at the bottom. If you’d like to see more examples, then skip to the bottom of this guide.
Please note – This is not the most robust method for building CSS Selectors and XPath expressions. The expressions given using this method can be very specific to the exact position of the element in the code. This is something that can change due to the inspected view being the rendered version of the page / DOM, when by default the SEO Spider looks at the HTML source, and HTML clean-up that can occur when the SEO Spider processes a page where there is invalid mark-up.
These can also differ between browser, e.g. for the above ‘author’ example the following CSS Selectors are given –
Chrome: body > div.main-blog.clearfix > div > div.main-blog–posts > div.main-blog–posts_single–inside_author.clearfix.drop > div.main-blog–posts_single–inside_author-details.col-13-16 > div.author-details–social > aFirefox: .author-details–social > a:nth-child(1)
The expressions given by Firefox are generally more robust than those provided by Chrome. Even so, this should not be used as a complete replacement for understanding the various extraction options and being able to build these manually by examining the HTML source.
The w3schools guide on CSS Selectors and their XPath introduction are good resources for understanding the basics of these expressions.
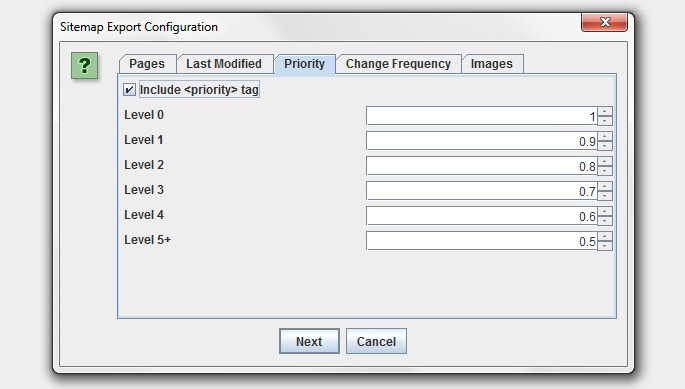
3) Image Sitemaps & Updated XML Sitemap Features
You can now add images to your XML sitemap or create an image sitemap file.
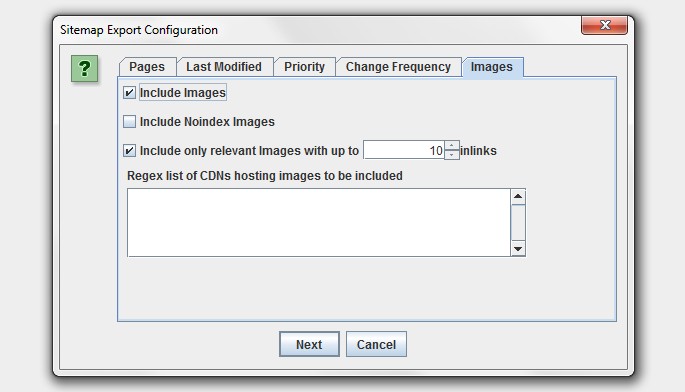
As shown in the screenshot above, you now have the ability to include images which appear under the ‘internal’ tab from a normal crawl, or images which sit on a CDN (and ).
Typically you don’t want to include images like logos in an image sitemap, so you can also choose to only include images with a certain number of source attribute references. To help with this, we have introduced a new column in the ‘images’ tab which shows how many times an image is referenced (IMG Inlinks).
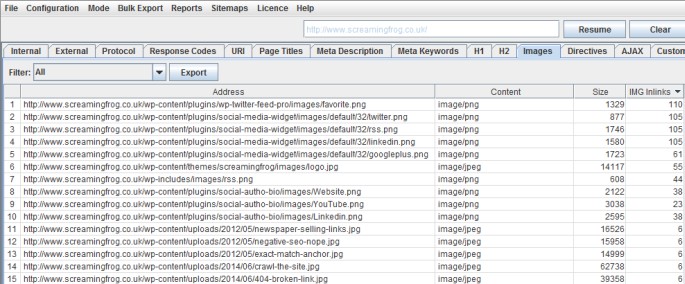
This is a nice easy way to exclude logos or social media icons, which are often linked to sitewide for example. You can also right-click and ‘remove’ any images or URLs you don’t want to include obviously too! The ‘IMG Inlinks’ is also very useful when viewing images with missing alt text, as you may wish to ignore social profiles without them etc.
There’s now also plenty more options when generating an XML sitemap. You can choose whether to include ‘noindex’, canonicalised, paginated or PDFs in the sitemap for example. Plus you now also have greater control over the lastmod, priority and change frequency.