Jetbrains pycharm professional 2021.1
Содержание:
- Установка Python и Pip
- Полезные хоткеи и фишки
- Web Development
- System requirements
- Other Useful Items
- ТОП 7 полезных плагинов для Pycharm
- Frontend development Pro only
- Customizable and Cross-platform IDE
- OpenPGP Public Keys
- Поиск и навигация в PyCharm
- Плагины и внешние инструменты в PyCharm
- Intelligent Coding Assistance
- Использование VirtualEnv и Pip в PyCharm
- Free software for developers
- Process data
- Scientific Tools
Установка Python и Pip
Pip является менеджером пакетов для Python. Именно с помощью него обычно устанавливаются модули/библиотеки для разработки в виде пакетов. В Windows Pip можно установить через стандартный установщик Python. В Ubuntu Pip ставится отдельно.
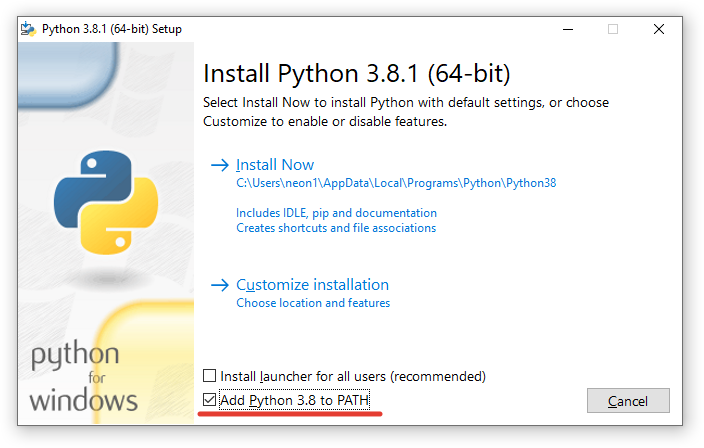
Установка Python и Pip в Windows
Далее в таблице с файлами выбираем «Windows x86-64 executable installer» для 64-битной системы или «Windows x86 executable installer» для 32-битной. И запускаем скачанный установщик, например, для версии Python 3.8.1 он называется .
Во время установки ставим галочку возле Add Python 3.x to PATH и нажимаем Install Now:
Установка Python и Pip в Ubuntu
В Ubuntu установить Python 3 можно через терминал. Запускаем его и вводим команду установки. Вторая команда выводит версию Python.
Далее устанавливаем Pip и обновляем его. После обновления необходимо перезапустить текущую сессию (или перезагрузить компьютер), иначе возникнет ошибка во время вызова Pip.
Полезные хоткеи и фишки
Как поменять цвет консоли в pycharm.
Поменять цвет консольного бэкграунда или шрифтов предельно просто: для этого нужно всего лишь зайти в настройки цветовой схемы и изменить их так, как того пожелает ваш внутренний дизайнер:
Поиск по всему проекту.
- Для поиска по коду во всем проекта, выполните комбинацию .
- Для поиска всего и вся во всём проекте дважды нажимаем клавишу .
Хоткеи по запуску и дебаггингу.
С помощью комбинации клавиш можно запустить ваш проект, а нажав – начать его отладку.
Закомментировать сразу несколько строк.
Комментирование кода ещё никогда не было таким простым: вы мышкой выделяете нужные строки, а затем нажимаете .
Повторив то же самое действие на том же самом месте, вы выполните раскомментирование кода.
Отступы.
- Отступ – .
- Для нескольких строк выделите нужные строки и нажмите .
- Для обратного отступа (отступа в левую сторону) – .
Некоторые горячие клавиши.
- – автоформатирование кода по PEP 8.
- – отмена последнего выполненного действия.
- – прокрутка без изменения позиции курсора.
- – дублировать строку.
- – увеличить / уменьшить отступ.
- – выводит предложения по автозаполнению.
Web Development
In addition to Python, PyCharm provides first-class support for various Python web development
frameworks, specific template languages, JavaScript, CoffeeScript, TypeScript, HTML/CSS, AngularJS,
Node.js, and more.
Python Web frameworks
PyCharm offers great framework-specific support for modern web development frameworks such as
Django, Flask, Google App Engine, Pyramid, and web2py, including Django templates debugger,
manage.py and appcfg.py tools, special autocompletion and navigation, just to name a few.
JavaScript & HTML
PyCharm provides first-class support for JavaScript, CoffeeScript, TypeScript, HTML and CSS,
as well as their modern successors. The JavaScript debugger is included in PyCharm and is
integrated with the Django server run configuration.
Live Edit
Live Editing Preview lets you open a page in the editor and the browser and see the changes
being made in code instantly in the browser. PyCharm auto-saves your changes, and the
browser smartly updates the page on the fly, showing your edits.
System requirements
| Requirement | Minimum | Recommended |
|---|---|---|
| RAM | 4 GB of free RAM | 8 GB of total system RAM |
| CPU | Any modern CPU | Multi-core CPU. PyCharm supports multithreading for different operations and processes making it faster the more CPU cores it can use. |
| Disk space | 2.5 GB and another 1 GB for caches | SSD drive with at least 5 GB of free space |
| Monitor resolution | 1024×768 | 1920×1080 |
| Operating system |
Officially released 64-bit versions of the following:
Pre-release versions are not supported. |
Latest 64-bit version of Windows, macOS, or Linux (for example, Debian, Ubuntu, or RHEL) |
You do not need to install Java to run PyCharm because JetBrains Runtime is bundled with the IDE (based on JRE 11).
Other Useful Items
- Looking for 3rd party Python modules? The
Package Index has many of them. - You can view the standard documentation
online, or you can download it
in HTML, PostScript, PDF and other formats. See the main
Documentation page. - Information on tools for unpacking archive files
provided on python.org is available. -
Tip: even if you download a ready-made binary for your
platform, it makes sense to also download the source.
This lets you browse the standard library (the subdirectory Lib)
and the standard collections of demos (Demo) and tools
(Tools) that come with it. There’s a lot you can learn from the
source! - There is also a collection of Emacs packages
that the Emacsing Pythoneer might find useful. This includes major
modes for editing Python, C, C++, Java, etc., Python debugger
interfaces and more. Most packages are compatible with Emacs and
XEmacs.
ТОП 7 полезных плагинов для Pycharm
Меню установки плагинов находится в:
Для установки плагина достаточно написать его название в строке поиска, найти плагин и нажать «Install».
Вот список полезных плагинов, которые стоит установить:
- Highlight Bracket Pair (описание) – плагин позволяет не запутаться в излюбленном занятии программистов – поиске соответствия между открывающими и закрывающими скобками.
- Grep Console (описание) – расширение функционала стандартной консоли PyCharm – изменение цвета для разного типа сообщений, вкладки в консоли, аналог для вывода и т.д.
- Pylint (описание) – Python линтер. После установки появится меню «Pylint» в нижнем левом углу. Для работы плагина необходимо установить модуль pylint ( или ), и в настройках PyCharm указать путь до него (в Windows он обычно лежит в папке , а в Linux путь до pylint можно узнать с помощью ).
- DeepBugs for Python (описание) – ищет потенциальные баги и проблемы, связанные с качеством кода используя модели машинного обучения.
Другие полезные плагины:
- Python Smart Execute (описание) – комбинация Alt + Shift + A копирует выделенный код в Python-консоль и выполняет его.
- MyPy (описание) — плагин для проверки типов (type hinting) и анализатор исходного кода для Python. После установки появится меню «MyPy» в нижнем левом углу.
- CodeGlance (описание) – добавляет мини-карту (minimap) кода в окне редактора справа.
Frontend development Pro only

Reload pages in browser on save
PyCharm lets you preview HTML files in a browser using the built-in web server.
Now it is able to automatically update the pages in a browser as you edit and save
your HTML, CSS, and JavaScript files. To get started, open an HTML file in the editor,
hover over the corner of the editor, and click on the icon for the browser you want to
use – all browsers are supported.
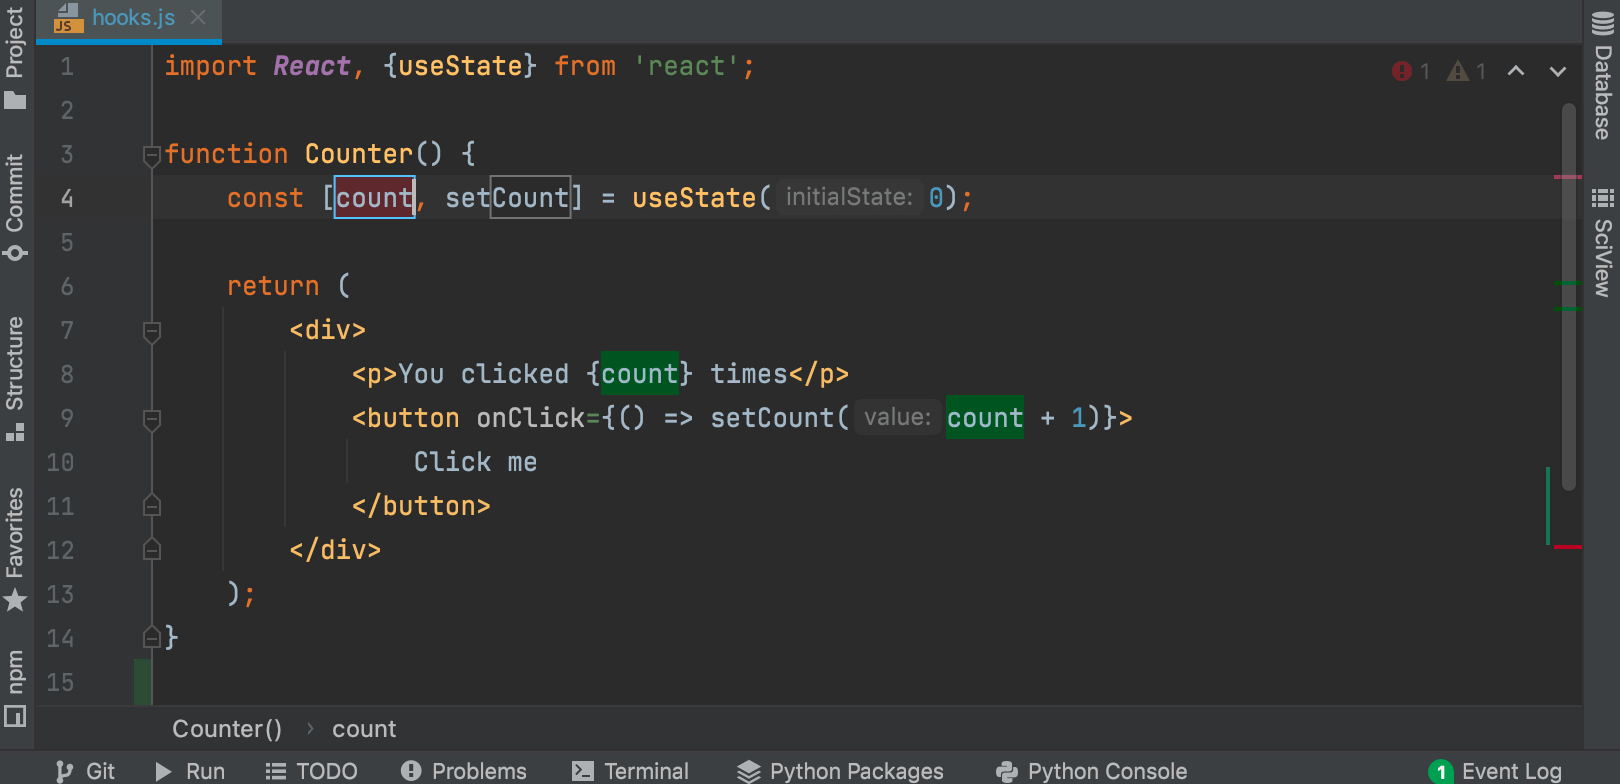
Rename refactoring for React useState hooks
You will no longer need to waste time on refactoring useState values and functions
one by one – PyCharm can now rename both for you! Place the caret on a state value
and press Shift+F6 or go to Refactor | Rename
from the right-click context menu.
Auto-import for
Did you know that PyCharm can add missing import statements as you complete ES6
symbols? Now it can do the same for CommonJS modules – imports will
be inserted on code completion.
Customizable and Cross-platform IDE
Use PyCharm on Windows, macOS and Linux with a single license key. Enjoy a fine-tuned workspace
with customizable color schemes and key-bindings, with VIM emulation available.
Customizable UI
Are there any software developers who don’t like to tweak their tools? We have yet to meet
one, so we’ve made PyCharm UI customization a breeze. Enjoy a fine-tuned workspace with
customizable color schemes and key-bindings.
Plugins
More than 10 years of IntelliJ platform development gives PyCharm 50+ IDE plugins of
different nature, including support for additional VCS, integrations with different tools
and frameworks, and editor enhancements such as Vim emulation.
Cross-platform IDE
PyCharm works on Windows, macOS or Linux. You can install and run PyCharm on as many
machines as you have, and use the same environment and functionality across all your
machines.
OpenPGP Public Keys
Source and binary executables are signed by the release manager or binary builder using their
OpenPGP key. Release files for currently supported releases are signed by the following:
- Pablo Galindo Salgado (3.10.x and 3.11.x source files and tags) (key id: 64E628F8D684696D)
- Steve Dower (Windows binaries) (key id: FC62 4643 4870 34E5)
- Łukasz Langa (3.8.x and 3.9.x source files and tags) (key id: B269 95E3 1025 0568)
- Ned Deily (macOS binaries, 3.7.x / 3.6.x source files and tags) (key ids: 2D34 7EA6 AA65 421D, FB99 2128 6F5E 1540, and Apple Developer ID DJ3H93M7VJ)
- Larry Hastings (3.5.x source files and tags) (key id: 3A5C A953 F73C 700D)
- Benjamin Peterson (2.7.z source files and tags) (key id: 04C3 67C2 18AD D4FF and A4135B38)
Release files for older releases which have now reached end-of-life may have been signed by one of the following:
- Anthony Baxter (key id: 0EDD C5F2 6A45 C816)
- Georg Brandl (key id: 0A5B 1018 3658 0288)
- Martin v. Löwis (key id: 6AF0 53F0 7D9D C8D2)
- Ronald Oussoren (key id: C9BE 28DE E6DF 025C)
- Barry Warsaw (key ids: 126E B563 A74B 06BF, D986 6941 EA5B BD71, and ED9D77D5)
You can import a person’s public keys from a public keyserver network server
you trust by running a command like:
or, in many cases, public keys can also be found
at keybase.io.
On the version-specific download pages, you should see a link to both the
downloadable file and a detached signature file. To verify the authenticity
of the download, grab both files and then run this command:
Note that you must use the name of the signature file, and you should use the
one that’s appropriate to the download you’re verifying.
(These instructions are geared to
GnuPG and Unix command-line users.)
Поиск и навигация в PyCharm
В большом проекте одному человеку трудно запомнить что‑где находится, поэтому очень важны механизмы быстрой ориентации и поиска того, что нужно. К нашему удовольствию в PyCharm это есть. Используйте проект, который вы открыли раньше и попрактикуйтесь в нажатии клавиш в следующих сочетаниях:
- Поиск фрагмента текста в текущем файле: нажмите Cmd+F на Mac или Ctrl+F на Windows или Linux.
- Поиск фрагмента во всем проекте: нажмите Cmd+Shift+F на Mac или Ctrl+Shift+F на Windows или Linux.
- Поиск класса: нажмите Cmd+O на Mac или Ctrl+N на Windows или Linux.
- Поиск файла: нажмите Cmd+Shift+O на Mac или Ctrl+Shift+N на Windows или Linux.
- Поиск везде, если не знаете, что конкретно ищете — файл, класс или фрагмент кода: нажмите Shift дважды.
Что касается навигации, шпаргалка ниже сэкономит вам массу времени:
- Переход к объявлению переменной: нажмите Cmd на Mac или Ctrl на Windows или Linux и щёлкните по переменной.
- Поиск используемого класса, метода или любого символа: нажмите Alt+F7.
- Просмотр последних изменений: нажмите Shift+Alt+C или выберите View → Recent Changes в главном меню.
- Просмотр ваших последних файлов: нажмите Cmd+E на Mac или Ctrl+E на Windows или Linux или в главном меню прйдите View → Recent Files.
- G>Переход назад и вперед по истории навигации после того, как вы уже что‑то сделали: нажмите Cmd+ / Cmd+ на Mac или Ctrl+Alt+Left / Ctrl+Alt+Right на Windows или Linux.
Для более подробного знакомства с этим вопросом читайте .
Плагины и внешние инструменты в PyCharm
В PyCharm вы найдёте почти все, что нужно для разработки. Если чего‑то нет, то, скорее всего, есть плагин, реализующий ту функциональность, которая вам нужна. Например, с помощью плагинов можно:
- Добавить поддержку для различных языков и структур;
- Увеличить свою пропродуктивность, используя быстрые подсказки, средства просмотра файлов и т.д.;
- Выучить новый язык программирования с помощью упражнений по кодированию
Измените тему своего PyCharm на и посмотрите, как это выглядит:
Если вы ничего не нашли, то можете .
Если вы не можете найти нужный плагин и не хотите разрабатывать свой собственный, потому что в PyPI уже есть пакет, то его можно добавить в PyCharm в качестве внешнего инструмента. Так, например, анализатор кода .
Сначала установите в своей virtualenv, используя в терминале приложения. Так же успешно можно использовать пакет интегрированный в PyCharm:
Далее пройдите в меню Preferences → Tools на Mac или Settings → Tools для Windows/Linux и выберите External Tools. Щёлкните на маленькую кнопку + (1). В новом всплывающем окне вставьте детали, как показано ниже, и нажмите ОК для обоих окон:
Здесь Program (2) относится к исполняемому файлу Flake8, который находится в папке /bin вашей виртуальной среды. Arguments (3) указывают, какой файл вы хотите проанализировать с помощью Flake8. Working directory — рабочий каталог вашего проекта.
Здесь можно жестко указать абсолютные пути для всего, но это будет означать, что вы не сможете использовать этот внешний инструмент в других проектах. Вы сможете использовать его только внутри одного проекта для одного файла.
Обратите свой взор на то, что называется Макрос. Макросы позволяют задавать значения переменным в формате , которые могут меняться в зависимости от вашего контекста. Например, — это , когда вы редактируете , а когда вы редактируете , то это . Вы можете просмотреть их список и вставить любой из них, нажав на кнопки Insert Macro…. Поскольку здесь вы использовали макросы, значения будут меняться в зависимости от проекта, над которым вы сейчас работаете, и Flake8 продолжит правильно выполнять свою работу.
Чтобы это понять, создайте файл и запишите туда следующий код:
CONSTANT_VAR = 1

def add(a, b):
    c = "hello"
    return a + b
То, что написано, немного не по правилам Flake8. Нажмите правую кнопку ыша на поле редактирования этого файла. Выберите External Tools и Flake8. Вуа‑ля! Результат анализа Flake8 можно посмотреть внизу:
Для ускорения работы с внешними инструментами можно добавить клавиши быстрого доступа. Перейдём к Preferences на Mac или к Settings на Windows или Linux. Затем Keymap → External Tools → External Tools. Дважды щёлкните на Flake8 и выберите Add Keyboard Shortcut. Посмотрите сюда:
На картинке выше показано, как назначены клавиши быстрого доступа Ctrl+Alt+A для загрузки этого инструмента. Добавьте свои клавиши быстрого доступа в текстовое поле и нажмите OK для обоих окон. Теперь вы можете использовать эти клавиши для загрузки Flake8 и анализа файла, над которым сейчас работаете.
Intelligent Coding Assistance
PyCharm provides smart code completion, code inspections, on-the-fly error highlighting and
quick-fixes, along with automated code refactorings and rich navigation capabilities.
Intelligent Code Editor
PyCharm’s smart code editor provides first-class support for Python, JavaScript,
CoffeeScript, TypeScript, CSS, popular template languages and more. Take advantage of
language-aware code completion, error detection, and on-the-fly code fixes!
Use smart search to jump to any class, file or symbol, or even any IDE action or tool window.
It only takes one click to switch to the declaration, super method, test, usages,
implementation, and more.
Fast and Safe Refactorings
Refactor your code the intelligent way, with safe Rename and Delete, Extract Method,
Introduce Variable, Inline Variable or Method, and other refactorings. Language and
framework-specific refactorings help you perform project-wide changes.
Использование VirtualEnv и Pip в PyCharm
Поддержка Pip и Virtualenv в PyCharm появилась уже довольно давно. Иногда конечно возникают проблемы, но взаимодействие работает в основном стабильно.
Рассмотрим два варианта работы с виртуальными окружениями:
- Создаём проект со своим собственным виртуальным окружением, куда затем будут устанавливаться необходимые библиотеки;
- Предварительно создаём виртуальное окружение, куда установим нужные библиотеки. И затем при создании проекта в PyCharm можно будет его выбирать, т.е. использовать для нескольких проектов.
Первый пример: использование собственного виртуального окружения для проекта
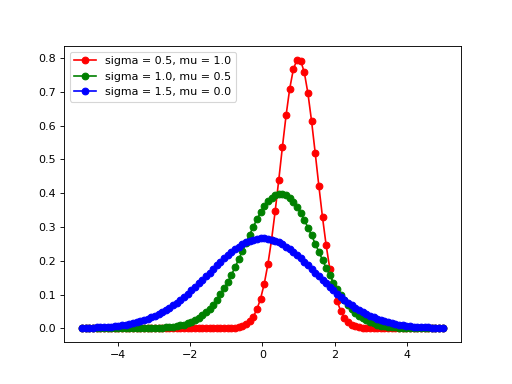
Создадим программу, генерирующую изображение с тремя графиками нормального распределения Гаусса Для этого будут использоваться библиотеки matplotlib и numpy, которые будут установлены в специальное созданное виртуальное окружение для программы.
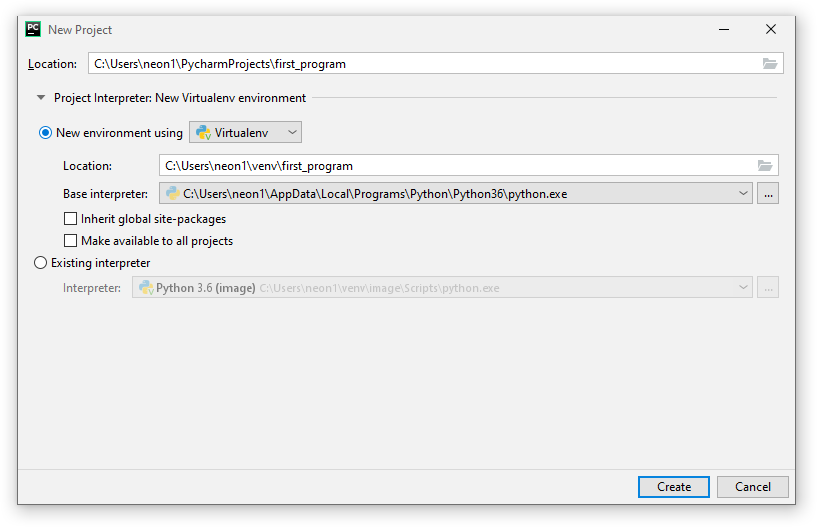
Запускаем PyCharm и окне приветствия выбираем Create New Project.
В мастере создания проекта, указываем в поле Location путь расположения создаваемого проекта. Имя конечной директории также является именем проекта. В примере директория называется ‘first_program’.
Далее разворачиваем параметры окружения, щелкая по Project Interpreter. И выбираем New environment using Virtualenv. Путь расположения окружения генерируется автоматически. В Windows можно поменять в пути папку на , чтобы команда находила создаваемые в PyCharm окружения. Ставить дополнительно галочки — нет необходимости. И нажимаем на Create.
Теперь установим библиотеки, которые будем использовать в программе. С помощью главного меню переходим в настройки File → Settings. Где переходим в Project: project_name → Project Interpreter.

Здесь мы видим таблицу со списком установленных пакетов. В начале установлено только два пакета: pip и setuptools.
Справа от таблицы имеется панель управления с четырьмя кнопками:
- Кнопка с плюсом добавляет пакет в окружение;
- Кнопка с минусом удаляет пакет из окружения;
- Кнопка с треугольником обновляет пакет;
- Кнопка с глазом включает отображение ранних релизов для пакетов.
Для добавления (установки) библиотеки в окружение нажимаем на плюс. В поле поиска вводим название библиотеки. В данном примере будем устанавливать matplotlib. Дополнительно, через Specify version можно указать версию устанавливаемого пакета и через Options указать параметры. Сейчас для matplotlib нет необходимости в дополнительных параметрах. Для установки нажимаем Install Package.

После установки закрываем окно добавления пакетов в проект и видим, что в окружение проекта добавился пакет matplotlib с его зависимостями. В том, числе был установлен пакет с библиотекой numpy. Выходим из настроек.
Теперь мы можем создать файл с кодом в проекте, например, first.py. Код программы имеет следующий вид:
Для запуска программы, необходимо создать профиль с конфигурацией. Для этого в верхнем правом углу нажимаем на кнопку Add Configuration…. Откроется окно Run/Debug Configurations, где нажимаем на кнопку с плюсом (Add New Configuration) в правом верхнем углу и выбираем Python.
Далее указываем в поле Name имя конфигурации и в поле Script path расположение Python файла с кодом программы. Остальные параметры не трогаем. В завершение нажимаем на Apply, затем на OK.

Теперь можно выполнить программу и в директории с программой появится файл :
Free software for developers
PyCharm Community Edition is a free and open-source integrated developer tool. JetBrains developed and published this freeware for Python code developers; this software is a free version of the professional PyCharm variant. Both of the programming applications are available on Apple Mac, Microsoft Windows, and Linux operating systems.
Is PyCharm Community Edition free?
JetBrains released a more accessible version of PyCharm: the Community Edition; the original version is purchasable and offers a free trial before people buy the app. The Community Edition is completely free and grants people the ability to modify the software through an open-source development network. Whether or not people want to pay for PyCharm or opt for the unpaid version will depend on what they need.
With the purchasable download, consumers receive the toolbox that the Community version has and gain database and SQL support, the profiler, Python website frameworks, remote development capacities, scientific tools, and web development.
With the free version, people only receive the code inspector, graphical debugger and test runner, intuitive Python editor, navigation with refactoring, and VCS support. Additionally, the Professional edition includes HTML, JS, and SQL assistance while the community option only permits core Python support. Along with the Community version, there is a free learning center: PyCharm Edu.
What is PyCharm Community Edition?
With the rise in technology-oriented careers and recreational pursuits, JetBrains released the PyCharm Community Edition to allow anyone to practice and perfect Python coding. This freeware enables and guides people to construct, debug, execute, and test code with capabilities: code completion and inspection. The Python console user interface is sleek and user-friendly.
Can PyCharm Community Edition work?
Download and install the IDE to open the program. People will be greeted by a welcome window in which they can set up a project. Under the title and version number in the middle, there is the option to ‘Create New Project’, ‘Open’, and ‘Check out from Version Control’. Users are able to quickly access all of their recent files within the left panel in the window.
By clicking on ‘Create New Project’, people will be directed to a blank page to code. To select a file to use that has valuable content, select ‘Open’. Browse through the window: ‘Open File or Project’. Navigate to the preferable folder and expand the contents to choose an individual file or highlight the entire folder to import the project.
When users open a folder within the IDE, the included files will be displayed in the left column under ‘Project’. Click on each of them to bring them into a tabbed view on the middle screen. To create a new document, right-click on the title of an existing file and hover above ‘New’ to access the desired type of file: an HTML file, Python, etc.
Name the new account and assign the file to a location. The community can begin to type. When people are ready to run their code, then they can right-click on the text and select ‘Run’ in the pop-up menu. Additional options in this area are ‘Debug’, ‘Create’, ‘Refactor’, etc.
Upon choosing ‘Run’, the content will appear on the bottom of the user interface. A myriad of options will accompany the completed text: the number of characters, the ability to print, etc.
Is Spyder better than PyCharm?
Atom, Spyder, Sublime Text, and Visual Studio Code are alternative options along with the aforementioned Educational and Professional version of PyCharm. Atom, Spyder, and VSCode are freeware in addition to the PyCharm Community and Edu software. Sublime Text is available as a free trial and requires a subscription for continued use. Microsoft developed VSC and GitHub created Atom.
Cross platform source code software
If people want to perform code inspections in the Python language for free, then PyCharm Community Edition is an excellent solution. The app engine allows for the integration of folders and individual files to be coded. Debug, edit, inspect, refactor, and run content to evaluate the progress directly in the application’s user interface.
What’s new?
The PyCharm developers, JetBrains, have their finger on the pulse of what the community is looking for. PyCharm is used by companies: Groupon, HP, , Yelp, etc. Releases and updates are coming consistently and contain new features. The latest versions are released within all of the provided operating systems: Linux, Mac, and Windows.
Process data
PyCharm has an interactive Python console to perform smart operations over data with on-the-fly syntax check with inspections, braces and quotes matching, and of course, code completion. You can also benefit from the built-in support for Anaconda.
With PyCharm Professional, you can analyze and visualize various scientific and statistical data. Jupyter Notebook integration enables editing, executing, and debugging notebook source code and examining execution outputs, including stream data, images, and other media.
With the R plugin installed in PyCharm, you can perform various statistical computing using R language and use coding assistance, visual debugging, smart running and preview tools, and other popular IDE features. 
As you might have noticed already, creating projects of the various types (Django, for example) requires a data source. It is also quite possible that you inject SQL statements into your source code.
PyCharm Professional does not enable you to create databases, but provides facilities to manage and query them. Once you are granted access to a certain database, you can configure one or more data sources within PyCharm that reflect the structure of the database and store the database access credentials. Based on this information, PyCharm establishes a connection to the database and provides the ability to retrieve or change information contained therein.
Access to the databases is provided by the Database tool window (View | Tool Windows | Database). This tool window allows you to work with the databases. It lets you view and modify data structures in your databases, and perform other associated tasks.

Scientific Tools
PyCharm integrates with IPython Notebook, has an interactive Python console, and supports Anaconda
as well as multiple scientific packages including Matplotlib and NumPy.
Interactive Python console
You can run a REPL Python console in PyCharm which offers many advantages over the
standard one: on-the-fly syntax check with inspections, braces and quotes matching,
and of course code completion.
Scientific Stack Support
PyCharm has built-in support for scientific libraries. It supports Pandas, Numpy,
Matplotlib, and other scientific libraries, offering you best-in-class code
intelligence, graphs, array viewers and much more.
Conda Integration
Keep your dependencies isolated by having separate Conda environments per project,
PyCharm makes it easy for you to create and select the right environment.
