Установка tesseract для ocr
Содержание:
- Резюме
- Traineddata Installation
- Adding the Tesseract Framework
- Что такое оптическое распознавание символов?
- Распознавание текста tesseract-ocr (интерфейс Python)
- I. введение в тессеракт-окр
- Во-вторых, конфигурация среды tesseract-ocr
- В-четвертых, обучение в библиотеке Тессеракт
- 6.1 Setup Tesseract (Finding the APIs)
- Let’s create a simple Java Project in IntelliJ IDEA
- Limits on the Application of Frequency-based Language Models to OCR
- Limitations of Tesseract
- Implementing Tesseract OCR
- Что мы будем использовать?
- Getting Started
- Where to Go From Here?
- Installation
- Expose the Required APIs — Writing a Wrapper
- Two types of models
Резюме
В этой статье было продемонстрировано применение OCR движка tesseract с языком программирования Python. Что позволило нам применять алгоритмы OCR из собственных сценариев Python.
Самый большой недостаток связан с ограничениями самого Tesseract – он работает когда на переднем плане есть чрезвычайно чистые фрагменты текста. Кроме того, эти фрагменты должны быть как можно более высокого разрешения (DPI), а символы входного изображения не были подвергнуты «пикселированию» после сегментации.
OCR не является новой технологией, но по-прежнему является областью исследований в компьютерной науке, особенно при применении OCR к реальным изображениям. Глубокое обучение и сверточные нейронные сети (CNN), безусловно, позволяют получать более высокую точность, но до почти идеальной системы распознавания ещё очень далеко. Кроме того, сейчас предлагается много OCR приложений на разных сайтах, в которых применены лучшие из алгоритмов распознавания, но они являются коммерческими и требуют лицензирования для использования в собственных проектах.
Если ни Tesseract, ни сторонние сервисы не предоставят достаточной точности, то нужно переосмыслить свой набор данных и задуматься о обучении своего классификатора символов. Это особенно предпочтительно, если набор данных зашумлён и/или содержит очень специфические шрифты. Примеры конкретных шрифтов включают в себя цифры на кредитной карте, номера счета и номера маршрута, найденные в проездных билетах или стилизованный текст, используемый в графическом дизайне.
Traineddata Installation
Tesseract contains a new neural network-based recognition engine that requires significantly more training data to deliver significantly higher accuracy contents. So we have to train our neural network application to return a better engine with higher accuracy. Normally, it takes a few days to a couple of weeks. So, I am going to choose to use an existing traineddata set that is trained on about 400000 text lines spanning about 4500 fonts.
There are three sets of traineddata files compatible with Tesseract 4.0x+, but I choose tessdata for my installation due to its support for the legacy recognizer. This traineddata is faster than other traineddata sets and has better accuracy. Below I provide some language links to get their traineddata.
English: Download
Tamil: Download
Sinhala: Download
You can also get other languages’ traineddata sets from here.
Adding the Tesseract Framework
First, you’ll have to install Tesseract OCR iOS via CocoaPods, a widely used dependency manager for iOS projects.
If you haven’t already installed CocoaPods on your computer, open Terminal, then execute the following command:
sudo gem install cocoapods
Enter your computer’s password when requested to complete the CocoaPods installation.
Next, into the Love In A Snap starter project folder. For example, if you’ve added Love In A Snap to your desktop, you can enter:
cd ~/Desktop/"Love In A Snap/Love In A Snap Starter"
Next, enter:
pod init
This creates a Podfile for your project.
Replace the contents of Podfile with:
platform :ios, '12.1'

target 'Love In A Snap' do
  use_frameworks!

  pod 'TesseractOCRiOS'

end
This tells CocoaPods that you want to include TesseractOCRiOS as a dependency for your project.
Back in Terminal, enter:
pod install
This installs the pod into your project.

As the terminal output instructs, “Please close any current Xcode sessions and use `Love In A Snap.xcworkspace` for this project from now on.” Open Love In A Snap.xcworkspace in Xcode.
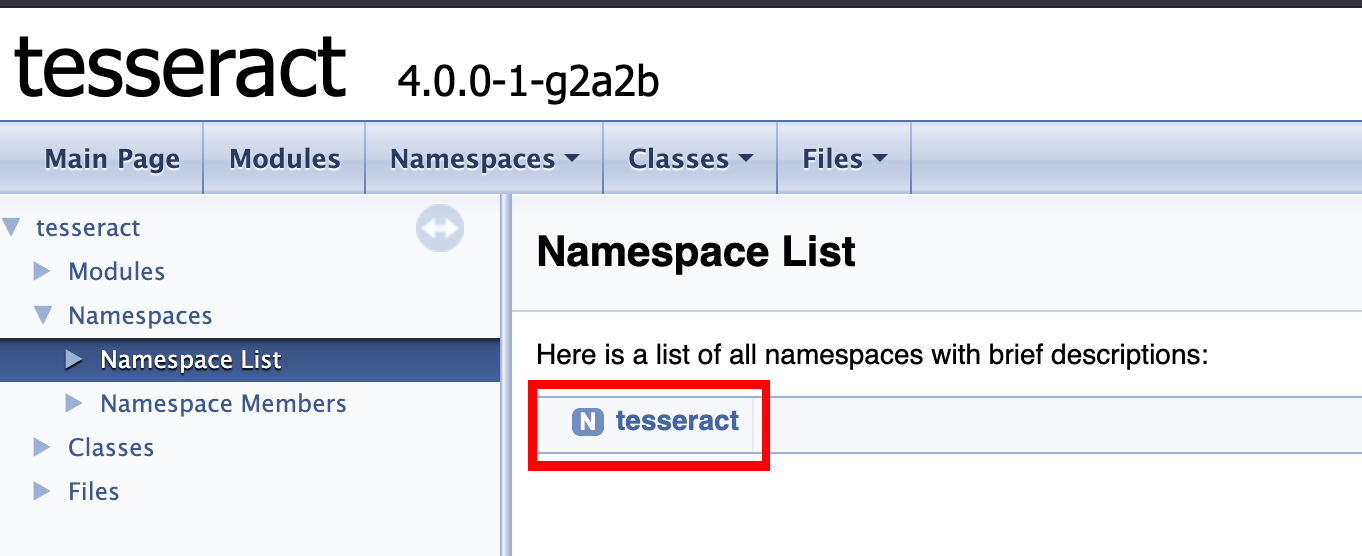
Что такое оптическое распознавание символов?
Оптическое распознавание символов включает в себя обнаружение текстового содержимого на изображениях и перевод изображений в закодированный текст, который компьютер может легко понять. Изображение, содержащее текст, сканируется и анализируется, чтобы идентифицировать символы в нем. После идентификации символ преобразуется в машинно-кодированный текст.
Как этого добиться на самом деле? Для нас текст на изображении легко различим, и мы можем обнаруживать символы и читать текст, но для компьютера это все серии точек.
Изображение сначала сканируется, а текст и графические элементы преобразуются в растровое изображение, которое по сути представляет собой матрицу из черных и белых точек. Затем изображение предварительно обрабатывается, где яркость и контраст регулируются для повышения точности процесса.
Изображение теперь разделено на зоны, идентифицирующие интересующие области, например, где находятся изображения или текст, и это помогает начать процесс извлечения. Области, содержащие текст, теперь могут быть разбиты на строки, слова и символы, и теперь программное обеспечение может сопоставлять символы с помощью сравнения и различных алгоритмов обнаружения. Конечный результат – это текст на изображении, которое нам дано.
Процесс может быть неточным на 100% и может потребоваться вмешательство человека для исправления некоторых элементов, которые не были отсканированы правильно. Исправление ошибок также может быть достигнуто с помощью словаря или даже обработки естественного языка (NLP).
Теперь вывод можно преобразовать в другие носители, такие как текстовые документы, PDF-файлы или даже аудиоконтент, с помощью технологий преобразования текста в речь.
Распознавание текста tesseract-ocr (интерфейс Python)
http-equiv=»Content-Type» content=»text/html;charset=UTF-8″>yle=»margin-bottom:5px;»>Теги: python tesseract
I. введение в тессеракт-окр
Механизм Tesseract-ocr был впервые разработан HP Labs в 1985 году, а к 1995 году он стал одним из трех самых точных механизмов распознавания в индустрии оптического распознавания текста. В 2005 году Tesseract был получен Институтом информационных технологий Невады и попросил Google улучшить Tesseract, устранить ошибки и оптимизировать работу. В настоящее время Tesseract доступен как проект с открытым исходным кодом в Google Project.
Во-вторых, конфигурация среды tesseract-ocr
Операционная среда: Win7 + python3 + tesseract 4.0.0-beta.1, эта статья основана на:https://www.cnblogs.com/vipstone/p/8894145.html 。
2. Установите инструмент pytesseract-ocr.
Библиотека pytesseract является библиотекой функций python, которая зависит от работы инструмента tesseract-ocr, поэтому вам необходимо загрузить и установить tesseract-ocr и установить его вместе с библиотекой pytesseract.
Адрес загрузки инструмента pytesseract-ocr:https://github.com/UB-Mannheim/tesseract/wikiНажмите «tesseract-ocr-w64-setup-v4.0.0-beta.1.20180414.exe» / «tesseract-ocr-w32-setup-v4.0.0-beta.1.20180414.exe», чтобы загрузить и установить его.Примечание:Китайский пакет должен быть выбран во время установки!
3. Параметры настройки связи
В пути установки pytesseract (обычно это путь: «… / lib / site-packages \ pytesseract \ pytesseract.py») найдите файл pytesseract.py, откройте файл и измените следующую инструкцию:

Вышеуказанный путь — это путь установки инструмента pytesseract-ocr.
Операционные результаты следующие:

В-четвертых, обучение в библиотеке Тессеракт
Являясь отличной библиотекой распознавания Ocr, tesseract, конечно, может обучать свою собственную модель данных, поэтому для достижения цели, которую я использую, в следующем тексте будет рассказано, как обучить свою собственную библиотеку распознавания текста.
Интеллектуальная рекомендация
По команде После установки Unity Tweak Tool я обнаружил, что его не удается открыть, отсутствуют связанные зависимости Я видел в Интернете некоторые решения, такие как: Но ни один из них не решает про…
Характеристики узла «однопоточный, управляемый событиями, неблокирующий ввод-вывод» понятны, но находятся в облаке. Давайте поговорим о небольшом понимании белыми характеристик узла после …
Недавно использовал weblogic для создания проекта, оставив блог для резервного копирования 1. Загрузите пакет программного обеспечения weblogic на официальном сайте Oracle.После того, как аппарат явля…
Загрузите исходный пакет Apache на сервер Загрузите установочные пакеты tocmat и jdk на сервер Установите корневой каталог веб-сайта Apache в соответствии с Tomcat Установить модуль mod_jk Настройте в…
Во-первых, объектно-ориентированные синтез 1. Настойчивость Открыть-> Читайте / Написать ——> Закрыть: Работа — это текст Разработка: объект работы Код Demo: 2. Функ…
Вам также может понравиться
Как мы все знаем, начать бизнес — непростое дело, и если вы хотите добиться успеха, вы должны выбрать подходящий проект для инвестиций в соответствии с вашей реальной ситуацией и окружающими привычкам…
Предисловие Sentry является членом экосистемы Hadoop и играет роль «привратника», охраняя безопасный доступ к данным на платформе больших данных. Он работает в компонентах в форме подключа…
Не заставляйте, просто перейдите к коду Готово…
Напишите здесь собственное название каталога Обзор точки знаний Файловые операции Используйте функцию fopen () Используйте функцию fwrite (), чтобы записать данные, прочитанные в соответствующей валют…
1. java.io.BufferedInputStream и java.io.BufferedOutputStream могут добавить функцию буфера для классов InputStream и OutputStream. При создании экземпляра BufferedInputStream необходимо указать экзем…
6.1 Setup Tesseract (Finding the APIs)
Let build it from the top down… In TesseractDemoScript.Start() add
_tesseractDriver.Setup();
Although the code goes red, Top-Down coding is a good practice to understand how little you need to code and expose when you are designing an API.Let’s add the Setup() for TesseractDriver
public void Setup(){ _tesseract = new TesseractWrapper(); _tesseract.Init();}
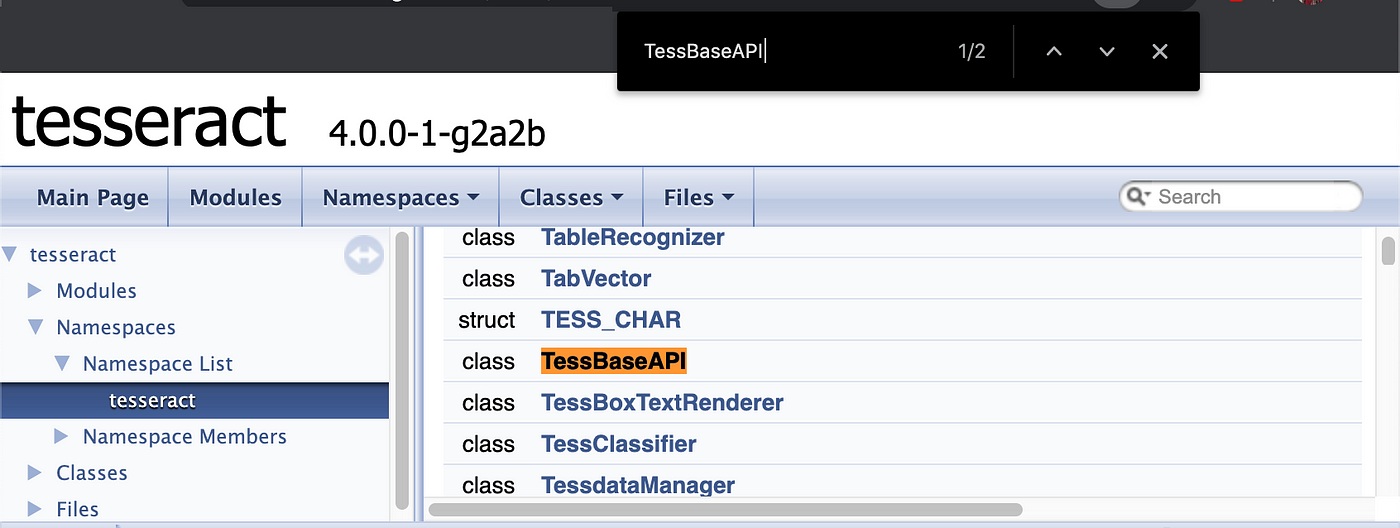
So now TesseractDemoScript is happy but TesseractDriver goes red, so let’s implement Init() in TesseractWrapperBut this is where we need to actually implement shit… So in order to setup an instance of Tesseract we need to call 2 functions from within the Plugin — TessBaseAPI.Create() and TessBaseAPI.Init(), so lets start by checking the docs and exposing them via our Wrapper, I will save you the pain of digging through the docs and get to the point.But, here’s to the brave souls who are willing to risk their time and sanity (skip to 6.2 Setup Tesseract (Implementing) section if you aren’t) to go through the docs in order to uncover long lost knowledge. If you visit the Docs select the version you need then open up the Namespace > tesseract
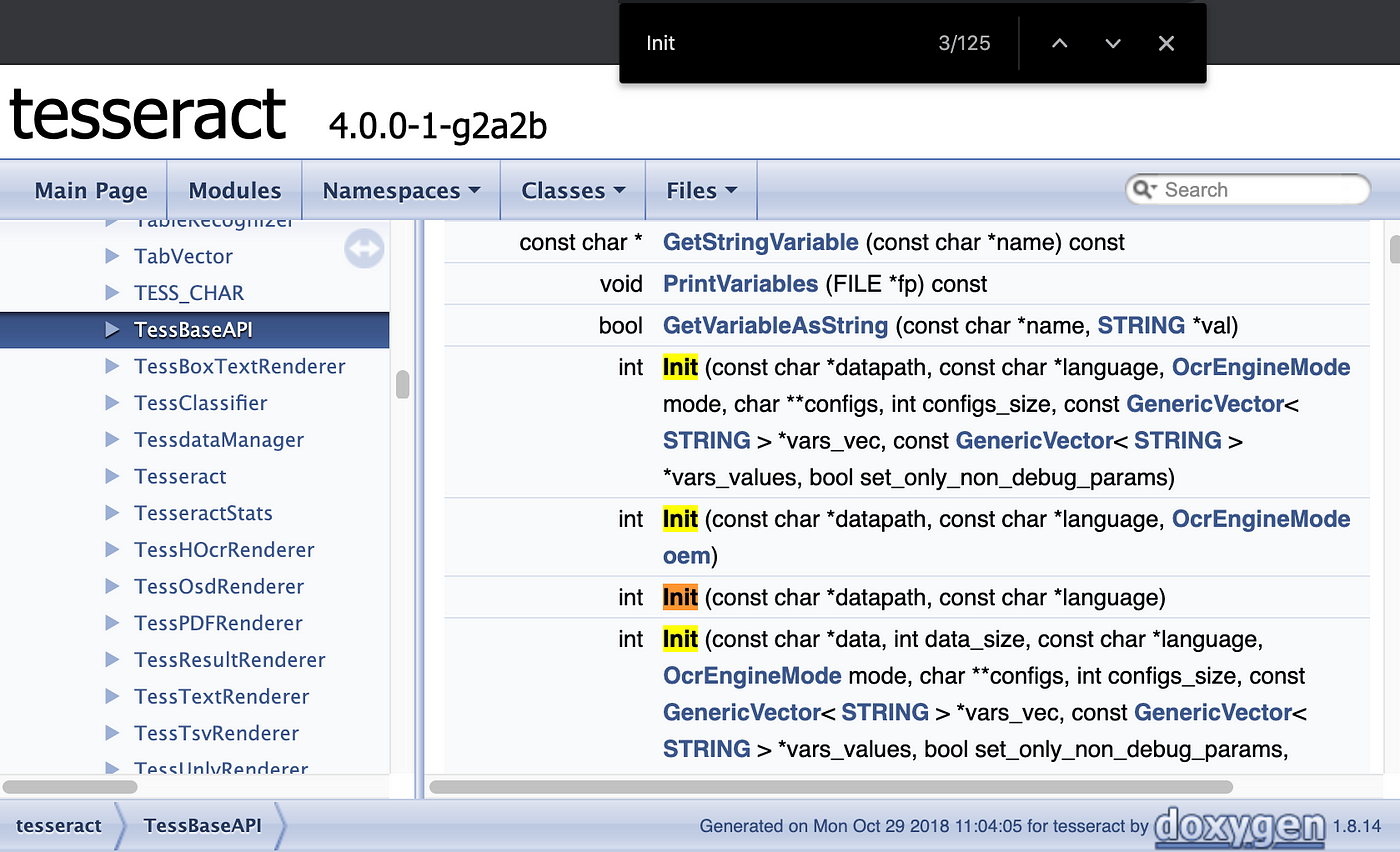
You will find a huge list of Classes look for the required class in our case TessBaseAPI
Or just search for it… I know what you are gonna say, “There’s a search functionality provided by the site why even go through the Namespace > Class > Function bs?”… Well I get your point, but what you missed is you didn’t know what you had to look for until I told you so… And that’s exactly why this article is required. And you know where to look if you need something I ain’t covering.After selecting TessBaseApi search for Init you will find 4 signatures for the function. When trying to expose an implementation from an DLL function overloading goes out the window and you need to specify the index (starting from 1) of the signature you will be using, so for the 3rd implementation the function name would be TessBaseAPIInit3(), yes class name followed by function name followed by signature index (not required if there is just 1 signature). So TessBaseApi.Create() (notice the dot), can be exposed via TessBaseApiCreate()
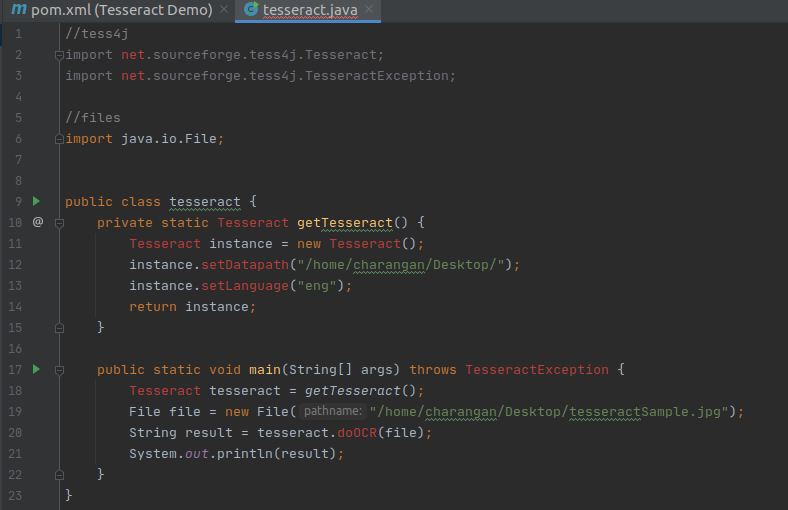
Let’s create a simple Java Project in IntelliJ IDEA
Create a new project based on Maven and create an empty class. After creating the class my folder structure will be like this.
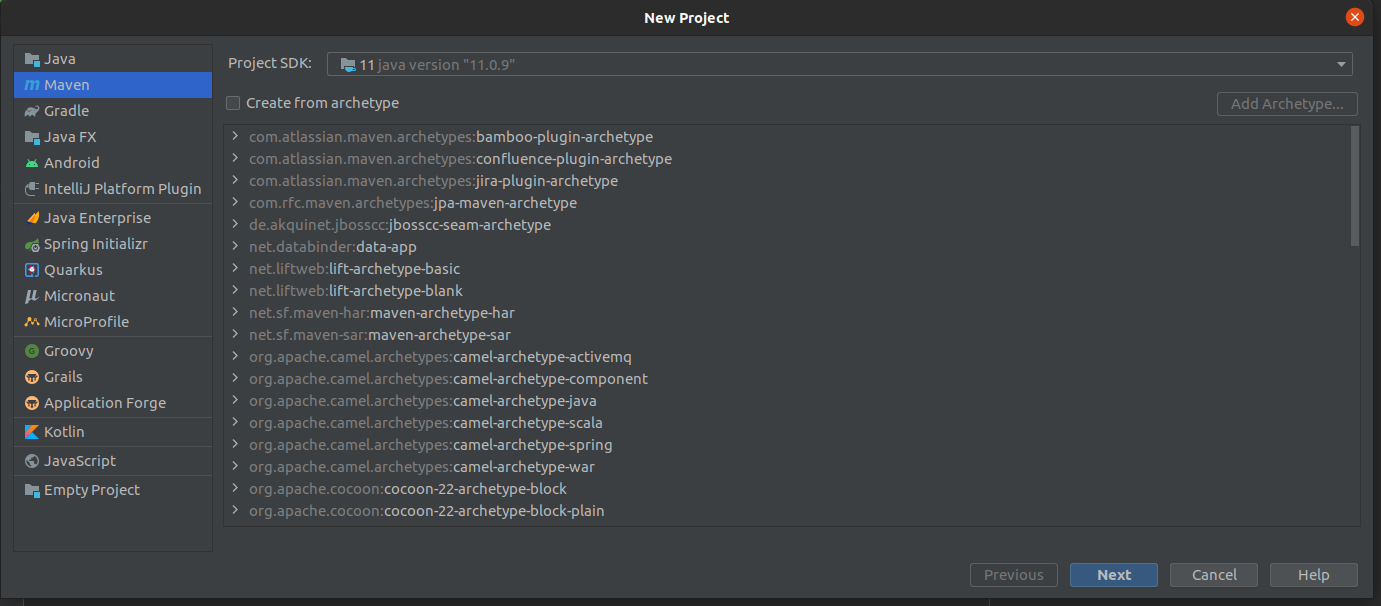
Creating a Project based on Maven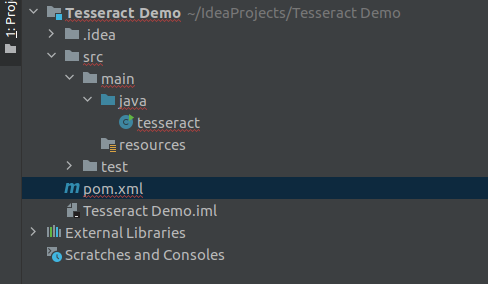
Folder Structure after creating the project
Modify your project’s pom.xml file to add the below dependency under dependencies element in pom.xml file to enable Maven.
Add Maven Dependency to pom.xml
After adding the above dependency, my pom.xml file will be like this.
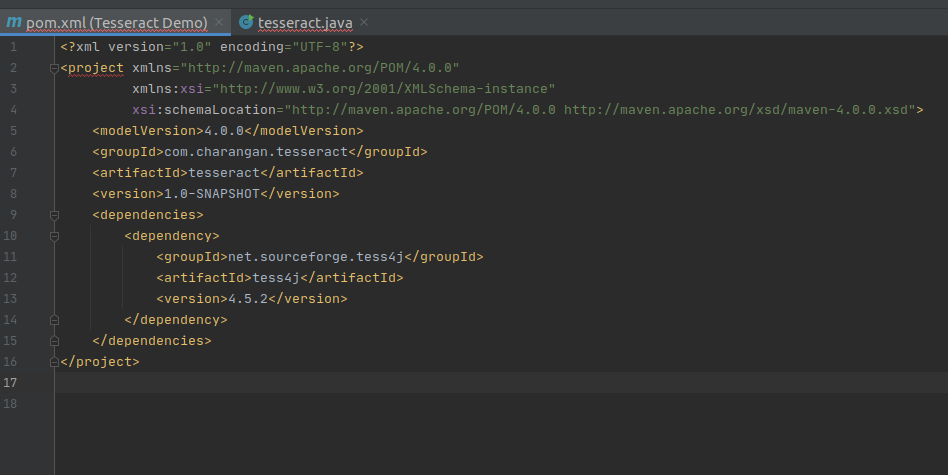
Modified pom.xml
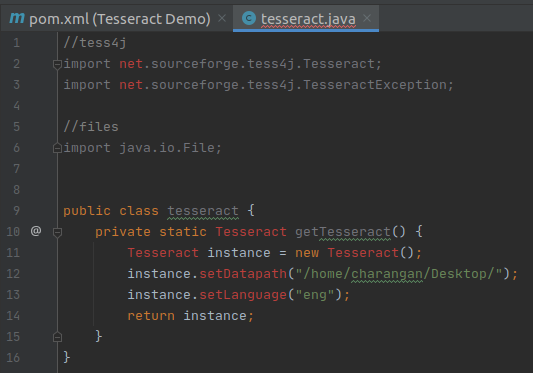
Once we have an empty class, we can start adding some code to it. Here is the import statement for the instantiation of the Tesseract object.
Import Tess4J for our Project File
and also we need to import the below statement to avoid exceptions rising while recognizing the text.
Import Tess4J Exception
I am going to use files for recognition which are on my local computer. So I need to import the below statement to handle files.
Import Java File Lib
Now, my IntelliJ IDEA view is

After all, packages imported
I will define a static method for Tesseract inside the class and Inside this method, make a new instance of Tesseract from the Maven library.
New Instance of Tesseract from the Maven Library
Next, I will add traineddata details to this instance like where the training data for this library can be found. As I mentioned earlier, I have downloaded the traineddata for English and stored it on my Desktop. So add the below two lines of code after instance creation inside the method.
Note: According to your traineddata file’s directory, the path will change.
Set Traineddaata Path
Finally, return the instance. Now my screen will be:
Return Plain Text
The above method returns the text as plain text from the resource. If you want to return the result as an HTML, you need to tell Tesseract that the output we need is in the format something called the hOCR(HTML). Basically, the hOCR format is a simple XML-based format.
We can make it an hOCR format by adding the below statement above the return statement.
Add hOCR Output Method
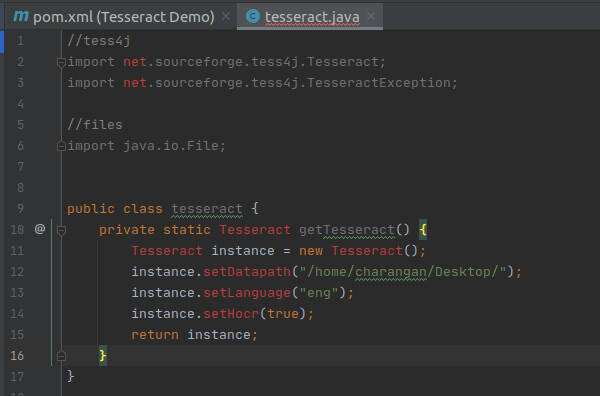
Return hOCR Format
Finally, I put the main function below to make it usable and call the static method inside it.
Tesseract Main Method
Now, what we have to do is provide a file to Tesseract which it can parse and read its Text. In this example, I am going to try with an image that is stored in my Ubuntu Desktop.
So, after knowing about the input file path, creating a new file instance, and setting the file path, I also need to pass the file to tesseract for recognition and write a java print statement to get the output. Finally, your code view will be:
With the main function
Since I settled all things correctly, still IntelliJ IDEA shows some errors in my files. It’s nothing but, we have to reload the project to load all dependency packages and sources.
Right-click on pom.xml file -> Maven -> Reload Project
Now, the problem is solved.
No errors after reloading the project
If we look closely, there is nothing we did much. That is the power of this wrapper for the Tesseract library I am provided with. Now we are ready to run our sample OCR program.
Note: Confirm that your project is set to the latest version of Java like Java 11. If you get an error regarding the Java version, you can simply set it to the latest version.
Go File -> Project Structure.
You will see a dialog box given below, Make sure that the Java version under Project and Modules section is set to the latest version of Java like Java 11.
Project Setting -> Project
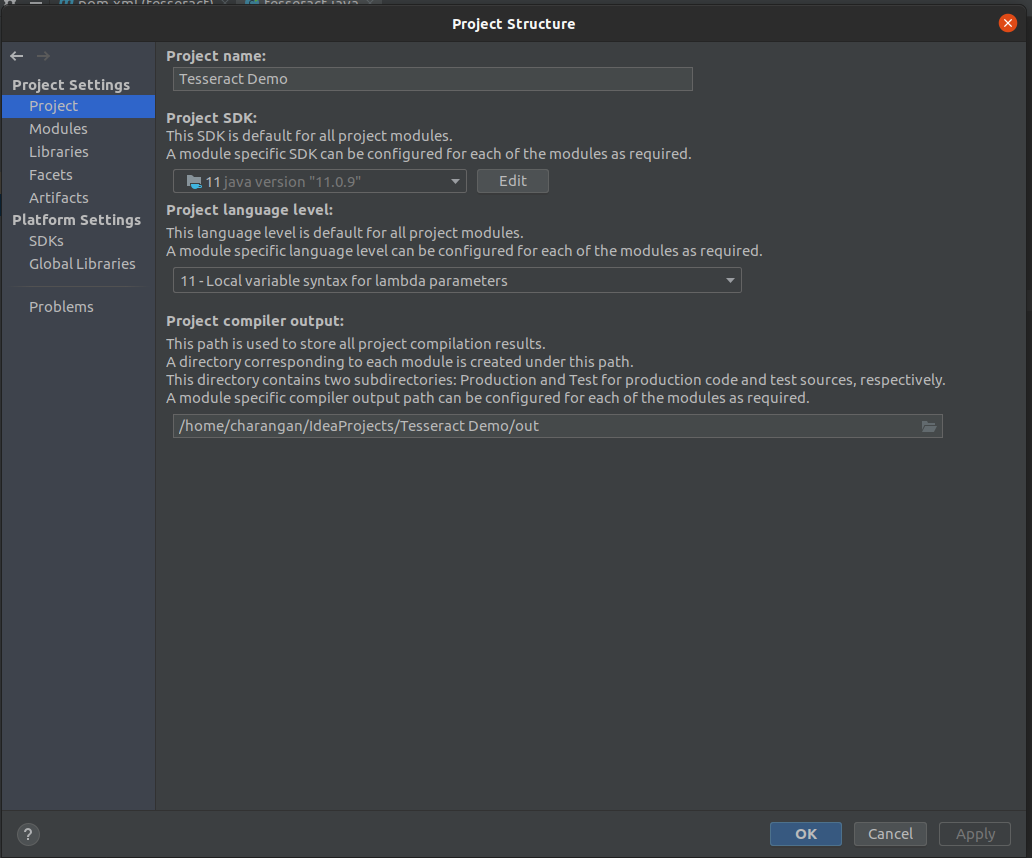
Project
Project Setting -> Modules
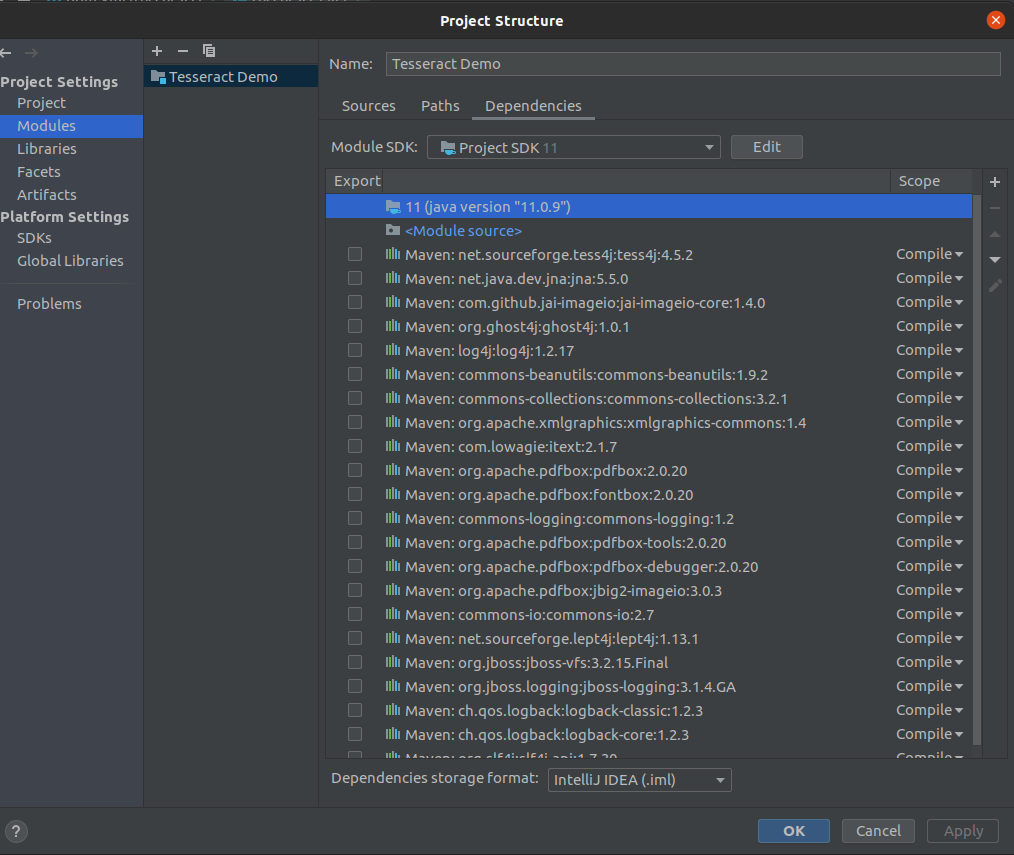
Module
And also make sure that the Java Compiler setting also by pressing Ctrl + Alt + S. You will popup a dialog box, then navigate to Java Compiler as given below and check if the target bytecode version is set above to 1.5 for your project.
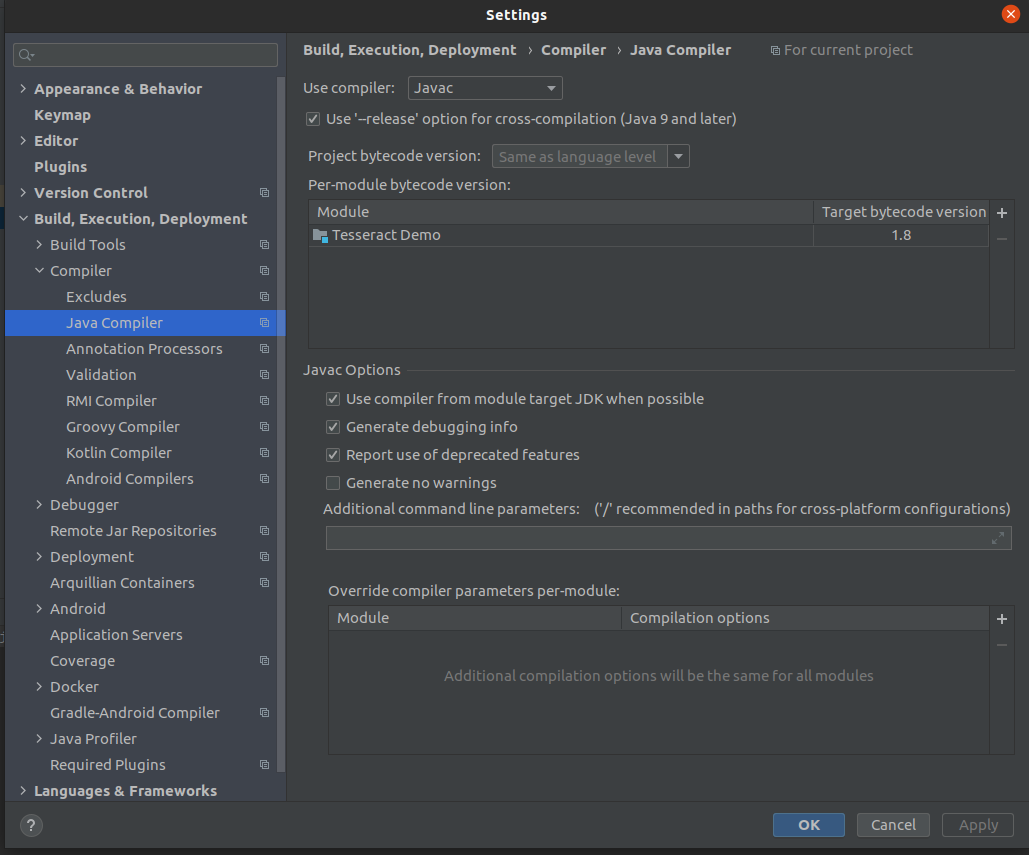
Target bytecode
Fine. Now the time to take a test drive through our sample application, so I am going to use google’s logo as my sample input.
Note: Try to avoid PNG images and use JPG/JPEG images instead if you’re working with images at all. This is because Tesseract is very bad at reading PNG images due to its compression techniques.

source: https://www.putnamlib.org/images/google.jpg/@@images/image.jpeg
Once I run the project, I get this simple output as:
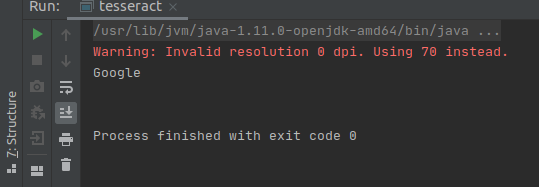
Output
Limits on the Application of Frequency-based Language Models to OCR
Publication Year: 2011
Although large language models are used in speech recognition and machine translation applications, OCR systems are “far behind” in their use of language models. The reason for this is not the laggardness of the OCR community, but the fact that, at high accuracies, a frequency-based language model can do more damage than good, unless carefully applied. This paper presents an analysis of this discrepancy with the help of the Google Books n-gram Corpus, and concludes that noisy-channel models that closely model the underlying classifier and segmentation errors are required.
Limitations of Tesseract
Since Tesseract is an OCR engine, it works well for only clean foreground text. For an instance, if we take an image which is having noise in the background, then we could not get an accurate result in the OCR test. So, there are many sorts of reasons for not getting good quality output from Tesseract. The image which has minimum requirements for its size, contrast, and lightning, recognizes better in the test. The lower quality images require preprocessing to improve the recognization results, such as scale appropriately, convert it to much contrast as possible, and the converted text to be horizontally aligned. Except for the following limitations, Tesseract OCR is a powerful OCR engine.
Implementing Tesseract OCR
First, add the following below to make the Tesseract framework available to :
import TesseractOCR
Now, in , replace the comment with the following:
// 1
if let tesseract = G8Tesseract(language: "eng+fra") {
  // 2
  tesseract.engineMode = .tesseractCubeCombined
  // 3
  tesseract.pageSegmentationMode = .auto
  // 4
  tesseract.image = image
  // 5
  tesseract.recognize()
  // 6
  textView.text = tesseract.recognizedText
}
// 7
activityIndicator.stopAnimating()
Since this is the meat of this tutorial, here’s a detailed break down, line by line:
- Initialize with a new G8Tesseract object that will use both English (“eng”)- and French (“fra”)-trained language data. Note that the poem’s French accented characters aren’t in the English character set, so it’s necessary to include the French-trained data in order for those accents to appear.
- Tesseract offers three different OCR engine modes: , which is the fastest, but least accurate method; , which is slower but more accurate since it employs more artificial intelligence; and , which runs both and . is the slowest, but since it’s most accurate, you’ll use it in this tutorial.
- Tesseract assumes, by default, that it’s processing a uniform block of text, but your sample image has multiple paragraphs. Tesseract’s lets the Tesseract engine know how the text is divided. In this case, set to to allow for fully automatic page segmentation and thus the ability to recognize paragraph breaks.
- Assign the selected image to the instance.
- Tell Tesseract to get to work recognizing your text.
- Put Tesseract’s recognized text output into your .
- Hide the activity indicator since the OCR is complete.
Now, it’s time to test out this first batch of new code!
Что мы будем использовать?
Для этого проекта OCR мы будем использовать библиотеку Python-Tesseract или просто PyTesseract, которая является оболочкой для Google Tesseract-OCR Engine.
Я выбрал его, потому что он полностью открыт и разрабатывается и поддерживается Google. Следуйте этим инструкциям, чтобы установить Tesseract на свой компьютер, поскольку от него зависит PyTesseract.
Мы также будем использовать веб-фреймворк Flask для создания нашего простого OCR-сервера, на котором мы можем делать снимки через веб-камеру или загружать фотографии для распознавания символов.
Мы также собираемся использовать Pipenv, поскольку он также выполняет настройку виртуальной среды и управление требованиями.
Помимо этого, мы также будем использовать библиотеку Pillow, которая является ответвлением Python Imaging Library (PIL) для обработки открытия и обработки изображений во многих форматах.
В этом посте мы сконцентрируемся на PyTesseract, хотя есть и другие библиотеки Python, которые могут помочь вам извлекать текст из изображений, например:
- Textract: который может извлекать данные из PDF-файлов, но является тяжелым пакетом.
- Pyocr: предлагает больше вариантов обнаружения, таких как предложения, цифры или слова.
Getting Started
Download the materials for this tutorial by clicking the Download Materials button at the top or bottom of this page, then extract the folder to a convenient location.
The Love In A Snap directory contains three others:
- Love In A Snap Starter: The starter project for this tutorial.
- Love In A Snap Final: The final project.
- Resources: The image you’ll process with OCR and a directory containing the Tesseract language data.
Open Love In A Snap Starter/Love In A Snap.xcodeproj in Xcode, then build and run the starter app. Click around a bit to get a feel for the UI.
Back in Xcode, take a look at ViewController.swift. It already contains a few s and empty methods that link the view controller to its pre-made Main.storyboard interface. It also contains where Tesseract will eventually do its work.
Scroll farther down the page and you’ll see:
// 1
// MARK: - UINavigationControllerDelegate
extension ViewController: UINavigationControllerDelegate {
}
// 2
// MARK: - UIImagePickerControllerDelegate
extension ViewController: UIImagePickerControllerDelegate {
  // 3
  func imagePickerController(_ picker: UIImagePickerController,
    didFinishPickingMediaWithInfo info: ) {
    // TODO: Add more code here...
  }
}
- The that you’ll eventually add to facilitate image loading requires the to access the image picker controller’s delegate functions.
- The image picker also requires to access the image picker controller’s delegate functions.
- The delegate function will return the selected image.
Now, it’s your turn to take the reins and bring this app to life!
Where to Go From Here?
Use the Download Materials button at the top or bottom of this tutorial to download the project if you haven’t already, then check out the project in Love In A Snap Final.
Try out the app with other text to see how the OCR results vary between sources and download more language data as needed.
You can also train Tesseract to further improve its output. After all, if you’re capable of deciphering characters using your eyes or ears or even fingertips, you’re a certifiable expert at character recognition already and are fully capable of teaching your computer so much more than it already knows.
As always, if you have comments or questions on this tutorial, Tesseract or OCR strategies, feel free to join the discussion below!
raywenderlich.com Weekly
The raywenderlich.com newsletter is the easiest way to stay up-to-date on everything you need to know as a mobile developer.
Installation
Linux and BSD/MacOS
$ pip install tesserocr
$ CPPFLAGS=-I/usr/local/include pip install tesserocr
or
$ python setup.py build_ext -I/usr/local/include
Tested on Linux and BSD/MacOS
Windows
The proposed downloads consist of stand-alone packages containing all the Windows libraries needed for execution. This means that no additional installation of tesseract is required on your system.
The recommended method of installation is via Conda as described below.
pip
Download the wheel file corresponding to your Windows platform and Python installation from simonflueckiger/tesserocr-windows_build/releases and install them via:
> pip install <package_name>.whl
Build from source
If you need Windows tessocr package and your Python version is not supported by above mentioned project,
you can try to follow step by step instructions for Windows 64bit in Windows.build.md.
Expose the Required APIs — Writing a Wrapper
using System;using System.Runtime.InteropServices;public class TesseractWrapper{#if UNITY_EDITOR private const string TesseractDllName = "tesseract"; private const string LeptonicaDllName = "tesseract";#elif UNITY_ANDROID private const string TesseractDllName = "libtesseract.so"; private const string LeptonicaDllName = "liblept.so";#else private const string TesseractDllName = "tesseract"; private const string LeptonicaDllName = "tesseract";#endif private static extern IntPtr TessVersion();}
So, we start by adding a class called TesseractWrapper which will act as an API layer between the application and the Tesseract DLL(s). As you might notice above the DLLs we got, have different names for different platforms. In order to get over this issue we are using Compiler Switches to fix the Tesseract and Leptonica(One of the major dependencies) plugin file names.The way we expose Functions is by using DllImport(<fileName>) and extern key word… The function signature is something you would have to look up from the Documentations. Here we are exposing the function TessVersion() which has…

Function signature according to the Tesseract Documentation, so the return type is a pointer (IntPtr) with no params.
Two types of models
The repository contains two types of models,
- those for a single language and
- those for a single script supporting one or more languages.
Most of the script models include English training data as well as the script, but not Cyrillic, as that would have a major ambiguity problem.
On Debian and Ubuntu, the language based traineddata packages are named where LANG is the three letter language code eg. tesseract-ocr-eng (English language), tesseract-ocr-hin (Hindi language), etc.
On Debian and Ubuntu, the script based traineddata packages are named where SCRIPT is the four letter script code eg. tesseract-ocr-script-latn (Latin Script), tesseract-ocr-script-deva (Devanagari Script), etc.
Data files for a particular script
Initial capitals in the filename indicate the one model for all languages in that script. These are now available under script subdirectory.
- Latin is all latin-based languages, except vie.
- Vietnamese is for latin-based Vietnamese language.
- Fraktur is basically a combination of all the latin-based languages that have an ‘old’ variant.
- Devanagari is for hin+san+mar+nep+eng.
LSTM training details for different languages and scripts
For Latin-based languages, the existing model data provided has been trained on about 400000 textlines spanning about 4500 fonts. For other scripts, not so many fonts are available, but they have still been trained on a similar number of textlines. eg. Latin ~4500 fonts, Devanagari ~50 fonts, Kannada 15.
With a theory that poor accuracy on test data and over-fitting on training data was caused by the lack of fonts, the training data has been mixed with English, so that some of the font diversity might generalize to the other script. The overall effect was slightly positive, hence the script models include English language also.
Example — jpn and Japanese
‘jpn’ contains whatever appears on the www that is labelled as the language, trained only with fonts that can render Japanese.
Japanese contains all the languages that use that script (in this case just the one) PLUS English.The resulting model is trained with a mix of both training sets, with the expectation that some of the generalization to 4500 English training fonts will also apply to the other script that has a lot less.
‘jpn_vert’ is trained on text rendered vertically (but the image is rotated so the long edge is still horizontal).
‘jpn’ loads ‘jpn_vert’ as a secondary language so it can try it in case the text is rendered vertically. This seems to work most of the time as a reasonable solution.
See the Tesseract wiki for additional information.
All data in the repository are licensed under the
Apache-2.0 License, see file LICENSE.
