Вступление и установка графической библиотеки sfml в c++
Содержание:
- Архитектура программного обеспечения
- Using OpenGL together with the graphics module
- Compiling a SFML program
- Semantics and Idioms
- Including and linking OpenGL to your application
- The sf::Event type
- Простая программа с библиотекой SFML
- Installing dependencies
- Installing SFML
- Рендеринг астероида
- Common shape properties
- The KeyPressed and KeyReleased events
- Installing SFML
- Installing dependencies
- Packets
- Using a UDP socket
- Opening a window
- Problems that need to be solved
- Installing SFML
- Fixed-size primitive types
- Using a TCP socket
- The drawing window
- Installing SFML
Архитектура программного обеспечения
Модули
SFML состоит из различных модулей:
- Система — векторные и строковые классы Unicode , переносимые средства многопоточности и таймера
- Окно — управление окнами и устройствами ввода, включая поддержку джойстиков , управление контекстом OpenGL
- Графика — аппаратное ускорение 2D-графики, включая спрайты , многоугольники и рендеринг текста.
- Аудио — пространственное воспроизведение и запись звука с аппаратным ускорением
- Сеть — сетевые сокеты TCP и UDP , средства инкапсуляции данных, классы HTTP и FTP.
Хотя графический модуль является одной из основных функций SFML, разработчики, которые заинтересованы только в создании среды для программирования непосредственно в OpenGL, могут сделать это, используя модуль Window отдельно без графического модуля. Точно так же другие модули также могут использоваться независимо друг от друга, за исключением системного модуля, который используется всеми модулями.
Языковые привязки
SFML написан на C ++ и предоставляет интерфейс C ++. Существует несколько языковых привязок, которые позволяют использовать SFML в других языках программирования.
В этой таблице перечислены поддерживаемые привязки для SFML по состоянию на 2017 год.
| Имя | Язык | Поддерживаемая версия |
|---|---|---|
| C | 2,5 | |
| .СЕТЬ | 2,5 | |
| 2,5 | ||
| D | 2,4 | |
| D | 2.1 | |
| Эйфория | 2,4 | |
| Свободный Паскаль | 2.4.0 | |
| Идти | 2.0 | |
| Haskell | 2.3.2 | |
| Ява | 2.2 | |
| Юлия | 2.5.1 | |
| Ним | 2.3 | |
| OCaml | 2.3 | |
| OCaml | 2.0 | |
| Паскаль | 2,4 | |
| Python | 2.3.2 | |
| Рубин | 2.3.2 | |
| Ржавчина | 2,4 |
1 Официальные привязки
Неофициальные дополнения
SFML предоставляет основные функции, на которых может быть построено программное обеспечение более высокого уровня . Существуют дополнительные библиотеки, которые обеспечивают дополнительную поддержку графических пользовательских интерфейсов (GUI), 2D- освещения , систем частиц и анимации , воспроизведения видео и тайловых карт .
Using OpenGL together with the graphics module
This tutorial was about mixing OpenGL with sfml-window, which is fairly easy since it’s the only purpose of this module. Mixing with the graphics
module is a little more complicated: sfml-graphics uses OpenGL too, so extra care must be taken so that SFML and user states don’t
conflict with each other.
If you don’t know the graphics module yet, all you have to know is that the class is replaced with
, which inherits all its functions and adds features to draw SFML specific entities.
The only way to avoid conflicts between SFML and your own OpenGL states, is to save/restore them every time you switch from OpenGL to SFML.
The easiest solution is to let SFML do it for you, with the / functions :
Since it has no knowledge about your OpenGL code, SFML can’t optimize these steps and as a result it saves/restores all available OpenGL states and matrices.
This may be acceptable for small projects, but it might also be too slow for bigger programs that require maximum performance. In this case, you can handle saving and
restoring the OpenGL states yourself, with /, /,
etc.
If you do this, you’ll still need to restore SFML’s own states before drawing. This is done with the function.
By saving and restoring OpenGL states yourself, you can manage only the ones that you really need which leads to reducing the number of unnecessary driver calls.
Compiling a SFML program
In this tutorial we’re not going to talk about IDEs such as Code::Blocks or Eclipse. We’ll focus on the commands required to compile and link an
SFML executable. Writing a complete makefile or configuring a project in an IDE is beyond the scope of this tutorial — there are better dedicated
tutorials for this.
If you’re using Code::Blocks, you may refer to the
Code::Blocks tutorial for Windows; many things should be similar.
You won’t have to set the compiler and linker search paths if you installed SFML to one of your system’s standard paths.
First, create a source file. For this tutorial we’ll name it «main.cpp». Put the following code inside the main.cpp file:
Now let’s compile it:
In case you installed SFML to a non-standard path, you’ll need to tell the compiler where to find the SFML headers (.hpp files):
Here, <sfml-install-path> is the directory where you copied SFML, for example /home/me/sfml.
You must then link the compiled file to the SFML libraries in order to get the final executable. SFML is made of 5 modules (system, window, graphics,
network and audio), and there’s one library for each of them.
To link an SFML library, you must add «-lsfml-xxx» to your command line, for example «-lsfml-graphics» for the graphics module
(the «lib» prefix and the «.so» extension of the library file name must be omitted).
If you installed SFML to a non-standard path, you’ll need to tell the linker where to find the SFML libraries (.so files):
We are now ready to execute the compiled program:
If SFML is not installed in a standard path, you need to tell the dynamic linker where to find the SFML libraries first by specifying LD_LIBRARY_PATH:
If everything works, you should see this in a new window:
Semantics and Idioms
Pointers are used if any of the following conditions are true. In all other situations, references are used.
- is a valid value
- the indirection is changed during its lifetime (i.e. the pointer points to something else)
- the pointer refers to manually allocated memory ( or other low-level resource)
- an indirection is stored as a member variable
Null pointers are represented with the macro .
Pointers that own their memory and require manual memory management ( and ) should be avoided, or at least encapsulated. Prefer the use of objects and RAII.
Any explicit type conversion is done using the C++ cast operators , , and . No C-style casts or function-style casts are used.
Booleans and pointers are never explicitly checked against literals.
In general, type conversions between signed integers, unsigned integers and floating point types (as well as between different types of the same category) are performed explicitly using .
Conversions from numeric types to happen explicitly (not by casting, but an appropriate condition such as ). An exception to this rule are flags and binary operations like or . Explicitly testing for (non-)zero equality should be avoided in such cases.
The public API lives in the namespace. The namespace is reserved for implementation details.
Anonymous namespaces are used when global variables are required, or for functions local to the current translation unit, in order to restrict their access to the translation unit.
No directive should be used. Instead the full name is used everywhere.
s are used to wrap up one or more variables together but do not use encapsulation; they are generally used by es that do protect their members with or modifiers. s can have constructors but should not have methods. They do not use access specifiers or inheritance.
In a class, the public interface comes first (usually with constructors at the top), followed by protected members and then private data. In a given access-modifier group members are grouped together.
Including and linking OpenGL to your application
OpenGL headers are not the same on every OS. Therefore, SFML provides an «abstract» header that takes care of including the right file for you.
This header includes OpenGL functions, and nothing else. People sometimes think that SFML automatically includes OpenGL extension headers because SFML loads
extensions itself, but it’s an implementation detail. From the user’s point of view, OpenGL extension loading must be handled like any other external library.
You will then need to link your program to the OpenGL library. Unlike what it does with the headers, SFML can’t provide a unified way of linking
OpenGL. Therefore, you need to know which library to link to according to what operating system you’re using («opengl32» on Windows, «GL» on Linux, etc.).
OpenGL functions start with the «gl» prefix. Remember this when you get linker errors, it will help you find which library you forgot to link.
The sf::Event type
Before dealing with events, it is important to understand what the type is, and how to correctly use it.
is a union, which means that only one of its members is valid at a time (remember your C++ lesson: all the
members of a union share the same memory space). The valid member is the one that matches the event type, for example for a
event. Trying to read any other member will result in an undefined behavior (most likely: random or invalid values).
It it important to never try to use an event member that doesn’t match its type.
instances are filled by the (or ) function of the class. Only these two functions can produce valid events, any attempt to use an which was not returned by successful call to
(or ) will result in the same undefined behavior that was mentioned above.
To be clear, here is what a typical event loop looks like:
Read the above paragraph once again and make sure that you fully understand it, the union is the cause of many problems for
inexperienced programmers.
Alright, now we can see what events SFML supports, what they mean and how to use them properly.
Простая программа с библиотекой SFML
Создать графическую программу немногим сложнее, чем консольную, благодаря SFML. SFML состоит из множества модулей, и нам нужны три модуля:
- SFML system, потому что его используют остальные два модуля
- SFML window, чтобы создать окно программы
- SFML graphics, чтобы нарисовать хотя бы что-то в этом окне
Для начала создайте каталог , и в нём создайте файл , сохраните в нём текст:
Теперь создайте в каталоге файл , и аккуратно перепишите в него код:
Теперь вернитесь к основному файлу и добавьте строку , чтобы он выглядел так:
После этого снова запустите CMake:
Если сборка была успешной, запустите программу . На 5 секунд появится окно, а затем оно исчезнет.
Давайте разберём, что выполняет код:
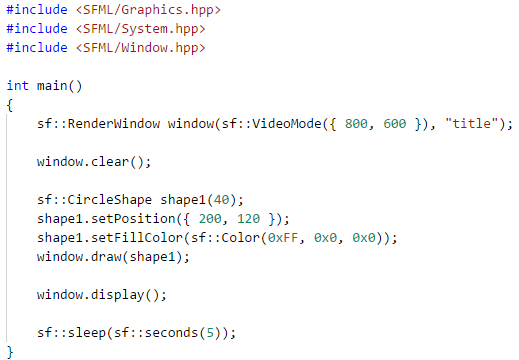
- Инструкция объявляет переменную window, которая имеет тип “графическое окно”, размеры 800×600 px и незамысловатый заголовок “title”.
- Вызов метода очищает окно, а вызов выводит на экран то, что было нарисовано после очистки.
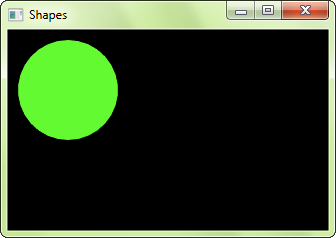
- Инструкция объявляет переменную shape1 — круг размером 40px.
- Вызовы и задают позицию круга в пикселях и цвет в виде RGB-компонентов (Red, Green, Blue).
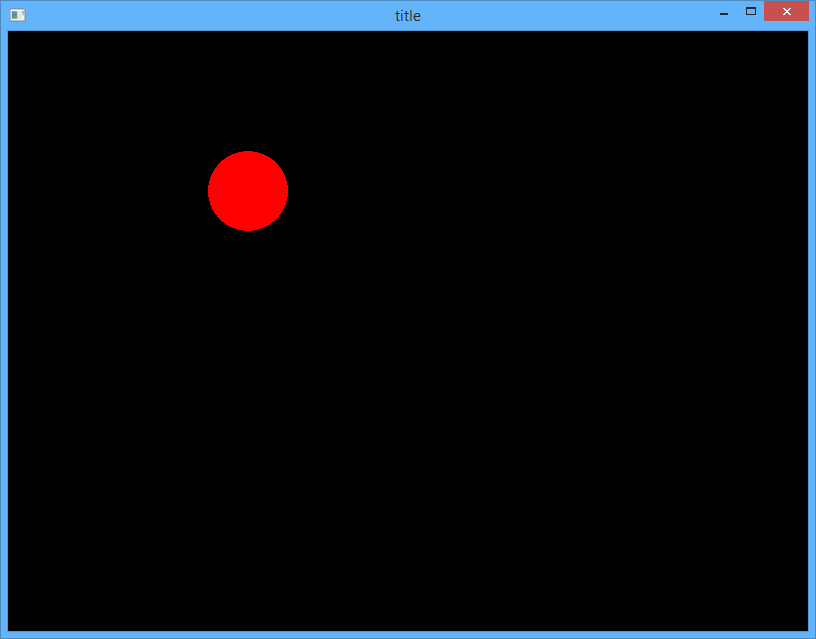
Теперь добавьте больше фигур:
Запустите CMake, а затем программу:
У вас должно получиться что-то такое:
Installing dependencies
SFML depends on a few other libraries, so before starting to configure you must have their development files installed.
On Windows and Mac OS X, all the required dependencies are provided alongside SFML so you won’t have to download/install anything else.
Building will work out of the box.
On Linux however, nothing is provided. SFML relies on you to install all of its dependencies on your own. Here is a list of what you need
to install before building SFML:
- freetype
- jpeg
- x11
- xrandr
- xcb
- x11-xcb
- xcb-randr
- xcb-image
- opengl
- flac
- ogg
- vorbis
- vorbisenc
- vorbisfile
- openal
- pthread
The exact name of the packages may vary from distribution to distribution. Once those packages are installed, don’t forget to install their development headers as well.
Installing SFML
First, you must download the SFML SDK from the download page.
There are multiple variants of GCC for Windows, which are incompatible with each other (different exception management,
threading model, etc.). Make sure you select the package which corresponds to the version that you use. If you are unsure, check which of
the libgcc_s_sjlj-1.dll or libgcc_s_dw2-1.dll files is present in your MinGW/bin folder. If MinGW was installed along with Code::Blocks,
you probably have an SJLJ version.
If you feel like your version of GCC can’t work with the precompiled SFML libraries, don’t hesitate to
build SFML yourself, it’s not complicated.
You can then unpack the SFML archive wherever you like. Copying headers and libraries to your installation of MinGW is not recommended, it’s better
to keep libraries in their own separate location, especially if you intend to use several versions of the same library, or several compilers.
Рендеринг астероида
Рендеринг (визуализация) небесного тела происходит одним из двух состояний астероида. Стандартный вид астероида, когда все части его показываются совместно и образуют целую каменную глыбу. Другое состояние астероида возникает при поражении его ракетой. Срабатывает детонация, части астероида мгновенно отлетают на установленное расстояние и далее происходит анимация последствий взрыва. Осколки хаотично разлетаются в космосе до тех пор, пока пользователь не разместит астероид в новой позиции пространства космоса. За прорисовку астероида в двух состояниях отвечает метод Draw класса Asteroid. Метод Draw принимает принимает один параметр: объект окна приложения RenderWindow.
Common shape properties
Transformation (position, rotation, scale)
These properties are common to all the SFML graphical classes, so they are explained in a separate tutorial:
Transforming entities.
One of the basic properties of a shape is its color. You can change with the function.
Outline
Shapes can have an outline. You can set the thickness and color of the outline with the and functions.

By default, the outline is extruded outwards from the shape (e.g. if you have a circle with a radius of 10 and an outline thickness of 5, the total radius of the circle will be 15).
You can make it extrude towards the center of the shape instead, by setting a negative thickness.
To disable the outline, set its thickness to 0. If you only want the outline, you can set the fill color to .
Texture
Shapes can also be textured, just like sprites. To specify a part of the texture to be mapped to the shape, you must use the function.
It takes the texture rectangle to map to the bounding rectangle of the shape. This method doesn’t offer maximum flexibility, but it is much easier to use than
individually setting the texture coordinates of each point of the shape.
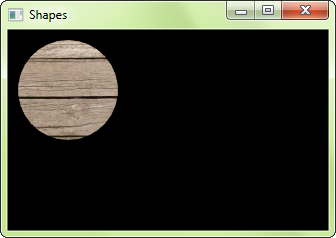
Note that the outline is not textured.
It is important to know that the texture is modulated (multiplied) with the shape’s fill color. If its fill color is sf::Color::White, the texture will appear unmodified.
To disable texturing, call .
The KeyPressed and KeyReleased events
The and events are triggered when a keyboard key is pressed/released.
If a key is held, multiple events will be generated, at the default operating system delay (ie. the same delay that applies when you hold
a letter in a text editor). To disable repeated events, you can call .
On the flip side, it is obvious that events can never be repeated.
This event is the one to use if you want to trigger an action exactly once when a key is pressed or released, like making a character jump with
space, or exiting something with escape.
Sometimes, people try to react to events directly to implement smooth movement. Doing so will not produce the expected effect,
because when you hold a key you only get a few events (remember, the repeat delay). To achieve smooth movement with events, you must use a boolean that you set
on and clear on ; you can then move (independently of events) as long as the boolean is set.
The other (easier) solution to produce smooth movement is to use real-time keyboard input with (see the
dedicated tutorial).
The member associated with these events is , it contains the code of the pressed/released key, as well as the current state of
the modifier keys (alt, control, shift, system).
Note that some keys have a special meaning for the operating system, and will lead to unexpected behavior. An example is the F10 key on Windows, which «steals»
the focus, or the F12 key which starts the debugger when using Visual Studio. This will probably be solved in a future version of SFML.
Installing SFML
There are different approaches to the installation of SFML on Linux:
- Install it directly from your distribution’s package repository
- Get the source code, build it and install it
- Download the precompiled SDK and manually copy the files
Option 1 is the preferred one; if the version of SFML that you want to install is available in the official repository, then install it using your
package manager. For example, on Debian you would do:
Option 2 requires more work: you need to ensure all of SFML’s dependencies including their development headers are available, make sure CMake is installed, and manually
execute some commands. This will result in a package which is tailored to your system.
If you want to go this way, there’s a dedicated tutorial on
building SFML yourself.
Finally, option 3 is a good choice for quick installation if SFML is not available as an official package. Download the SDK
from the download page, unpack it and copy the files to your
preferred location: either a separate path in your personal folder (like /home/me/sfml), or a standard path (like /usr/local).
If you already had an older version of SFML installed, make sure that it won’t conflict with the new version!
Installing dependencies
SFML depends on a few other libraries, so before starting to configure you must have their development files installed.
On Windows and macOS, all the required dependencies are provided alongside SFML so you won’t have to download/install anything else.
Building will work out of the box.
On Linux however, nothing is provided. SFML relies on you to install all of its dependencies on your own. Here is a list of what you need
to install before building SFML:
- freetype
- x11
- xrandr
- udev
- opengl
- flac
- ogg
- vorbis
- vorbisenc
- vorbisfile
- openal
- pthread
The exact name of the packages may vary from distribution to distribution. Once those packages are installed, don’t forget to install their development headers as well.
Packets
The two other problems (endianness and message boundaries) are solved by using a specific class to pack your data: . As a bonus, it provides
a much nicer interface than plain old byte arrays.
Packets have a programming interface similar to standard streams: you can insert data with the << operator, and extract data with the >> operator.
Unlike writing, reading from a packet can fail if you try to extract more bytes than the packet contains. If a reading operation fails, the packet error flag is set.
To check the error flag of a packet, you can test it like a boolean (the same way you do with standard streams):
Sending and receiving packets is as easy as sending/receiving an array of bytes: sockets have an overload of and that directly
accept a .
Packets solve the «message boundaries» problem, which means that when you send a packet on a TCP socket, you receive the exact same packet on the other end, it cannot
contain less bytes, or bytes from the next packet that you send. However, it has a slight drawback: To preserve message boundaries, has to send
some extra bytes along with your data, which implies that you can only receive them with a if you want them to be properly decoded. Simply put,
you can’t send an SFML packet to a non-SFML packet recipient, it has to use an SFML packet for receiving too. Note that this applies to TCP only, UDP is fine since the protocol itself preserves
message boundaries.
Using a UDP socket
UDP sockets are connectionless, so they are the easiest ones to use. No connection is needed,
all you have to do is sending and receiving data. The only step required is to bind the socket to a port before
receiving data.
SFML sockets allow sending raw data, defined by a pointer to a byte array and its size :
Here, we send our byte array (containing «Hi guys !») to the computer which IP address is 192.168.0.2,
on port 4567. The second parameter is a , so you could as well
use a network name, a broadcast address or whatever type of address.
If you don’t want to use a specific port, you can just take any free port number between 1024 and
65535 (ports less than 1024 are reserved). And of course, make sure that your firewall is not
blocking this port !
The function, as well as all other functions that can block,
returns a socket status (see ) which can be :
- : the operation has been completed with success
- : in non-blocking mode only, returned when the socket is not yet ready to complete the task
- : the socket has been disconnected
- : an unexpected error happened
Receiving data is exactly the same, except you first need to bind the socket to a port before
receiving data from this port.
Then you can receive a byte array, its size, and the address / port of the sender.
Please note that is blocking, meaning that it won’t return
until it has received something if the socket is in blocking mode (which is the default).
When you don’t need the socket anymore, you have to close it (the destructor won’t do it for you !) :
Opening a window
Windows in SFML are defined by the class. A window can be created and opened directly upon construction:
The first argument, the video mode, defines the size of the window (the inner size, without the title bar and borders). Here, we create
a window with a size of 800×600 pixels.
The class has some interesting static functions to get the desktop resolution, or the list of valid video modes for
fullscreen mode. Don’t hesitate to have a look at its documentation.
The second argument is simply the title of the window.
This constructor accepts a third optional argument: a style, which allows you to choose which decorations and features you want. You can use any
combination of the following styles:
| No decoration at all (useful for splash screens, for example); this style cannot be combined with others | |
| The window has a titlebar | |
| The window can be resized and has a maximize button | |
| The window has a close button | |
| The window is shown in fullscreen mode; this style cannot be combined with others, and requires a valid video mode | |
| The default style, which is a shortcut for |
There’s also a fourth optional argument, which defines OpenGL specific options which are explained in the
dedicated OpenGL tutorial.
If you want to create the window after the construction of the instance, or re-create it with a different
video mode or title, you can use the function instead. It takes the exact same arguments as the constructor.
Problems that need to be solved
Exchanging data on a network is more tricky than it seems. The reason is that different machines, with different operating systems and processors, can be involved. Several problems
arise if you want to exchange data reliably between these different machines.
The first problem is the endianness. The endianness is the order in which a particular processor interprets the bytes of primitive types that occupy more than a single byte
(integers and floating point numbers).
There are two main families: «big endian» processors, which store the most significant byte first, and «little endian» processors, which store the least significant byte
first. There are other, more exotic byte orders, but you’ll probably never have to deal with them.
The problem is obvious: If you send a variable between two computers whose endianness doesn’t match, they won’t see the same value. For example, the 16-bit integer
«42» in big endian notation is 00000000 00101010, but if you send this to a little endian machine, it will be interpreted as «10752».
The second problem is the size of primitive types. The C++ standard doesn’t set the size of primitive types (char, short, int, long, float, double), so, again,
there can be differences between processors — and there are. For example, the type can be a 32-bit type on some platforms, and a 64-bit type on others.
The third problem is specific to how the TCP protocol works. Because it doesn’t preserve message boundaries, and can split or combine chunks of data, receivers must
properly reconstruct incoming messages before interpreting them. Otherwise bad things might happen, like reading incomplete variables, or ignoring useful bytes.
You may of course face other problems with network programming, but these are the lowest-level ones, that almost everybody will have to solve. This is the reason why SFML provides
some simple tools to avoid them.
Installing SFML
There are different approaches to the installation of SFML on Linux:
- Install it directly from your distribution’s package repository
- Get the source code, build it and install it
- Download the precompiled SDK and manually copy the files
Option 1 is the preferred one; if the version of SFML that you want to install is available in the official repository, then install it using your
package manager. For example, on Debian you would do:
Option 2 requires more work: you need to ensure all of SFML’s dependencies including their development headers are available, make sure CMake is installed, and manually
execute some commands. This will result in a package which is tailored to your system.
If you want to go this way, there’s a dedicated tutorial on
building SFML yourself.
Finally, option 3 is a good choice for quick installation if SFML is not available as an official package. Download the SDK
from the download page, unpack it and copy the files to your
preferred location: either a separate path in your personal folder (like /home/me/sfml), or a standard path (like /usr/local).
If you already had an older version of SFML installed, make sure that it won’t conflict with the new version!
Fixed-size primitive types
Since primitive types cannot be exchanged reliably on a network, the solution is simple: don’t use them. SFML provides fixed-size types for data exchange:
, etc. These types are just typedefs to primitive types, but they are mapped to the type which has the expected size according
to the platform. So they can (and must!) be used safely when you want to exchange data between two computers.
SFML only provides fixed-size integer types. Floating-point types should normally have their fixed-size equivalent too, but in practice this is not needed
(at least on platforms where SFML runs), and types always have the same size, 32 bits and 64 bits respectively.
Using a TCP socket
TCP sockets must be connected before sending or receiving data. Here is how it works.
First, you open a socket and make it listen to a given port.
Then, you can wait for connections on this port.
The function will wait until an incoming connection arrives,
and return a new socket that will be used to exchange data with the connected computer. If you pass
a to the function, it will be filled with the client’s address
(so you can know who is connected).
If the socket is in non-blocking mode, the function will return immediatly if there’s no connection arriving, with the
status .
Let’s now have a look at the client’s code. All you have to do is creating a socket and connect
to the server on the port that he’s listening to.
Now, both the client and the server are ready to communicate. The functions for sending and receiving
data are the same as UDP sockets, except that you don’t need to give the port and the host address.
So basically, the only parameters are the array to send / receive and its size.
For TCP sockets, the and functions can return
, which means the socket has been disconnected.
As for UDP sockets, don’t forget to close the socket when you have finished.
The drawing window
To draw the entities provided by the graphics module, you must use a specialized window class: . This class is derived
from , and inherits all its functions. Everything that you’ve learnt about (creation, event handling,
controlling the framerate, mixing with OpenGL, etc.) is applicable to as well.
On top of that, adds high-level functions to help you draw things easily. In this tutorial we’ll focus on two
of these functions: and . They are as simple as their name implies: clears the whole window with
the chosen color, and draws whatever object you pass to it.
Here is what a typical main loop looks like with a render window:
Calling before drawing anything is mandatory, otherwise the contents from previous frames will be present behind anything you draw. The only exception is
when you cover the entire window with what you draw, so that no pixel is not drawn to. In this case you can avoid calling (although
it won’t have a noticeable impact on performance).
Calling is also mandatory, it takes what was drawn since the last call to and displays it on the window.
Indeed, things are not drawn directly to the window, but to a hidden buffer. This buffer is then copied to the window when you call
— this is called double-buffering.
This clear/draw/display cycle is the only good way to draw things. Don’t try other strategies, such as keeping pixels from the previous frame,
«erasing» pixels, or drawing once and calling display multiple times. You’ll get strange results due to double-buffering.
Modern graphics hardware and APIs are really made for repeated clear/draw/display cycles where everything is completely refreshed at each iteration of
the main loop. Don’t be scared to draw 1000 sprites 60 times per second, you’re far below the millions of triangles that your computer can handle.
Installing SFML
First, you must download the SFML SDK from the download page.
There are multiple variants of GCC for Windows, which are incompatible with each other (different exception management,
threading model, etc.). Make sure you select the package which corresponds to the version that you use. If you are unsure, check which of
the libgcc_s_sjlj-1.dll or libgcc_s_dw2-1.dll files is present in your MinGW/bin folder. If MinGW was installed along with Code::Blocks,
you probably have an SJLJ version.
If you feel like your version of GCC can’t work with the precompiled SFML libraries, don’t hesitate to
build SFML yourself, it’s not complicated.
You can then unpack the SFML archive wherever you like. Copying headers and libraries to your installation of MinGW is not recommended, it’s better
to keep libraries in their own separate location, especially if you intend to use several versions of the same library, or several compilers.
