Openssl 1.1.0k / 1.0.2s для windows x64/x32
Содержание:
- Introduction
- Configuring OpenSSL
- Из исходника
- Converting Certificates with OpenSSL
- Practical OpenSSL Usage
- Autoconf[edit]
- Features and Technologies that Require OpenSSL
- Create the Certification Authority (CA)
- Windows OpenSSL.cnf File Example
- ✔️ Как установить самую последнюю версию OpenSSL на Windows 10
- Interesting tutorials
- Как установить OpenSSL на Windows Server 2019
- Embed SSL and TLS support into your projects to enhance security with the help of this lightweight cryptography library, which comprises various encryption algorithms
- Что делать если нет сертификата в запросах заявок на сертификат
- Поддержка ГОСТ-сертификатов в nginx
- Причины
- Create Apache Certification
- Сборка OpenSSL, GOST-engine, cURL
- Как получить PFX ключ на IIS
- Installing OpenSSL
- Issues encountered on Windows while generating a CSR via one command
- Target Audience
Introduction
This guide is designed to introduce the reader to the Secure Sockets Layer (SSL) application-level protocol, and particularly the OpenSSL implementation of SSL. After a brief description of exactly what OpenSSL is, and what it is useful for, the guide will further illustrate the practical usage of OpenSSL in a client-server environment, and provide specific examples of applications which may benefit from OpenSSL. Finally, the guide will lead the user through example procedures required to use OpenSSL with the popular Apache Hyper Text Transport Protocol (HTTP) server for the purpose of serving secured web pages from your Ubuntu computer.
Configuring OpenSSL
By default, OpenSSL on Windows 10 does not come with a configuration file. This is intentional because there are a lot of configuration options that you can customize. For the purposes of this guide, you are going to use a sample configuration that you can customize later to best suit your security requirements.
Open up PowerShell and run the below command. This command downloads a sample configuration file from MIT and saves it as openssl.cnf in the current working directory.
You can now open up the openssl.cnf file and you should see something that looks like below.
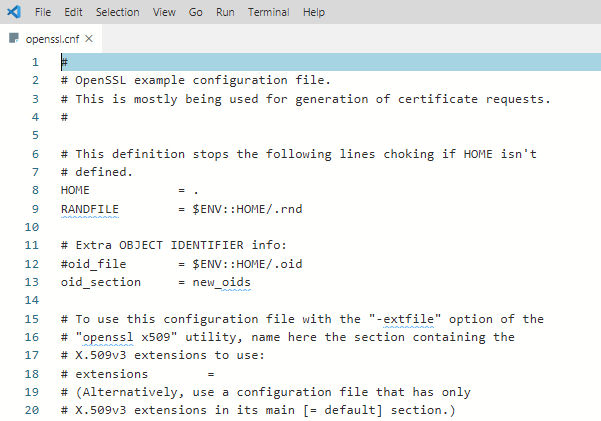 Sample OpenSSL configuration file
The downloaded configuration will work as-is for now. Do not use the defaults in a production environment!
Из исходника
Устанавливаем пакеты, необходимые для сборки пакета:
yum install make gcc

* как видим, на момент написания обновления инструкции это была версия 1.1.1.
И копируем ссылку на ее скачивание:

На CentOS скачиваем исходник с использованием найденной ссылки:
wget https://www.openssl.org/source/openssl-1.1.1g.tar.gz
И распаковываем его с последующим удалением:
tar -xvf openssl-*.tar.gz && \rm openssl-*.tar.gz
Переходим в папку с распакованным исходником:
cd openssl-*
Конфигурируем его:
./config —prefix=/usr/local —openssldir=/usr/local
Собираем:
make
И устанавливаем:
make install
Резервируем предыдущую версию openssl:
mv /usr/bin/openssl /root/openssl.back
И делаем ссылку на новую:
ln -s /usr/local/bin/openssl /usr/bin/openssl
Снова проверяем версию:
openssl version -a
Система вернет либо ошибку, например:
openssl: error while loading shared libraries: libssl.so.1.1: cannot open shared object file: No such file or directory
… либо полные сведения об openssl, например:
OpenSSL 1.1.1g 21 Apr 2020 (Library: OpenSSL 1.0.2k-fips 26 Jan 2017)
built on: Sat May 11 01:54:53 2019 UTC
platform: linux-x86_64
options: bn(64,64) rc4(16x,int) des(int) idea(int) blowfish(ptr)
compiler: gcc -fPIC -pthread -m64 -Wa,—noexecstack -Wall -O3 -O2 -g -pipe -Wall -Werror=format-security -Wp,-D_FORTIFY_SOURCE=2 -Wp,-D_GLIBCXX_ASSERTIONS -fexceptions -fstack-protector-strong -grecord-gcc-switches -specs=/usr/lib/rpm/redhat/redhat-hardened-cc1 -specs=/usr/lib/rpm/redhat/redhat-annobin-cc1 -m64 -mtune=generic -fasynchronous-unwind-tables -fstack-clash-protection -fcf-protection -Wa,—noexecstack -Wa,—generate-missing-build-notes=yes -specs=/usr/lib/rpm/redhat/redhat-hardened-ld -DOPENSSL_USE_NODELETE -DL_ENDIAN -DOPENSSL_PIC -DOPENSSL_CPUID_OBJ -DOPENSSL_IA32_SSE2 -DOPENSSL_BN_ASM_MONT -DOPENSSL_BN_ASM_MONT5 -DOPENSSL_BN_ASM_GF2m -DSHA1_ASM -DSHA256_ASM -DSHA512_ASM -DKECCAK1600_ASM -DRC4_ASM -DMD5_ASM -DAES_ASM -DVPAES_ASM -DBSAES_ASM -DGHASH_ASM -DECP_NISTZ256_ASM -DX25519_ASM -DPADLOCK_ASM -DPOLY1305_ASM -DZLIB -DNDEBUG -DPURIFY -DDEVRANDOM=»\»/dev/urandom\»» -DSYSTEM_CIPHERS_FILE=»/etc/crypto-policies/back-ends/openssl.config»
OPENSSLDIR: «/etc/pki/tls»
ENGINESDIR: «/usr/lib64/engines-1.1»
Seeding source: os-specific
Обратите внимание, что у нас установлена новая версия OpenSSL, но по прежнему, используется старая библиотека — Library: OpenSSL 1.0.2k-fips 26 Jan 2017. Необходимо добавить в ldconfig новый путь
Для это создаем файл:
Необходимо добавить в ldconfig новый путь. Для это создаем файл:
vi /etc/ld.so.conf.d/openssl.conf
/usr/local/lib64
* если у нас используется система 32-бит, то путь будет /usr/local/lib.
Применяем настройки:
ldconfig -v
Снова проверяем:
openssl version
Мы должны увидеть:
OpenSSL 1.1.1g 21 Apr 2020
Обновление выполнено.
Converting Certificates with OpenSSL
There are occasions where an application does not use a particular certificate format. You can run into this issue with an application called HAproxy, for example that requires a PEM certificate when you may have a DER-formatted certificate (.crt .cer .der).
To demonstrate converting a certificate, let’s convert the self-signed certificate created earlier in a DER format (certificate.crt) to PEM. Use the code in the following code snippet to do so.
This command below uses the sub-command with the parameter of which should match the format of the file followed by the format.
You can also reverse the order if you’d like to the DER format from PEM too as shown below.
And last but not least, you can convert PKCS#12 to PEM and PEM to PKCS#12. This is a file type that contain private keys and certificates. To convert to PEM format, use the sub-command.
You can convert a PEM certificate and private key to PKCS#12 format as well using with a few additional options. Below you are exporting a PKCS#12 formatted certificate using your private key by using as the input source. Using the option value allows you to validate .
Practical OpenSSL Usage
Installing OpenSSL Library
To install the OpenSSL general-purpose library, first determine the applicable version of the library available for your Ubuntu computer with the following command issued at a terminal prompt:
apt-cache search libssl | grep SSL
You should observe output from the command similar to the following:
libssl0.9.6 - SSL shared libraries (old version)
libssl-dev - SSL development libraries, header files and documentation
libssl0.9.7 - SSL shared libraries
In the above example, you would most likely want to install the current OpenSSL library, which appears in the output as libssl0.9.7 (like sudo apt-get install libssl0.9.7. Install the following packages libssl0.9.7 (see InstallingSoftware). You may also need to install ca-certificates.
Installing OpenSSL Development Library
In order to build software which requires the OpenSSL general-purpose library, you must first install the development instance of the OpenSSL library. Install the following packages libssl-dev (see InstallingSoftware). Due to OpenSSL’s license being incompatible with the GPL, linking the OpenSSL library with programs covered by GPL requires an explicit linking exception for packages present in the Ubuntu Archive. (Ubuntu Technical Board decision)
Basic OpenSSL Commands
The following section of the guide presents some of the more common basic commands, and parameters to commands which are part of the OpenSSL toolkit. For additional information, read the various OpenSSL system manual pages with the man command, and refer to the information presented in the Resources section of this guide.
Determine installed OpenSSL version:
openssl version
List of available OpenSSL sub-commands:
openssl help
Get additional help information on OpenSSL sub-commands by using the openssl command followed by the sub-command, and the -h switch. For example, to get additional information on the openssl enc sub-command:
openssl -h enc
List all available cipher algorithms:
openssl ciphers -v
You may benchmark your computer’s speed with OpenSSL, measuring how many bytes per second can be processed for each algorithm, and the times needed for sign/verify cycles by using the following command:
openssl speed
Autoconf[edit]
OpenSSL uses its own configuration system, and does not use Autoconf. However, a number of popular projects use both OpenSSL and Autoconf, and it would be useful to detect either OPENSSL_init_ssl or SSL_library_init from libssl. To craft a feature test for OpenSSL that recognizes both OPENSSL_init_ssl and SSL_library_init, you can use the following.
if test "$with_openssl" = yes ; then
  dnl Order matters!
  if test "$PORTNAME" != "win32"; then
     AC_CHECK_LIB(crypto, CRYPTO_new_ex_data, [], )])
     FOUND_SSL_LIB="no"
     AC_CHECK_LIB(ssl, OPENSSL_init_ssl, )
     AC_CHECK_LIB(ssl, SSL_library_init, )
     AS_IF(, )])
  else
     AC_SEARCH_LIBS(CRYPTO_new_ex_data, eay32 crypto, [], )])
     FOUND_SSL_LIB="no"
     AC_SEARCH_LIBS(OPENSSL_init_ssl, ssleay32 ssl, )
     AC_SEARCH_LIBS(SSL_library_init, ssleay32 ssl, )
     AS_IF(, )])
  fi
fi
Features and Technologies that Require OpenSSL
RAD Studio requires OpenSSL for HTTPS support for the following features and technologies:
- Sending push notifications with the EMS Server: You need to install the OpenSSL libraries in the system where the RAD Server Engine (EMS Server) runs to send push notifications. You need to install the 32-bit or 64-bit OpenSSL depending on the EMS Server binary you are running.
- Indy
- InterBase: InterBase uses OpenSSL for encryption and OTW/SSL features.
- DataSnap Server: OpenSSL is required by DataSnap servers when encryption filters are enabled, or when the Communication Protocol is set to HTTPS in the .
Create the Certification Authority (CA)
Create the folder structure to hold certificates:
$ mkdir /opt/met-ca$ mkdir /opt/met-ca/certs$ mkdir /opt/met-ca/crl$ mkdir /opt/met-ca/newcerts$ mkdir /opt/met-ca/private$ mkdir /opt/met-ca/requests$ touch /opt/met-ca/index.txt$ echo “01” > /opt/ca/serial$ echo “01” > /opt/ca/crlnumber$ chmod 700 /opt/ca
Create public and private auto signed keys of our own Certification Authority (in the example it is valid for 10 years). We will need to specify certificate data, the password for encryption and the process will generate two files:
$ openssl req -config /etc/ssl/openssl.cnf -new -x509 -days 3650 -sha1 -newkey rsa:2048 -keyout /opt/ca/private/ca.key -out /opt/ca/ca.crt
Change key grants:
$ chmod 600 /opt/met-ca/private/ca.key
Windows OpenSSL.cnf File Example
This section contains the contents of the openssl.cnf file
that can be used on Windows. Be sure to make the appropriate changes to the
directories.
# # SSLeay example properties file. # This is mostly being used for generation of certificate requests. # RANDFILE = .rnd #################################################################### default_ca = CA_default # The default ca section #################################################################### dir = G:\\openssl\\\bin\\demoCA # Where everything is kept certs = $dir\\certs # Where the issued certs are kept crl_dir = $dir\\crl # Where the issued crl are kept database = $dir\\index.txt # database index file. new_certs_dir = $dir\\newcerts # default place for new certs. certificate = $dir\\cacert.pem # The CA certificate serial = $dir\\serial # The current serial number crl = $dir\\crl.pem # The current CRL private_key = $dir\\private\\cakey.pem # The private key RANDFILE = $dir\\private\\private.rnd # private random number file x509_extensions = x509v3_extensions # The extentions to add to the cert default_days = 365 # how long to certify for default_crl_days = 30 # how long before next CRL default_md = md5 # which md to use. preserve = no # keep passed DN ordering # A few difference way of specifying how similar the request should look # For type CA, the listed attributes must be the same, and the optional # and supplied fields are just that :-) policy = policy_match # For the CA policy countryName = match stateOrProvinceName = match organizationName = match organizationalUnitName = optional commonName = supplied emailAddress = optional # For the ’anything’ policy # At this point in time, you must list all acceptable ’object’ # types. countryName = optional stateOrProvinceName = optional localityName = optional organizationName = optional organizationalUnitName = optional commonName = supplied emailAddress = optional #################################################################### default_bits = 1024 default_keyfile = privkey.pem distinguished_name = req_distinguished_name attributes = req_attributes countryName = Country Name (2 letter code) countryName_min = 2 countryName_max = 2 stateOrProvinceName = State or Province Name (full name) localityName = Locality Name (eg, city) 0.organizationName = Organization Name (eg, company) organizationalUnitName = Organizational Unit Name (eg, section) commonName = Common Name (eg, your website’s domain name) commonName_max = 64 emailAddress = Email Address emailAddress_max = 40 challengePassword = A challenge password challengePassword_min = 4 challengePassword_max = 20 |
Note –
The following copyright notices apply: Copyright 2004-2008
The OpenSSL Project. All rights reserved.Copyright 2005-2008 World
Wide Web Consortium, (Massachusetts Institute of Technology, Institut National
de Recherche en Informatique et en Automatique, Keio University). All Rights
Reserved. http://www.w3.org/Consortium/Legal/
✔️ Как установить самую последнюю версию OpenSSL на Windows 10

В эпоху кибервойн единственная разумная позиция – быть параноиком, а это означает, помимо прочего, быть параноиком по поводу обновлений программного обеспечения.
Взять к примеру OpenSSL.
Эта криптографическая библиотека с открытым исходным кодом, которая реализует протоколы Transport Layer Security (TLS) и Secure Sockets Layer (SSL), разработана для «защиты связи по компьютерным сетям от перехвата», но угадайте, что?
С самого начала она была пронизана ошибками.
Это может быть неизбежно, в определенной степени – в конце концов, мы говорим о программном обеспечении.
Несмотря на то, что вы не можете ничего сделать с ошибками, которые еще предстоит идентифицировать, вы можете по крайней мере защитить свои системы от тех ошибок, которые уже исправлены и задокументированы.
Хотя дистрибутивы Linux обычно поставляются с OpenSSL, это не никак относится к Windows … или, скажем, «дистрибутивам Windows».
Если вы хотите запустить его, вам нужен бинарник под Windows, и если вы не хотите его собирать самостоятельно, вы должны найти другой вариант.
В этой статье я покажу,как можно настроить OpenSSL в Windows, не имея дело при этом дела со сборкой из исходников.
Шаг 1. Скачать бинарник
Поиск бинарных файлов OpenSSL для Windows – непростая задача, но не отчаивайтесь.
Не дайте себя одурачить ни строкой Win32 в URL-адресе, ни навигацией, указывающей на казалось бы древнюю страницу загрузки еще с 2004 года.
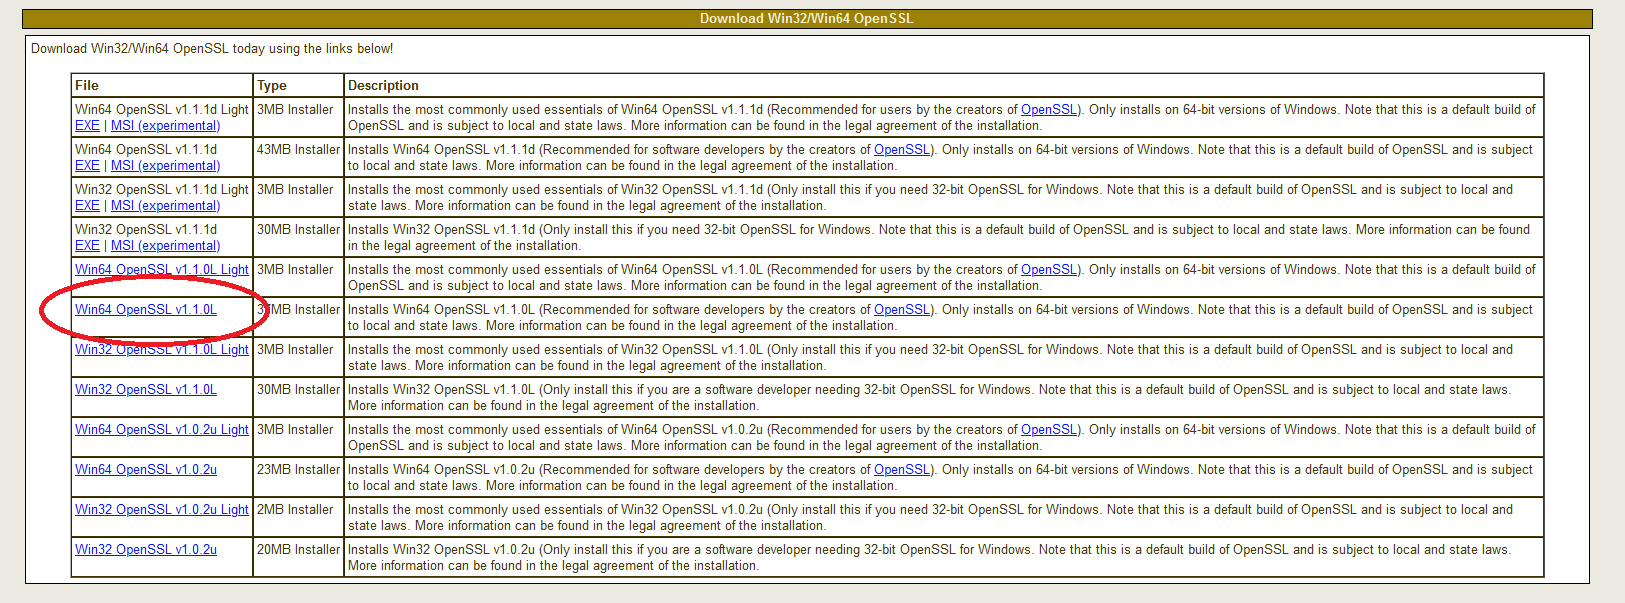
Прокрутите страницу вниз до раздела «Download Win32 OpenSSL».
Теперь вам нужно выбрать правильный файл из этого списка.
Для каждой версии есть два основных типа: light и full.
Загрузите файл под названием «Win64 OpenSSL v1.1.0f» (или версию с более новой версией, как только она станет доступна), чтобы скачать фулл установщик.
Шаг 2. Запустите установщик
Мы рекомендуем установить OpenSSL вне вашей системной директории Windows.
Следуйте инструкциям по установке через GUI.
Шаг 3. Запустите бинарный файл OpenSSL
Чтобы начать работу с OpenSSL, вы можете просто щелкнуть по нему правой кнопкой мыши в проводнике Windows в месте его установки, например в моем случае:
Источник
Interesting tutorials
How to Upgrade your Windows 7/8/8.1 to Windows 10 for Free
… easily download via the Windows … of Windows 10
Get Windows 10 app … system and download all …
How to easily reinstall Windows 10
… help you download the official … .
Activate Windows 10
During the Windows 10 installation …
How to uninstall programs in Windows 10 with system tools
… bundled with Windows 10. They … that Windows 10 provides you … .
Uninstall Windows 10 built-in …
How to use the remote desktop feature of Windows 10
… from any Windows 10 version, … example, Windows 10 Home, … have Windows 10 Home edition …
How to install custom themes on Windows 10
… unavailable in Windows 10 is the … 2
Download UltraUXThemePatcher on your Windows 10 PC …
How to effectively backup and restore your Windows 10 PC
… crucial. Luckily, Windows 10 provides you … a backup solution, Windows 10 provides you …
How to disable ads in Windows 10
… «helpful» Windows 10 feature called «Windows Spotlight … that Windows 10 provides …
Как установить OpenSSL на Windows Server 2019
OpenSSL – это библиотека с открытым исходным кодом, которая предоставляет криптографические протоколы, используемые для защиты приложений и передачи информации между системами.
Менеджмент OpenSSL находится под управлением добровольцев по всему миру.
В двух словах, инструментарий OpenSSL реализует протоколы Secure Sockets Layer (SSL v2 / v3) и Transport Layer Security (TLS v1) с полной криптографией.
Это руководство покажет вам, как установить OpenSSL на Windows Server 2019.
Установите OpenSSL на Windows Server 2019
Перейдите на страницу загрузок OpenSSL и скачайте последнюю версию OpenSSL, соответствующую архитектуре вашего процессора.
Для себя я скачаю 64-битную версию.
У вас есть возможность выбрать версию Light или полную версию.
Вы также можете использовать команду curl.exe для загрузки из командной строки.
Смотрите скриншот ниже.

Примите лицензионное соглашение и нажмите «Next».

Выберите папку назначения, в которую будет установлен OpenSSL.

Выберите каталог для ярлыка приложения.

Выберите дополнительные задачи для выполнения.

Нажмите «Install», чтобы начать установку OpenSSL на Windows Server 2019.

Подождите установку несколько минут для завершения.
Нажмите «Finish», чтобы завершить успешную установку.
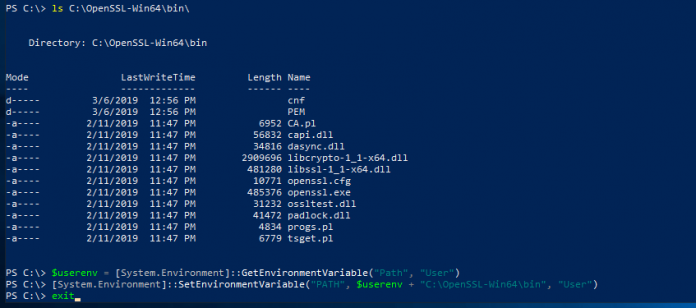
Наконец добавьте C:\OpenSSL-Win64 в PATH среды Windows.
Для 32-разрядной системы замените OpenSSL-Win64 на OpenSSL-Win32.

Создание сертификатов с OpenSSL на Windows Server 2019
Теперь вы готовы использовать OpenSSL на Windows Server 2019 для создания сертификатов.
Начните с экспорта OPENSSL_CONF.
Для 32-разрядной системы замените OpenSSL-Win64 на OpenSSL-Win32. Давайте создадим тестовый SSL-сертификат для проверки нашей установки.
Источник
Embed SSL and TLS support into your projects to enhance security with the help of this lightweight cryptography library, which comprises various encryption algorithms
What’s new in OpenSSL 3.0.0:
- TLS_MAX_VERSION, DTLS_MAX_VERSION and DTLS_MIN_VERSION constants are now deprecated.
- The `OPENSSL_s390xcap` environment variable can be used to set bits in the S390X capability vector to zero. This simplifies testing of different code paths on S390X architecture.
- Encrypting more than 2^64 TLS records with AES-GCM is disallowed as per FIPS 140-2 IG A.5 «Key/IV Pair Uniqueness Requirements from SP 800-38D». The communication will fail at this point.
- The EC_GROUP_clear_free() function is deprecated as there is nothing confidential in EC_GROUP data.
Read the full changelog
NOTE: Users should currently install a 1.1.1 series + a 3.0 series for maximum application compatibility
OpenSSL is a development tool designed to implement the SSL and TLS cryptographic protocols in your projects. The library is developed as open source and can be used on multiple operating systems in order to secure the data transferred over the Internet.
Secure your Internet data transfers
The TLS and SSL protocols are widely used to secure the Internet communication by using data encryption and complex authentication keys in order to ensure the confidentiality of sensitive messages.
OpenSSL aims to provide you with a reliable way to encrypt your data and generate the security keys required to safely transfer the information over the Internet. The main library is developed in C and includes a command line tool that provides access to all the available algorithms and ciphers.
Supports various encryption algorithms
The list of encryption algorithms is extensive and you can use the console to generate personal keys and certificates with Blowfish, MD5, SHA-1, DES or AES. The library also supports public-key cryptography algorithms such as RSA, DSA, and the Diffie–Hellman key exchange method.
Although the download package does not include a documentation, the online resources are extensive and provide you with details about implementing the algorithms. You can also bring your own contribution to the project as a part of the open source community.
The tools included in the package can only be used in the console which might be difficult for the users that are accustomed to graphical interfaces. Moreover, using the library requires solid knowledge about encryption algorithms and cryptography standards.
To end with
However, OpenSSL is a useful tool for generating and managing private keys, public keys or certificates for a large variety of projects.
Что делать если нет сертификата в запросах заявок на сертификат
Бывают ситуации, что на вашем сервере по каким-то причинам, в папке запросы на сертификат, может не оказаться вашего, в этом случае вам необходимо будет перейти в этой же mmc в раздел «Личное-Сертификаты». Выбираем нужный и делаем экспорт.

Появится мастер экспорта сертификатов.

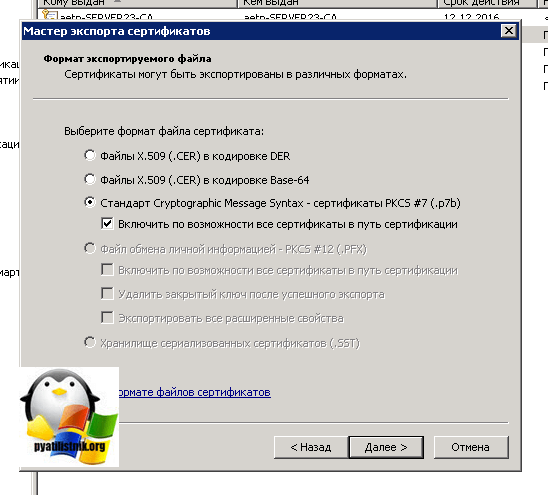
Обратите внимание, что в pfx выгрузить не получится, но это не страшно, нам подойдет и p7b, но с включенной галкой «Включить по возможности все сертификаты в путь сертификации»
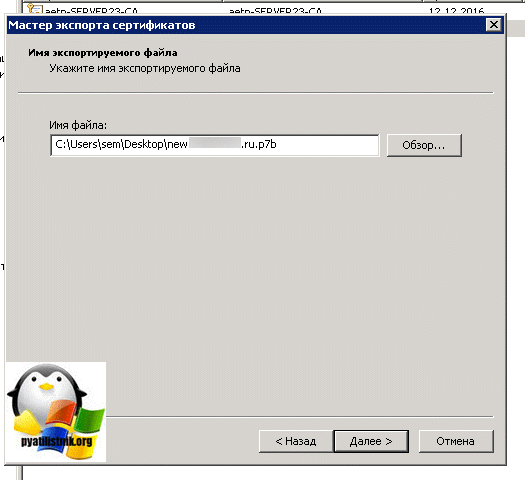
Указываем путь сохраняемого файла.
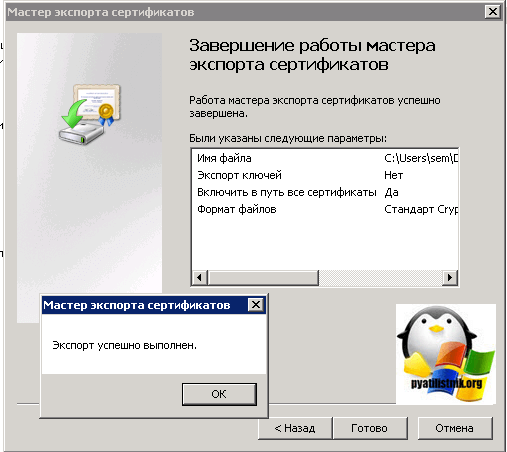
Видим, что все успешно выполнено.
Преобразование p7b в pem
Попробует такое преобразование.
openssl pkcs7 -in cert.p7b -inform DER -print_certs -out cert.pem
Мой пример
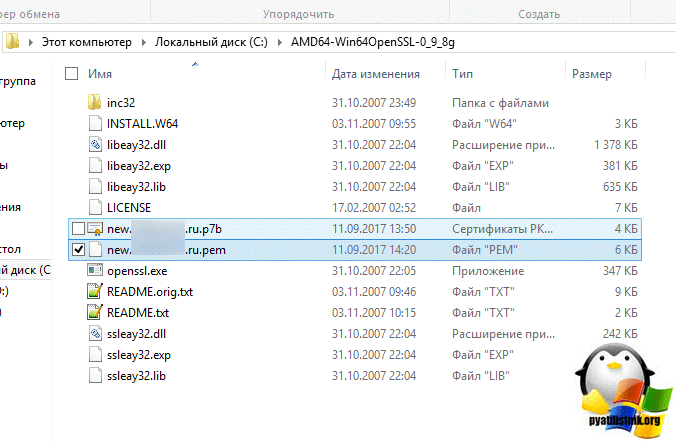
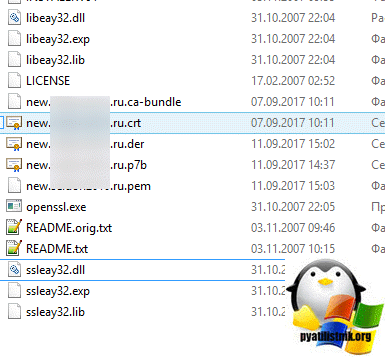
openssl.exe pkcs7 -in new.pyatilistnik.ru.p7b -inform DER -print_certs -out new.pyatilistnik.ru.pem

В итоге я получил файл new.pyatilistnik.ru.pem
Ну, а дальше уже по инструкции сверху. Если у вас выскочит ошибка, по типу
C:\AMD64-Win64OpenSSL-0_9_8g>openssl.exe rsa -in new.pyatilistnik.ru.pem -out new. pyatilistnik.ru.key unable to load Private Key 6944:error:0906D06C:PEM routines:PEM_read_bio:no start line:.\crypto\pem\pem_lib .c:647:Expecting: ANY PRIVATE KEY
То наш вариант это .crt в .der и уже .der в .pem
Преобразование CRT в PEM
Кладем так же все в одну папку, файл crt вам должны были прислать вместе с ca-bundle.
Первое это crt в der
openssl x509 -in new.pyatilistnik.ru.crt -out new.pyatilistnik.ru.der -outform DER
Теперь der в pem.
openssl x509 -in new.pyatilistnik.ru.der -inform DER -out new.pyatilistnik.ru.pem -outform PEM
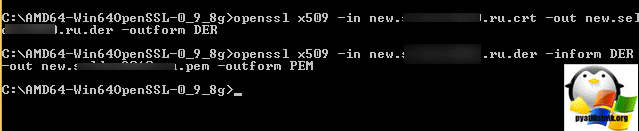
В итоге у меня получилось, вот так.
Поддержка ГОСТ-сертификатов в nginx
Возможность работать из языков программирования это уже много, но хотелось еще две возможности:
- Легко поднимать свой веб-сервер с ГОСТ-сертификатом по HTTPS (TLS).
- Легко проксировать все запросы на хост с ГОСТ-сертификатом
Легко – это означает докер-образ. Его нужно создать. Для этого нужно в Dockerfile собрать nginx с кастомным OpenSSL и GOST-engine. Открыв документацию сборки nginx, я увидел одну опцию о ssl — , которая просто булева. Но nginx популярный продукт, инструкций по сборке с openssl много, поэтому я нашел еще опцию . Как показала практика, nginx хочет, чтобы здесь были исходники openssl, а сборкой скрипты nginx займутся сами. Это не совсем то, что я хотел бы (я хотел использовать multi-stage build). Я ознакомился с help-выводом сборщика nginx, но ничего, что мне там помогло бы, я не нашел.
Пришлось дублировать инструкции выкачивания исходников OpenSSL, распаковки, сборки GOST-engine, включения GOST-engine в конфиги. Всё это начало собираться, но поддержки ГОСТ-алгоритмов в nginx все ещё не было. Это я проверял указанием в конфиге . Выполнение говорило, что не знает этого алгоритма.
Как оказалось, openssl, собранный nginx, не поддерживал динамические движки, т.е. выводил . Здесь пришлось внимательно почитать документацию сборки OpenSSL, чтобы выяснить, что проставило . Причина нашлась в openssl, которые вызывал nginx, а именно . Если это указано, то нет никаких флагов, чтобы включить поддержку загрузки движков. Пришлось править инструкцию сборки:
Всё это собралось, но nginx начал ругаться, что не может найти по пути , это довольно странно, потому что тот же собранный openssl ищет и находит движки совсем в другом месте, а именно там, где и собирался . Добавил инструкцию копирования собранных движков в , чтобы угодить nginx. Заработало.
Рядом с основным Dockerfile в репозитории я положил демонстрационный Dockerfile, который при сборке создает себе ГОСТ-сертификаты и использует их, обрабатывая соединения на https://gost.example.com. Придется поработать с DNS или docker network, чтобы из одного контейнера попробовать подключится к этому демонстрационному, но все это я описал в документации.
Демонстрационный хост использует ключи по , другие варианты это , . А вместо — .
Образ с nginx + GOST запушен в Docker Hub: https://hub.docker.com/r/rnix/nginx-gost/
Причины
Для начала стоит сказать, что для продакшн-окружения существуют сертифицированные средства от компаний «Криптоком», «Крипто-Про», «Сигнал-КОМ» и других. Мне же нужно было реализовать взаимодействие в тестовом (девелоперском) окружении на Linux, покупать для этого лицензии не очень-то удобно, но что хуже, в открытом доступе отсутствуют документации по этому вопросу. По запросу «https гост» не так много решений. Среди них упоминается использование OpenSSL + Крипто CSP, я не помню деталей, но эта связка у меня не завелась с поддержкой ГОСТ Р 34.10-2012. Другим результатом, который часто встречался, было предложение использовать OpenSSL 1.0, в котором GOST-engine встроен внутрь, но такое решение тоже не содержало в себе поддержку .
Рабочим решением оказалась сборка OpenSSL 1.1.0g + вынесенный в отдельно подключаемый динамический движок GOST-engine. В интернете часто встречается упоминание, что некая российская компания приложила усилия по его разработке, но в самом репозитории нет сведений об авторах продукта. Пользуясь случаем, выражаю авторам благодарность за движок в open source. На этой странице сказано, что до OpenSSL 1.1.0 использовался встроенный движок GOST, сейчас для GOST используется сторонний от OpenSSL продукт. Судя по конфигурации, скорее всего, это одна и та же библиотека.
Create Apache Certification
Create a pair of keys. We will need to specify the password and certification data. A file key (server.key) and certification request (server.pem) will be created.
$ openssl req -new -sha1 -newkey rsa:2048 -nodes -keyout server.key -out server.pem
CA should sign the certification request. Copy server.pem to certification request and sign.
$ openssl ca -config /etc/ssl/openssl.cnf -policy policy_anything -extensions ssl_server -out requests/server-signed.pem -infiles requests/server.pem
Apache will need a PEM format, is mandatory to convert to this format:
$ openssl x509 -in requests/server-signed.pem -out requests/server.crt
Сборка OpenSSL, GOST-engine, cURL
Сборка стороннего продукта для тех, кто делает это редко, может быть нетривиальной задачей. Для сборки OpenSSL, GOST-engine и cURL пришлось разобраться с кучей опций и перепробовать несколько комбинаций версий. Если в Dockerfile вы заметите странное, то, скорее всего, это осталось от таких экспериментов.
Я зафиксировал все версии проектов для сборки, чтобы исключить ситуацию, что из-за обновления что-то перестанет работать. Например, я собирал OpenSSL 1.1.0h + GOST-engine и команда не содержала GOST-алгоритмов, хотя показывала GOST-engine в списке. Указав предыдущую версию OpenSSL 1.1.0g, все работало, как ожидалось. Это было очень странно, я повторил это еще раз, потом пытался выяснить , но в итоге решил остаться на 1.1.0g.
Собирая сам GOST-engine, я не сразу обратил внимание на наличие файла в master-ветке, потому что собирал из ветки по неизвестно откуда взятой документации. Та версия собиралась с кастомной сборкой OpenSSL командой. Но master-ветка так собираться перестала, появились ошибки об отсутствии и подобное
В итоге решение было найдено и зафиксировано
Но master-ветка так собираться перестала, появились ошибки об отсутствии и подобное. В итоге решение было найдено и зафиксировано.
Для сборки cURL с кастомной сборкой OpenSSL гораздо больше документации, тем не менее, документация успевала устаревать, и с опциями пришлось много экспериментировать.Результат работы выложен здесь.Образ запушен в Docker Hub.
Как получить PFX ключ на IIS
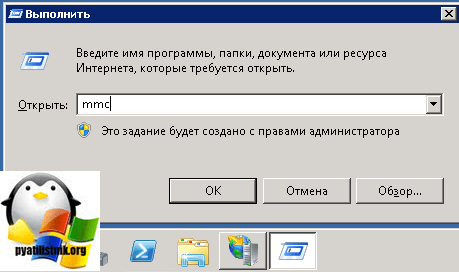
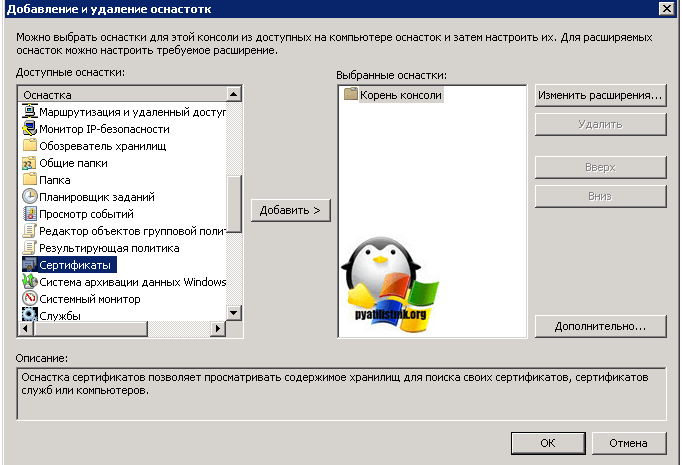
нажимаем сочетание клавиш WIN+R и вводим mmc, для вызова оснастки. Я вам уже рассказывал о ее применении и удобстве для системного администратора.
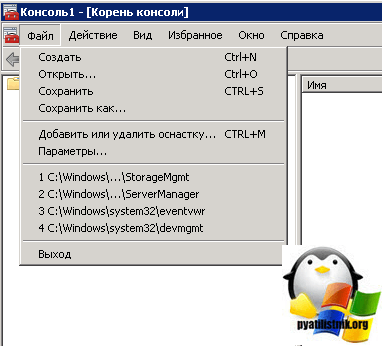
Далее вам необходимо через меню «Файл» добавить новую оснастку.
Находим сертификаты и нажимаем кнопку «Добавить»
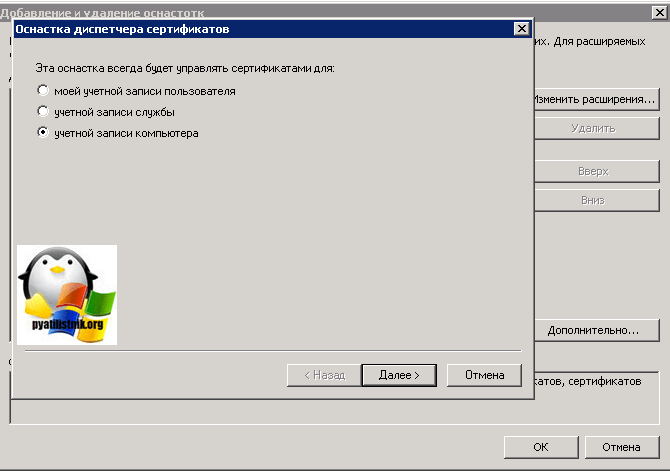
В следующем окне выбираем «для учетной записи компьютера»
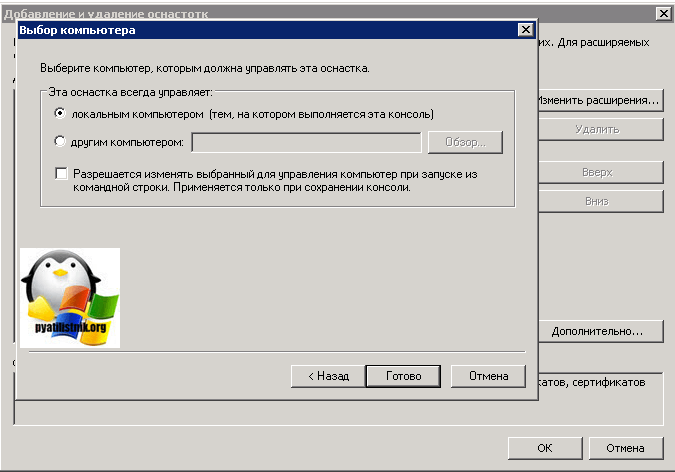
подтверждаем, что нас интересует локальный компьютер.
Далее находим пункт «Запросы заявок на сертификат», тут вы обнаружите ваш запрос, находите его и через правый клик экспортируете его.
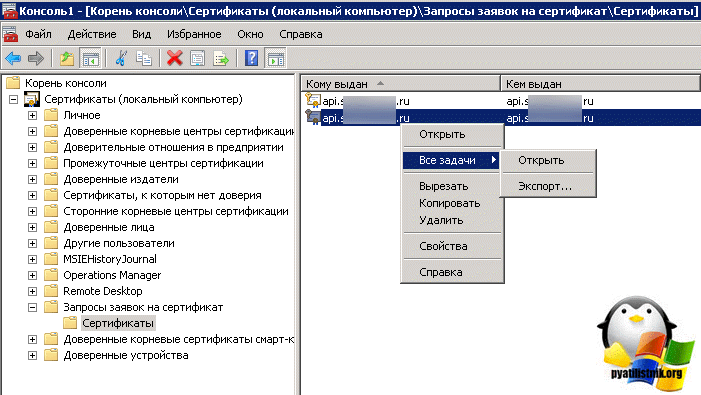
У вас откроется мастер экспорта сертификатов

Далее вы выбираете «Да, экспортировать закрытый ключ»

Ставим галку «Включить по возможности все сертификаты в путь сертификации» и начинаем наш экспорт PFX архива.

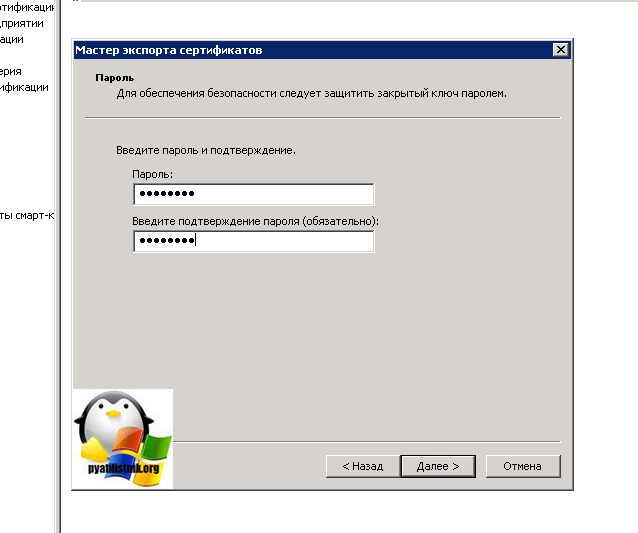
Теперь мастер экспорта, просит вас указать два раза нужный вам пароль, для защиты pfx архива.
Через кнопку обзор, указываем место сохранения вашего файла.
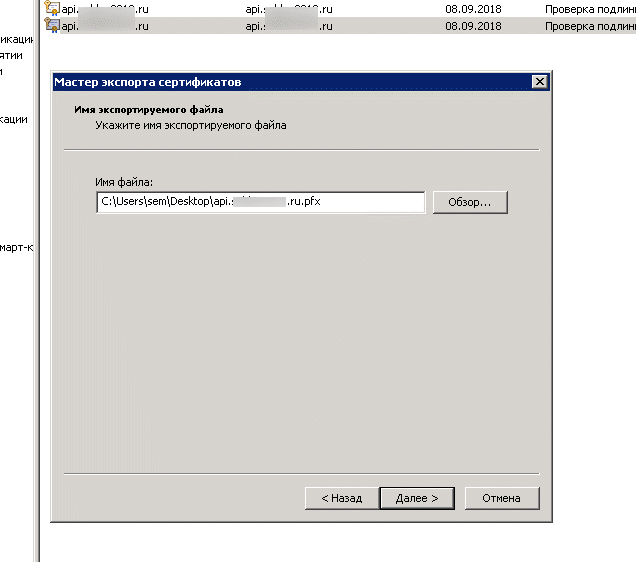
Нажимаем «Готово»

Как видим, все успешно выгружено.

Installing OpenSSL
If your application , you need to have the necessary library files in your file system before deploying your application.
| Platform | Download Required | File Names | Static/Dynamic Linking |
|---|---|---|---|
| Yes | libeay32.dll and ssleay32.dll | Dynamic | |
| No | libcrypto.dylib, libssl.dylib | Dynamic | |
| Yes | libcrypto.a and libssl.a | Static | |
| No | libcrypto.dylib, libssl.dylib | Dynamic | |
| No | Dynamic |
Review the requirements below depending on the platform that you are using:
32-bit and 64-bit Windows
To install OpenSSL in a 32-bit or 64-bit Windows, you need to copy the libeay32.dll and ssleay32.dll dynamic library files to your file system, you can download them from one of these locations:
- Option 1 — Download the OpenSSL installer files and install them.
- Option 2 — Download the OpenSSL compressed library files and copy the libeay32.dll and ssleay32.dll files to your system path.
- If you go for Option 2 and decide to copy libeay32.dll and ssleay32.dll files to your system path, ensure you copy them to the right location:
- 32-bit Windows: You must copy the libeay32.dll and ssleay32.dll 32-bit files to your Windows system folder (System32 folder).
- 64-bit Windows: You must copy the libeay32.dll and ssleay32.dll 64-bit files to your Windows system folder for 64-bit files (System32) and the libeay32.dll and ssleay32.dll 32-bit files to your Windows 32-bit files folder (SysWOW64 folder).
- So when working with a 64-bit Windows, remember:
- System32 folder is for 64-bit files only.
- SysWOW64 folder is for 32-bit files only.
32-bit and 64-bit iOS Device
To install OpenSSL in a 32-bit or 64-bit iOS device, you must copy the libcrypto.a and libssl.a SSL library files to your system. Download the .zip iOS OpenSSL, extract it and find the .a files in the directory. You must copy the libcrypto.a and libssl.a SSL library files to these directories:
iOS Simulator, macOS and Android
No additional steps are required in iOS Simulator and macOS since the required files are already in your file system.
For Android versions up to 6, you need to include the OpenSSL Libraries since Android moved away from OpenSSL to BoringSSL.
Note: RAD Studio Sydney only supports up to Android 6 versions.
Tip: Android no longer uses OpenSSL since version 6, ensure to bundle all your non-NDK libraries with your APK.
Issues encountered on Windows while generating a CSR via one command
According to the version of OpenSSL you installed or to the the installation method on Windows, you may encounter error messages such as:
-
config or req is not recognized as an internal or external command
Check the syntax and the quotes when executing your command. -
Unable to load config info from /usr/local/ssl/openssl.cnf
OpenSSL relies here on a Linux default arborescence.
Troubleshooting: execute simplified commands:
Reminder:
— To launch the command prompt, go to the start menu and execute «cmd».
— To paste the following command lines in dos command prompt, right click and select paste.
— To go to the repertory in which is installed OpenSSL, execute:
cd c:\
cd "Program Files" (or cd "Program Files(x86)")
cd OpenSSL-Win64 (or cd OpenSSL-Win32)
cd bin
- The private key is generated with the following command. Define a file name that suits you:
openssl genrsa 2048 > website-file.key
- then use this command to generate the CSR:
openssl req -new -key website-file.key > website-file.csr
or this one:
openssl req -new -key website-file.key -config "C:\Program Files\OpenSSL-Win64\openssl.cnf" -out website-file.csr
On some platforms, theopenssl.cnf that OpenSSL reads by default to create the CSR is not good or nonexistent.
In this case you can download our
and place it, for example, in C:\Program Files\OpenSSL-Win64\openssl.cnf:- For DigiCert or Thawte server certificates: openssl-dem-server-cert-thvs.cnf
- For TBS X509 or Sectigo server certificates: openssl-dem-server-cert.cnf
-
You’ll be asked by the system to fill-in fields ; Fill them in and respect the instructions (more information onObtain a server certificate) Country Name (2 letter code) []: (FR for example)State or Province Name (full name) : (the name of your state in full letters)Locality Name (eg, city) []: (the name of your city)Organization Name (eg, company) []: (the name of your organization)Organizational Unit Name (eg, section) []: (let blank — advised — or provide a generic term such as «IT department»)Common Name (eg, YOUR name) []: (the name of the site to be secured)Email Address []: (let blank)
Let the other fields blank, they are optional.
So you get 2 files: site-file.key and site-file.csr. Keep the private key file (site-file.key) securely,
then copy / paste the content of the site-file.csr file into the order form at TBS CERTIFICATES.
Warning: Never send us or a third party the private key (site-file.key) otherwise the security of your site may no longer be ensured.
Target Audience
To properly implement the practical steps found in this guide, the reader should be a user of Ubuntu who is comfortable with the use of command-line applications, using the Bourne Again SHell (bash) environment, and editing system configuration files with their preferred text editor application. While previous familiarity with Server Sockets Layer (SSL), or the OpenSSL implementation in particular, is not required for this guide, if desired, the reader is advised to pursue further learning from the resources listed in the Resources section of this guide in order to broaden his/her understanding of this powerful security layer.