Putty для windows 7
Содержание:
- Аналоги PuTTY
- Почему SSH, когда вы можете использовать Linux?
- Официальная версия PuTTY
- Development Snapshot
- Download PuTTYgen for Mac
- Puttygen aka Putty Key Generator
- Server for Windows or other platforms
- Как подключиться к серверу по SSH по ключу через PuTTY
- Using SSH in PuTTY (Windows)
- Download PuTTYgen for Ubuntu/Linux
- SSH key management needs attention
- Скачайте PuTTY для Windows Vista на русском бесплатно
- PuTTY for Mac
- Download PuTTY for Mac and Installation
- PuTTY Like Программы для Windows
Аналоги PuTTY

Русскоязычная сборка PuTTY 0.73-RU-17 от 21 декабря 2019:
| Обычная версия: | putty-0.73-ru-17.zip |
| Портативная версия: | putty-0.73-ru-17-portable.zip |
| PSCP: | pscp.exe |
| PSFTP: | psftp.exe |
| Plink: | plink.exe |
| Pageant: | pageant.exe |
| PuTTYgen: | puttygen.exe |
| Исходный код: | putty-0.73-ru-17-src.zip |
| Контрольные суммы: | sha256sums |
Стабильный релиз PuTTY 0.73 от 29 сентября 2019. Скачать официальную версию Telnet/SSH клиента:
64-разрядная версия:
| Инсталлятор: | putty-64bit-0.73-installer.msi | (цифровая подпись) |
| Архив Zip: | putty.zip | (цифровая подпись) |
| PuTTY: | putty.exe | (цифровая подпись) |
| PSCP: | pscp.exe | (цифровая подпись) |
| PSFTP: | psftp.exe | (цифровая подпись) |
| Plink: | plink.exe | (цифровая подпись) |
| Pageant: | pageant.exe | (цифровая подпись) |
| PuTTYgen: | puttygen.exe | (цифровая подпись) |
| PuTTYtel: | puttytel.exe | (цифровая подпись) |
| Контрольные суммы: | md5sums | (цифровая подпись) |
| sha1sums | (цифровая подпись) | |
| sha256sums | (цифровая подпись) | |
| sha512sums | (цифровая подпись) |
32-разрядная версия:
| Инсталлятор: | putty-0.73-installer.msi | (цифровая подпись) |
| Архив Zip: | putty.zip | (цифровая подпись) |
| PuTTY: | putty.exe | (цифровая подпись) |
| PSCP: | pscp.exe | (цифровая подпись) |
| PSFTP: | psftp.exe | (цифровая подпись) |
| Plink: | plink.exe | (цифровая подпись) |
| Pageant: | pageant.exe | (цифровая подпись) |
| PuTTYgen: | puttygen.exe | (цифровая подпись) |
| PuTTYtel: | puttytel.exe | (цифровая подпись) |
| Контрольные суммы: | md5sums | (цифровая подпись) |
| sha1sums | (цифровая подпись) | |
| sha256sums | (цифровая подпись) | |
| sha512sums | (цифровая подпись) |
Почему SSH, когда вы можете использовать Linux?
Хотя удаленное управление Linux через SSH может быть жизненно важным, вам может даже не понадобиться SSH. В Windows 10 теперь есть подсистема Linux и командная строка в стиле Bash.
Это означает, что вы можете легко вводить команды Linux и получать реалистичные ответы. Хотя это может быть не идеально для всех сценариев, если вам нужен доступ к Linux для обучения в колледже или для обучения и у вас нет доступа по SSH (независимо от приложения) к устройству Linux, это может быть идеальным вариантом.
Конечно, это не единственный вариант. Если вам нужно практиковать команды Bash в Windows, вы всегда можете настроить виртуальную машину. Просто установите дистрибутив Linux в него и (если разрешить аппаратное обеспечение) у вас есть готовая к использованию ОС Linux.
Официальная версия PuTTY
Стабильный релиз PuTTY 0.76 от 17 июля 2021. Скачать официальную версию Telnet/SSH клиента:
64-разрядная версия:
| Инсталлятор: | putty-64bit-0.76-installer.msi | (цифровая подпись) |
| Архив Zip: | putty.zip | (цифровая подпись) |
| PuTTY: | putty.exe | (цифровая подпись) |
| PSCP: | pscp.exe | (цифровая подпись) |
| PSFTP: | psftp.exe | (цифровая подпись) |
| Plink: | plink.exe | (цифровая подпись) |
| Pageant: | pageant.exe | (цифровая подпись) |
| PuTTYgen: | puttygen.exe | (цифровая подпись) |
| PuTTYtel: | puttytel.exe | (цифровая подпись) |
| Контрольные суммы: | md5sums | (цифровая подпись) |
| sha1sums | (цифровая подпись) | |
| sha256sums | (цифровая подпись) | |
| sha512sums | (цифровая подпись) |
32-разрядная версия:
| Инсталлятор: | putty-0.76-installer.msi | (цифровая подпись) |
| Архив Zip: | putty.zip | (цифровая подпись) |
| PuTTY: | putty.exe | (цифровая подпись) |
| PSCP: | pscp.exe | (цифровая подпись) |
| PSFTP: | psftp.exe | (цифровая подпись) |
| Plink: | plink.exe | (цифровая подпись) |
| Pageant: | pageant.exe | (цифровая подпись) |
| PuTTYgen: | puttygen.exe | (цифровая подпись) |
| PuTTYtel: | puttytel.exe | (цифровая подпись) |
| Контрольные суммы: | md5sums | (цифровая подпись) |
| sha1sums | (цифровая подпись) | |
| sha256sums | (цифровая подпись) | |
| sha512sums | (цифровая подпись) |
Development Snapshot
Регулярная тестовая сборка PuTTY собирается каждый день из Git-репозитория.
Нашли ошибку в стабильной версии и ждёте её исправления? Можно рассчитывать, что здесь этот фикс появится намного раньше, чем выйдет следующий релиз. Эта версия для вас, если вам не терпится опробовать все нововведения раньше остальных. С другой стороны, тестовые сборки иногда могут получиться крайне нестабильными.
64-разрядная версия:
| Инсталлятор: | putty-64bit-installer.msi | (цифровая подпись) |
| Архив Zip: | putty.zip | (цифровая подпись) |
| PuTTY: | putty.exe | (цифровая подпись) |
| PSCP: | pscp.exe | (цифровая подпись) |
| PSFTP: | psftp.exe | (цифровая подпись) |
| Plink: | plink.exe | (цифровая подпись) |
| Pageant: | pageant.exe | (цифровая подпись) |
| PuTTYgen: | puttygen.exe | (цифровая подпись) |
| PuTTYtel: | puttytel.exe | (цифровая подпись) |
| Контрольные суммы: | md5sums | (цифровая подпись) |
| sha1sums | (цифровая подпись) | |
| sha256sums | (цифровая подпись) | |
| sha512sums | (цифровая подпись) |
32-разрядная версия:
| Инсталлятор: | putty-installer.msi | (цифровая подпись) |
| Архив Zip: | putty.zip | (цифровая подпись) |
| PuTTY: | putty.exe | (цифровая подпись) |
| PSCP: | pscp.exe | (цифровая подпись) |
| PSFTP: | psftp.exe | (цифровая подпись) |
| Plink: | plink.exe | (цифровая подпись) |
| Pageant: | pageant.exe | (цифровая подпись) |
| PuTTYgen: | puttygen.exe | (цифровая подпись) |
| PuTTYtel: | puttytel.exe | (цифровая подпись) |
| Контрольные суммы: | md5sums | (цифровая подпись) |
| sha1sums | (цифровая подпись) | |
| sha256sums | (цифровая подпись) | |
| sha512sums | (цифровая подпись) |
Download PuTTYgen for Mac
Below is the detailed guide to download PuTTYgen on Mac operating system. Mac OS has a built-in command-line SSH client known as Terminal. To utilize it, go to Finder and then opt for Go -> utilities from the top menu. After that find the terminal which supports SSH connections to remote servers.
However, to run PuTTYgen for mac, the first one must have to install PuTTY. There are multiple ways to install PuTTY, which are Homebrew or MacPorts. Both alternatives will also install the command-line of adaptations of PuTTYgen.
Ported PuTTY for Mac
Mac has the port of PuTTY which can be installed in various ways described as below:
-
Installation using Homebrew:
First, install the ‘brew command line’
Once installed use the below-given command to install PuTTY:- -
Installation using MacPorts:
First of all, one must install MacPorts and then use the command-line to install PuTTY.
Here is the command to install PuTTY via MacPorts
Additionally, a user can also add a shortcut to the desktop by writing the following command line
However, there is an alternative way to install PuTTY on Mac OS. Cyberduck is a widely used Mac OS SSH Client. Once PuTTY installed on the Mac OS, a user can convert PuTTY derived private key format to OpenSSH.
To convert the private key to standard PEM format, type the following command –
You can also read the guide to convert .pem file to .ppk using puttygen.
Puttygen aka Putty Key Generator
The key generation utility – PuTTYgen can create various public-key cryptosystems including Rivest–Shamir–Adleman (RSA), Digital Signature Algorithm (DSA), Elliptic Curve Digital Signature Algorithm (ECDSA), and Edwards-curve Digital Signature Algorithm (EdDSA) keys.
The aforementioned public-key cryptosystems principally focus on secure data transmission and digital signatures.
Although PuTTYgen collects keys in its native file format i.e. .ppk files, the keys can easily be converted to any file format. For Windows, the software interface is PuTTYgen.exe, whereas, for Linux OS the command-line adaptation is available using SSH commands.
Server for Windows or other platforms
You don’t need to worry about a server if you are going to connect to a school or work server. However, if you are planning to use PuTTY to log into your own systems, then you may need to install and enable a server.
Most Linux and Unix systems come with OpenSSH preinstalled. On some distributions, you may need to install the server. On Debian-derived systems, the following will install the server:
On Red Hat systems, the following will install the server:
Depending on the system, you may also need to start the server if you don’t want to reboot. The following should work on most systems:
For Windows, the Tectia SSH is a popular choice and comes with commercial support services. It also runs on IBM z/OS mainframes. Unix/Linux are available with support for business-critical applications.
Как подключиться к серверу по SSH по ключу через PuTTY
Очень часто для подключения к серверу опытные пользователи используют не связку логина и пароля, а авторизацию по ключу. Это обеспечивает более высокий уровень безопасности и освобождает от необходимости каждый раз вручную вводить пароль.
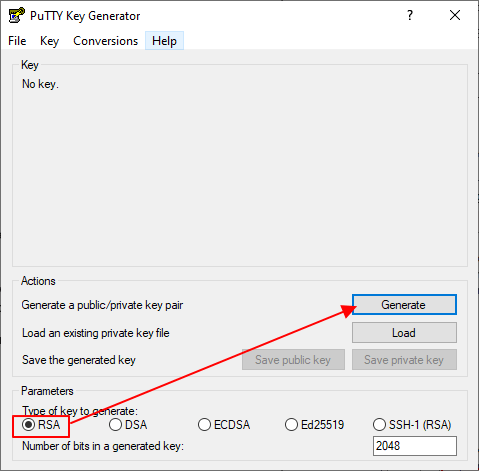
Но, для того чтобы подключиться к серверу по SSH с использованием ключей, эти ключи нужно сначала сгенерировать. Для этого понадобится программа PuTTYgen (PuTTY Key Generator), которая устанавливается в систему вместе с программой PuTTY. Для генерации ключей запускаем PuTTYgen, выбираем тип ключей «RSA» и нажимаем на кнопку «Generate». После этого нужно подвигать мышкой в окне программы PuTTYgen для того, чтобы создать случайные данные, которые будут использованы для создания ключей.
Обратите внимание, если у вас уже есть ключ, который был сгенерирован с помощью OpenSSH, то вы можете загрузить его в программу PuTTYgen и сконвертировать в формат понятный программе PuTTY
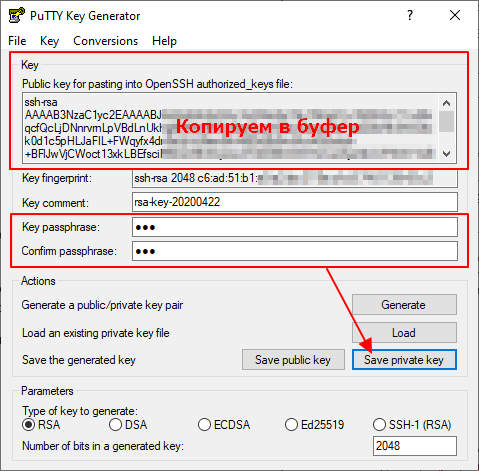
После того как ключи будут созданы, приватный ключ нужно сохранить на диск с помощью кнопки «Save private key». При этом приватный ключ можно дополнительно защитить с помощью ключевой фразы, которую нужно ввести в поле «Key passphrase», хотя это не обязательно.
Что касается публичного ключа, то его нужно скопировать в буфер обмена. Также его можно сохранить на диск с помощью кнопки «Save public key». В дальнейшем этот файл пригодится для настройки других серверов.
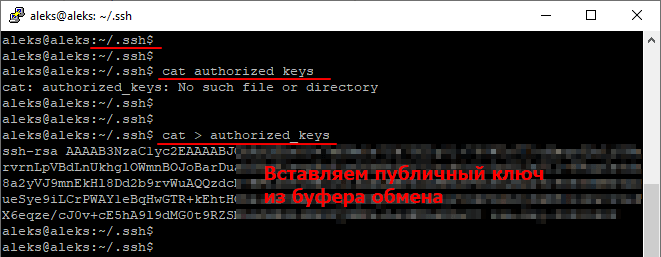
Теперь нужно записать публичный ключ на сервер, в конец файла «authorized_keys» в папке «.ssh» в вашей домашней директории. Для этого подключитесь к серверу по SSH с помощью PuTTY используя логин и пароль. После этого откройте папку «.ssh» в вашей домашней директории:
cd ~/.ssh
Дальше необходимо записать ранее созданный публичный ключ в конец файла «authorized_keys». Если такой файл отсутствует, то его нужно создать. Это можно сделать при помощи команды «cat». Для этого нужно выполнить следующую команду:
cat > authorized_keys
После выполнения данной команды вставляем публичный ключ из буфера обмена (правая кнопка мышки) и сохраняем файл нажатием Ctrl-D.
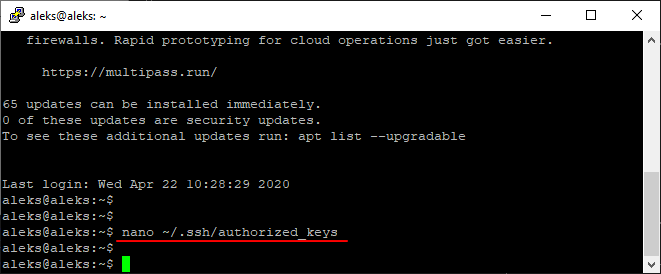
Также вы можете создать и отредактировать файл «authorized_keys» с помощью текстового редактора. Например, в Ubuntu можно использовать программу Nano. Для этого нужно выполнить команду:
nano ~/.ssh/authorized_keys
Более подробно о создании текстовых файлов можно почитать в отдельной статье «Как создать текстовый файл через терминал».
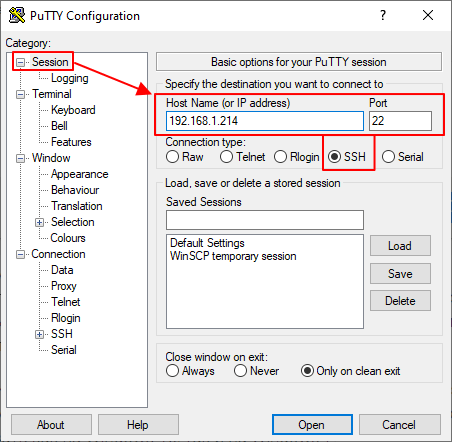
После того как публичный ключ был скопирован на сервер, вы можете использовать оставшийся приватный ключ для подключения к серверу по SSH. Для этого запустите программу PuTTY и введите IP адрес и порт в разделе «Session».
После этого перейдите в раздел «Connection – SSH – Auth» и укажите путь к приватному ключу, который был сгенерирован и сохранен с помощью программы PuTTYgen. Когда все будет готово можно запускать подключение с помощью кнопки «Open».

Если все было настроена правильно, то перед подключением вы увидите запрос на ввод логина и ключевой фразы (если она использовалась). После ввода этих данных вы будете авторизованы без использования пароля.

После завершения настройки подключения с помощью ключей, вход по паролю в целях безопасности нужно отключить. Для этого на сервере нужно открыть файл «/etc/ssh/sshd_config», установить значение «PasswordAuthentication no» и перезапустить службу «sshd» с помощью команды «systemctl restart ssh».
Using SSH in PuTTY (Windows)
Following the successful installation, navigate to the location folder where you have installed the application and run the .exe file.
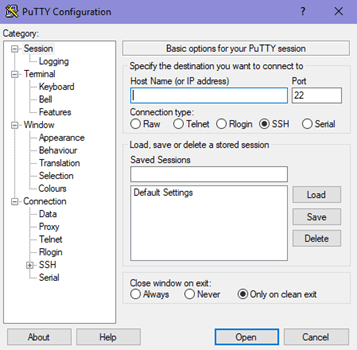 PuTTY Configuration
1. Manage Session in PuTTY
It is the preliminary panel where you get to specify specific options to open a session.
- The Host Name (or IP Address) bar is where a user will input the name or IP address of the server they want to connect.
- Connection type of radio buttons allows users to choose from the kind of network they are planning to connect.
- The Port bar is the section that is filled automatically on selecting the type of connection. However, if you choose the Raw type, the bar stays blank and requires the user to enter the port manually.
- Upon selecting Serial as the connection type, the Host Name and Port bars will be replaced by Serial Line and Speed.
The “Load, save or delete a stored session” section is to set some connection setting without having to type all the details again when needed.
- Once you save it, it can just select on the saved session and click on Load. The saved settings will appear on their respective boxes in the configuration panel.
- The panel permits to modify a saved session by first loading a session, editing everything you want to change and then clicking on “save” button.
- Users have the option to delete a session as well.
The Close Window On Exit option helps in deciding whether the PuTTY terminal will close as soon as the session ends or restarts the session on the termination.
2. What is Logging in PuTTY?
This configuration panel saved the log files of your PuTTY sessions which can be used for debugging and analysis purposes. Users can choose the type of data you want to log in this window.
3. What is Terminal in PuTTY?
The section has a variety of options to decide how the texts in the window should appear. Whether you want the text to come in the next line as soon as it reaches the right edge of the window or you want to interpret the cursor position.
4. Configure Keyboard setting in PuTTY.
With the option, users can modify the behavior of ‘backspace,’ ‘home’ and ‘end’ keys, and several other keys to coordinate with the server settings.
6. Features of PuTTY
Users can choose to disable or enable some of the advanced terminal features of PuTTY like disabling cursor keys, etc. using the function.
7. Adjust the size of Window in PuTTY.
The option allows to predefine a fixed size of the PuTTY window and control the scrolling. Many other configurations can be made using this feature.
8. Change the Appearance of PuTTY
Under this panel, the appearance of the cursor, the font in the terminal window or even control the window border can be changed.
11. What is Selection in PuTTY?
Users can change the course of copy-pasting or the actions of mouse-buttons in Unix environment by making appropriate changes in this panel.
13. Configure Connection in PuTTY.
The panel has options that solve any issues when closing of connections while a window is idle. With the option, users can select between the old and new protocols.
14. Manage Data in PuTTY.
The auto-login option dismisses the need to type the username every time. It can also specify the terminal needs using this panel.
16. What are Telnet, Rlogin, and SSH in PuTTY?
These panels allow configuration of session-related options like changing the mode for negotiation between the server and client, allowing an automated form of login on the server, etc.
The above were details about the panels and the steps to install PuTTY client on windows.
PuTTY, the open-source and free to download software, provides an easy way to access a Unix shell environment from a windows system. Unlike Unix, Windows don’t have any SSH server or client pre-installed. The network file transfer application supports many protocols including the popular SSH and Telnet clients.
Download PuTTYgen for Ubuntu/Linux
To download PuTTYgen for Ubuntu (Linux) operating system, a user to first install PuTTY. However, in some Linux distributions, the SSH key generation tool – PuTTYgen needs to be installed independently from the PuTTY client.
For example, Debian Linux requires the below-given code to install PuTTYgen:
Various Command Line Options of PuTTY in Linux
Below are few important command line options in the Linux operating system for PuTTY:
PuTTYgen | keyfile]
Options:
- Keyfile – It is the name of the existing key file to read at the time of changing the current key.
- –t keytype – The command specifies the type of key to creating. Its acceptable values are RSA and dsa.rsa1.
- -b bits – This command specifies a total number of bit in a particular key. 1024 is the perfect size for DSA key, while 2048 or 4096 are the perfect size for RSA keys.
- –q – The command suppresses the message about progress at the time of key generation.
- -C new-comment – The command will specify the comment to describe the key. It can be used for the new and/or existing key. Key operation is not affected by a comment. However, it is used to recognize the key owner, it’s not reliable completely as any value can be applied to it.
- –P – Using the command will update the passphrase of a key. Passphrase helps to encrypt the private key. As passphrase can’t add or update on a command line, it prompts a new passphrase tool to alter it.
- –old-passphrase-file – The old password of the key remains in this file. The command is used when the key is protected by a passphrase.
- –new-passphrase file – This command prompts the new passphrase of the key. It comes in the action either at the time of generating a new key or while applying –P command to change the passphrase.
- -O output-type – This command defines what to give in output. By default, the private key is the output.
Thus, above are the prominent commands of PuTTYgen in Linux operating system. Besides that, there are many other commands available to perform various tasks from the command prompt in Linux at flank speed.
Types of Keys Supported on PuTTYgen
It is important to know the types of key PuTTYgen supports prior to using it. Below are the key types that it currently supports for SSH-2 and SSH-1 protocol:-
- SSH-1 protocol:- For SSH-1 only supports one key i.e. Rivest–Shamir–Adleman (RSA)
- SSH-2 protocol: – SSH-2 supports multiple key types that include – Digital Signature Algorithm (DSA), Elliptic Curve Digital Signature Algorithm (ECDSA) and Ed25519.
The above description is a detailed brief on downloading and running PuTTYgen on all major operating systems. For further details please check the Download PuTTY page.
SSH key management needs attention
SSH is often used with public key authentication to implement automation and single sign-on.
Public key authentication uses a new kind of access credential, the SSH key, for authentication. It is much more secure than traditional password authentication, especially compared to hard-coded passwords in scripts, but the keys need proper management.
Most organizations with more than a hundred servers have large numbers of SSH keys. Usually, these keys have not been properly managed and audited. An SSH risk assessment is recommended. Organizations should consider deploying key management software to establish proper provisioning, termination, and monitoring for key-based access.
Risks of unmanaged SSH keys include uncontrolled attack spread across the server infrstructure, including to disaster recovery data centers and backup systems.
Organizations should also be aware of security risks related to SSH port forwarding. It is a technology that has many good uses, but it can also enable unfettered access across firewalls. Employees and attackers can leave tunnels back into the internal network from the public Internet. This particularly affects organizations using cloud computing services.
Скачайте PuTTY для Windows Vista на русском бесплатно
| Версия | Платформа | Язык | Размер | Формат | Загрузка |
|---|---|---|---|---|---|
| * скачайте бесплатно PuTTY для Windows, файл проверен! | |||||
|
PuTTY 0.66 RU |
Windows Vista |
Русский | 9.8MB | .zip |
Скачать |
|
PuTTY 0.7 x32 |
Windows | English | 2.9MB | .exe |
Скачать |
|
PuTTY 0.7 x64 |
Windows | English | 3.1MB | .exe |
Скачать |
Обзор PuTTY
PuTTY (Путти) – бесплатная клиентская программа, предназначенная для работы с рядом протоколов, включая SSH, SCP, Telnet и SFTP. Предназначена для системных администраторов и опытных пользователей с навыками профессиональной работы с сетями.
Скриншоты
Похожие программы
SpeedFan
Google Earth
DirectX — пакет библиотек, необходимый системе для работы с мультимедиа
ArtMoney
Andy
Hamachi
Tunngle
Game Maker Studio — разработка игр и приложений под различные платформы
IObit Malware Fighter — для удаления вредоносных программ – троянов, кейлоггеров
Mobogenie
Nokia PC Suite
BlueStacks — программа для запуска android приложение на windows
360 Total Security — условно-бесплатное антивирусное программное обеспечение
Fences
Hotspot Shield
7-Zip — бесплатный архиватор для windows
Origin
CPU-Z
Driver Booster Free — программа для поиска и установки новых драйверов
Acronis Disk Director — пакет инструментов для работы с жесткими дисками компьютера
DriverPack Solution — для автоматической установки и обновления драйверов
Cheat Engine
VirtualBox — создание вирутальных машин
Reg Organizer — программное обеспечение для оптимизации и очистки компьютера
Bandicam — программа для снятия скриншотов и записи видео с экрана
Nox App Player — программа для запуска андроид игр и приложений на windows
2GIS
Razer Game Booster — программа для отключения неиспользуемых процессов
Punto Switcher
Radmin
Mathcad
Ammyy Admin
3DMark
Action!
FurMark
Xpadder
Adobe Dreamweaver
Driver Genius — сканирования и обновление драйверов на компьютере
PowerDVD — проигрыватель мультимедийных файлов
CheMax
GOM Player — медиапроигрыватель для Windows
FBReader
Cool Reader
Samsung Kies — подключение телефонов и смартфонов компании Samsung к ПК
Connectify Hotspot
MyPublicWiFi
Nero Burning ROM
Free Studio — пакет объединяющий более 40 мультимедийных программ
WinSCP
ImgBurn
FB2 Reader
FastStone Capture
EasyBCD
STDU Viewer
NVIDIA PhysX
ManyCam
Virtual Router
Dropbox
Adguard
Dr.Web CureIt! — бесплатная утилита для лечения компьютера от вредоносного ПО
Яндекс.Диск
Kaspersky Free — бесплатная версия антивируса от лаборатории Касперского
NOD32 — хороший антивирус для компьютера
iTunes — программа для синхронизации между мобильными устройствами Apple
Rufus
PRO100
Arduino
CGMiner
Maple
Visual Studio
Bitcoin Core
Глаз.ТВ
Kingo Root
Android Studio
Scratch
Firebird
Charles
NVIDIA GeForce
MinerGate
Microsoft .NET Framework — платформа создающая условия установки компьютерного ПО
Eclipse
NVIDIA Inspector — для работы с графической подсистемой
HWMonitor
Core Temp
Display Driver Uninstaller — для удаления устаревших драйверов видеокарт
VueScan
CrystalDiskInfo — диагностическая утилита для проверки жестких дисков
HDD Low Level Format Tool — утилита, предназначенная для форматирования жестких дисков
Ускоритель компьютера — оптимизация операционной системы Windows
Classic Shell
WinThruster — оптимизация операционных систем семейства Windows
Avast Free Antivirus — бесплатный Аваст антивирус для компьютера
Mcafee — антивирусная программа, для защиты компьютера от внешних угроз
Intel Driver
ASUS Update — утилита, предназначенная для обновления BIOS на компьютере
Clownfish
Evernote
GeForce Experience — автоматического поиск драйверов видеокарт компании Nvidia
Облако Mail.ru
CPU Control
Microsoft Security Essentials — антивирус для защищиты операционной системы
ActiveSync
BlueSoleil
Malwarebytes Anti-Malware — частично бесплатная антивирусная утилита
TV Player Classic
CyberGhost VPN
RivaTuner
PuTTY
Trend Micro HijackThis
VMWare Workstation
Supremo
AnyDesk
Rainmeter
RocketDock
Lightshot
TunnelBear
AMD Catalyst Control Center — программа для настройки видеокарт AMD Radeon
Аудио | Видео программы
Графические программы
Microsoft Office
Игры
Интернет программы
Диски и Файлы
PuTTY for Mac
Let’s talk about the steps to install PuTTY on a MAC operating system. As a prerequisite, users need the following application installed on the system:
- Command-line Tools
- X-CODE
- MacPorts
Install Putty on a Mac using Command-line Tools
MAC users have this facility to use a Unix toolkit. Users have to use the terminal to access the kit. The tool package gives its users many tools, utilities, and compilers that include GCC, Perl, svn, git, etc. Many of the commands are found on Linux installations by default. Let’s look at the steps to install it.
- To begin with, the installation, go to the Apple Developer website.
- Login and in the download section and search for Command Line Tools.
- Install the .dmg file.
Use X-Code to install Putty for mac
It’s an IDE (Integrated Development Environment) specially designed for MAC OS. It consists of a suite of software development tools for developing software for MAC OS, iOS, WatchOS, and tvOS.
It also supports source codes from programming languages like C, C++, Java, Python, Ruby, etc. It’s available on the app store. So, go to app store, search for “x-code” and click on “get.”
Install Putty for mac using MacPorts
It’s open-source software designed to simplify the installation of other software. One can install some packages by entering a command in the terminal, which will download, compile and install the requested software. It also installs any required dependencies related to the software automatically.
- Download MacPorts from here.
- A pkg file will be downloaded. Just double-click to install it.
Download PuTTY for Mac and Installation
After installing the tools, let’s get to the PuTTY installation part.
1. You need to accept the Licence Agreement of X-Code before using it. So, open the terminal from the utility section. It’s just like command line on Linux.
2. Type the command:
sudo xcodebuild –license
By running this command, the Xcode License will be viewed/accepted on behalf of all accounts on the Mac.
3. Press enter to view the License agreement and type “agree.” A line on the terminal will say “You can view the license agreements in x-code About box.”
4. Update MacPorts by typing:
sudo port –v self-update
to make sure that x-code is fully installed. Now, the Mac system is ready to install PuTTY.
5. Type the following command
sudo port install putty
in the Terminal and run the command. It will download some of the dependencies of PuTTY.
6. Type:
putty
in the terminal to launch the application. Running the command would open PuTTY in an X11 window.
7. To copy PuTTY to the desktop as a shortcut icon, type the following command
cp /opt/local/bin/putty ~/Desktop/putty
and hit enter.
8. A desktop icon will be on the desktop which opens the PuTTY configuration box.
Following the installation users can start connecting to servers by adding the IP address and the port (depending on the type of connection you want to make) of the server.
Users can even save sessions containing the IP address of the servers, which would need to be accessed multiple times. Once connected, users can create, update or manipulate with the data present on the server, given that you have the necessary rights to perform those actions.
PuTTY client is one of the best SSH clients as it offers a variety of features like logging, cursor formatting, keyboard formatting, alert sound, resizing the terminal window, changing the actions of mouse buttons, configuring proxies, configuring session-related options, auto-login facility and much more.
However, alternatives to PuTTY can be found here.
PuTTY Like Программы для Windows
Ниже перечислены 3 SSH-клиента, основанные на PuTTY, и они выглядят как PuTTY, но предоставляют дополнительные функции для перехода на следующий уровень. Если вы хотите придерживаться среды PuTTY, то стоит взглянуть на один из этих SSH-клиентов для Windows.
2. SuperPutty (бесплатно; с открытым исходным кодом; на основе PuTTY)
SuperPutty – это альтернатива Windows PuTTY, целью которой является создание лучшей версии PuTTY. Однако для запуска требуется PuTTY. Другими словами, SuperPuTTY делает существующую установку PuTTY лучше. Это позволяет сеансам с вкладками, а также передачу файлов SCP между удаленной и локальной системой.
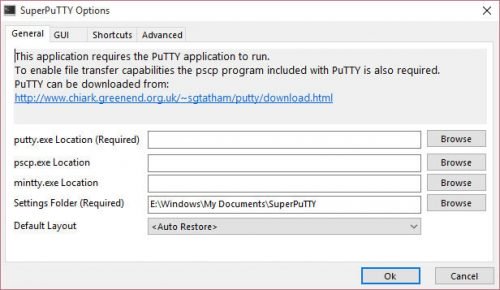
SuperPuTTY требует PuTTY для запуска
Особенности SuperPuTTY включают в себя:
- Пользовательский интерфейс стыковки позволяет персонализировать рабочее пространство и легко управлять несколькими сеансами PuTTY
- Экспорт / Импорт конфигурации сеанса
- Безопасная загрузка файлов с использованием протоколов scp или sftp
- Макеты позволяют настраивать виды сеансов
- Поддерживает конфигурации сеансов PuTTY, включая приватные ключи
- Поддерживает протоколы SSH, RLogin, Telnet и RAW
- Поддерживает локальную оболочку через MinTTY или puttycyg
- Поддерживает Китти
3. PuTTY Tray (бесплатно; с открытым исходным кодом; на основе PuTTY)
PuTTY Tray, как следует из названия, основан на PuTTY. Он добавляет косметические изменения и расширяет PuTTY, используя дополнения, которые делают его лучше, чем PuTTY. Но во многих отношениях это очень похоже на PuTTY. Некоторые из его особенностей включают в себя:
- Минимизация в системный трей (по CTRL + минимизация, всегда или непосредственно при запуске)
- Иконки настраиваемые
- Мигает значок в трее при получении сигнала звонка
- Настраиваемая прозрачность окна
- Гиперссылка на URL
- Портативность: опционально сохраняет конфигурацию сеанса в файлах (например: на USB-накопителе), например, portaPuTTY
- Легкий доступ к настройке «всегда сверху» (в системном меню)
- Поддержка Android adb
Если вы большой поклонник PuTTY, то PuTTY Tray – отличная альтернатива PuTTY SSH.
4. KiTTY (бесплатно; с открытым исходным кодом; на основе PuTTY)
KiTTY – это форк PuTTY, предназначенный для работы в качестве SSH-клиента Windows. KiTTY имеет все функции от PuTTY и добавляет много других функций.

KiTTY очень похож на PuTTY
Хотя весь список функций можно найти на веб-сайте KiTTY, некоторые ключевые добавленные функции перечислены ниже:
- Фильтр сессий
- портативность
- Ярлыки для предопределенной команды
- Автоматический пароль
- Запуск локально сохраненного скрипта в удаленном сеансе
- Значок для каждой сессии
- Отправить в трей
- Быстрый старт повторяющегося сеанса
- Интеграция pscp.exe и WinSCP
KiTTY – еще одна отличная альтернатива PuTTY.
