Pyqt5: первые программы
Содержание:
- PyQt5 simple example
- Using Qt Designer and .ui files
- QTableWidget
- Closing a window
- Install pyqt5
- Centering window on the screen
- Showing a tooltip in PyQt5
- Виджет QLabel
- References
- Multiple windows
- System Tray and Notifications
- Creating a new window
- Predefined QColor Objects
- PyQt5 — QClipboard
- An application icon
- Packaging
- Building Signal-slot Connection
- PyQt5 message box
- Toggling a window
- Portable or not, the choice is yours!
- Persistent windows
- Загрузка .ui против конвертации .ui в .py
PyQt5 simple example
This is a simple example showing a small window. Yet we can do a lot
with this window. We can resize it, maximise it or minimise it. This requires
a lot of coding. Someone already coded this functionality. Because it is repeated
in most applications, there is no need to code it over again. PyQt5 is a high
level toolkit. If we would code in a lower level toolkit, the following code
example could easily have hundreds of lines.
simple.py
#!/usr/bin/python

"""
ZetCode PyQt5 tutorial

In this example, we create a simple
window in PyQt5.

Author: Jan Bodnar
Website: zetcode.com
"""

import sys
from PyQt5.QtWidgets import QApplication, QWidget


def main():

    app = QApplication(sys.argv)

    w = QWidget()
    w.resize(250, 150)
    w.move(300, 300)
    w.setWindowTitle('Simple')
    w.show()

    sys.exit(app.exec_())


if __name__ == '__main__':
    main()
The above code example shows a small window on the screen.
import sys
from PyQt5.QtWidgets import QApplication, QWidget
Here we provide the necessary imports. The basic widgets are
located in module.
app = QApplication(sys.argv)
Every PyQt5 application must create an application object.
The parameter is a list
of arguments from a command line. Python scripts can be run from
the shell. It is a way how we can control the startup of our scripts.
w = QWidget()
The widget is the base class of all user
interface objects in PyQt5. We provide the default constructor for .
The default constructor has no parent. A widget with no parent is called a window.
w.resize(250, 150)
The method resizes the widget.
It is 250px wide and 150px high.
w.move(300, 300)
The method moves the widget to a position
on the screen at x=300, y=300 coordinates.
w.setWindowTitle('Simple')
We set the title of the window with . The title is
shown in the titlebar.
w.show()
The method displays the widget on the screen. A widget is
first created in memory and later shown on the screen.
sys.exit(app.exec_())
Finally, we enter the mainloop of the application. The event handling starts
from this point. The mainloop receives events from the window system and
dispatches them to the application widgets. The mainloop ends if we call the
method or the main widget is destroyed. The method
ensures a clean exit. The environment will be informed how the application
ended.
The method has an underscore. It is because
the is a Python keyword. And thus,
was used instead.
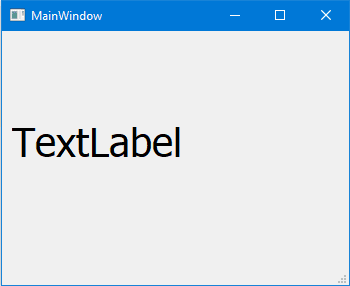
Figure: Simple
Using Qt Designer and .ui files
Using the Designer is optional, but it can be a very helpful way to layout
interfaces. I highly recommend using the Designer.
Once you have created a file in the Designer, you can either
convert it to a Python file which will create the interface programmatically,
or you can load the file directly. The next sections will cover both options.
Convert UI file to Python code
From the terminal, you can convert a QtDesigner .ui file to
a Python file. This method works fine, however it becomes difficult
to iterate rapidly on changes with this extra step. You also cannot
modify the .py file if you ever want to regenerate it. I recommend
using the method in the next section, where you load the .ui file
directly.
The Python file output will have all the code needed to recreate
the interface created in Designer.
Load the UI file in Python
My preferred option for loading interfaces, is to the load the file
directly. This means you will need to include the file with your
distribution, but it means you can easily make changes in the Designer
and quickly test them in Python w/o the extra step of converting the file.
QTableWidget
Если вы хотите просмотреть вашу базу данных в формате таблицы, в PyQt5 предоставляется QTableWidget как раз для этой цели.
QTableWidget состоит из клеток, каждая клетка — экземпляр класса QTableWidgetItem.
Давайте создадим форму, которая содержит QTableWidget и QPushButton.
Перетяните QTableWidget и QPushButton из PyQt5 Designer. После этого, сохраните форму как qtable.ui и конвертируйте дизайн в qtable.py.
Чтобы добавлять ряды в QTableWidget, вы можете использовать метод setRowCount().
Для внесения столбцов в QTableWidget, воспользуйтесь методом setColumnCount().
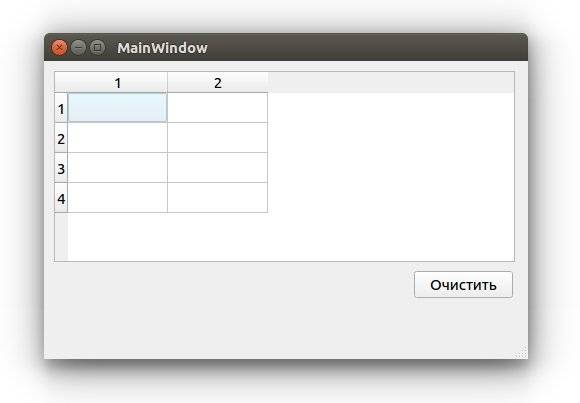
Теперь вы можете писать текст вручную внутри клеток QTableWidget.
Заполнение QTableWidget из кода
Чтобы заполнить QtableWidget программно, вам нужно использовать метод setItem() для каждого объекта QtableWidgetItem.
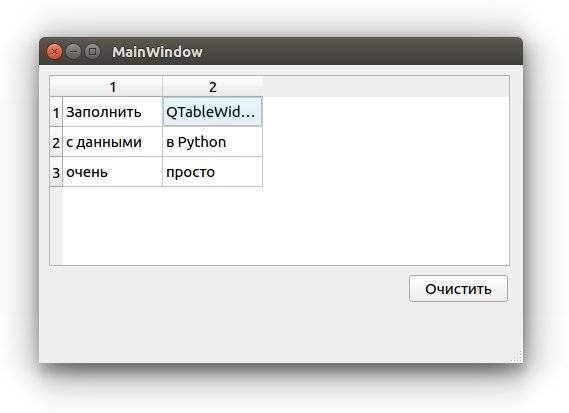
- Сначала мы создали список трех кортежей Python;
- Внутри конструктора главного окна, мы установили количество столбцов и рядов;
- Далее мы перебираем список и получаем каждый кортеж в списке, для заполнения клеток таблицы, при помощи метода setItem()
- Наконец, мы показываем главное окно.
Делаем QTableWidget нередактируемым (только для чтения)
Вам может не понравится то, что клетки в вашей таблице могут быть отредактированы пользователем в том или ином случае. Например, при отображении нередактируемых данных. В этом случае возможность редактирования не имеет никакого смысла.
Чтобы сделать QTableWidget нередактируемым, вы можете использовать метод setFlags(), чтобы сделать каждый QTableWidgetItem доступным только для чтения.
Вам нужно установить флажки, перед тем как настраивать содержимое вашей клетки.
Таким образом, ваш код будет выглядеть вот так:
Теперь, если вы попробуете отредактировать какую-либо клетку — у вас не выйдет, так как QtableWidgetItem теперь нельзя редактировать
Заголовок для столбцов в QTableWidget
До этого момента, названия столбцов QTableWidget были числами. Как на счет того, чтобы поменять названия столбцов на что-нибудь другое?
Чтобы задать текст заголовкам QTableWidget, вы можете использовать метод setHorizontalHeaderLabels(), вот так:
Таким же образом, вы можете менять заголовок ряда, при помощи метода setVerticalHeaderLabels():
Как сортировать QTableWidget
Вы можете сделать ваш QTableWidget сортируемым, при помощи метода setSortingEnabled().
Теперь, если пользователь нажмет на любой заголовок столбца, он может сортировать данные в порядке убывания, или возрастания.
Вы можете использовать этот метод перед, или до наполнения QTableWidget данными.
Что на счет сортировки в QTableWidget, но только для определенного столбца?
Вы можете использовать метод sortByColumn(), и указать индекс столбца и порядок сортировки, вот так:
Кстати, вы можете использовать метод sortItems() для сортировки QTableWidget в возрастающем порядке по умолчанию.
Или вы можете определить свой порядок сортировки:
Помните, что если вы хотите сортировать ваши столбцы программно, вам нужно использовать методы сортировки после заполнения QTableWidget данными, иначе они не будут в нужном вам порядке.
Добавляем QComboBox в QTableWidget
У вас может появится задача, чтобы пользователь выбирал значение внутри QTableWidget, вместо ввода текста.Как на счет того, чтобы добавить QComboBox в QTableWidgetItem?
Чтобы добавить QComboBox внутрь QTableWidgetItem, вы можете использовать метод setCellWidget():
Отлично!
Не ограничивайте себя в воображении и попробуйте вставлять различные виджеты, такие как QСheckbox, или даже QProgressBar.
QProgressBar в QTableWidget
Указанный выше код будет таким же, за исключением строки, где вы создаете QСomboBox, здесь вы внесете тот виджет, который вам нужен.
Единственное ограничение — это ваше собственное воображение!
Closing a window
The obvious way to close a window is to click on the x mark on the titlebar.
In the next example, we show how we can programatically close our window.
We will briefly touch signals and slots.
The following is the constructor of a widget that we use
in our example.
QPushButton(string text, QWidget parent = None)
The parameter is a text that will be displayed on the button.
The is a widget on which we place our button.
In our case it will be a . Widgets of an application form a hierarchy.
In this hierarchy, most widgets have their parents. Widgets without parents are toplevel windows.
quit_button.py
#!/usr/bin/python

"""
ZetCode PyQt5 tutorial

This program creates a quit
button. When we press the button,
the application terminates.

Author: Jan Bodnar
Website: zetcode.com
"""

import sys
from PyQt5.QtWidgets import QWidget, QPushButton, QApplication

class Example(QWidget):

    def __init__(self):
        super().__init__()

        self.initUI()


    def initUI(self):

        qbtn = QPushButton('Quit', self)
        qbtn.clicked.connect(QApplication.instance().quit)
        qbtn.resize(qbtn.sizeHint())
        qbtn.move(50, 50)

        self.setGeometry(300, 300, 350, 250)
        self.setWindowTitle('Quit button')
        self.show()


def main():

    app = QApplication(sys.argv)
    ex = Example()
    sys.exit(app.exec_())


if __name__ == '__main__':
    main()
In this example, we create a quit button. Upon clicking on
the button, the application terminates.
qbtn = QPushButton('Quit', self)
We create a push button. The button is an instance of the
class. The first parameter of the constructor is the label of the button.
The second parameter is the parent widget. The parent widget is the
widget, which is a by inheritance.
qbtn.clicked.connect(QApplication.instance().quit)
The event processing system in PyQt5 is built with the signal & slot
mechanism. If we click on the button, the signal is
emitted. The slot can be a Qt slot or any Python callable.
, which is retrieved with
, contains the main event loop—it processes
and dispatches all events. The clicked signal is connected to the
method which terminates the application. The communication
is done between two objects: the sender and the receiver. The sender is the push
button, the receiver is the application object.
Figure: Quit button
Install pyqt5
You need the package for Python and Qt Designer. You can get
both of these by running:
You will find the designer in the directory of
your Python environment and should be available in your as or .
On Mac, I found it can be run from your venv with .
These packages will also provide for converting Designer files to Python
files. It also includes many other utilities like , , , , and more.
If you are using Linux or a system that doesn’t have the packages
for you can usually find the Designer and other apps
in your system’s package repositories. For example, in Fedora
there is a package named .
You can test your installation by attempting to run the Hello World application
in the next section.
Centering window on the screen
The following script shows how we can center a window on the desktop screen.
center.py
#!/usr/bin/python

"""
ZetCode PyQt5 tutorial

This program centers a window
on the screen.

Author: Jan Bodnar
Website: zetcode.com
"""

import sys
from PyQt5.QtWidgets import QWidget, QDesktopWidget, QApplication


class Example(QWidget):

    def __init__(self):
        super().__init__()

        self.initUI()

    def initUI(self):

        self.resize(250, 150)
        self.center()

        self.setWindowTitle('Center')
        self.show()

    def center(self):

        qr = self.frameGeometry()
        cp = QDesktopWidget().availableGeometry().center()
        qr.moveCenter(cp)
        self.move(qr.topLeft())


def main():

    app = QApplication(sys.argv)
    ex = Example()
    sys.exit(app.exec_())


if __name__ == '__main__':
    main()
The class provides information about
the user’s desktop, including the screen size.
self.center()
The code that will center the window is placed in the custom
method.
qr = self.frameGeometry()
We get a rectangle specifying the geometry of the main window.
This includes any window frame.
cp = QDesktopWidget().availableGeometry().center()
We figure out the screen resolution of our monitor.
And from this resolution, we get the center point.
qr.moveCenter(cp)
Our rectangle has already its width and height. Now we set the center
of the rectangle to the center of the screen.
The rectangle’s size is unchanged.
self.move(qr.topLeft())
We move the top-left point of the application window to the
top-left point of the qr rectangle, thus centering the
window on our screen.
In this part of the PyQt5 tutorial, we have created simple code examples
in PyQt5.
Contents
Previous
Next
Showing a tooltip in PyQt5
We can provide a balloon help for any of our widgets.
tooltip.py
#!/usr/bin/python

"""
ZetCode PyQt5 tutorial

This example shows a tooltip on
a window and a button.

Author: Jan Bodnar
Website: zetcode.com
"""

import sys
from PyQt5.QtWidgets import (QWidget, QToolTip,
    QPushButton, QApplication)
from PyQt5.QtGui import QFont


class Example(QWidget):

    def __init__(self):
        super().__init__()

        self.initUI()


    def initUI(self):

        QToolTip.setFont(QFont('SansSerif', 10))

        self.setToolTip('This is a <b>QWidget</b> widget')

        btn = QPushButton('Button', self)
        btn.setToolTip('This is a <b>QPushButton</b> widget')
        btn.resize(btn.sizeHint())
        btn.move(50, 50)

        self.setGeometry(300, 300, 300, 200)
        self.setWindowTitle('Tooltips')
        self.show()


def main():

    app = QApplication(sys.argv)
    ex = Example()
    sys.exit(app.exec_())


if __name__ == '__main__':
    main()
In this example, we show a tooltip for two PyQt5 widgets.
QToolTip.setFont(QFont('SansSerif', 10))
This static method sets a font used to render tooltips.
We use a 10pt SansSerif font.
self.setToolTip('This is a <b>QWidget</b> widget')
To create a tooltip, we call the method. We can use
rich text formatting.
btn = QPushButton('Button', self)
btn.setToolTip('This is a <b>QPushButton</b> widget')
We create a push button widget and set a tooltip for it.
btn.resize(btn.sizeHint())
btn.move(50, 50)
The button is being resized and moved on the window. The
method gives a recommended size for the button.
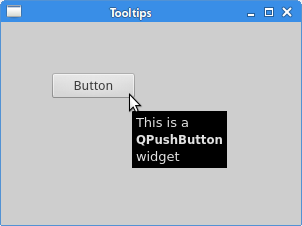 Figure: Tooltips
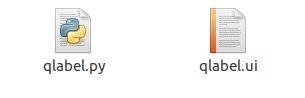
Виджет QLabel
Для внесение виджета QLabel в вашу форму, выполните следующее:
- Откройте PyQt5 Designer и выберите шаблон Main Window;
- Перетяните виджет ярлыка из бокса слева;

Сохраните дизайн в файл как qlabel.ui и конвертируйте его в файл qlabel.py. Теперь поработаем с ярлыком виджета при помощи кода.
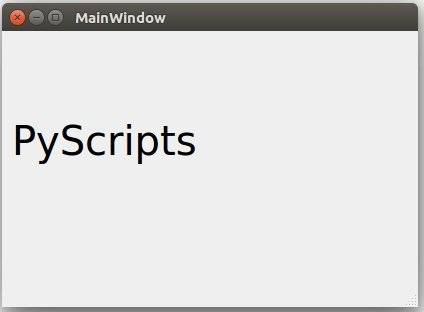
Результат:
Меняем шрифт QLabel
Чтобы поменять шрифт QLabel, используйте метод setFont() и передайте ему QFont следующим образом:
После того, как запустите этот код, обратите внимание на то, что ярлык возникает некорректно, так как размер — меньше, чем размер шрифта, который мы используем. Так что нам нужно установить размер ярлыка
Чтобы поменять размер QLabel, вам нужно указать его геометрию при помощи метода setGeometry(), вот так:
Меняем текст в QLabel
Чтобы изменить текст в QLabel, вы можете использовать метод setText(), вот так:
Именно на столько все просто! Давайте рассмотрим другие виджеты.
References
- Official Qt C++ Documentation
- PyQt5 Reference Guide
- PtQt5 Class Documentation
- https://www.qt.io/
- https://github.com/DevDungeon/PyQt5-Bitcoin-Price-Checker
- https://www.devdungeon.com/content/live-coding-pyqt5-guis-w-python
- https://www.qt.io/download
- https://github.com/baoboa/pyqt5/tree/master/examples
- https://www.riverbankcomputing.com/static/Docs/PyQt5
- https://www.riverbankcomputing.com/static/Docs/PyQt5/signals_slots.html
- https://github.com/baoboa/pyqt5/tree/master/examples/
- https://github.com/DevDungeon/Cookbook/tree/master/python/pyqt5_examples
- https://setuptools.readthedocs.io/en/latest/
- https://www.pyinstaller.org/
Multiple windows
You can use the same principle for creating multiple windows — as long as you keep a reference to the window, things will work as expected. The simplest approach is to create a separate method to toggle the display of each of the windows.
- PyQt5
- PyQt6
python
python
 A mainwindow with two child windows.
However, you can also create a generic method which handles toggling for all windows — see transmitting extra data with Qt signals for a detailed explanation of how this works. The example below shows that in action, using a function to intercept the signal from each button and pass through the appropriate window. We can also discard the value since we aren’t using it.
System Tray and Notifications
Creating a system tray icon for your application can be
very useful. A common task is to keep an application
running even when the main window is closed while leaving
an icon in the system tray.
This example will demonstrate how to:
- Create a system tray icon
- Add a right-click context menu
- Add custom action handlers to the context menu items
- Capture window close event, ignore, and hide window (exit to system tray)
- Add an Exit option to the context menu of the system tray
- Generate a desktop notification
You can also create application that doesn’t have a main window
at all and lives entirely in the sytem tray. In that case,
don’t make your main widget a Q or a .
Instead, make it a
Creating a new window
In Qt any widget without a parent is a window. This means, to show a new window you just need to create a new instance of a widget. This can be any widget type (technically any subclass of ) including another if you prefer.
There is no restriction on the number of instances you can have. If you need toolbars or menus on your second window you will have to use a to achieve this. This can get confusing for users however, so make sure it’s necessary.
As with your main window, creating a window is not sufficient, you must also show it.
- PyQt5
- PyQt6
python
python
A main window with a button to launch a child window,
If you run this, you’ll see the main window. Clicking the button may show the second window, but if you see it it will only be visible for a fraction of a second. What’s happening?
python
Inside this method, we are creating our window (widget) object, storing it in the variable and showing it. However, once we leave the method we no longer have a reference to the variable (it is a local variable) and so it will be cleaned up – and the window destroyed. To fix this we need to keep a reference to the window somewhere, for example on the object.
python
Now, when you click the button to show the new window, it will persist.
However, what happens if you click the button again? The window will be re-created! This new window will replace the old in the variable, and – because there is now no reference to it – the previous window will be destroyed.
You can see this in action if you change the window definition to show a random number in the label each time it is created.
python
The block is only run when creating the window. If you keep clicking the button the number will change, showing that the window is being re-created.
One solution is to simply check whether the window has already being created before creating it. The example below shows this in action.
- PyQt5
- PyQt6
python
python
 Child window with a label randomly generated on creation.
Using the button you can pop up the window, and use the window controls to close it. If you click the button again, the same window will re-appear.
This approach is fine for windows that you create temporarily – for example if you want to pop up a window to show a particular plot, or log output. However, for many applications you have a number of standard windows that you want to be able to show/hide them on demand.
In the next part we’ll look at how to work with these types of windows.
Predefined QColor Objects
Given below are the Predefined QColor Objects −
| Qt.white |
| Qt.black |
| Qt.red |
| Qt.darkRed |
| Qt.green |
| Qt.darkGreen |
| Qt.blue |
| Qt.cyan |
| Qt.magenta |
| Qt.yellow |
| Qt.darkYellow |
| Qt.gray |
PyQt5 — QClipboard
The QClipboard class provides access to system-wide clipboard that offers a simple mechanism to copy and paste data between applications. Its action is similar to QDrag class and uses similar data types.
QApplication class has a static method clipboard() which returns reference to clipboard object. Any type of MimeData can be copied to or pasted from the clipboard.
Following are the clipboard class methods that are commonly used −
| Sr.No. | Methods & Description |
|---|---|
| 1 |
clear() Clears clipboard contents |
| 2 |
setImage() Copies QImage into clipboard |
| 3 |
setMimeData() Sets MIME data into clipboard |
| 4 |
setPixmap() Copies Pixmap object in clipboard |
| 5 |
setText() Copies QString in clipboard |
| 6 |
text() Retrieves text from clipboard |
Signal associated with clipboard object is −
| Sr.No. | Method & Description |
|---|---|
| 1 |
dataChanged() Whenever clipboard data changes |
An application icon
The application icon is a small image which is usually displayed
in the top left corner of the titlebar. In the following example we will
show how we do it in PyQt5. We will also introduce some new methods.
Some environments do not display icons in the titlebars. We need to enable them.
See my
on Stackoverflow for a solution, if you are seeing no icons.
icon.py
#!/usr/bin/python

"""
ZetCode PyQt5 tutorial

This example shows an icon
in the titlebar of the window.

Author: Jan Bodnar
Website: zetcode.com
"""

import sys
from PyQt5.QtWidgets import QApplication, QWidget
from PyQt5.QtGui import QIcon


class Example(QWidget):

    def __init__(self):
        super().__init__()

        self.initUI()


    def initUI(self):

        self.setGeometry(300, 300, 300, 220)
        self.setWindowTitle('Icon')
        self.setWindowIcon(QIcon('web.png'))

        self.show()


def main():

    app = QApplication(sys.argv)
    ex = Example()
    sys.exit(app.exec_())


if __name__ == '__main__':
    main()
The previous example was coded in a procedural style. Python programming language
supports both procedural and object oriented programming styles. Programming in
PyQt5 means programming in OOP.
class Example(QWidget):

    def __init__(self):
        super().__init__()
        ...
Three important things in object oriented programming are classes,
data, and methods. Here we create a new class called .
The class inherits from the class.
This means that we call two constructors: the first one for the
class and the second one for the inherited class. The
method returns the parent object of the class and we call its constructor.
The method is a constructor method in Python language.
self.initUI()
The creation of the GUI is delegated to the method.
self.setGeometry(300, 300, 300, 220)
self.setWindowTitle('Icon')
self.setWindowIcon(QIcon('web.png'))
All three methods have been inherited from the class.
The does two things: it locates the window on the screen and sets
it size. The first two parameters are the x and y
positions of the window. The third is the width and the fourth is the height of the
window. In fact, it combines the and methods
in one method. The last method sets the application icon. To do this, we have created a
object. The receives the path to our icon to be displayed.
def main():

    app = QApplication(sys.argv)
    ex = Example()
    sys.exit(app.exec_())
The application and example objects are created. The main loop is started.
![]() Figure: Icon
Figure: Icon
Packaging
You can package your PyQt5 app in a number of ways including:
- Python setuputils packaging (for and pypi.org).
- PyInstaller to create an , , or Linux executable
We will only look at using PyInstaller here since regular Python packaging
is already well documented. You can also check out my
PyInstaller Tutorial.
PyInstaller can be used to create .exe files for Windows, .app
files for Mac, and distributable packages for Linux.
Optionally, it can create a single file which is more convenient for
distributing, but takes slightly longer to start because it unzip itself.
Use to generate a file based on your application.
You can find more details about spec files at https://pythonhosted.org/PyInstaller/spec-files.html.
After generating the spec file, you can customize it to suit your needs.
For example, to add template files, modify the variable.
Note that starting in PqyQt 5.13.0 there is an additional build step
for the files to be found. When packaging, it expects
the libraries to be in but they get put in the root
directory. You can manually move the files in to that directory after
build or you can set it in the flag or object.
If you add it in the object, it will put the files
in the right spot, but it still ALSO leave the same files in the root
of the output directory. You will need to clean up the duplicates.
For example:
Then, after the spec file is complete, you can build it using PyInstaller.
Alternatively, instead of using a file, you can specify
all the options at the command line. For example:
When a Hello World type application is packaged with PyInstaller,
it comes out to about 100MB on disk, and uses about 13MB or RAM
when running.
Building Signal-slot Connection
Instead of using Designer, you can directly establish signal-slot connection by following syntax −
widget.signal.connect(slot_function)
Suppose if a function is to be called when a button is clicked. Here, the clicked signal is to be connected to a callable function. It can be achieved in any of the following technique −
button.clicked.connect(slot_function)
Example
In the following example, two QPushButton objects (b1 and b2) are added in QDialog window. We want to call functions b1_clicked() and b2_clicked() on clicking b1 and b2 respectively.
When b1 is clicked, the clicked() signal is connected to b1_clicked() function −
b1.clicked.connect(b1_clicked())
When b2 is clicked, the clicked() signal is connected to b2_clicked() function.
import sys
from PyQt5.QtCore import *
from PyQt5.QtGui import *
from PyQt5.QtWidgets import *

def window():
   app = QApplication(sys.argv)
   win = QDialog()
   b1 = QPushButton(win)
   b1.setText("Button1")
   b1.move(50,20)
   b1.clicked.connect(b1_clicked)

   b2 = QPushButton(win)
   b2.setText("Button2")
   b2.move(50,50)
   b2.clicked.connect(b2_clicked)

   win.setGeometry(100,100,200,100)

   win.setWindowTitle("PyQt5")
   win.show()
   sys.exit(app.exec_())

def b1_clicked():
   print ("Button 1 clicked")

def b2_clicked():
   print ("Button 2 clicked")

if __name__ == '__main__':
   window()
The above code produces the following output −
Output
Button 1 clicked
Button 2 clicked
A GUI widget can be placed inside the container window by specifying its absolute coordinates measured in pixels. The coordinates are relative to the dimensions of the window defined by setGeometry() method.
PyQt5 message box
By default, if we click on the x button on the titlebar,
the is closed. Sometimes we want to modify
this default behaviour. For example, if we have a file opened in an editor
to which we did some changes. We show a message box to confirm the action.
messagebox.py
#!/usr/bin/python

"""
ZetCode PyQt5 tutorial

This program shows a confirmation
message box when we click on the close
button of the application window.

Author: Jan Bodnar
Website: zetcode.com
"""

import sys
from PyQt5.QtWidgets import QWidget, QMessageBox, QApplication


class Example(QWidget):

    def __init__(self):
        super().__init__()

        self.initUI()

    def initUI(self):

        self.setGeometry(300, 300, 250, 150)
        self.setWindowTitle('Message box')
        self.show()

    def closeEvent(self, event):

        reply = QMessageBox.question(self, 'Message',
                                     "Are you sure to quit?", QMessageBox.Yes |
                                     QMessageBox.No, QMessageBox.No)

        if reply == QMessageBox.Yes:

            event.accept()
        else:

            event.ignore()


def main():
    app = QApplication(sys.argv)
    ex = Example()
    sys.exit(app.exec_())


if __name__ == '__main__':
    main()
If we close a , the
is generated. To modify the widget behaviour we need to reimplement
the event handler.
reply = QMessageBox.question(self, 'Message',
                             "Are you sure to quit?", QMessageBox.Yes |
                             QMessageBox.No, QMessageBox.No)
We show a message box with two buttons: Yes and No. The first string appears
on the titlebar. The second string is the message text displayed by the dialog.
The third argument specifies the combination of buttons appearing in the dialog.
The last parameter is the default button. It is the button which has initially
the keyboard focus. The return value is stored in the variable.
if reply == QtGui.QMessageBox.Yes:
    event.accept()
else:
    event.ignore()
Here we test the return value. If we click the Yes button, we accept
the event which leads to the closure of the widget and to the
termination of the application. Otherwise we ignore the close event.
Figure: Message box
Toggling a window
Often you’ll want to toggle the display of a window using an action on a toolbar or in a menu. As we previously saw, if no reference to a window is kept, it will be discarded (and closed). We can use this behaviour to close a window, replacing the method from the previous example with –
python
By setting to the reference to the window will be lost, and the window will close.
If we set it to any other value that the window will still close, but the test will not pass the next time we click the button and so we will not be able to recreate a window.
This will only work if you have not kept a reference to this window somewhere else. To make sure the window closes regardless, you may want to explicitly call on it. The full example is shown below.
- PyQt5
- PyQt6
python
python
Create GUI Applications with Python & Qt6
The easy way to create desktop applications
My complete guide, updated for 2021 & PyQt6. Everything you need build real apps.
More info

Downloadable ebook (PDF, ePub) & Complete Source code
To support developers in ` countryRegion ` I give a
]]% discount on all books and courses.
` activeDiscount`.`description ` I’m giving a
` activeDiscount`.`discount `% discount on all books and courses.
Portable or not, the choice is yours!
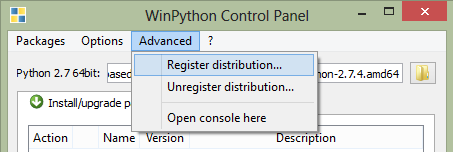
WinPython is a portable application, so the user should not expect any integration into Windows explorer during installation. However, the WinPython Control Panel allows to «register» your distribution to Windows (see screenshot below).
Registering your WinPython installation will:
- associate file extensions .py, .pyc and .pyo to Python interpreter
- register Python icons in Windows explorer
- add context menu entries Edit with IDLE and Edit with Spyder for .py files
- register WinPython as a standard Python distribution (standard Python Windows installers will see WinPython in Windows registry)
(*) For recent WinPython, Windows 8..10 users may have to install missing system DLL Microsoft Visual C++ Redistributable for Visual Studio 2017..2019 (vc_redist_x86.exe for WinPython 32bit, vc_redist_x64.exe for Winpython 64bit)
(*) For best Winpython 2018-01 and later experience, it is recommended to have WinPython base directory path smaller than 37 characters. example: C:\Users\xxxxxxxx\Downloads\WinPython
(**) Since WinPython 2019-02, all installers are just 7zip auto-extracts.
Persistent windows
So far we’ve looked at how to create new windows on demand. However, sometimes you have a number of standard application windows. In this case rather than create the windows when you want to show them, it can often make more sense to create them at start-up, then use to display them when needed.
In the following example we create our external window in the block for the main window, and then our method simply calls to display it.
- PyQt5
- PyQt6
python
python
If you run this, clicking on the button will show the window as before. However, note that the window is only created once and calling on an already visible window has no effect.
Showing & hiding persistent windows
Once you have created a persistent window you can show and hide it without recreating it. Once hidden the window still exists, but will not be visible and accept mouse/other input. However you can continue to call methods on the window and update it’s state — including changing it’s appearance. Once re-shown any changes will be visible.
Below we update our main window to create a method which checks, using to see if the window is currently visible. If it is not, it is shown using , if it is already visible we hide it with .
python
The complete working example of this persistent window and toggling the show/hide state is shown below.
- PyQt5
- PyQt6
python
python
Note that, again, the window is only created once — the window’s block is not re-run (so the number in the label does not change) each time the window is re-shown.
Загрузка .ui против конвертации .ui в .py
В данном руководстве мы используем PyQt5 Designer, но перед тем, как мы пойдем дальше, давайте рассмотрим, как еще мы можем использовать сгенерированный файл из PyQt5 Designer.
Нам нужно открыть PyQt5 Designer, выбрать шаблон Main Window и нажать кнопку create.
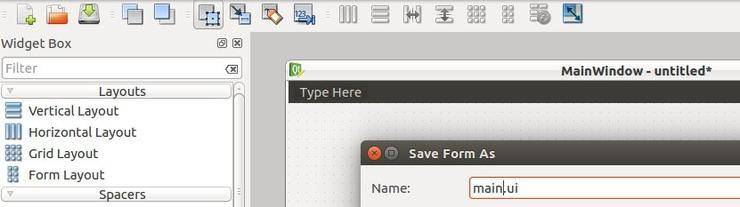
Далее в файловом меню (File), нажимаем сохранить. PyQt5 Designer экспортирует вашу форму в XML с расширением .ui.
Для использования этого дизайна, у вас есть два способа:
- Загрузить файл .ui в ваш код Python;
- Конвертировать файл .ui в файл .py при помощи pyuic5;
Загрузка .ui файла в ваш код Python
Чтобы загрузить файл .ui в ваш код Python, вы можете использовать функцию loadUI() из uic вот так:
Если вы запустите код, вы увидите окно, в котором есть только ярлык.
Это значит, что ui файл успешно загрузился!
Мы используем sys.exit(app.exec()) вместо использования app.exec() напрямую, чтобы выслать правильный код статуса, родительский процесс, или процесс вызова.
Если вы использовали app.exec() напрямую, приложение отправит ноль, что говорит об успехе, и это произойдет даже если приложение упадет.
Конвертация файла .ui в файл .py при помощи pyuic5
Давайте попробуем еще один способ и конвертируем файл .ui в код Python:
Да! Был создан новый файл под названием mydesign.py. Теперь, импортируем этот файл, чтобы показать его в окне.
Если запустите этот код, вы должны увидеть то же окно, что было в первом методе.
Преимущество использования второго метода — это автоматическое завершение, которое выполнит IDE, так как все ваши виджеты импортированы
В то же время, пользуясь первым методом, вы просто загружаете файл .ui и вам нужно обращать внимание на названия ваших виджетов
Еще одно преимущество использования второго метода. Скорость: вам не нужен парсинг XML для загрузки UI.
Настало время закатить рукава и поиграть с виджетами PyQt5.
