Создаём окружение для pyqt5 в linux mint (ubuntu)
Содержание:
- Содержание:
- Типы макета
- Layout Objects
- Installing Qt
- Matching Build Keys
- Run Time Form Processing
- Создание проекта
- Editing and Deleting Connections
- Qt QML
- Руководство по настройке среды Qt Designer в Pycharm!
- Finished main.py
- Установка макета верхнего уровня
- 3 Использование формы, созданной в Qt Designer
- Other improvements
- Создание виджетов с хорошим поведением.
- qt designer download
Содержание:
- — как создать в Qt Designer форму, а затем использовать ее в программе;
Снимок окна программы, которая получилась при написании статьи приведен на рис. 1.

рис. 1 пример окна, созданного в Qt Designer
В нижней части рисунка находится счетчик, значение которого увеличивается с заданной периодичностью. Счетчик можно запустить или остановить при помощи соответствующих кнопок.
Раньше я никогда дизайнером не пользовался, т.к. думал, что он недостаточно гибок (это верно, отчасти), и позволяет использовать лишь стандартные элементы управления. Однако, недавно выполнял несколько заказов, в которых требовалось наклепать бешено много окошек, кнопочек и т.п. (все элементы управления были стандартными), поэтому я решил использовать Qt Designer. Я остался очень доволен дизайнером, но решил попробовать использовать в нем кастомные виджеты (есть несколько способов добиться такого результата, я расскажу лишь про один из них), и написать про это статью :).
Типы макета
Горизонтальная и вертикальная (бокс)планировки
Самый простой способ расположить объекты на форме-поместить их в горизонтальном или вертикальном положении.Горизонтальные компоновки обеспечивают выравнивание виджетов внутри по горизонтали;вертикальные компоновки обеспечивают выравнивание по вертикали.
Горизонтальная и вертикальная планировки могут быть объединены и вложены на любую глубину.Однако,если вам нужен больший контроль над размещением объектов,подумайте об использовании сетчатой компоновки.
Макет сетки
Сложные компоновочные формы можно создавать,размещая объекты в сетке.Такой вид компоновки дает дизайнеру формы гораздо больше свободы в размещении виджетов на форме,но может привести к гораздо меньшей гибкости компоновки.Тем не менее,для некоторых видов раскладок формы расположение по сетке гораздо более удобно,чем вложенное расположение горизонтальных и вертикальных компоновок.
Макет формы
Класс QFormLayout управляет виджетами в виде двух столбцов; левый столбец содержит метки, а правый столбец содержит виджеты полей, такие как редактирование строк, счетчики и т. д. Класс QFormLayout придерживается различных правил внешнего вида платформы и поддерживает перенос для длинных строк.
Файл пользовательского интерфейса выше дает результаты предварительного просмотра,показанные ниже.
| Windows XP | macOS | Cleanlooks |
|---|---|---|
Сплиттер-макеты
Другой распространенный способ управления расположением объектов на форме-поместить их в сплиттер.Эти разделители располагают объекты по горизонтали или вертикали так же,как и обычные раскладки,но также позволяют пользователю регулировать количество пространства,отведенного под каждый объект.
Хотя QSplitter — это виджет контейнера,Qt Designerобрабатывает объекты-разделители как макеты, которые применяются к существующим виджетам. Чтобы поместить группу виджетов в разделитель, выберите их, затем примените макет разделителя с помощью соответствующей кнопки панели инструментов, сочетания клавиш или пункта контекстного меню « Макет» .
Layout Objects
Layout objects are created by applying a layout to a group of existing objects. This is achieved by selecting the objects that you need to manage and applying one of the standard layouts using the main toolbar, the Form menu, or the form’s context menu.
The layout object is indicated by a red frame on the form and appears as an object in the Object Inspector. Its properties (margins and constraints) are shown in the Property Editor.
The layout object can be selected and placed within another layout along with other widgets and layout objects to build a layout hierarchy.
When a child layout object is selected, its parent layout object can be selected by pressing down the Shift key while clicking on it. This makes it possible to select a specific layout in a hierarchy, which is otherwise difficult due to the small frame.
Installing Qt
You can install the Qt Framework and tools by using an or installer, or by building the source packages yourself.
The installers allow you to download and install the following components:
- Qt libraries, prebuilt for a particular development platform (operating system and compiler)
- Qt Creator integrated development environment (IDE)
- Reference Documentation and examples
- Qt in source code form (needed only if you want to build the framework and tools yourself)
- Add-On components that are relevant for different platforms
Online Installation
In the online installer, you can select commercial or open source versions of Qt, tools, and Add-On components to install. Using the online installer requires signing in to your Qt Account. The installer retrieves the license attached to the account from a server and provides a list of available components corresponding to the license.
The online installer is available from the Qt Downloads page.
Offline Installation
An offline installer is a single package that contains all of Qt and Add-Ons relevant for a target platform. Users with a commercial license can either sign in with their Qt account or with their Qt license key during the installation process. The license key is available in the Qt Account Web portal.
The offline installer is available here.
Installation Process
To run the installer, you need a Qt Account. You can use your Qt Account credentials to sign-in to all Qt services, including the forums and wiki. If you do not already have a Qt Account, you can create one during the installation process.
To complete the installation, select the components that you want to install and follow the instructions of the installation program.
The following YouTube video gives a complete walk-through of the installation process:
Updating or Removing Qt
Once Qt is installed, you can use the Maintenance Tool under <install_dir> to add components and to update or remove installed components.
Platform Requirements
Specific requirements and instructions for developing applications on different platforms are covered in the platform pages.
- Android
- iOS
- Windows
- Linux/X11
- macOS
- Universal Windows Platform
For more information, visit the supported platforms page.
Matching Build Keys
The Qt Creator that is included in pre-built Qt packages on Windows is built with the Microsoft Visual Studio compiler, whereas the version of Qt shipped for building applications is configured and built to use the MinGW/g++ compiler. Plugins built by using this version of Qt cannot be loaded by Qt Creator because the build-keys do not match. The plugins can only be used in the standalone version of Qt Designer. Choose Help > About Qt Creator to check the Qt version Qt Creator was built with.
To use Qt Designer plugins that were built for the shipped Qt version, make sure that Qt Creator is built with the same compiler by either recompiling Qt Creator using MinGW or recompiling Qt with Microsoft Visual Studio, depending on which configuration you want to use for your applications.
Run Time Form Processing
Alternatively, forms can be processed at run time, producing dynamically- generated user interfaces. This can be done using the QtUiTools module that provides the QUiLoader class to handle forms created with Qt Designer.
The UiTools Approach
A resource file containing a UI file is required to process forms at run time. Also, the application needs to be configured to use the QtUiTools module. This is done by including the following declaration in a project file, ensuring that the application is compiled and linked appropriately.
QT += uitools
The QUiLoader class provides a form loader object to construct the user interface. This user interface can be retrieved from any QIODevice, e.g., a QFile object, to obtain a form stored in a project’s resource file. The () function constructs the form widget using the user interface description contained in the file.
The QtUiTools module classes can be included using the following directive:
#include <QtUiTools>
The () function is invoked as shown in this code from the Text Finder example:
static QWidget *loadUiFile(QWidget *parent)
{
    QFile file(":/forms/textfinder.ui");
    file.open(QIODevice::ReadOnly);

    QUiLoader loader;
    return loader.load(&file, parent);
}
In a class that uses QtUiTools to build its user interface at run time, we can locate objects in the form using (). For example, in the following code, we locate some components based on their object names and widget types:
    ui_findButton = findChild<QPushButton*>("findButton");
    ui_textEdit = findChild<QTextEdit*>("textEdit");
    ui_lineEdit = findChild<QLineEdit*>("lineEdit");
Processing forms at run-time gives the developer the freedom to change a program’s user interface, just by changing the UI file. This is useful when customizing programs to suit various user needs, such as extra large icons or a different colour scheme for accessibility support.
Создание проекта
Вначале нам необходимо создать проект. Сразу скажу, что наша программа будет консольным приложением. Для этого выберите или можно воспользоваться сочетанием клавиш :

Перед вами появится «Мастер настройки проектов». В левой колонке отметьте пункт , а затем в правой — :

На следующем шаге нужно будет указать имя для нашей будущей программы и папку, где будут располагаться файлы проекта. У меня это и соответственно:

На следующем шаге без изменений, поэтому просто нажимаем кнопку :

Теперь нам нужно выбрать набор компиляторов, который мы будем использовать для сборки нашего проекта. Я настоятельно рекомендую выбрать (сняв при этом отметки с остальных, если они у вас есть):

На последнем шаге нажимаем :

Теперь вы можете увидеть автоматически сгенерированный Qt-проект консольного приложения. Давайте рассмотрим его детально:

В корневой папке у нас лежит файл My_QtApplication.pro — это основной файл настроек проекта
Мы разберем его позже, а пока обратите внимание на папку «Исходники», в которой расположен файл main.cpp. Данный файл содержит минимальный исходный код нашей программы
Он был автоматически сгенерирован средствами Qt. Я не буду вдаваться в детальное описание класса QCoreApplication, скажу лишь, что он предоставляет обработку сообщений для консольного приложения Qt и является особенностью архитектуры построения Qt-приложений.
Editing and Deleting Connections
By default, connection paths are created with two labels that show the signal and slot involved in the connection. These labels are usually oriented along the line of the connection. You can move them around inside their host widgets by dragging the red square at each end of the connection path.
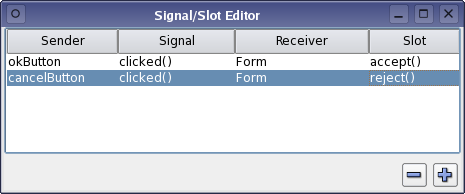 |
The Signal/Slot Editor
The signal and slot used in a connection can be changed after it has been set up. When a connection is configured, it becomes visible in Qt Designer‘s signal and slot editor where it can be further edited. You can also edit signal/slot connections by double-clicking on the connection path or one of its labels to display the Connection Dialog. |
|
Deleting Connections
The whole connection can be selected by clicking on any of its path segments. Once selected, a connection can be deleted with the Delete key, ensuring that it will not be set up in the UI file. |
Qt QML
With Qt QML we focused on preparing for Qt 6, which has lead to a useful set of new features in Qt 5.15.
QML now has the concept of ‘required’ properties for components. These are properties that have to be set by a user of the component. Components can now be specified inline in a QML file. We’ve also added a new, declarative way of registering types.
We have improved the qmllint tool to give you far better warnings about possible problems in your QML code base. We’ve also added a new qmlformat tool that can help you format your QML files according to our QML coding style guidelines.
Finally, we’ve also worked on making sure that QML used in Qt for MCUs and Qt 5.15 are compatible.
Руководство по настройке среды Qt Designer в Pycharm!
http-equiv=»Content-Type» content=»text/html;charset=UTF-8″>yle=»margin-bottom:5px;»>Теги: Pyqt5
Qt designerпротив Pycharm Конфигурация среды
пролог
Qt designer Да Qt Созданный инструмент можно использовать как программное обеспечение (аналогичноPS ), вы можете разработать интерфейс более интуитивно понятным способом в программе и сохранить его какui файл,Qt DesignerEстьPyGUI Вы можете напрямую преобразовать файл пользовательского интерфейса вpy(Здесь сpyqt5 Например)py файл. Перед установкой Qt Designer убедитесь, чтоPyQt5 Установлен успешно, метод установки PyQt5 относительно прост, напрямую с помощьюpip :
Интерфейс Qt Designer выглядит следующим образом:

Настройте Qtdesigner и PyUIC в Pycharm
Настроить Qt Designer
Сначала найдите установленныйdesigner.exe Расположение файла, здесь могу порекомендовать инструментeverything Вы можете быстро получить местоположение файла на компьютере, обычно в следующей папке следующего уровня пакета python (site-packages-> pyqt-tools), например, на моем компьютере,designer.exe Расположение:C:\Users\13479\Anaconda3\Lib\site-packages\pyqt5_tools\designer.exe
Откройте pycharm и щелкните в соответствии со следующим каталогом: ** Файл -> Настройки -> Инструменты -> Внешние инструменты **, найдитеExternal Tools, Затем щелкните+ число,:

Затем появится окошко, вам нужно заполнить три места, заполнить следующими способами:
- Name Заполните Qt Designer;
- Program Заполните адрес дизайнера, вот мой:C:\Users\13479\Anaconda3\Lib\site-packages\pyqt5_tools\designer.exe;
-
Working directory заполнить:
P
r
o
j
e
c
t
F
i
l
e
D
i
r
ProjectFileDir
ProjectFileDir;
Затем нажмите ОК.

Настроить PyGUI
КонфигурацияPyGUI Метод иQt Designer Метод аналогичен:
- Name : PyGUI;
- Program : Это не адрес каталога Designer.exe, он относится к адресу python.exe, например: C: \ Users \ 13479 \ Anaconda3 \ python.exe
-
Arugments для:-m PyQt5.uic.pyuic
F
i
l
e
N
a
m
e
FileName
FileName -oF
i
l
e
N
a
m
e
W
i
t
h
o
u
t
E
x
t
e
n
s
i
o
n
FileNameWithoutExtension
FileNameWithoutExtension.py; -
Working directory :для**
F
i
l
e
D
i
r
FileDir
FileDir**;

Вышеупомянутое — это всеQt Designer Процесс настройки,
Как открыть Qt Designer в PyCharm:Tools -> External Tools -> Qtdesigner, Просто нажмите.

Поставитьui Файл преобразован вpy Файловый метод:
Вpycharm Выбраноui Файл, щелкните правой кнопкой мыши,Внешние инструменты (здесь я установил qt) -> PyGUI , Щелкните один раз, чтобы создать файл с тем же именем, но с суффиксом py.

Я сосредотачиваюсь на областях анализа данных, визуализации данных и обработки изображений Личная учетная запись WeChat: г-н Z, просто помните об этом, делайте это часто, когда вам нечего делать!
Интеллектуальная рекомендация
По команде После установки Unity Tweak Tool я обнаружил, что его не удается открыть, отсутствуют связанные зависимости Я видел в Интернете некоторые решения, такие как: Но ни один из них не решает про…
Характеристики узла «однопоточный, управляемый событиями, неблокирующий ввод-вывод» понятны, но находятся в облаке. Давайте поговорим о небольшом понимании белыми характеристик узла после …
Недавно использовал weblogic для создания проекта, оставив блог для резервного копирования 1. Загрузите пакет программного обеспечения weblogic на официальном сайте Oracle.После того, как аппарат явля…
Загрузите исходный пакет Apache на сервер Загрузите установочные пакеты tocmat и jdk на сервер Установите корневой каталог веб-сайта Apache в соответствии с Tomcat Установить модуль mod_jk Настройте в…
Во-первых, объектно-ориентированные синтез 1. Настойчивость Открыть-> Читайте / Написать ——> Закрыть: Работа — это текст Разработка: объект работы Код Demo: 2. Функ…
Вам также может понравиться
Как мы все знаем, начать бизнес — непростое дело, и если вы хотите добиться успеха, вы должны выбрать подходящий проект для инвестиций в соответствии с вашей реальной ситуацией и окружающими привычкам…
Предисловие Sentry является членом экосистемы Hadoop и играет роль «привратника», охраняя безопасный доступ к данным на платформе больших данных. Он работает в компонентах в форме подключа…
Не заставляйте, просто перейдите к коду Готово…
Напишите здесь собственное название каталога Обзор точки знаний Файловые операции Используйте функцию fopen () Используйте функцию fwrite (), чтобы записать данные, прочитанные в соответствующей валют…
1. java.io.BufferedInputStream и java.io.BufferedOutputStream могут добавить функцию буфера для классов InputStream и OutputStream. При создании экземпляра BufferedInputStream необходимо указать экзем…
Finished main.py
That’s the basic logic of using Qt Designer and PyQt to design and develop a GUI application.
You can safely edit your design and re-run the command without fear of your main code getting lost or overwritten.
Final notes
All the code in this example is done in the main UI thread, which is often a bad idea — especially if you have something that takes time to finish. For example if the function took long time our UI would be frozen the whole time. In one of the future tutorials I’ll cover PyQt threading, this one is focused on just the bare basics without too much unnecessary things. But please keep in mind that anything that doing stuff in main UI thread is generally a bad idea.
All the code and files used can be found in this gist: https://gist.github.com/nikolak/615def9e197d5db04bef
Useful links:
Python Inheritance SO thread: http://stackoverflow.com/questions/576169/understanding-python-super-with-init-methods
PyQt reference guide: http://pyqt.sourceforge.net/Docs/PyQt4/
Установка макета верхнего уровня
Макет верхнего уровня формы можно задать,очистив выделение (щелкните левой кнопкой мыши на самой форме)и применив макет.Макет верхнего уровня необходим для правильного изменения размера виджетов при изменении размера окна.Чтобы проверить,установлен ли макет верхнего уровня,просмотрите виджет и попытайтесь изменить размер окна,перетащив ручку размера.
|
Применение макета
Чтобы применить макет,можно выбрать его на панели инструментов,показанной слева,или в контекстном меню,показанном ниже. |
Аналогичным образом макеты верхнего уровня устанавливаются на виджеты-контейнеры ( QGroupBox ) или на страницы страничных виджетов-контейнеров ( QTabWidget , QToolBox и QStackedWidget ) соответственно. Для этого необходимо выбрать виджет-контейнер.
Макеты верхнего уровня не видны как отдельные объекты в Инспекторе объектов.Их свойства отображаются ниже свойств виджета основной формы,виджета-контейнера или страницы виджета-контейнера в редакторе свойств.
3 Использование формы, созданной в Qt Designer
Я дал своей форме имя MainUI, виджету — имя m_counter, а кнопка — m_start и m_stop, соответственно. При этом, рядом с файлом проекта появился файл ui_mainui.h, в пространстве имен Ui которого расположен класс MainUI. Есть 2 варианта использовать этот класс:
- наследование. При этом, должно использоваться множественное наследование (например, от классов QWidget и Ui::MainUI). Наследование от Ui::MainUI должно быть закрытым для решения проблемы ромбовидного наследования;
- агрегация. Класс агрегат хранит указатель на форму, созданную в Qt Designer. Мне этот вариант кажется более естественным, хотя, обращаться к элементам формы приходится через указатель (в отличии от варианта с наследованием).
Файл заголовка формы, используемой в программе приведен на листинг 3, реализация — на листинг 4.
#ifndef MAINUI_H
# define MAINUI_H
#include <QDialog>

namespace Ui {
  class MainUI;
}

class MainDialog :public QDialog {
  Q_OBJECT
public:
  explicit MainDialog(QWidget *parent = 0);
  ~MainDialog();
public slots:
private:
  Ui::MainUI *m_ui;
};

#endif // MAINUI_H
#include "mainui.h"
#include "ui_mainui.h"

MainDialog::MainDialog(QWidget *parent)
  : QDialog(parent), m_ui(new Ui::MainUI) {
  m_ui->setupUi(this);

  m_ui->m_counter->set(6, 200);

  connect(m_ui->m_start, SIGNAL(clicked()), m_ui->m_counter, SLOT(on_start()));
  connect(m_ui->m_stop, SIGNAL(clicked()), m_ui->m_counter, SLOT(on_stop()));
}

MainDialog::~MainDialog() {
  delete m_ui;
}
В 6 строке реализации форма, созданная дизайнером устанавливается для текущего диалога (this) при помощи метода setupUI.
Таким образом, практически одной мышью можно создать пользовательский интерфейс и использовать при этом нестандартные виджеты. Однако, при описании класса Counter отмечены особенности создания виджетов, используемых в Qt Designer (такой виджет не может содержать дочерних элементов, а его конструктор принимает единственный аргумент — указатель на родительский диалог).
Исходй код проекта статьи: Виджет счетчика (исходный код)
Other improvements
Our desktop users will be happy to learn that Qt has now much better support for client-side/custom window decorations. This allows you to define your own window decorations and put custom content into the windows title bar space.
Qt Lottie, a module that we introduced as a Technology Preview in Qt 5.14, is now fully supported. The module allows you to integrate After Effects animations into your Qt-based application. Learn more about Qt Lottie in this webinar and this blog post.
Qt WebEngine has been updated from Chromium 77 in Qt 5.14 to Chromium 80 and comes with all the new features from that Chromium update.
Qt 3D has gained better profiling and debugging support and a couple of smaller new features.
Qt Multimedia now supports rendering to multiple surfaces. In Qt GUI, image scaling and conversion routines are now multi-threaded for many use cases.
Qt Network now supports TLS 1.3 session tickets and configurable timeouts.
In Qt Core, QRunnable and QThreadPool can now work together with std::function and a new QFile::moveToTrash() method makes moving items to the trash can possible in a cross-platform way.
Finally, we’ve also added support for the native file dialog on Android.
Создание виджетов с хорошим поведением.
Некоторые пользовательские виджеты имеют специальные функции пользовательского интерфейса,которые могут заставить их вести себя иначе,чем многие стандартные виджеты,которые можно найти вQt Designer. В частности, если пользовательский виджет захватывает клавиатуру в результате вызова (), операцияQt Designerбудут затронуты.
Чтобы придать индивидуальным виджетам особое поведение вQt Designer, предоставить реализацию функции initialize () для настройки процесса создания виджета дляQt Designerспецифическое поведение.Эта функция будет вызываться впервые перед любыми вызовами функции createWidget()и,возможно,может установить внутренний флаг,который может быть проверен позже,когдаQt Designerвызывает функцию createWidget()плагина.
qt designer download
- 軟體兄弟
- qt安装教程
- 文章資訊
Download Qt, the software that allows you to reach all your target platforms — desktop and embedded systems — and try out our UI and UX design tools. ,Qt Creator is a fully loaded cross-platform IDE that enables embedded software development, has a spectrum of mobile development tools, & more! ,Qt Designer normally ships as a part of Qt Creator. This is Qt’s official editor and lets you do a lot more than just graphically design user interfaces. It is … ,Qt Designer is the Qt tool for designing and building graphical user interfaces (GUIs) with Qt Widgets. You can compose and customize your windows or … ,2020年6月26日 — https://build-system.fman.io/qt-designer-download. 若是Linux 系統, 可由如下指令安裝及啟動Qt Designer sudo apt-get install python3-pyqt5 … ,Learn how you can use the Qt framework under both open source and commercial licenses. Download Qt for open source development and get started today! ,Download Qt Creator and Qt source packages offline. Whether you’re i
注意! 請解除 AdBlock 的阻擋廣告,才可以瀏覽完整網頁資訊…
| 相關軟體 Qt Creator (64-bit) 資訊 |
|---|
|
Qt Creator 64 位是面向應用程序開發人員的完整集成開發環境(IDE)!無論您是創建移動應用程序,桌面應用程序還是連接的嵌入式設備,Qt Creator 都是跨平台的 IDE,使應用程序和 UI 開髮變得輕而易舉。由於上市時間至關重要,因此 IDE 包含可加快開發時間的生產力工具。完整的跨平台集成開發環境,可輕鬆創建連接設備,用戶界面和應用程序.超越代碼設計和創新我們相信,提供滿足並超出… Qt Creator (64-bit) 軟體介紹 qt designer download 相關參考資料 Download Qt | Real Time Embedded Systems — Qt Download Qt, the software that allows you to reach all your target platforms — desktop and embedded systems — and try out our UI and UX design tools. https://www.qt.io Qt Creator — A Cross-platform IDE for Application Development Qt Creator is a fully loaded cross-platform IDE that enables embedded software development, has a spectrum of mobile development tools, & more! https://www.qt.io Qt Designer Download for Windows and Mac — fman Build … Qt Designer normally ships as a part of Qt Creator. This is Qt’s official editor and lets you do a lot more than just graphically design user interfaces. It is … https://build-system.fman.io Qt Designer Manual — Qt Documentation Qt Designer is the Qt tool for designing and building graphical user interfaces (GUIs) with Qt Widgets. You can compose and customize your windows or … https://doc.qt.io Qt Designer的用途 — MahalJsp 2020年6月26日 — https://build-system.fman.io/qt-designer-download. 若是Linux 系統, 可由如下指令安裝及啟動Qt Designer sudo apt-get install python3-pyqt5 … Qt for Open Source Development Learn how you can use the Qt framework under both open source and commercial licenses. Download Qt for open source development and get started today! https://www.qt.io Source Package Offline Installer | Qt Download Qt Creator and Qt source packages offline. Whether you’re installing for the first time or using the Qt Maintenance Tool, Qt has you covered. https://www.qt.io 在Mac OS 中安裝Qt Designer 方法筆記 — Clay … 2020年10月28日 — Qt Designer 是一個專用於Python PyQt5 圖形化介面框架的輔助程式,可以讓我們直接拉出自己想要的程式介面,非常方便。不過在Mac OS 上安裝較為困難, … |
