Расширенные функции листа событий construct 2
Содержание:
- Мощный движок Construct 3
- Плюсы и минусы
- From the past into the future
- Parameters
- Function actions
- Display
- System
- Создаем Red Ball
- Монетизация
- Публикация
- IAP conditions
- Как пользоваться приложением
- Достоинства и недостатки
- General
- Highest Rated Game Assets
- Editor
- The Personal license
- About
- Construct 2 Free Edition
- Лист событий и плагин клавиатуры
- Описание Construct 2
- IAP actions
Мощный движок Construct 3
Construct сильно упрощает работу по созданию игр. Под его капотом находится невероятно мощный и универсальный движок с топовыми характеристиками. Он идеален для бесперебойной и эффективной работы в современных продвинутых играх. Для расширения возможностей движка можно использовать сторонние дополнения.
Construct позволяет создавать игры с потрясающими визуальными эффектами — начиная от эффекта частиц (particle effects), художественных сочетаний (blends), эффект искажения (distortions) и отбрасывание теней (shadow-casting).
Весь этот функционал предлагается по значительно низкой цене по сравнению с аналогичными инструментами.
Плюсы и минусы
Приложение пользуется большой популярностью, что обусловлено следующими ее положительными качествами:
- Наличие продвинутого физического движка, полезных инструментов и широкого функционала, множества звуковых и графических эффектов, фоновых изображений и многого другого.
- Удобный интерфейс. Разработка проектов заключается в перетаскивании элементов. Большая же часть инструментов доступна к использованию лишь из графического интерфейса. Благодаря этому, не придется писать ни одной строчки программного кода.
- За счет подключения дополнительных плагинов, можно значительно расширять возможности.
- В Сети есть свыше 150 плагинов, специально разработанных для Construct
- Большое количество визуальных эффектов, которые можно совмещать, добавлять к слоям, уровням и объектам.
- Предпосмотр геймплея запускается моментально.
- Мощная система событий.
- Многие преподаватели используют приложение для обучения студентов принципам программирования в более увлекательной и простой форме.
- Каждый пользователь может получить помощь, зайдя на официальный форум разработчика.
- Экспортированные в Сеть игры запускаются из любого браузера. Их также можно портировать для устройств на ОС Android и iOS.
- К программе прилагает подробная и информативная документация. В ней наглядно описан каждый этап создания игры.
- Construct 2 поддерживает скрипты, написанные на языке программирования Python.
- Приложение подходит и для людей, не имеющих опыта программирования.
- Модульность ПО.
Недостатки:
- Отсутствие интерфейса на русском языке.
- Нельзя создавать трехмерные игры.
From the past into the future
Looking back, it’s quite a journey we’ve been on. The first lines of code for Construct 2 were written while I was still a student armed only with a laptop, moving on to working from home, then to a shared office, and eventually to our own office and hiring more staff to help work on Construct 3. I’m thankful to everyone at Scirra who’s helped get us to where we are today — in particular Tom, who’s been working super hard all these years behind the scenes from the very beginning, and generally not getting as much credit as he deserves! I also wish to express gratitude to all our customers over the years who have helped make Scirra possible by purchasing Construct, being part of a great community around it, helping with questions on the forum and bug reports, trying out beta releases, and sharing our passion for great technology.
Parameters
When calling a function, you can also pass parameters. These are simply numbers or strings that are made available to the function. For example, the CreateEnemy function from the previous example could be modified to take two parameters: the X and the Y co-ordinates at which to create the enemy. This helps functions to be made more general purpose by using extra information from the action calling the function.
To add a parameter to a function call, click the Add parameter link that appears in the Parameters dialog when editing the Call function action. This is a special link that only appears for this action in the Function object. Inside an On function event, you can then use the Param expression with the zero-based index of the parameter to retrieve the corresponding value.
Function actions
- Call expression
- This is an alternative to the Call function action. It simply provides a parameter to enter an expression, and the result is ignored. You can use this to call a function via the Function.Call(…) expression, which may be more convenient if using a very large number of parameters.
- Call function
- Trigger the corresponding On function events. Additional parameters can be passed that are accessed by the Param expression.
- Set return value
- In a function event, set the value to be returned to the caller. This is either returned by the Call expression or accessed later using the ReturnValue expression.
Display
- Viewport size
- The size, in pixels, of the view area in to the game. A dashed line indicating the window size appears in the Layout View. The viewport aspect ratio is also displayed underneath to help you easily identify which aspect ratio your project is using.
- Viewport fit
- How to fit the viewport to the display on devices with non-rectangular screens (such as the iPhone X). The viewport is rectangular, and the default Auto will add borders around the screen to ensure the full viewport is visible. Using Cover will display the viewport covering the entire physical screen, but this can result in parts of the viewport being hidden on non-rectangular screens, such as if there are notches or rounded corners.
- Fullscreen mode
- This determines how to fill the available window or screen space with the viewport. By default it uses Letterbox scale, which stretches the viewport to fill all available space, using black bars down the sides to preserve the aspect ratio. There are several variations; for more information see the tutorial on supporting multiple screen sizes.
- Fullscreen quality
- This only applies when the viewport is being stretched (i.e. Fullscreen mode is not Off). High quality mode renders at the full resolution of the displayed size. Low quality mode first renders at the project viewport size, and then simply stretches the result to fill the screen. Low quality mode often improves performance on low-end systems and is often suitable for retro-style pixellated games with Point sampling. However note that text, downscaled sprites and effects will appear with better detail in high quality mode.
- Orientations
- Whether to lock the orientation on mobile devices. Any allows the display to switch between portrait and landscape automatically; choosing either portrait or landscape will attempt to lock the orientation to prevent it changing. This is applied when publishing an app, but for web exports note that not all browsers or platforms support orientation locking or have limitations on when it can apply. In some browsers it must be in fullscreen mode (using the Browser object’s Request fullscreen action) before orientation lock takes effect.
- Sampling
- Choose between nearest (pixellated), bilinear (smooth) and trilinear (smooth with better quality downscaling) sampling when resizing images. Trilinear is recommended for modern games with hi-res graphics, and nearest is better suited to retro games with blocky pixel art. Bilinear can be faster than Trilinear on low-end devices if the improved downscaling quality is not necessary.
- Pixel rounding
- By default objects can be drawn at sub-pixel positions, e.g. (100.3, 200.8). If Sampling is set to Linear, this can make fine pixel art appear blurry. If Pixel rounding is enabled,objects round their position to a whole number before drawing, e.g. (100, 201). This prevents any blurring, and can also prevent «seams» appearing on grids of objects. Note this does not affect their actual X and Y co-ordinates, which can still be between pixels — it only affects where they are drawn on the screen.
System
- ImageMemoryUsage
- Returns the estimated total memory usage, in megabytes, of all the currently-loaded images. Only supported in the WebGL renderer; if canvas2D rendering is in use, the expression always returns 0. Note image memory is sometimes also referred to as «VRAM», but this is not strictly correct since not all devices have video-specific memory. Also remember this expression does not include the memory use of sounds, code, or other non-image resources.
- loadingprogress
- Return the current load progress on a loader layout, or the current update progress while the Browser object’s Is downloading update condition is true. The progress is returned as a number from 0 to 1, e.g. 0.5 for half complete. For more information, see the tutorials how to make a custom loading screen and offline games in Construct 2.
- loopindex
- Get the index (number of repeats so far) in any currently running loop.
- loopindex(name)
- Get the index (number of repeats so far) of the loop with the given name. Useful for getting indices in nested loops.
- objectcount
- The total number of objects currently created.
- projectname
- Return the name of the project as it appears in Project Properties.
- projectversion
- Return the version entered in to Project Properties. Note that this is always returned as a string, not a number.
- renderer
- The name of the renderer used to draw the game, currently either canvas2d or webgl. See Technology for more information on canvas renderers.
- rendererDetail
- The name of the graphics hardware in use to draw the game, such as «NVIDIA GeForce GTX 660″ or «Adreno 330». This is only available in WebGL mode in certain browsers and platforms; unsupported browsers/systems will return «(unavailable)». Projects should not rely on this string having any exact contents, but it can be useful to diagnose which GPU is in use in dual-GPU systems, or to look for keywords and apply default graphics settings based on the type of hardware.
Создаем Red Ball
В ролике показано, как сделать и наделить движениями красный шар. Посредством спрайта создается форма, затем прописывают поведение, физику. Все предметы в сцене наделены физикой, чтобы мячик мог взаимодействовать с ними. Подробно рассматриваются параметры элемента, определяющие соприкосновение и столкновение с предметами (вращения, плотность, трение, эластичность, демпфирование). Максимальное и минимальное значение всех параметров отображается в подсказке. Все параметры являются важным условием для правильного отображения движений, прыжков и скольжений персонажа.
Монетизация
В качестве способа монетизации я решил использовать наименее простой, на мой взгляд, способ – рекламу. Я решил, что рекламу обязательно подключить сразу. Было бы подло выкладывать впоследствии обновление бесплатного приложения, после установки которого у пользователя появляется отсутствующая ранее реклама.
Единственный способ подключения рекламы к созданной в Construct 2 игре под Android и экспортируемой через CocoonJS – это связка рекламных сетей Mopub + Admob и остальные. Реклама MoPub подключается к приложению при экспорте в CocoonJS. Однако эта рекламная сеть, помимо своих объявлений (которых у нее мало, и оплата за них небольшая), может служить посредником между другими сетями, выставляя при этом для каждой сети минимальную стоимость за показ. Таким образом, можно в одном приложении показывать рекламу нескольких рекламных сетей, и для показа будет выбрана одна из наиболее дорогих. Admob, безусловно, является фаворитом среди рекламных сетей для Android, поэтому в качестве дополнительной я остановился на ней.
Сразу отмечу, что для тестирования рекламы публикация в App Store не нужна, можно встраивать и тестировать рекламу на любом удобном этапе разработки приложения.
Мой выбор формата показа рекламы пал на Full screen ads в момент нажатия кнопки Back или Restart, но не чаще чем раз в 2 минуты. Использование баннеров на экранах меню бессмысленно, ибо никто там надолго не задерживается; баннер на экране с уровнем в случае с динамичной аркадной игрой еще более бесполезен.
При подключении рекламы по данной схеме следует отметить несколько особенностей. 1. Интегрировав рекламу в приложение – не стоит волноваться первые минуты/часы при тестировании. Первое время реклама не будет показываться вовсе, потом будет показываться очень редко – нужно некоторое время, чтобы объявления начали подгружаться в полную силу. 2. Admob имеет один из самых высоких показателей Fill Rate, однако в случае с реализацией по данной схеме с использованием MoPub в качестве посредника FillRate сети Admob падает до 30-80%. Эта проблема существует, о ней известно, и разработчики обещали ее исправить. Однако когда это произойдет – неизвестно.
По данной причине я решил не ждать и выйти из сложившейся ситуации достаточно простым способом. Очевидно, никто не будет показывать рекламу в приложении каждые 10 секунд. Независимо от реализованного вами способа выбора момента показа рекламы (будь то нажатие определенной кнопки, или показ каждые n минут), между двумя показами проходить сколько-нибудь существенное время. Допустим, 2 минуты. В Construct 2 при подключении рекламы делаем следующую вещь: заводим переменную AdsLoadTrigger, обозначающую, была ли подгружена реклама, и, если нет – каждые 10-20 секунд пробуем загрузить снова, вплоть до удачной попытки. Таким образом, при фактическом Fill Rate в 20% можно без труда достичь близкой к 100% вероятности показа рекламы в нужный вам момент.
На подключение рекламы я потратил уйму времени. Анализ множества различных рекламных сетей, регистрация и освоение в каждой из них, интеграция рекламы в приложение, ее тестирование и настройка оптимальных мест и частоты показа занимают очень много времени. Однако если вы сразу пойдете по указанному выше пути – справитесь за несколько дней.
Публикация
Напомню, что портирование производил на устройство под Android: разумеется, самой популярной площадкой для распространения мобильных приложений является Google Play, однако существует немало альтернатив, про которые не стоит забывать. Таким образом, помимо очевидного выбора в пользу Google Play, я использовал также одни из наиболее популярных альтернативных магазинов: SlideMe и GetJar. Учитывая, что для продвижения в наиболее перспективном Google Play очень важен мощный уверенный старт (для попадания в топы разделов) – альтернативные площадки можно использовать для обкатки приложения на пользователях, устранения основных замечаний и сбора данных для аналитики (конечно, если такая возможность была учтена в приложении).
Несколько слов о локализации: как минимум описание игры следует перевести на 4 языка – японский, английский, корейский и китайский. Таким образом, Вы охватите больше половины всех потенциальных пользователей Вашего продукта.
Еще один очень важный момент — это подпись вашего продукта. Не уверен насчет других площадок, но для Google Play наличие подписи обязательно. При выполнении этой операции рекомендую использовать Java Development Kit версии 1.6. Я, по незнанию, использовал следующую версию 1.7 — в результате при установке приложения из Google Play выдавалось сообщение о неверной подписи пакета, и фактически с первых минут публикации игры никто не мог ее установить. Что неприятно. Единственное найденное мной решение: залить новый apk, подписанный уже версией JDK 1.6, так что лучше сразу пользоваться этой версией.
IAP conditions
- Has product
- Test if a given product ID has been successfully purchased by the user. Note that in some cases this will be false for the first few seconds of the app running even if the user has purchased the item, and then later become true when the store finishes loading the store status in the background. Try to avoid using this condition before On store listing success triggers.
- Is app purchased
- On the Windows Store, test if the app itself has been purchased. On other platforms, tests if the product ID «app» has been purchased.
- Is store available
- True if a supported store is currently available and purchases can be made. False on unsupported platforms or if no store is available (such as in an ordinary web browser).
- On any purchase success
- On any purchase failed
- Triggered after any purchase finishes to indicate whether it was successful (and the item is now owned) or unsuccessful.
- On purchase success
- On purchase failed
- Triggered after the purchase of a specific product ID finishes, to indicate whether it was successful (and the item is now owned) or unsuccessful.
- On store listing success
- On store listing failed
- Triggered after the Request store listing action has completed, to indicate whether the store listing was successfully retrieved. After On store listing success you can then check whether products are purchased, make new purchases, and retrieve lists of available items and their details.
Как пользоваться приложением
Перед загрузкой желаемого контента рекомендуем обязательно ознакомиться с инструкцией по установке программы.
Загрузка и установка
Мы предлагаем скачать уже готовый крякнутый вариант приложения. Если же вам нужна лицензия, ее можно приобрести на официальном сайте компании. Итак, чтобы установить утилиту, действуем по такому сценарию:
- Переходим в раздел «Скачать», который располагается ниже в статье и кликаем по прикрепленной в нем ссылке. Здесь содержится уже взломанная версия утилиты.
- Запускаем установщик. Читаем и принимаем условия пользовательского соглашения.
- Выбираем путь установки приложения.
- Ждем, пока закончится процесс распаковки файлов на компьютер.

Никаких дополнительных действий не потребуется. Кряк и русификатор уже содержатся в архиве.
Инструкция по работе
Полностью описать процесс создания игры мы, конечно же, не сможем, так как для этого потребуется много времени. Рассмотрим только основной принцип работы утилиты:
- Создаем новый проект. Это можно сделать по шаблону или задав нужные параметры.
- При желании можно ввести подробную информацию о будущей игре, например, название самого проекта, имя автора, описание и другое.
- Следующий шаг – создание первого уровня с помощью применения различных объектов, содержащихся в библиотеке приложения.
- Выбор внешнего оформления персонажей и предметов первого уровня.
- Сохранение проекта.

Достоинства и недостатки
Уделим внимание основным положительным и отрицательным сторонам программы:
Плюсы:
- Пользователь имеет возможность подключать дополнительные сторонние плагины.
- Гибкая настройка приложения.
- Использование реалистичных законов физики.
- Разработчики регулярно обновляют базы утилиты.
- Простота в эксплуатации.
- Можно загрузить дополнительный инвентарь и исходники.
- Для ознакомления с работой приложения есть различные гайды и уроки.
- Возможность использовать самые разнообразные шаблоны и объекты.
Минусы:
- Русский язык внедрен частично.
- Нет возможности создавать игры с 3D графикой.

General
- Create object
- Create a new instance of an object type on a layer at a given position. If a Family is chosen, a random object type from the family is picked, and an instance created for that.
- Go to layout
- Go to layout (by name)
- Switch to another layout in the project. Note that global variables keep their current value — they are not reset. To reset them use the system action Reset global variables.
- Go to next/previous layout
- Switch to the next or previous layout in the project. The order as they appear in the Project Bar is used, where layouts at the top are first and layouts at the bottom are last. If on the first layout, trying to go to the previous layout does nothing, and if on the last layout, trying to go to the next layout does nothing. Note that global variables keep their current value — they are not reset. To reset them use the system action Reset global variables.
- Restart layout
- Restart the current layout. Note that unlike Go to layout, this action resets all event groups to their initial activation state. Global variables keep their current value — they are not reset. To reset them use the system action Reset global variables.
- Set group active
- Set an event group active or inactive. None of the events in an inactive group run until it is activated again. The event group is identified by its name.
- Sort Z order
- Sort the Z order of instances of a given object according to an instance variable. This effectively removes all instances from their Z order, sorts them, then inserts the sorted sequence back in to the holes left behind. This means if the instances are spread across a range of layers, they will be sorted in the same Z order locations, maintaining the same order relative to other instances on those layers. Note this action is much faster than using an ordered For each with an action like Send to front/back, so this action should be the preferred way to sort the Z order of large numbers of instances.
- Stop loop
- Stop a Repeat, For or For each loop currently running. These loops are system conditions. The rest of the event’s actions and subevents will still complete, but the loop will not run any further after that.
Highest Rated Game Assets
Assets with the highest ratings as reviewed by our customers.
View more
-
14 favourites
Match 3
727,39 ₽
Template for a match 3 game, fully documented in comments and video
-
5 favourites
Space Outpost Buildings
290,49 ₽
Perfect HD side-scroller/platformer space outpost buildings
-
10 favourites
Glow Creatures
218,49 ₽
5 glow creatures with size, shape and color variations.
-
7 favourites
36 5×7 Tiny Sprite Font + Kerning
287,59 ₽
Minimal Sprite Font with Stroke for Pixel Art games.
-
Sold Recently
22 favourites
Inventory with crafting
727,39 ₽
Template for maintaining an inventory with crafting possibilities. Completely documented in text and video.
-
Demo Available
Exclusive Available
11 favourites
Candy Blast Match 3
1 019,29 ₽
Full game Construct 2 and Construct 3 to post on Google Play
-
Demo Available
4 favourites
Desert Racing
1 019,29 ₽
Full game Construct 2 and Construct 3 to post on Google Play
-
Demo Available
6 favourites
Candy Monster
728,09 ₽
Full game Construct 2 and Construct 3 to post on Google Play
Editor
- Preview effects
- Whether or not to display effects and blend modes in the Layout View. If enabled, WebGL must also be enabled for the effects to appear. If disabled, WebGL effects are not rendered in the editor, and all objects are drawn as if they have the Normal blend mode.
- Pause on unfocus
- If enabled, the preview will pause when the browser window loses focus, e.g. when switching back to work in Construct. This can be useful for certain workflows, or to prevent the project distracting you as you work. If disabled the preview will continue to run even without focus, but note switching to another browser tab or minimising the preview window will still pause (as it does with published projects).
- Bundle addons Paid plans only
- If enabled, all third-party addons that the project uses will be bundled with the project file when saved. This allows the project to be opened anywhere, such as on another system where the addons have not been pre-installed. This makes it more convenient to move projects using third-party addons between different devices. Note that addons can opt out of bundling; you will be notified when enabling this option if any addons cannot be bundled with the project. Bundled addons always use the version of the addon that was installed when they are saved. They can however be updated if the installed addon is a newer version via the View used addons dialog.
The Personal license
All the free edition limits are removed with a Personal license. However, the rules for commercial use are different for individuals and organisations.
Individuals may use a standard license for commercial purposes up to a revenue limit of $5000. Once revenues associated with creations made with Construct 2 exceed $5000 (including associated advertising/promotion) a business license must be purchased. However, no business license is necessary before that point.
Not-for-profit organisations like schools, libraries and universities may use personal licenses to remove the free edition limits. Bulk discounts are available.
Commercial organisations cannot purchase standard licenses: they must purchase business licenses.
About
- Name
- The name or title of the project.
- Version
- The version of the project, which conventionally is four numbers in descending importance (e.g. 1.0.0.0), where the first number is the major version and the last number is the revision number. This is also used by several exporters to assign the version to your published app.Note: different platforms have their own way of handling the version. To ensure the version works consistently across platforms, try to follow these rules with the project version:
- Use 3 or 4 version components (using too few could become limiting)
- Don’t exceed the range 0-99 for any particular component. E.g. instead of incrementing 1.0.0.99 to 1.0.0.100, increment the next component, using 1.0.1.0.
- Increment the version every time you export your project. (Some platforms do not allow you to publish an update unless the version is higher.)
- Description
- A sentence or two giving a short summary of the project. Several exporters use this as the description for your published app.
- ID
- An ID uniquely identifying your application. This should be in reverse domain format, such as com.mycompany.mygame. Some exporters use this as the ID for your exported app, so try to ensure it will be unique.
- Author
- The name of the individual or organisation developing the project.
- A support or contact email address for the project. Some exporters use this to fill out the Email field of the published app.
- Website
- A link to the author’s website or other related web address. Your site should be hosted securely (with https://). Some exporters use this to fill out the Website field of the published app.
Construct 2 Free Edition
Construct 2 can be downloaded and installed to any computer for free, including site-wide at non-commercial institutions like schools. Without a license, it runs as the Free Edition. This has the following limitations:
- A maximum of 100 events in a project
- A maximum of 4 layers in any layout
- A maximum of 2 effects in a project
- No folder organisation in the project bar
- No event search
- No configurations bar
- No Families
- No Preview on LAN
- Not allowed to be used for commercial purposes (however, it can be used in education and other non-profit organisations)
Buying a license removes all of these limits. Licenses can be purchased from Scirra.com or from Steam. Both the Standard and Business licenses remove all the above free edition limitations.
Лист событий и плагин клавиатуры
Хорошо, давайте научимся строить логику игры и управлять персонажем через кнопки клавиатуры, которые укажем сами. Никаких стрелочек, только WASD!
Открыв лист событий можно добавить первое событие, но подождите… Что за события?
Все очень просто… У каждого события есть свои последствия и именно по таким правилам происходит процесс программирования в Construct.
Давайте сделаем так, чтобы при удержании какой-либо клавиши наш персонаж бы двигался влево и наоборот.
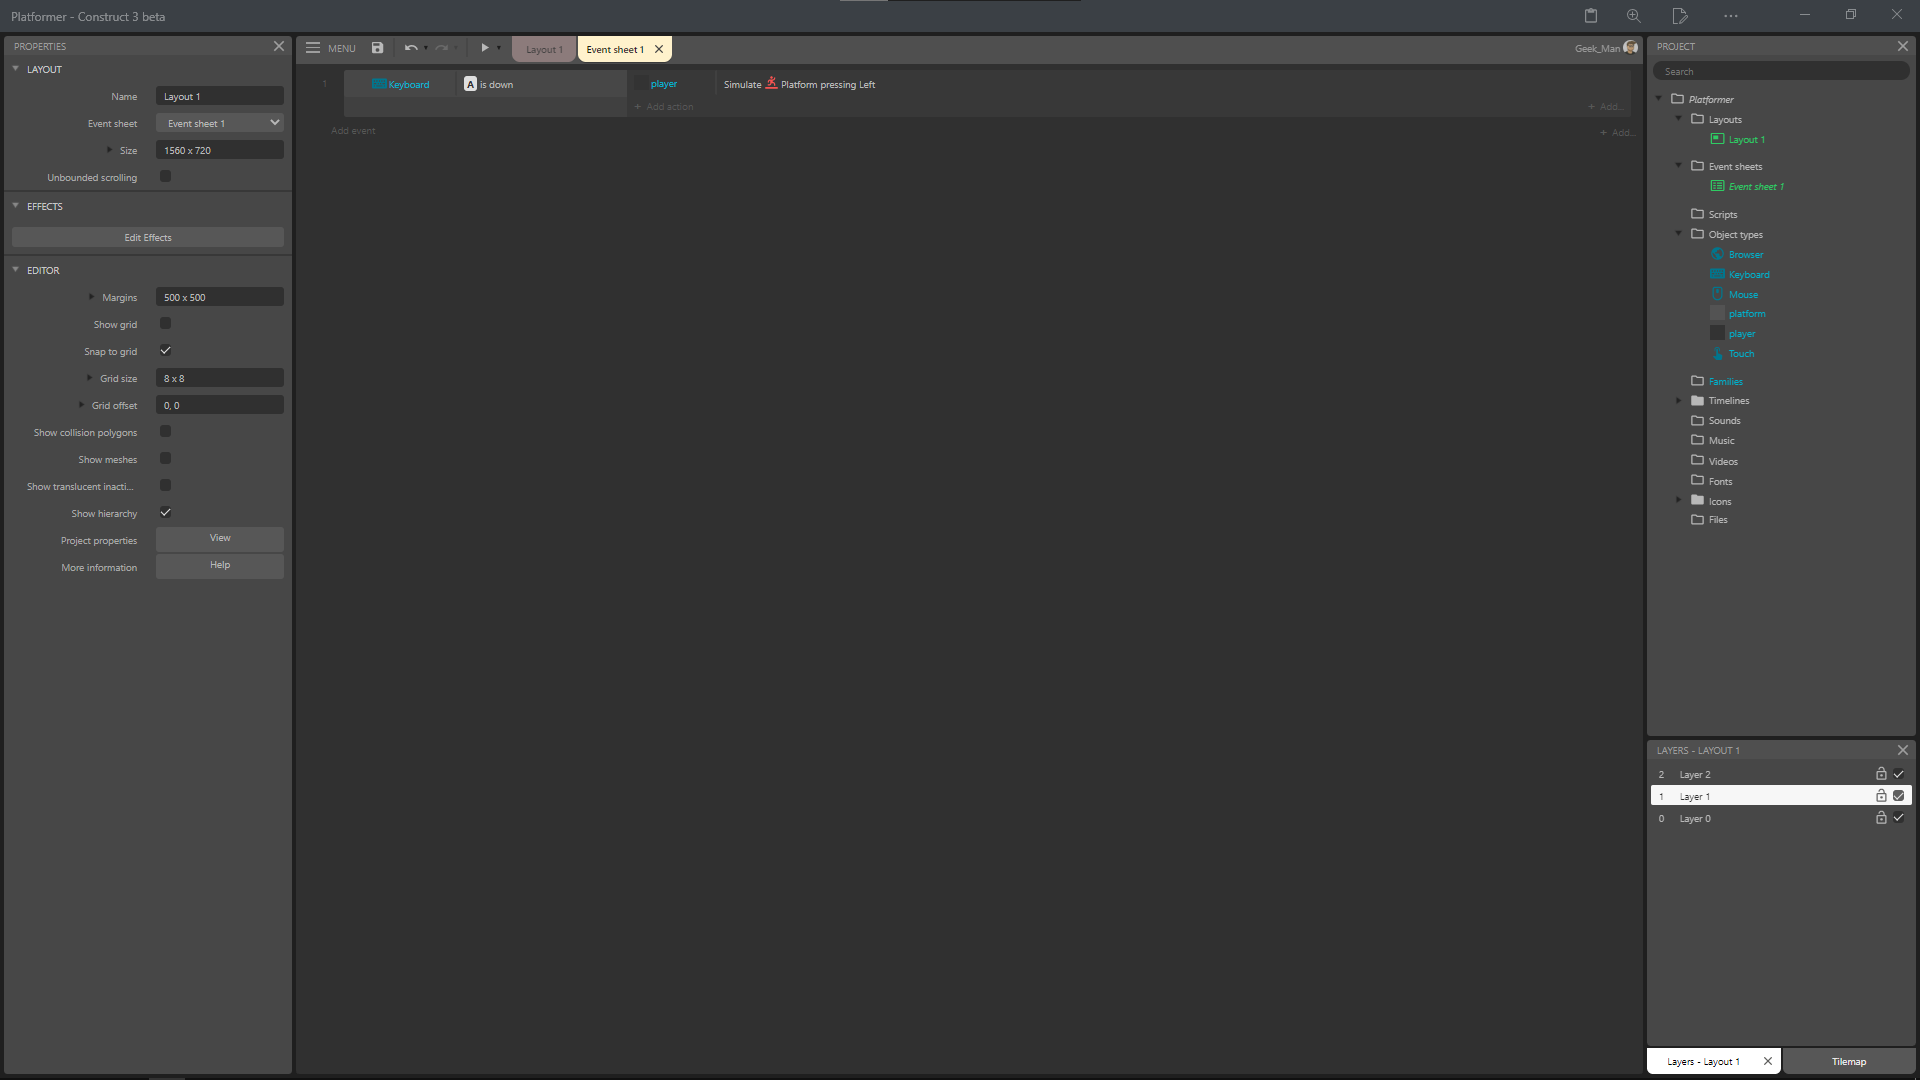
Вот так будет выглядеть наше событие. Но этого мало и поэтому добавим еще несколько событий.

Теперь мы сделали полноценное управление за счет привычных клавиш на клавиатуре. Но что дальше? Дальше я предлагаю добавить камеру и немного больше платформ.
Описание Construct 2
Construct 2 – это отличная программа, которая поможет новичкам ознакомиться с написанием компьютерных игр. Отличительная черта утилиты – возможность разрабатывать проект без знания и использования специальных языков, применяемых в программировании. Все, что требуется от пользователя – освоить интерфейс приложения и понять принцип его работы. Для начала давайте выделим главные характеристики обозреваемого софта:
- Проектирование С++ проектов и их преобразование в JavaScript.
- Выбор поведения тех или иных объектов в игре.
- В библиотеке есть большой выбор фонов, различных объектов и много другого.
- Можно использовать наложение текстов самых разнообразных стилей.
- Есть возможность настраивать систему событий.
- Пользователь может применять в создаваемом проекте законы физики.
- Можно настроить уровни объектов и их визуальное оформление.
- Готовый объект можно перенести на телефон.
- При желании можно подключить дополнительные плагины.
- Готовый проект можно протестировать в любых браузерах, которые поддерживают

IAP actions
- Add product ID
- Use on start of layout to indicate all the product IDs the app will be using. The action can be used multiple times, or with a comma-separated list of product IDs to add multiple products at once. See the section on Basic usage above for more information.
- Purchase app
- On the Windows Store, request to purchase the app itself. On other platforms, request the purchase of the product ID «app».
- Purchase product
- Request to purchase a particular product by its product ID.
- Request store listing
- Request the details of available and purchased items from the store. This must be used on start of layout. See the section on Basic usage above for more information.
- Restore purchases
- Update the status of which items have been purchased from the store.
